
Hey, I’m Jackson Walker — welcome back to Food Meld. If you’re after something silly, nostalgic, and absolutely foolproof, today we’re building Dirt and Worms Pudding Cups. These little cups are my kind of dessert: simple, playful, and impossible not to smile at. Think silky chocolate pudding, a crunchy Oreo “dirt” topping, and gummy worms wriggling on top — the ultimate mash-up of childhood whimsy and grown-up flavor. They’re perfect for weeknight treats, school parties, or a last-minute dessert that looks like you spent way more time on it than you actually did.
I love recipes that are as much about the moment as they are about the flavor. These pudding cups hit both marks — they’re quick to throw together, scale like a dream, and everyone from toddlers to your dessert-snob neighbor will be reaching for seconds. You can use homemade pudding for an extra-special, custardy base, or keep it delightfully easy with instant pudding. Either way, this recipe is about maximizing fun and minimizing fuss.
If you’re into layered, no-bake desserts, you’ll find this idea right up your alley — and if you want another riff on cookies + cream that’s equally crowd-pleasing, check out my take on cookies and cream dessert cups. Keep reading and I’ll walk you through everything: the ingredients (with substitutions), step-by-step assembly, plating, variations, and troubleshooting. By the end you’ll know how to make these look Instagram-ready while keeping your kitchen clean — or at least as clean as a gummy-worm-fueled party allows. Let’s make something awesome.
Personal Story
One of my favorite memories around a dessert exactly like this is from a summer backyard birthday when I was about twelve. My cousin brought a tray of “worms in dirt” cups — they were instant pudding, Oreos crushed in a zip-top, and a generous pile of gummy worms. There was this moment of collective delight when the cups hit the picnic table: kids squealing, adults pretending not to be excited, someone accidentally stepping on a toy and crying, the usual. My grandma took one look and asked where the real cake was. I remember thinking, “This is dessert magic — simple, ridiculous, and perfect.”
That goofy little dessert stuck with me because it’s the kind that makes people talk. It’s nostalgic but also flexible — I’ve upgraded the pudding to homemade chocolate custard, swapped Oreos for different cookies, and even added flaky sea salt to cut through the sweetness. Every time I bring these cups out, someone tells a story: a childhood memory, a Halloween party, a first-time baking disaster. Food like this is what I started Food Meld for — to bring people together with bold flavors and a playful spirit.
Ingredients
-
2 cups chocolate pudding (homemade or instant)
- Chef insight: Homemade pudding brings deeper chocolate flavor and silkier texture. Instant pudding speeds things up and stabilizes better for longer sitting time. Use full-fat milk for richer pudding.
-
2 cups crushed chocolate sandwich cookies (about 16 cookies)
- Substitution tip: If Oreos aren’t your thing, try chocolate graham crackers, Biscoff for a spiced twist, or gluten-free chocolate cookies. Pulse in a food processor for the perfect dirt texture.
-
12–16 gummy worms
- Quick tip: Pick a mix of colors for a playful look. If you prefer less sugar, you can use fruit leather strips cut into “worms.”
-
1 1/2 cups whipped cream or whipped topping
- Chef insight: Freshly whipped heavy cream with a teaspoon of sugar and a drop of vanilla is unbeatable. Stabilized whipped topping helps if these will sit out for a while.
-
1 teaspoon vanilla extract (optional)
- Swap idea: Use coffee extract for mocha vibes or a splash of rum extract for an adult twist.
-
Pinch of flaky sea salt
- Why it matters: Salt brightens the chocolate and balances sweetness — small detail, big impact.
-
Mini chocolate chips or chocolate sprinkles (optional)
- Garnish tip: These add texture contrast and visual interest on top of the “dirt.”
-
Fresh berries for garnish (optional)
- Flavor boost: Raspberries or sliced strawberries cut through the sweetness and add color.
-
Serving cups or small mason jars
- Practical note: Small mason jars make these portable and adorable; disposable clear cups work great for parties.
Step-by-Step Instructions
-
Prepare your pudding (homemade or instant)
- If making homemade chocolate pudding, whisk together sugar, cocoa powder, cornstarch, salt, and milk in a saucepan. Heat gently, whisking constantly until thickened, then remove from heat and stir in butter and vanilla. Chill slightly. Instant pudding? Whisk it with milk per package directions and refrigerate until set (usually 5–10 minutes). Tip: If your pudding is too thick straight from the pan, whisk in a tablespoon of milk at a time to reach the perfect scoopable consistency.
-
Crush the cookies into “dirt”
- Place cookies in a zip-top bag and roll with a rolling pin, or pulse in a food processor until you have a mix of fine crumbs and a few larger pieces for texture. If you want ultra-fine “soil,” process longer; for rustic dirt, stop earlier. Pro tip: Reserve a tablespoon or two of the larger chunks for the top to mimic clods of earth.
-
Whip the cream (if using fresh)
- Chill your bowl and whisk or beaters for best volume. Whip heavy cream with a tablespoon of sugar and the optional vanilla extract until soft peaks form. For stabilized whipped cream (if you expect the cups to sit out), whisk in a teaspoon of unflavored gelatin dissolved in warm water or use a tablespoon of instant pudding mix to firm it up.
-
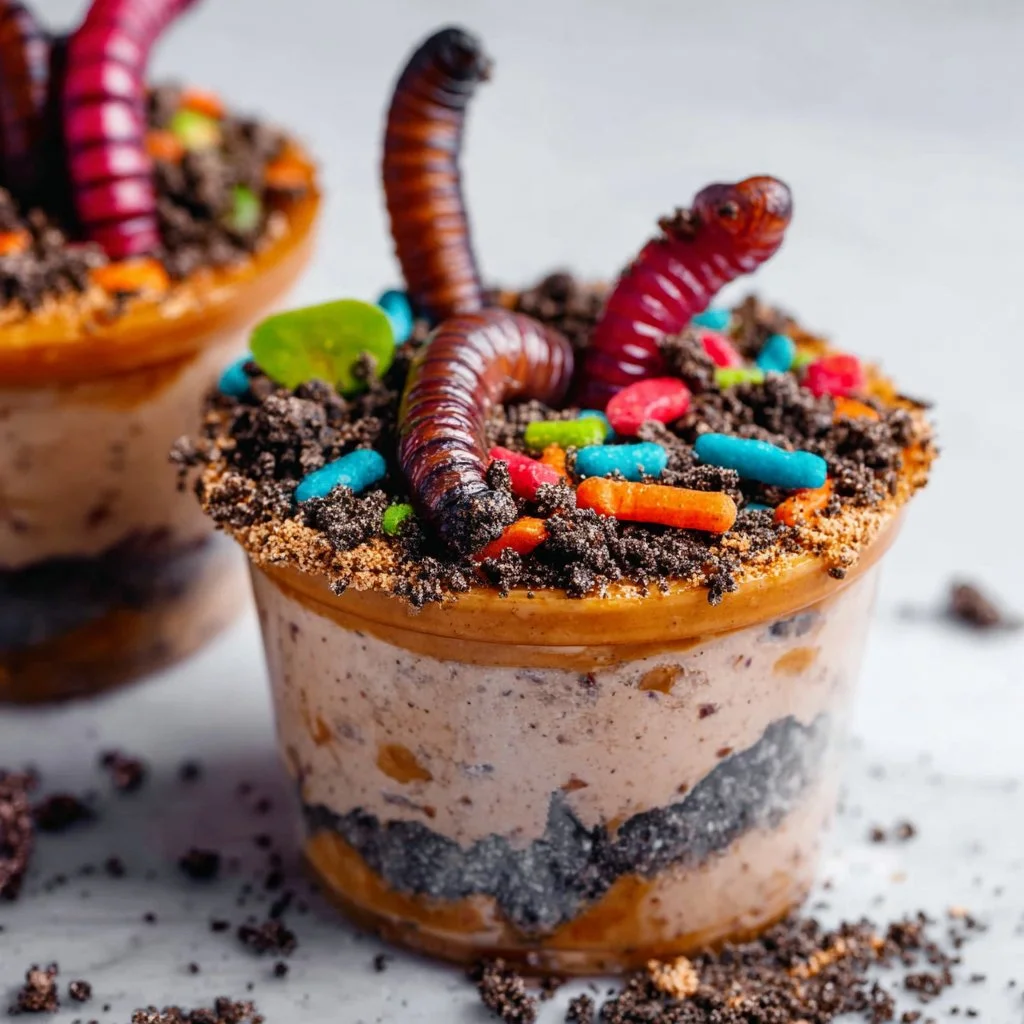
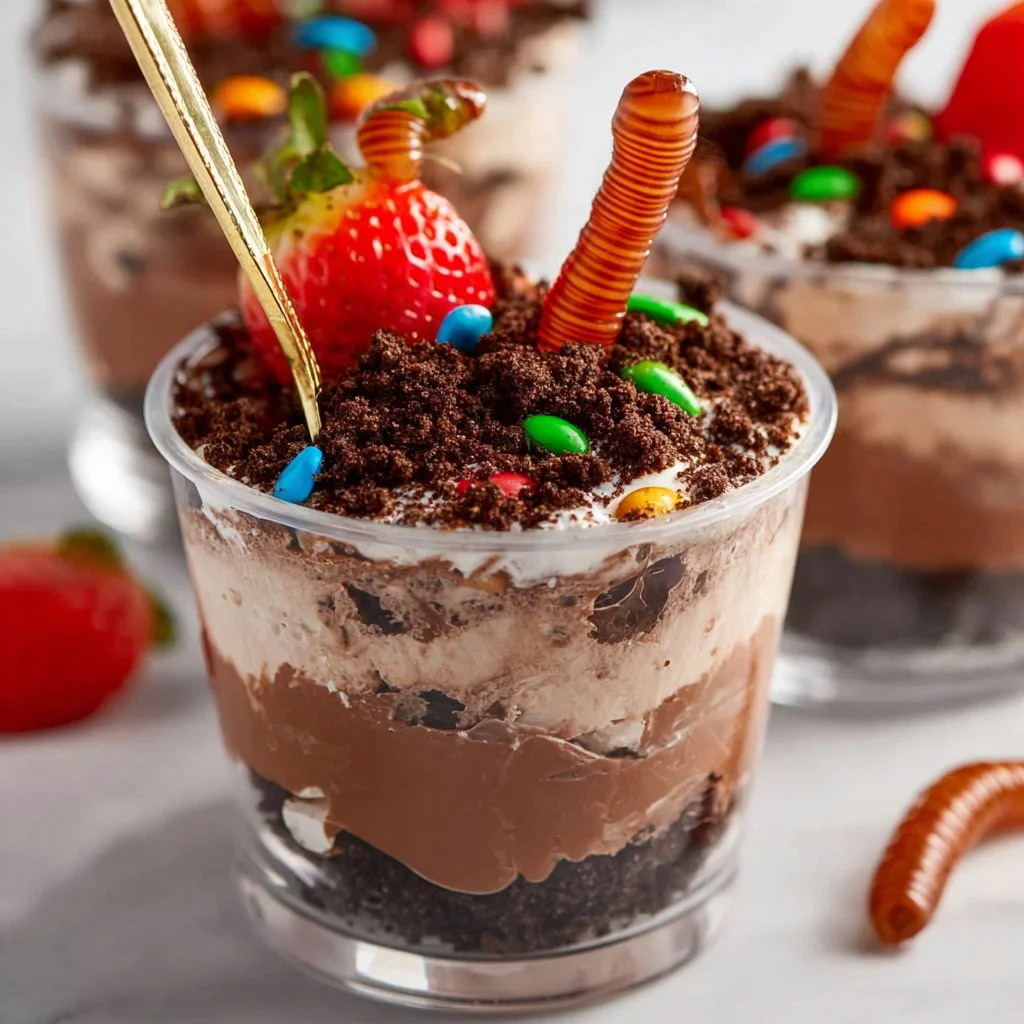
Layer the cups
- Spoon about 2–3 tablespoons of pudding into each cup as the first layer. Press a thin bed of crushed cookies on top to make the “dirt” layer. Repeat with a second pudding layer if your cups are tall — I love two pudding layers to cookie ratio that gives you pudding on every spoonful. Finish with a generous sprinkle of crushed cookies.
-
Add whipped cream and garnish
- Dollop or pipe on a swirl of whipped cream, then press a couple gummy worms partway into the dirt so they’re halfway buried. Sprinkle with mini chocolate chips or chocolate sprinkles and finish with a tiny pinch of flaky sea salt on each cup — it’s subtle but lifts everything.
-
Chill and serve
- Let the cups sit in the fridge for at least 15–20 minutes to set and let flavors marry; they can sit for a few hours if refrigerated. If serving at a party, assemble just before guests arrive so the cookies stay crunchy; if you need to assemble ahead, keep the dirt separate and add it right before serving.
Little chef hacks: For a layered parfait look, try adding a thin layer of jam or fruit compote between pudding and cookies — raspberry is my favorite because it cuts sweetness. If you’re preparing for kids, tuck a tiny plastic shovel into the cup for extra giggles. And if you want to make these adult-only, swap a tablespoon of coffee liqueur into the pudding for depth.
Serving Suggestions
These pudding cups shine when presented with a little playfulness. For a family get-together, serve them in clear mason jars lined up on a picnic table so the layers are visible — that visual contrast is what makes them Instagram-worthy and irresistible. For a Halloween or themed party, scatter plastic bugs, mini pumpkins, or candy eyes around a big tray of cups for dramatic effect.
Plating tips:
- Arrange cups on a rustic wooden board or a silver tray lined with parchment for a mix of casual and polished. Add a small bowl of extra gummy worms on the side for people who want more.
- Garnish with a light dusting of cocoa powder or a few fresh berries for color contrast. A sprig of mint peeking out beside a strawberry adds freshness.
- If you’ve used stabilized whipped cream, pipe it with a star tip for a bakery-style finish. Otherwise, a rough dollop looks homey and authentic.
Portioning guidance:
- These cups are inherently portion-controlled, which is great for parties. Use 4-ounce cups for small bites or 8-ounce jars if you want a more indulgent single-serving dessert. For kids, smaller cups keep sugar in check and let them enjoy the fun without overdoing it.
If you’re hosting, set up a “decorate your own dirt cup” station with bowls of extra cookie crumbs, gummy worms, sprinkles, and berries — it’s fun, interactive, and keeps guests engaged while you mingle.
Recipe Variations
-
Tropical Twist
- Swap chocolate pudding for coconut or vanilla pudding. Replace Oreos with crushed vanilla wafers mixed with toasted coconut. Garnish with gummy fruit slices and a wedge of pineapple. This version is sunny and unexpected.
-
Peanut Butter & Jelly Dirt Cups
- Fold creamy peanut butter into warm chocolate pudding for a nutty base. Use crushed graham crackers or chocolate cookies for the dirt. Add a thin swirl of your favorite jam between layers — grape or raspberry works beautifully.
-
Coffee-Lovers’ Adult Version
- Add a tablespoon of espresso or coffee liqueur to your pudding and use chocolate shortbread cookies for the dirt. Top with a dollop of coffee-flavored whipped cream and a chocolate-covered espresso bean for garnish. This one’s sophisticated and slightly grown-up.
-
Gluten-Free / Allergy-Friendly Option
- Use certified gluten-free chocolate cookies or crushed gluten-free chocolate cereal. Substitute whipped coconut cream for dairy-free topping and use gelatin-free gummies for a fully allergen-friendly treat.
-
Healthy(ish) Fruit Forward Swap
- Make a pudding base using avocado, cocoa powder, maple syrup, and a splash of almond milk for a nutrient-dense chocolate layer. Use crushed toasted oats and almond flour mixed with a touch of honey for the “dirt.” Garnish with fresh berries and skip the gummy worms — or replace them with sliced fruit leather for the playful element.
These variations keep the spirit of the dessert while letting you tailor flavor profiles or dietary needs. Mix and match ideas to fit your crowd.
Chef’s Notes
This dessert has evolved from simple pantry staples to a slightly more nuanced treat depending on the occasion. When I started riffing on it at Food Meld, the main goal was to keep the assembly easy while elevating texture and balance — hence the flaky sea salt and the option for homemade pudding. I’ve learned that the ratio of pudding to cookie matters: too much cookie and the dessert becomes dry; too much pudding and you lose the crunchy contrast.
Funny kitchen takeaway: once, I left a tray of these cups unattended at a kids’ party and returned to find each cup had been “decorated” with half a dozen gummy worms. Kids have no restraint, and honestly, neither should you. Embrace the chaos — that’s where the best memories (and photos) come from.
Over time I’ve also found the best containers for these are clear jars that show off the layers. They make leftovers optional — and rarely happen.
FAQs and Troubleshooting
Q: My cookie “dirt” got soggy after chilling. How do I keep it crunchy?
A: The key is to add the cookie crumb layer just before serving if possible. If you must assemble ahead, keep a small container of crumbs separate and sprinkle them on top right before serving. Using slightly coarser cookie crumbs also helps maintain texture longer.
Q: Can I make the pudding ahead of time?
A: Absolutely. Homemade or instant pudding can be made a day ahead and refrigerated. If making from scratch, press plastic wrap directly onto the surface of the pudding to prevent a skin from forming. Rewhisk gently before layering to restore silkiness.
Q: The whipped cream collapsed — what happened?
A: If whipped cream deflates, it may have been overwhipped (turned to butter) or underchilled. Make sure your bowl and beaters are cold, don’t overwhip, and stabilize with a teaspoon of gelatin or a tablespoon of instant pudding mix if you need extra hold for prolonged serving.
Q: Any tips for adult-friendly versions?
A: Yes — add a splash of coffee liqueur, rum, or bourbon to the pudding base (start with 1 tablespoon for 2 cups pudding) for depth. You can also top with a dusting of cocoa mixed with a pinch of espresso powder for a sophisticated finish.
Nutritional Info
Because this recipe is playful and flexible, nutritional content varies significantly depending on your ingredient choices (instant vs. homemade pudding, whipped cream vs. whipped topping, full-fat vs. low-fat milk, etc.). Here’s a general estimate per 6-ounce serving using the base recipe (homemade or instant pudding, whipped cream, Oreo crumbs, and two gummy worms):
- Calories: ~280–380 kcal
- Total Fat: 12–20 g (depending on milk and cream choices)
- Saturated Fat: 7–12 g
- Carbohydrates: 36–50 g (sugar content is high due to pudding and gummy worms)
- Protein: 3–6 g (from milk/cream)
- Fiber: 1–2 g (from cookie crumbs)
- Sodium: 120–250 mg (check labels for cookies and instant pudding)
Ways to reduce calories and sugar:
- Use low-fat or plant-based milk and a lower-sugar pudding mix.
- Swap gummy worms for sliced fresh fruit or fruit leather.
- Use a light whipped topping or a stabilized whipped cream made with less sugar.
- Reduce the cookie amount slightly or use cookies with less sugar.
These cups are meant to be an occasional treat — but they’re also great for portion control since you can make them in small cups and satisfy that sweet craving without a full cake.
Final Thoughts
Dirt and Worms Pudding Cups are a reminder that great food doesn’t need to be serious to be satisfying. They combine texture, nostalgia, and a little bit of playfulness into something that’s quick to make and impossible not to enjoy. Whether you’re making them for kids, parties, or a cheeky dessert for grown-ups, these cups adapt to your pantry and your crowd. Keep a bag of cookies and some gummy worms handy — you never know when dessert inspiration will strike.
I hope this recipe sparks a fun moment at your table. If you try a variation, tag me or share your photo — I love seeing how people put their spin on these.
Conclusion
If you’d like another playful no-bake treat idea to pair with this, check out this fun riff on a similar layered dessert at Dirt and Worms Pudding Cups – Fake Ginger.
Print
Dirt and Worms Pudding Cups
- Total Time: 25 minutes
- Yield: 4 servings 1x
- Diet: Vegetarian
Description
A playful and nostalgic dessert featuring silky chocolate pudding, crunchy Oreo ‘dirt’, and gummy worms for a whimsical touch.
Ingredients
- 2 cups chocolate pudding (homemade or instant)
- 2 cups crushed chocolate sandwich cookies (about 16 cookies)
- 12–16 gummy worms
- 1 1/2 cups whipped cream or whipped topping
- 1 teaspoon vanilla extract (optional)
- Pinch of flaky sea salt
- Mini chocolate chips or chocolate sprinkles (optional)
- Fresh berries for garnish (optional)
Instructions
- Prepare your pudding (homemade or instant).
- Crush the cookies into “dirt”.
- Whip the cream (if using fresh).
- Layer the cups.
- Add whipped cream and garnish.
- Chill and serve.
Notes
For best results, serve immediately after assembly for crunchy cookies.
- Prep Time: 15 minutes
- Cook Time: 10 minutes
- Category: Dessert
- Method: No-Bake
- Cuisine: American
Nutrition
- Serving Size: 1 serving
- Calories: 350
- Sugar: 25g
- Sodium: 250mg
- Fat: 15g
- Saturated Fat: 8g
- Unsaturated Fat: 5g
- Trans Fat: 0g
- Carbohydrates: 45g
- Fiber: 2g
- Protein: 5g
- Cholesterol: 25mg
Keywords: dessert, no-bake, chocolate, pudding, childhood treat


