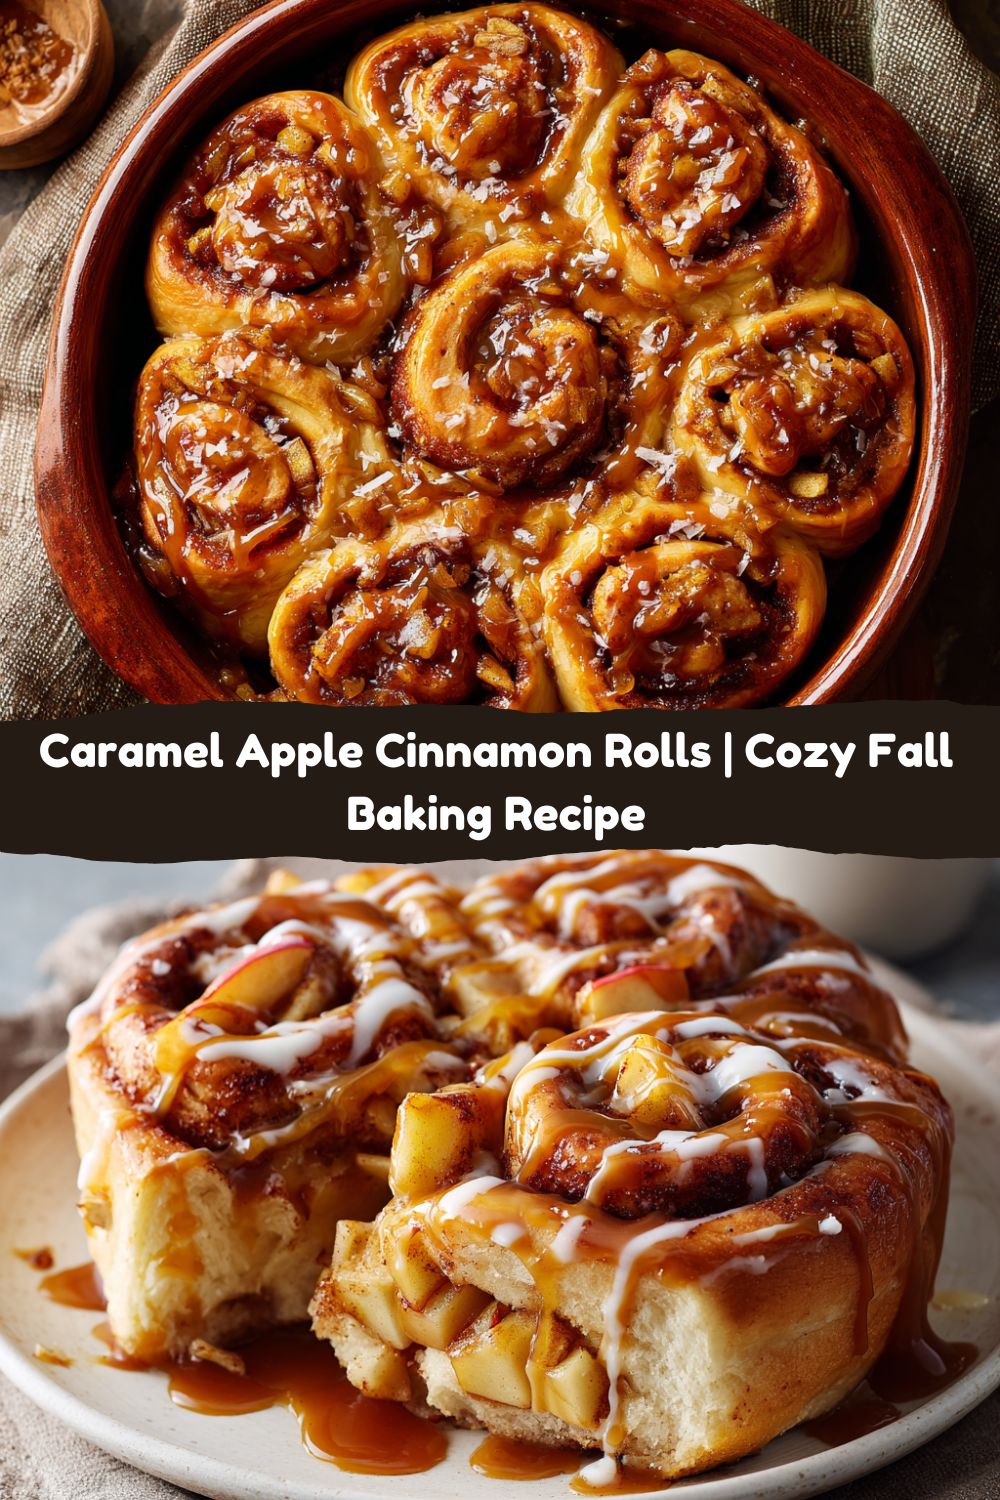
Your New Favorite Fall Morning Starts Right Here
Hey friends, Jackson from Food Meld here. Let’s talk about that perfect, crisp autumn morning. You know the one. There’s a chill in the air, you’re wrapped in your favorite flannel, and the only thing missing is the unmistakable, soul-warming aroma of something sweet and spiced baking in the oven. Well, I’m about to fix that. We’re ditching the basic and diving headfirst into the kind of baking project that feels like a triumphant hug—Caramel Apple Cinnamon Rolls.
This isn’t just a recipe; it’s a flavor experience. We’re taking the cozy, familiar comfort of a classic cinnamon roll and melding it with the quintessential taste of a caramel apple, straight from the county fair. Imagine: a soft, pillowy dough, swirled with a generous layer of cinnamon-spiced apples, all baked to golden perfection and then, just when you think it can’t get any better, drowned in a rich, homemade salted caramel sauce that oozes into every nook and cranny. This is the ultimate “wow” factor bake, the kind that makes you feel like a kitchen rockstar with minimal fuss. So, preheat those ovens, grab your favorite mixing bowl, and let’s cook something awesome together.
The County Fair & A Recipe Born from Nostalgia
This recipe hits close to home for me. Every fall, my family would make the pilgrimage to the state fair. The sounds of the midway, the livestock shows… but let’s be real, I was there for one thing and one thing only: the food. And the king of all fair food, in my humble opinion, was the simple, glorious caramel apple. That first crack through the hard caramel shell into the tart, crisp apple underneath was a moment of pure joy. It was messy, it got stuck in your teeth, and it was 100% worth it.
Years later, I found myself on a chilly Sunday, craving that exact flavor combination but wanting the warmth and comfort of a fresh-baked good. I looked at a classic cinnamon roll recipe and thought, “What if we tried this?” What if we brought the fairgrounds into the kitchen? The result was a happy, delicious accident that’s now a permanent fixture in my fall baking rotation. It’s my way of capturing that childhood magic and turning it into something you can enjoy with a hot cup of coffee, no sticky fingers required (well, maybe a few).
Gathering Your Flavor Arsenal
Here’s everything you’ll need to create this masterpiece. Don’t just think of these as ingredients; think of them as your flavor building blocks. I’ve thrown in some chef insights and swaps to make this work for you.
For the Dough:
- ¾ cup warm milk (110°F / 43°C): This is the sweet spot for waking up the yeast. Too hot and you’ll kill it; too cold and it won’t get going. Pro tip: if you don’t have a thermometer, it should feel warm to the touch but not hot—like a perfect baby bottle. Dairy-free? Unsweetened almond or oat milk works great!
- 2¼ tsp active dry yeast: This is one packet. Make sure it’s not expired! Your yeast is the life of the party here; it’s what gives our rolls that incredible fluff.
- ¼ cup granulated sugar: A little food for our yeast friends, plus it adds a touch of sweetness to the dough itself.
- 1 egg + 1 egg yolk: The whole egg adds structure, while that extra yolk gives us an incredibly rich and tender crumb. It’s a little baker’s hack for maximum luxury.
- ¼ cup melted butter: For flavor and fat, which equals tenderness. I use unsalted so I can control the salt level myself.
- 3 cups all-purpose flour: The backbone of our dough. I always fluff my flour with a spoon before measuring it into the cup to avoid a dense, dry dough.
- ½ tsp salt: The ultimate flavor enhancer. It balances the sweetness and strengthens the gluten network. Don’t skip it!
For the Apple Cinnamon Filling:
- 2 medium apples, peeled and finely chopped: I love a tart apple like Granny Smith to cut through the sweetness, but Honeycrisp or Braeburn are amazing too. The key is to chop them small so they soften nicely and don’t make the rolls soggy.
- ⅓ cup brown sugar: Its molasses notes bring a deeper, more caramel-like flavor than white sugar would. Pack it tight in that measuring cup!
- 2 tsp ground cinnamon: The warm, spicy soul of this dish. Feel free to add a pinch of nutmeg or cardamom if you’re feeling adventurous.
- ¼ cup softened butter: This gets spread over the dough to create a sticky, delicious glue for our sugar and apples. Softened, not melted, is key for easy spreading.
For the Salted Caramel Sauce:
- ½ cup brown sugar: Again, that deep molasses flavor is our best friend here.
- ¼ cup butter: Salted or unsalted both work. If using unsalted, you might want to add an extra pinch of salt at the end.
- 2 tbsp heavy cream: This creates the luscious, creamy texture. For a thicker sauce, you can use a bit less.
- Pinch of salt: This is what takes it from “caramel” to “salted caramel.” It makes all the flavors pop.
- Optional: ¼ tsp vanilla extract: A splash of vanilla adds a beautiful layer of warmth and complexity. Highly recommend!
Let’s Get Rolling: The Step-by-Step Fun
Okay, team. Put on some good music, clear some counter space, and let’s do this. It’s a process, but I’ll walk you through every step. Remember, baking is supposed to be fun, not perfect!
- Wake Up the Yeast: In the bowl of your stand mixer (or a large mixing bowl), whisk together the warm milk, yeast, and that ¼ cup of granulated sugar. Let it hang out for 5-10 minutes. You’re waiting for it to get frothy and smell like bread—that’s how you know your yeast is alive and ready to rock. If it doesn’t foam, your milk was probably too hot or your yeast is old. Start over!
- Build the Dough: To the yeasty mixture, add the egg, egg yolk, melted butter, and salt. Give it a quick whisk to combine. Attach your dough hook and start on low speed, gradually adding the flour about a cup at a time. Once all the flour is in, kick the speed up to medium and let the mixer knead for 6-8 minutes. The dough should pull away from the sides but still be slightly tacky to the touch. No stand mixer? No problem! Use a wooden spoon and then turn the shaggy dough out onto a floured surface and knead by hand for a good 8-10 minutes. It’s a great arm workout!
- The First Rise: Shape your beautiful dough into a ball. Place it in a lightly greased bowl, turn it over to coat, and cover the bowl with plastic wrap or a clean kitchen towel. Find a warm, draft-free spot (like an off oven with the light on) and let it rise for 1 to 1.5 hours, or until it’s doubled in size. This is a great time to prep your apple filling!
- Roll It Out: Punch that puffy dough down—get all that air out! Turn it out onto a lightly floured surface and, using a rolling pin, roll it into a roughly 14×9 inch rectangle. It doesn’t have to be perfect. My rectangles always look like abstract art, and they taste incredible.
- Add the Filling: Spread the ¼ cup of softened butter evenly over the entire surface of the dough, leaving a tiny border around the edges. In a small bowl, mix the brown sugar and cinnamon together, then sprinkle this mixture evenly over the butter. Now, scatter your finely chopped apples all over the top. Press them down gently so they stick.
- The Tight Roll: Now for the fun part. Starting from the long 9-inch side closest to you, tightly roll the dough into a log. Take your time and try to keep it snug. When you get to the end, pinch the seam to seal it. This helps prevent our delicious filling from leaking out everywhere during baking.
- Slice & Second Rise: Using a sharp serrated knife or a piece of unflavored dental floss (my secret weapon! Slide it under the log, cross the ends over the top, and pull—perfect, clean slices every time), cut the log into 9-12 even rolls. Place them cut-side up in a greased 9×9 or 9-inch round baking pan. Cover them and let them rise again for 30-40 minutes. They’ll get nice and puffy.
- Bake to Golden Perfection: Preheat your oven to 350°F (175°C). Once the rolls have risen, bake them for 25-30 minutes, or until they’re golden brown on top and the apples are bubbly. Your kitchen will smell like heaven. I promise.
- Whip Up the Caramel: While the rolls are baking, make the caramel sauce. It’s so easy. In a small saucepan over medium heat, melt the butter and brown sugar together, stirring constantly. Let it bubble for about a minute. Carefully whisk in the heavy cream and salt (and vanilla if using) and let it simmer for another 2-3 minutes until it thickens slightly. Remove from heat. It will continue to thicken as it cools.
- The Grand Finale: As soon as the rolls come out of the oven, pour that warm, glorious caramel sauce all over the top. Don’t be shy. Let them cool for about 10-15 minutes—this is the hardest part, I know—so the sauce can set a little and you don’t burn your tongue. Then, dig in!
How to Serve These Bad Boys
Presentation is part of the fun! I like to serve these warm, right out of the pan. Use a spatula to lift them out, making sure to get a generous drizzle of that caramel from the bottom of the pan on each plate. They are decadent all on their own, but if you want to go full dessert-for-breakfast mode, a little scoop of vanilla bean ice cream on the side while they’re still warm is a game-changer. For a classic touch, a dollop of freshly whipped cream never hurt anybody.
Mix It Up: Your Rules, Your Rolls
The beauty of this recipe is its flexibility. Want to make it your own? Here are a few ideas:
- Pecan Praline Twist: Sprinkle a handful of chopped pecans over the apple filling before you roll it up. Toast them first for even more flavor!
- Maple Kiss: Swap the caramel sauce for a simple maple glaze. Whisk together 1 cup of powdered sugar, 2-3 tbsp of pure maple syrup, and a splash of milk until smooth.
- Boozy Apple: Soak your chopped apples in a tablespoon of bourbon or spiced rum for 15 minutes before adding them to the filling. It adds a wonderful depth of flavor.
- Vegan-Friendly: Use plant-based milk and butter, a flax egg (1 tbsp ground flax + 3 tbsp water), and coconut cream instead of heavy cream. It works like a charm!
- Gluten-Free: Swap the all-purpose flour for a 1:1 gluten-free baking blend. The texture will be slightly different but still delicious.
Jackson’s Chef Notes & Kitchen Confessions
This recipe has seen some iterations in my kitchen. The first time I made them, I got overzealous with the apple filling and didn’t chop them small enough. The rolls were delicious, but a little soggy in the middle—a classic case of too much of a good thing! Lesson learned: small apple pieces are key.
I also highly recommend making the caramel sauce yourself. The jarred stuff works in a pinch, but homemade is just… better. It’s richer, and you can control the salt level. Plus, it comes together in the same amount of time it takes to bake the rolls, so there’s really no excuse.
And finally, don’t stress if your roll isn’t a perfect log or your slices aren’t exactly even. I’ve had lopsided, messy-looking rolls that tasted out-of-this-world. It’s all about the flavor and the love you put in, not about winning a beauty contest. The imperfections are what make them yours.
FAQs: Your Questions, Answered
Q: Can I make these the night before?
A: Absolutely! You have two great options. 1) Overnight Rise: Assemble the rolls up to the point before the second rise. Instead of letting them rise on the counter, cover the pan tightly with plastic wrap and pop them in the fridge overnight. The next morning, take them out, let them sit on the counter for about an hour to come to room temperature and finish rising, then bake as directed. 2) Full Make-Ahead: Bake the rolls and let them cool completely. Don’t add the caramel sauce. Wrap the pan tightly and store at room temp. Gently reheat in a 300°F oven for 10-15 minutes and then drizzle with warm caramel sauce right before serving.
Q: My dough didn’t rise! What went wrong?
A: This is almost always one of two things: 1) Old or dead yeast. Always check the expiration date. Your yeast mixture should get foamy during the first step. If it doesn’t, it’s time to start over with new yeast. 2) The milk was too hot or too cold. Too hot will kill the yeast; too cold won’t activate it. Aim for that 110°F sweet spot. The environment matters too—a cold, drafty kitchen will slow rising way down.
Q: My caramel sauce is too thin / too thick. How can I fix it?
A: Sauces can be fickle! If it’s too thin, let it simmer for another minute or two to cook off more moisture and thicken up. If it’s too thick and has cooled down, simply whisk in a teaspoon of warm cream at a time until it reaches your desired consistency. It will also thicken significantly as it cools.
Q: Can I use canned apple pie filling?
A: You can, but I wouldn’t recommend it for the best results. Canned filling is often too wet and overly sweet, which can make your rolls soggy and cloying. The fresh apples provide a better texture and a brighter flavor that balances the sweetness of the caramel. Peeling and chopping two apples is a small step for a huge payoff!

Caramel Apple Cinnamon Rolls
- Total Time: 2 hours
- Yield: 9 - 12 1x
Description
Warm, gooey, and bursting with cinnamon-spiced apple filling—these rolls are like a cozy autumn hug. Swirled with love and finished with sticky caramel sauce, they’re the ultimate fall baking treat.
Ingredients
For the Dough:
¾ cup warm milk (110°F / 43°C)
2¼ tsp active dry yeast
¼ cup granulated sugar
1 egg + 1 egg yolk
¼ cup melted butter
3 cups all-purpose flour
½ tsp salt
For the Filling:
2 medium apples, peeled and finely chopped
⅓ cup brown sugar
2 tsp ground cinnamon
¼ cup softened butter
For the Caramel Sauce:
½ cup brown sugar
¼ cup butter
2 tbsp heavy cream
Pinch of salt
Optional: ¼ tsp vanilla extract
Instructions
Activate yeast: Mix warm milk, yeast, and sugar in a bowl. Let sit for 5–10 minutes until frothy.
Add egg, yolk, melted butter, and salt. Stir in flour gradually until a soft dough forms.
Knead dough 8–10 minutes, then place in a greased bowl. Cover and let rise for 1 hour or until doubled.
Roll dough into a rectangle. Spread with butter, sprinkle brown sugar, cinnamon, and apples.
Roll tightly, slice into 9–12 rolls, and place in a greased pan. Cover and let rise for another 30–40 minutes.
Bake at 350°F (175°C) for 25–30 minutes until golden.
While baking, make caramel: melt butter and brown sugar, stir in cream and salt, and simmer for 2–3 minutes.
Drizzle warm caramel over baked rolls and serve.
- Prep Time: 30 mins (+ 90 mins rising)
- Cook Time: 30 minutes
Nutrition
- Calories: 420 / Serving
- Sugar: 32g / Serving
- Sodium: 280mg / Serving
- Fat: 19g / Serving
- Saturated Fat: 10g / Serving
- Carbohydrates: 58g / Serving
- Fiber: 2g / Serving
- Protein: 6g / Serving
Nutritional Info (Because Knowledge is Power)
Servings: 9 rolls | Prep Time: ~2 hrs (including rising) | Bake Time: 25–30 mins
-
Calories: ~420
-
Carbohydrates: ~58g
-
Protein: ~6g
-
Fat: ~19g
-
Saturated Fat: ~10g
-
-
Fiber: ~2g
-
Sugar: ~32g
-
Sodium: ~280mg
*These values are approximate, calculated using common ingredients. Actual nutrition may vary depending on specific brands and portion sizes.
Final Thoughts
Caramel Apple Cinnamon Rolls are the kind of bake that make fall mornings unforgettable. They’re soft, pillowy, and swirled with warm, spiced apples, then crowned with a glossy blanket of salted caramel that seeps into every bite. This recipe takes the nostalgia of fairground caramel apples and marries it with the cozy comfort of homemade cinnamon rolls—creating a dessert (or breakfast, no judgment here) that’s as impressive as it is comforting.
Whether you’re making them for a holiday brunch, a weekend family breakfast, or just because you want to treat yourself, these rolls are guaranteed to earn rave reviews. They may look bakery-level fancy, but the steps are simple, forgiving, and fun. So roll up your sleeves, get a little flour on the counter, and let your kitchen smell like fall magic. Trust me—you’ll be making these again and again.