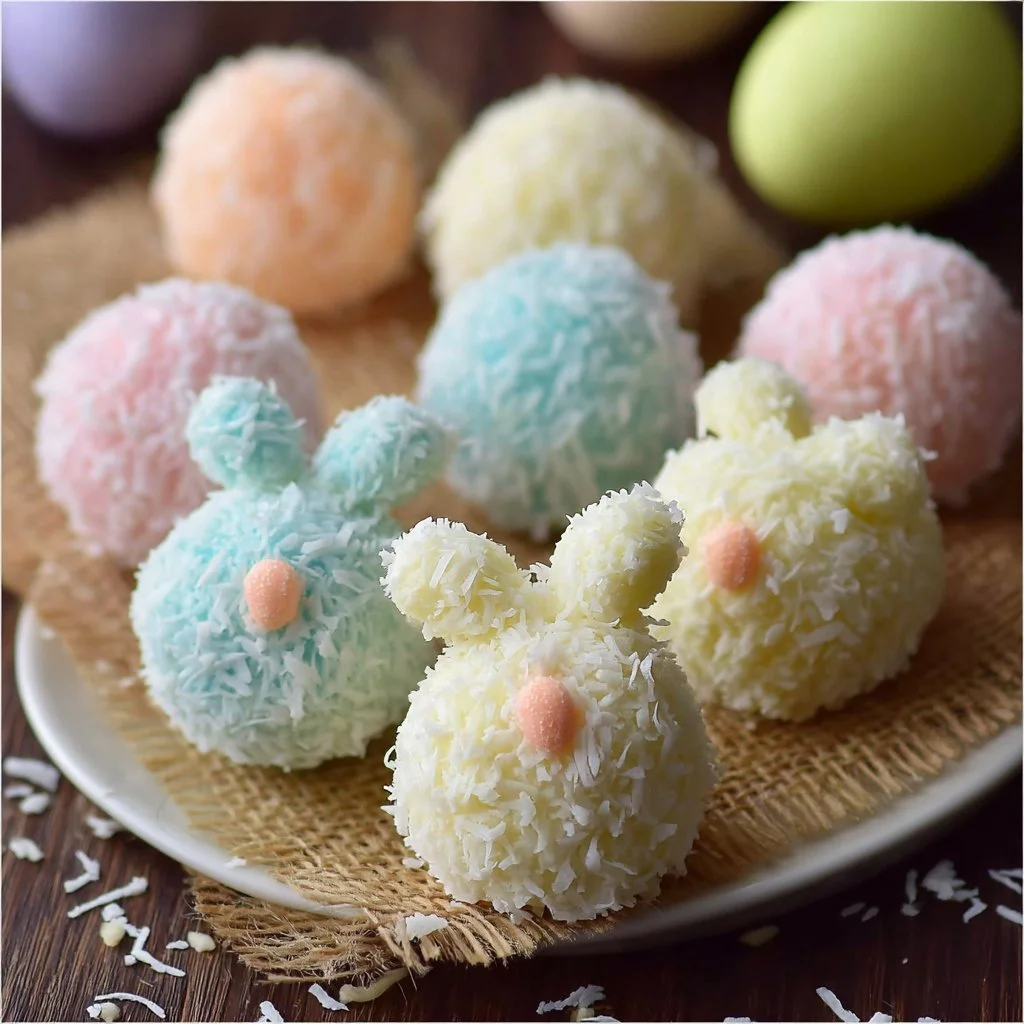
Easter Bunny Coconut Tails – A Sweet No-Bake Treat!
Hey there, fellow food lover! 👋 Are you ready to hop into the delightful world of Easter treats? If there’s one thing I adore about this holiday, it’s the spirit of creativity that comes with it. Families come together, laughter fills the air, and the kitchen vibes are all about fun and sweetness. Speaking of sweet, I can’t wait to share my recipe for Easter Bunny Coconut Tails—a charming no-bake treat that’s perfect for sharing or keeping all to yourself (no judgment here!).
Imagine this: fluffy coconut, a hint of sweetness, and the cutest bunny tails you’ve ever seen! These delightful little bites are not just a visual treat; they are packed with flavor and can be made in a snap, giving you more time to enjoy the Easter festivities. Whether you’re hosting a brunch, joining an egg hunt, or just indulging in a cozy day at home, these coconut tails will surely bring smiles. Plus, they’re super easy to whip up, making them the perfect project to get the kids (or your inner child) involved. Let’s get started!
Personal Story
Growing up, Easter was nothing short of magical in our household. One of my favorite traditions involved a mad dash through our backyard, hunting for colorful eggs that were filled with candy and surprises. But the real highlight? My grandma’s kitchen during the days leading up to Easter, where she’d whip up these unforgettable coconut confections. The first time I tasted one, the delicate texture and rich sweetness transported me to a world of springtime joy.
My grandma had a way of making every recipe feel like a secret treasure, and there was something about the way she rolled those coconut tails that made them feel extra special. Each bite was a reminder of how food could create memories and connections, and I knew I wanted to carry on that tradition. Fast forward to today, and I’ve added my twist to her original recipe. Trust me, these Easter Bunny Coconut Tails are the perfect blend of nostalgia and fun.
Ingredients
Here’s what you’ll need to make these cuties:
-
Shredded Coconut (unsweetened)
Why? The star of our show! Unsweetened coconut gives a natural flavor and texture.
Substitution Tip: You could use sweetened coconut if you prefer, but keep in mind that the overall sweetness might increase. -
Sweetened Condensed Milk
Why? This sticky goodness acts as the glue that holds everything together while adding creaminess.
Substitution Tip: You can make homemade sweetened condensed milk if you want a lighter version without preservatives. -
Butter
Why? Adds richness and helps with the texture—who doesn’t love a bit of buttery goodness?
Substitution Tip: Coconut oil can replace butter for a dairy-free option while enhancing the coconut flavor. -
Vanilla Extract
Why? Enhances the flavor and adds a sweet aroma.
Chef Insight: A hint of almond extract can also elevate the flavor profile—try it if you’re feeling adventurous! -
Mini Chocolate Chips
Why? For those little bunny eyes and added chocolaty goodness.
Substitution Tip: You can swap these for colorful candies (like M&M’s) for a fun twist. -
Candy Melts (white or colored)
Why? These are perfect for glazing and bringing the bunny tails to life.
Substitution Tip: You can use regular chocolate if you prefer a richer flavor instead of a candy coating. -
Candy Eyes
Why? To give our bunny tails some personality!
Chef Insight: You can use small chocolate chips if you can’t find candy eyes.
Step-by-Step Instructions
Now that we have our ingredients all set, let’s dive into the fun part—making our Easter Bunny Coconut Tails!
Step 1: Prep Your Workspace
Make sure your workspace is clean and you have all your ingredients ready. You’ll need a mixing bowl, a baking sheet lined with parchment paper, and a microwave-safe bowl for melting the candy melts.
Step 2: Mix the Coconut Base
In a large mixing bowl, combine 3 cups of shredded unsweetened coconut with 1 can of sweetened condensed milk. Toss in ½ cup of melted butter and 1 teaspoon of vanilla extract. This mixture should hold together well when squeezed in your hands. If it feels too loose, just add more coconut!
Tip: Use your hands! It’s messy but oh-so-fun and helps you gauge the texture better.
Step 3: Shape the Tails
Once the mixture is well combined, it’s time to shape the tails. Grab a handful of the mixture and roll it into a log shape (about 2-3 inches long). Place each tail on the lined baking sheet.
Chef Hack: If you want uniformity, use an ice cream scoop to measure out each portion before rolling.
Step 4: Chilling Time
Pop the baking sheet into the fridge for about 30 minutes or until the tails are firm. This will make dipping them in the candy melts much easier!
Step 5: Melt the Candy Coating
While the tails chill, melt your candy melts in the microwave in 30-second intervals. Stir between each interval to avoid burning. You want a smooth, pourable consistency.
Pro Tip: Add a little vegetable oil to the melts for a thinner consistency if you find it too thick.
Step 6: Dip for the Bunny Look
Once the tails are firm, dip the end of each into the melted candy, letting the excess drip off. Place it back on the baking sheet.
Commentary: Use a fork for dipping—this makes the process less messy and provides a good coverage!
Step 7: Add the Finishing Touches
While the candy is still wet, place two mini chocolate chips for the eyes on each tail, and if you’re using candy eyes, pop those on too! Let the candy coating set.
Tip: If you find the candy melts are hardening too quickly, just briefly reheat them.
Step 8: Enjoy Your Bunny Tails!
Once everything is set and you have a beautiful batch of Easter Bunny Coconut Tails, transfer them to a serving platter and enjoy!
Serving Suggestions
Presentation is key, my friends! Arrange the Easter Bunny Coconut Tails on a festive platter. You can even sprinkle a little extra shredded coconut around as faux "grass" for an Easter display. Don’t forget to provide some small plates and napkins for your guests; these little treats are sure to be a hit, and trust me, they won’t last long!
For an added touch, consider pairing these treats with a light, refreshing spring drink, like a homemade lemonade or a fruity iced tea. It’ll create that perfect sweet-and-tangy combo to complement all that coconut goodness!
Recipe Variations
Feeling like switching things up? Here are a few fun ways to customize your Easter Bunny Coconut Tails:
-
Nutty Addition: Stir in some chopped nuts like almonds or pecans for an added crunch. This gives a delightful texture to each bite!
-
Marshmallow Delight: Mix in mini marshmallows along with the coconut for an extra gooey treat. It’ll remind you of a classic Rice Krispies Treat—yum!
-
Lemon Zest Twist: Add a teaspoon of lemon zest to the coconut mixture for a refreshing citrus flavor.
-
Colorful Fun: Use colored candy melts to make a rainbow of bunny tails. This will surely be a showstopper on any table!
-
Diet-Friendly Swap: Use sugar-free sweetened condensed milk and dairy-free chocolate to cater to those dietary needs without compromising on taste.
Chef’s Notes
These Easter Bunny Coconut Tails have come a long way from my grandma’s kitchen, where she would roll them out in her well-worn apron with a smile. I’ve played with flavors and techniques over the years until I found this version that sings to my sweet tooth.
I once had a kitchen disaster when I used old coconut that was more chewy than fluffy. It ended up being a “coconut cluster” rather than tails! But funny enough, that embrace of imperfection is what made me realize how much I love experimenting. So, get creative, and don’t fret if it doesn’t go perfectly!
FAQs and Troubleshooting
1. My coconut mixture is too wet; what can I do?
If you’ve added more sweetened condensed milk than intended, just add more shredded coconut until it reaches a workable consistency.
2. Can I freeze these tails?
Absolutely! These coconut tails can freeze well. Just make sure to store them in an airtight container with parchment paper between layers to prevent sticking.
3. How long do they stay fresh?
If stored properly in an airtight container in the fridge, they’ll last about a week. But trust me, they won’t stick around that long!
4. Can I make these ahead of time?
Definitely! You can prepare them a few days in advance. Just wait to add the candy coating until the day you plan to serve them for best texture.
Nutritional Info
Here’s a quick glance at the nutritional information for a serving of these delightful Easter Bunny Coconut Tails (note that these can vary based on specific brands or variations used):
- Calories: Approximately 120
- Fat: 8g
- Carbohydrates: 12g
- Sugar: 6g
- Protein: 1g
Remember, it’s all about balance, and these bites are well worth the sugar rush for the joy they bring!
Final Thoughts
So there you have it—my Easter Bunny Coconut Tails, a sweet no-bake treat that captures the essence of family, creativity, and a whole lot of love! I hope this recipe brings a touch of joy to your holiday celebrations. Whether you’re enjoying them alone with a good cup of coffee or sharing them with family and friends, these delicious bites will surely make your Easter a little sweeter.
I’d love to hear how your bunny tails turn out, so don’t forget to snap a pic and share it with me! And as always, get ready to create some flavorful memories in your kitchen. Happy cooking, and let’s chow down! 🐰🥥
Print
Easter Bunny Coconut Tails
- Total Time: 45 minutes
- Yield: 12 servings 1x
- Diet: Vegetarian
Description
A charming no-bake treat that features fluffy coconut and sweetness, shaped like adorable bunny tails, perfect for Easter celebrations.
Ingredients
- 3 cups shredded coconut (unsweetened)
- 1 can sweetened condensed milk
- ½ cup melted butter
- 1 teaspoon vanilla extract
- Mini chocolate chips (for eyes)
- Candy melts (white or colored)
- Candy eyes (optional)
Instructions
- Prep your workspace with clean surfaces and all ingredients ready.
- In a large mixing bowl, combine shredded coconut, sweetened condensed milk, melted butter, and vanilla extract until well mixed.
- Roll the mixture into log shapes (2-3 inches) and place on a lined baking sheet.
- Chill in the fridge for about 30 minutes.
- Melt candy melts in the microwave, stirring between intervals.
- Dip the end of each tail into the melted candy, letting excess drip off.
- Add mini chocolate chips or candy eyes for the face while the coating is still wet.
- Transfer to a serving platter and enjoy!
Notes
For a dairy-free option, substitute butter with coconut oil. Customize with nuts, marshmallows, or colorful candy melts.
- Prep Time: 15 minutes
- Cook Time: 30 minutes
- Category: Dessert
- Method: No-Bake
- Cuisine: American
Nutrition
- Serving Size: 1 piece
- Calories: 120
- Sugar: 6g
- Sodium: 50mg
- Fat: 8g
- Saturated Fat: 5g
- Unsaturated Fat: 2g
- Trans Fat: 0g
- Carbohydrates: 12g
- Fiber: 2g
- Protein: 1g
- Cholesterol: 15mg
Keywords: Easter, no-bake dessert, coconut treats, bunny tails, sweet snacks