Kimchi Deviled Eggs: Your New Party Appetizer Hero
Hey friends, Jackson here from Food Meld. Let’s talk about the party platter that never lets you down: the deviled egg. We all know them. We all love them. That creamy, slightly tangy filling, the sprinkle of paprika… they’re a classic for a reason. But what if I told you we could take that beloved bite and crank the flavor dial up to eleven? What if we injected it with a shot of funky, spicy, utterly addictive energy?
That’s exactly what we’re doing today with these Kimchi Deviled Eggs. This isn’t just a recipe; it’s a flavor experiment that paid off big time. We’re melding the comforting, familiar creaminess of the classic deviled egg with the bold, tangy punch of kimchi. The result is something truly special: a bite that’s rich and smooth, then immediately wakes up with a spicy, fermented kick that makes you go, “Whoa, what *is* that?” in the best way possible.
If you’ve ever looked at a tray of traditional deviled eggs and thought, “These are good, but I wish they had more personality,” you’re in the right kitchen. This recipe is for the curious cook, the flavor adventurer, the person who wants to serve something at their next gathering that people genuinely remember and beg you for the recipe. It’s surprisingly simple, wildly delicious, and embodies that whole “what if we tried this?” energy I live for. So, grab your eggs and your favorite jar of kimchi. We’re about to make the most unforgettable deviled eggs of your life.
The Kimchi “Aha!” Moment That Inspired It All
This recipe was born from a happy accident, like most of the best things in my kitchen. A few years back, I was hosting a big, messy, friends-giving style potluck. My mission was to make a mountain of classic deviled eggs. I had my yolks mashed, my mayo measured, my mustard at the ready… and then I realized I was completely out of pickle relish. Panic? Nah. Opportunity.
Scanning the fridge, my eyes landed on a nearly-finished jar of homemade kimchi, just sitting there, glowing a fierce red. On a whim, I grabbed my knife, finely chopped a big spoonful of it, and folded it right into the creamy yolk mixture. I gave it a taste, and honestly, my eyebrows hit my hairline. The creamy richness was still there, but now it was cut through with this exhilarating tang, heat, and deep umami that made the old version taste… well, a little sleepy.
I piped them out, sprinkled on some green onion, and put them on the table without a word. They were the first thing to disappear. Friends who usually took one polite egg were coming back for thirds, asking, “What did you DO to these?” That night, the classic deviled egg got a permanent upgrade in my playbook. It taught me that the greatest kitchen upgrades often come from looking at what you already have and asking, “What if we meld these worlds together?”
Gathering Your Flavor Arsenal
Here’s the beautiful part: you only need a handful of ingredients to create this flavor bomb. Quality matters here, but we’re keeping it simple and accessible.
- 6 large eggs: The foundation. I like older eggs for boiling—they peel a bit easier. But fresh-from-the-farm eggs work beautifully too; we’ll use a foolproof method.
- 2½ tbsp mayonnaise: This is our creamy glue. Use a good-quality, full-fat mayo for the best texture and flavor. For a tangier twist, swap in a bit of Greek yogurt or sour cream for half the mayo.
- 2 tbsp finely chopped kimchi (well-drained): The STAR. Use your favorite brand, homemade or store-bought. Chef’s Insight: Drain it REALLY well. Squeeze the chopped kimchi in a paper towel to get rid of excess liquid. We want all that flavor without making our filling watery.
- ½ tsp rice vinegar or kimchi juice (optional): My secret weapon. A tiny splash of the brine from the kimchi jar intensifies that fermented tang perfectly. Rice vinegar is a great, slightly milder backup.
- Salt and black pepper, to taste: Season as you go! The kimchi and mayo already have salt, so taste before you add more.
For the Toppings (Make it Pretty!)
- Extra chopped kimchi: A little pop on top tells people exactly what they’re in for.
- Thinly sliced scallions or sesame seeds: Scallions add fresh bite and color; sesame seeds give a nice little crunch and nutty finish.
- A few drops of chili oil (optional): For my heat-seekers. A drizzle of chili oil adds a gorgeous sheen and an extra layer of slow-building warmth.
Let’s Build Some Flavor: Your Step-by-Step Guide
Ready? Put on some music, clear a little space, and let’s get cooking. This process is as fun as it is easy.
Step 1: The Foolproof Hard-Boiled Egg
Place your eggs in a single layer in a saucepan. Cover them with cold water by about an inch. Bring the pot to a rolling boil over high heat. Now, here’s the hack: as soon as it hits a full boil, turn off the heat, slap the lid on, and set a timer for 10 minutes (for a perfectly set yolk with no gray ring). Don’t peek! The residual heat does the work.
While they wait, prepare an ice bath—a big bowl of cold water with plenty of ice. When the timer goes off, immediately transfer the hot eggs to the ice bath with a slotted spoon. Let them chill for at least 5 minutes. This shock stops the cooking and, most importantly, makes peeling a dream. Gently tap and roll each egg on the counter to crackle the shell, then peel under cool running water. Halve them lengthwise and pop the yolks into a separate bowl.
Step 2: Crafting the “Funky & Creamy” Filling
Take your well-drained, finely chopped kimchi and add it to the egg yolks. Grab a fork and mash everything together until it looks crumbly. Now, add in your mayo and that optional ½ tsp of kimchi juice or vinegar. Pro Tip: Start with 2 tbsp of mayo, mix, then decide if you need the extra half tablespoon. You want a filling that holds its shape but isn’t stiff.
Mix until it’s beautifully smooth and creamy. Now, TASTE. This is the most important step. Does it need a pinch of salt? A crack of black pepper? More tang? Adjust now. Remember, the flavors will meld and deepen a bit as they sit, so trust your palate.
Step 3: The Grand Assembly
You can simply spoon the filling back into the egg white cups, but for that pro-platter look, piping is the way to go. Spoon the filling into a zip-top bag, snip off a corner (about ½-inch wide), and pipe away with a gentle swirl. It looks fantastic and is oddly satisfying. If you’re going for a more rustic, homemade vibe, a spoon is absolutely perfect.
Step 4: The Garnish Game
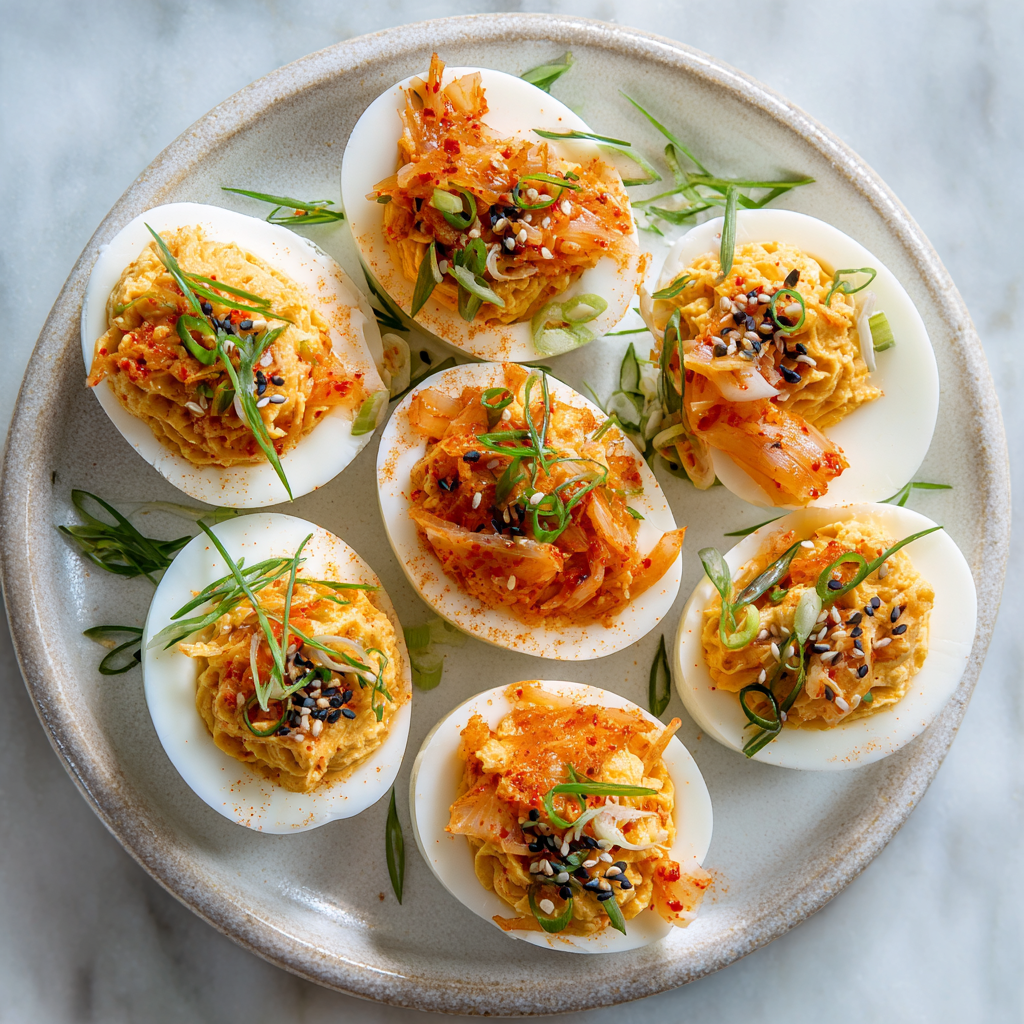
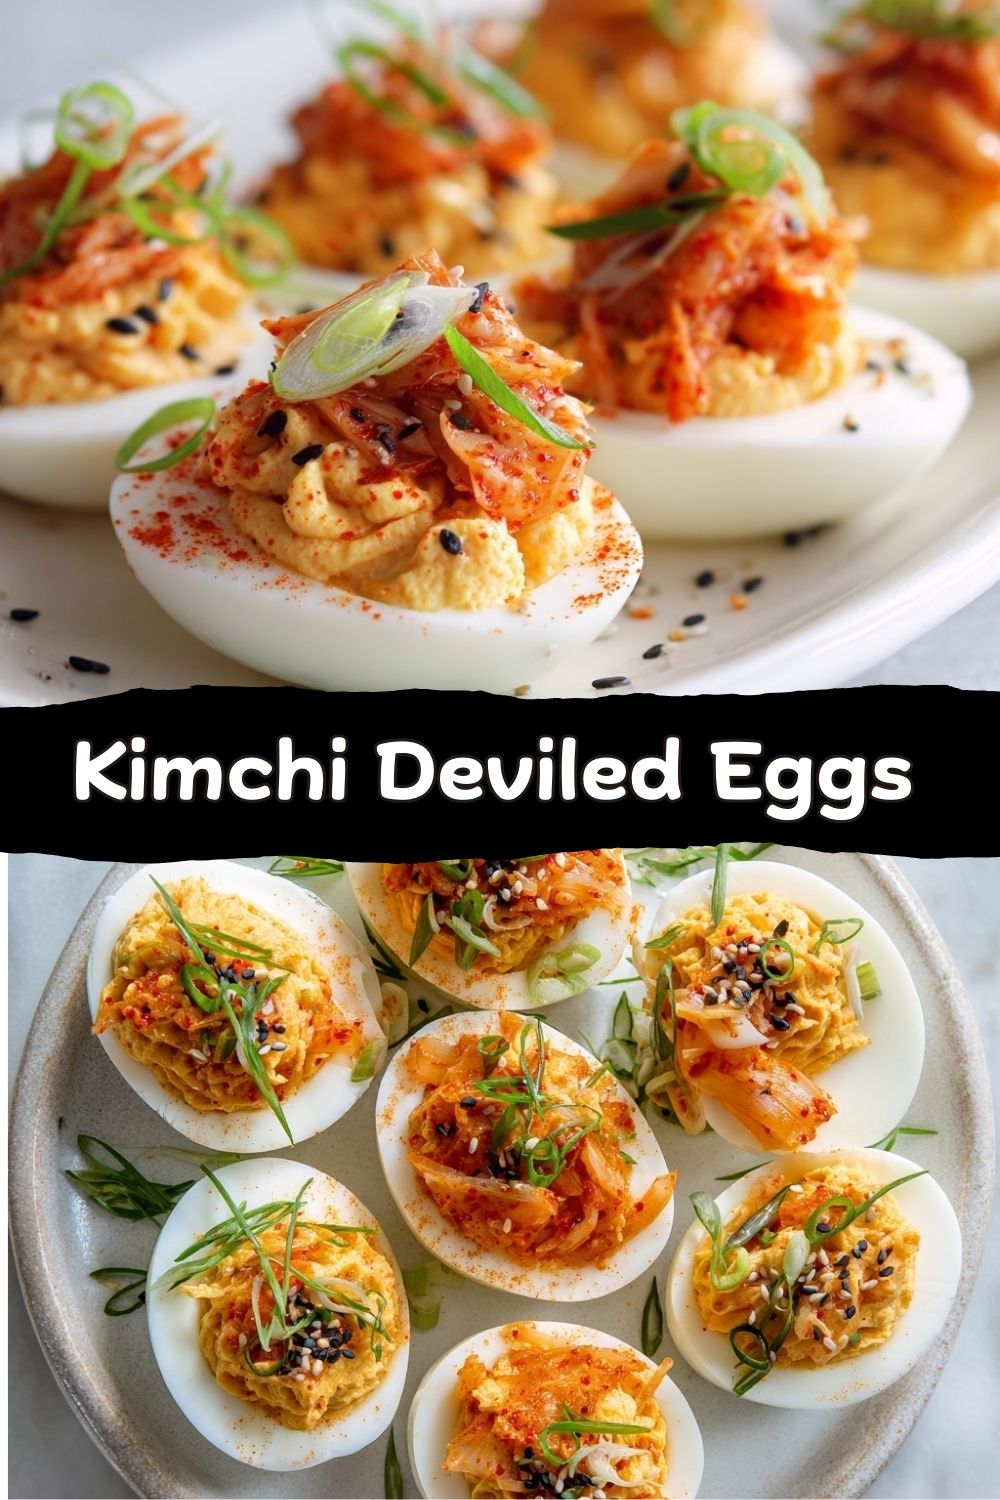
This is where you make them Instagram-worthy (or just extra delicious). Top each one with a tiny mound of the reserved chopped kimchi, a few slivers of bright green scallion, and if you’re feeling fancy, a sprinkle of sesame seeds or that dramatic drizzle of chili oil.
Serving Your Masterpiece
Presentation is part of the fun! Don’t just plop these on a plate. A simple, elegant deviled egg tray is a great investment if you make these often (and trust me, you will). If you don’t have one, a simple platter works wonders. Arrange them in a circle or rows, and sprinkle a few extra scallions and sesame seeds over the whole platter for a finished look.
These are the ultimate conversation-starting appetizer. They’re perfect for game day spreads, potlucks, cocktail hours, or even as a bold side for a Korean BBQ night at home. I love serving them alongside other “meld” dishes—maybe some gochujang-glazed wings, a crisp Asian slaw, and plenty of cold beer or a crisp, dry cider to cut through the richness.
Timing Tip: You can make the filling up to a day ahead. Keep it in a sealed container in the fridge, and pipe or spoon it into the whites an hour or two before your guests arrive. They’re best served cool, not ice-cold.
Make It Your Own: Fun Twists & Swaps
The beauty of this recipe is its adaptability. Play with it! Here are a few of my favorite riffs:
- The “Extra Umami” Bomb: Add 1 teaspoon of finely minced capers or a dash of fish sauce to the filling. It sounds wild, but it deepens the savory flavor incredibly.
- Smoky & Spicy: Mix a teaspoon of gochujang (Korean chili paste) into the mayo first. Garnish with crumbled, crispy bacon. It’s a Southern-Korean fusion that absolutely sings.
- Vegan-Friendly Fun: Use your favorite plant-based hard-boiled egg substitute (like agar-based “yolks”) or even halved small roasted potatoes or mushroom caps as the base. For the filling, blend well-drained kimchi with vegan mayo and a bit of soft tofu or mashed avocado for creaminess.
- Herb It Up: Fold in a tablespoon of finely chopped fresh cilantro or chives into the filling for a bright, green lift.
- The “Everything Bagel” Version: Top your finished eggs with a sprinkle of everything bagel seasoning instead of sesame seeds. The onion, garlic, and extra seeds are a fantastic match.
Chef’s Notes: A Few Parting Thoughts
This recipe has evolved from that first desperate pickle-relish substitution into a true Food Meld staple. The biggest lesson? Drain that kimchi! I’ve had a batch or two turn out a bit runny because I got lazy, and it’s a sad sight. Taking that extra 30 seconds to squeeze it in a paper towel makes all the difference between good and great.
Also, don’t be afraid of the kimchi juice. It’s liquid gold. If your filling seems a tad thick, that brine is your best friend for adjusting consistency and punch. Start small—you can always add more, but you can’t take it out. Most of all, have fun with it. Cooking should be a joy, not a stress. If you spill a little filling, if one egg white cracks—it doesn’t matter. The flavor will still be unforgettable.
FAQs & Quick Fixes
Q: My filling is a little runny. What can I do?
A: No worries! Pop the whole bowl of filling into the fridge for 20-30 minutes to firm up. If it’s still loose, you can mix in a tiny bit more mayo or a pinch of finely crushed plain breadcrumbs or panko to absorb excess moisture.
Q: My eggs are a nightmare to peel! Help!
A: This is the eternal struggle. The ice bath method is key. Also, using slightly older eggs (1-2 weeks old) helps. If you’re still stuck, try peeling them under a slow stream of cool running water—the water gets under the shell and membrane, making it easier.
Q: Can I make these ahead of time?
A: Absolutely! You can boil and peel the eggs up to 2 days ahead (keep them whole in a sealed container). The filling can be made 1 day ahead. Store separately and assemble within a few hours of serving for the best texture.
Q: What kind of kimchi is best?
A> Use any napa cabbage kimchi you enjoy! Traditional, vegan, or even a “white” (non-spicy) kimchi will work, though you’ll get less heat. I prefer a well-fermented, tangy kimchi for the most complex flavor.
A Quick Note on Nutrition
While I’m all about flavor first, I know some folks like to keep track. Here’s a general breakdown per deviled egg half (approximate, as ingredients vary):
- Calories: 80
- Protein: 3g
- Carbohydrates: 1g
- Fat: 7g
- Fiber: 0g
- Sugars: <1g
Eggs are a fantastic source of high-quality protein and essential nutrients. Kimchi, being a fermented food, brings beneficial probiotics to the party, which are great for gut health. The fats come primarily from the mayo and egg yolk, so using a high-quality mayonnaise you enjoy is my recommendation. Remember, this is meant to be a flavorful appetizer or shareable snack—a little goes a long way in terms of satisfaction!
Let’s Keep the Meld Going!
And there you have it, friends—Kimchi Deviled Eggs in all their funky, spicy, creamy glory. This recipe is a perfect example of what I love about cooking: taking something familiar, adding a dash of curiosity and a bold ingredient, and ending up with something that feels completely new, exciting, and totally irresistible.
These Kimchi Deviled Eggs are proof that the best party food doesn’t come from playing it safe—it comes from leaning into flavor and trusting your instincts. They’re bold without being intimidating, funky without being weird, and familiar enough that even deviled-egg purists find themselves reaching for another one. That creamy yolk base grounds everything, while the kimchi brings the spark that makes people stop mid-bite and say, “Okay…wow.”
That’s the Food Meld sweet spot. Comfort meets curiosity. Classic meets bold. And somehow, it all just works.
So the next time you’re tasked with bringing an appetizer, skip the predictable tray. Bring these instead. They’ll disappear fast, start conversations, and quietly earn you a reputation as the person who always brings the good stuff.
From my kitchen to your party table,
Jackson 🌶️🥚


