Let’s Bake Something Awesome: The Strawberry Danish Braid of Your Dreams
Hey friends, Jackson here from Food Meld. Let me ask you a question: have you ever walked past a bakery window, seen one of those impossibly beautiful, golden, fruit-filled braided pastries, and thought, “Wow, I could never make that”? I get it. I’ve been there. For the longest time, I put pastries like that on a pedestal, thinking they were the exclusive domain of professional bakers with years of training and magical ovens.
But here’s the secret I finally learned: the most show-stopping, “how-did-you-make-that?!” breakfast treats are often the ones built on a foundation of simplicity and smart shortcuts. That’s the entire spirit of Food Meld—taking bold, comforting flavors and making them approachable for your kitchen. And this Strawberry Danish Braid is the perfect poster child for that philosophy.
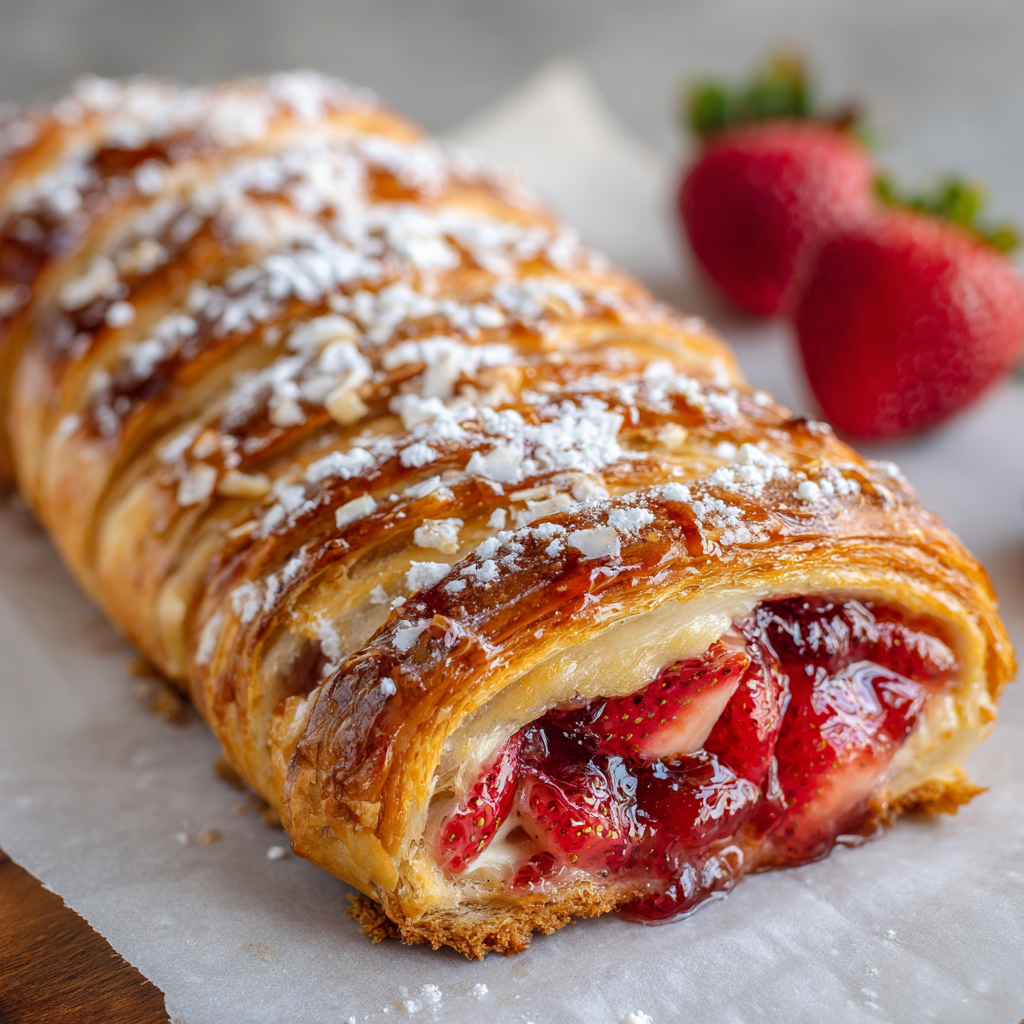
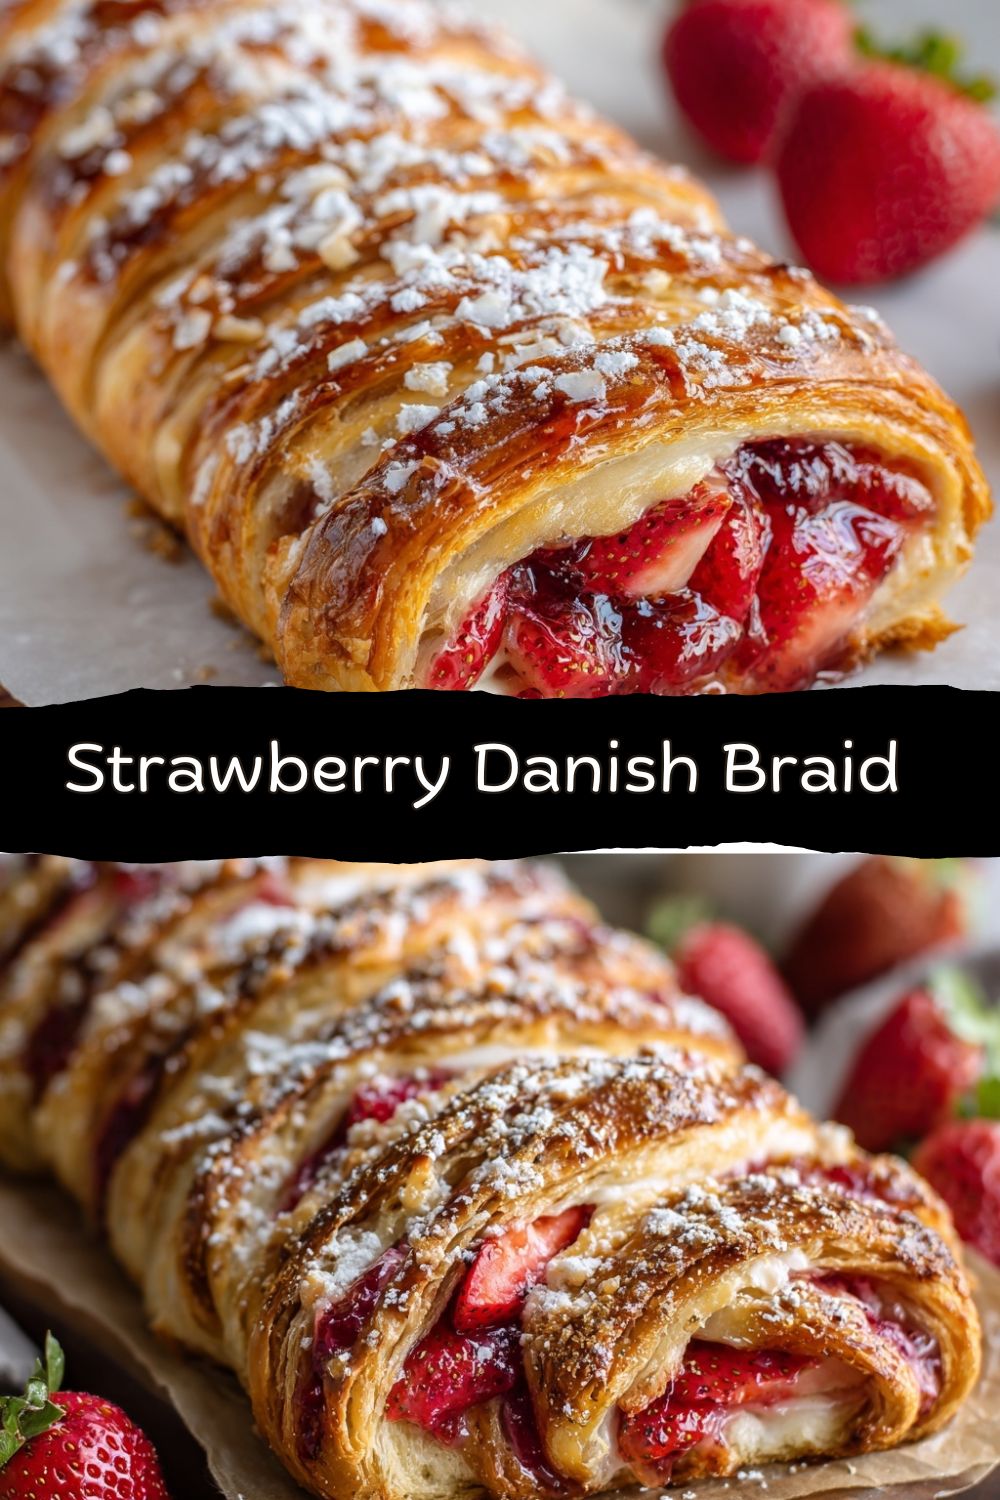
We’re talking about layers of buttery, flaky pastry, cradling a river of sweet-tart homemade strawberry jam and a ribbon of luscious vanilla cream cheese. It’s got the wow factor of a Parisian patisserie but the soul of a sunny, Southern berry pie. The best part? We’re using store-bought puff pastry as our secret weapon. No fussing with laminated dough for hours—just pure, unadulterated flavor and fun.
Whether you’re hosting a brunch, want to turn an ordinary Saturday into something special, or just need a baking project that guarantees smiles (and seconds), this braid is your answer. So, tie on your apron, clear some counter space, and let’s transform a few simple ingredients into a centerpiece that’s as joyful to make as it is to eat. Welcome to your new favorite baking adventure!
The Braid That Started It All: A Sticky, Sweet Memory
This recipe always takes me back to my grandma’s linoleum kitchen floor, sticky with jam and powdered sugar. She wasn’t a fancy baker, but she had a way of turning the ordinary into an event. One summer, when the strawberry patch out back was overflowing, she decided we were going to tackle a “fancy danish.” I was maybe ten, and the idea of “braiding” food seemed both ridiculous and brilliant.
Our first attempt was… let’s call it abstract. The filling oozed out the sides, my braiding was more like a haphazard bundle of sticks, and we definitely pulled it out of the oven a smidge too early. But when we sliced into it? Magic. The flavors were all there—the jammy berries, the rich filling, the flaky crust. It was messy and imperfect and absolutely delicious. That moment taught me something I’ve carried into every recipe I create: perfection is overrated, but flavor and fun are everything. This braid is my homage to that lesson—a little more refined in method, but with the same heart and glorious, berry-stained messiness.
Gathering Your Flavor Arsenal
Here’s everything you’ll need to create this masterpiece. I’ve added my notes alongside each one because knowing your ingredients is the first step to making a recipe truly yours.
- 1 sheet puff pastry, thawed: This is our golden ticket to flaky layers without the work. Find it in the freezer aisle. Chef’s Insight: Thaw it in the fridge overnight for the best results. If you’re in a pinch, leave it on the counter for 30-40 minutes—you want it pliable but still cold to the touch.
- 4 oz cream cheese, softened: The base of our creamy filling. Full-fat is my go-to for the richest texture. Sub Tip: For a tangier twist, swap in mascarpone. Need it dairy-free? A good-quality vegan cream cheese works beautifully.
- 2 tablespoons + 2 tablespoons sugar: Divided use. The first two tablespoons sweeten the cream cheese, the second goes into the strawberry jam. Chef’s Insight: I like using granulated white sugar here. Its neutral sweetness lets the strawberry and vanilla flavors shine.
- ½ teaspoon vanilla extract: The soul of the cream cheese filling. Pro Move: If you have a bottle of vanilla bean paste, use it! Those little black specks make it look (and taste) extra special.
- 1 cup fresh or frozen strawberries, chopped: The star of the show! Fresh is fantastic in season, but frozen berries are a year-round hero and often more budget-friendly. Chef’s Insight: No need to thaw frozen berries—just toss them right into the pan.
- 1 teaspoon lemon juice: A bright squeeze to balance the sweetness of the berries and help them release their juices. Fresh is best, but bottled is totally fine.
- 1 teaspoon cornstarch: Our thickener. This is what transforms juicy berries into a glossy, jammy filling that won’t make the pastry soggy. Sub Tip: An equal amount of all-purpose flour can work in a pinch.
- 1 egg (for egg wash): The secret to that deep, golden-brown, professional-looking shine. Pro Move: Whisk it with a teaspoon of water or milk for an easier-to-brush consistency.
- Optional: powdered sugar for dusting or a simple glaze: The finishing touch! A dusting of snow-white sugar is elegant, or mix ½ cup powdered sugar with 1-2 tablespoons of milk or lemon juice for a drizzle.
Let’s Build Your Braid: A Step-by-Step Journey
Don’t let the “braid” part intimidate you. We’re going to take it step by step, and I promise, it’s more forgiving than it looks. Think of it as edible origami!
Step 1: Make the Strawberry Jam Filling. In a small saucepan, combine your chopped strawberries, 2 tablespoons of sugar, lemon juice, and cornstarch. Stir it all together and cook over medium heat. You’ll watch the magic happen as the berries break down, the juices bubble, and the mixture transforms from watery to beautifully thick and glossy in about 5-7 minutes. Chef’s Hack: Use a potato masher halfway through if you want a less chunky jam. Once done, scrape it into a bowl and let it cool completely. This is crucial—a hot filling will melt our precious pastry layers!
Step 2: Whip Up the Cream Cheese Filling. While the jam cools, grab a medium bowl. Plop in your softened cream cheese, 2 tablespoons of sugar, and that lovely vanilla. Use a hand mixer or a firm whisk to beat it until it’s completely smooth and spreadable. No lumps allowed! Set this aside, too.
Step 3: Prepare the Puff Pastry Stage. Preheat your oven to 400°F (200°C). Line a baking sheet with parchment paper—trust me, this is non-negotiable for easy cleanup and no sticking. Unfold your thawed puff pastry sheet onto the parchment. If it needs a little help becoming a neat rectangle, gently roll it out with a rolling pin. You’re aiming for about a 10×14 inch shape.
Step 4: The Fill & Cut. Now, visualize your rectangle divided lengthwise into three equal strips. Spread the cream cheese mixture down the center strip only, leaving about an inch bare at the top and bottom. Then, carefully spoon your cooled strawberry jam on top of the cream cheese layer. Chef’s Hack: Use the back of the spoon to make a little well in the cream cheese to cradle the jam and prevent spillage.
Here comes the fun part! Using a sharp knife or pizza cutter, make slanting cuts from the filling edge to the pastry edge, about 1 inch apart, on both sides. You’ll have a series of strips or “fingers” on the left and right, with your beautiful filling mound safe in the middle.
Step 5: The Grand Braid. Starting at the top, fold the top inch of pastry down over the filling to seal it. Then, begin folding the strips over the filling, alternating left and right in a crisscross pattern. It will look like a cozy, overlapping blanket over your filling. Don’t stress about perfection—a little gap is charming! When you get to the bottom, fold the last bit of pastry up and tuck it in.
Step 6: Bake to Golden Perfection. Give your beautiful braid a generous brush with the egg wash. This is what gives it that irresistible shine and color. Slide the baking sheet into your preheated oven and bake for 20-25 minutes. You’re looking for the pastry to be deeply golden brown and puffed up like a proud chef’s hat. The smell will be incredible.
Step 7: The (Brief) Wait & The Finish. I know, the wait is the hardest part! Let the braid cool on the pan for at least 15-20 minutes. This allows the filling to set so it doesn’t run everywhere when you cut it. Then, finish it with your choice of a snowy dusting of powdered sugar or a simple glaze drizzle. Slice and serve warm, or at room temperature.
How to Serve This Showstopper
Presentation is part of the joy here! I love placing the whole braid on a big wooden cutting board or a simple white platter to let its beautiful shape take center stage. Slice it into thick pieces right at the table for that bakery-style drama.
This braid is a complete star on its own, but if you want to build a whole experience around it, here are my favorite pairings:
- For brunch: Serve with crispy bacon or savory breakfast sausages to balance the sweetness. A big pot of strong coffee or a pitcher of mimosas is non-negotiable.
- As an afternoon treat: A cup of Earl Grey tea or a cold glass of milk turns a slice into a moment of pure bliss.
- For dessert: Add a scoop of vanilla bean ice cream or a dollop of lightly sweetened whipped cream on the side. The warm pastry with cold cream is a next-level texture party.
Make It Your Own: Flavor Twists & Swaps
The basic blueprint of this braid is your canvas. Once you master the classic strawberry, the world is your flavor-filled oyster! Here are a few of my favorite twists:
- Mixed Berry Bliss: Swap the strawberries for a mix of raspberries, blueberries, and blackberries. Add a pinch of cinnamon to the cream cheese for a warm spice note.
- Lemon Blueberry: Use blueberry jam or fresh blueberries for the fruit. Add the zest of one lemon to the cream cheese filling. It’s bright, tangy, and unforgettable.
- Apple Cinnamon “Pie” Braid: Sauté 1 ½ cups of thinly sliced apples with butter, brown sugar, and cinnamon until tender. Use this as your fruit layer. It tastes like apple pie in flaky pastry form!
- Chocolate-Hazelnut: Skip the fruit and cream cheese. Spread the center with your favorite chocolate-hazelnut spread, then sprinkle with chopped toasted hazelnuts before braiding. A sprinkle of sea salt on top after baking is *chef’s kiss*.
- Savory Spinach & Feta: Go savory! Mix 4 oz of softened cream cheese with ½ cup crumbled feta, a handful of chopped fresh spinach (wilted and squeezed dry), and some black pepper. Omit the sugar and vanilla. A perfect brunch switch-up.
Jackson’s Kitchen Notes & Stories
This recipe has evolved in my kitchen more times than I can count. I’ve learned that a slightly thicker jam filling is better than a runny one (hence the cornstarch!), and that a really cold pastry before it hits the oven makes for the flakiest layers. One time, I was filming a video for the blog and got so caught up in chatting that I completely forgot to add the sugar to the cream cheese filling. We baked it anyway, sliced it, and drizzled it with extra honey. It was different, but still delicious! The point is, kitchens are for experiments. If your braid isn’t picture-perfect on the first try, I guarantee it will still taste amazing. The mess and the “oops” moments are where the best food memories (and sometimes new recipes) are born.
Your Questions, Answered
Q: My filling leaked out everywhere while baking! What did I do wrong?
A: This usually happens for one of two reasons: 1) The filling was too warm when you assembled the braid, or 2) The braid wasn’t sealed at the ends. Make sure both fillings are cooled, and don’t overfill the center. Also, remember to firmly press down that top and bottom flap of pastry to create a seal before you start braiding. A little leakage is normal and tasty; a river means adjust for next time!
Q: Can I make this ahead of time?
A: Absolutely! You have two great options. 1) Assemble and refrigerate: Put the fully assembled, unbaked braid on the pan, cover loosely with plastic wrap, and refrigerate overnight. In the morning, brush with egg wash and bake straight from the fridge (add 2-3 extra minutes). 2) Bake and reheat: Bake it completely, let it cool, and store covered at room temp for a day. Re-warm slices in a 300°F oven for 5-10 minutes to re-crisp the pastry.
Q: My pastry didn’t puff up very much. Why?
A: Puff pastry needs to be cold and the oven needs to be hot to create steam, which is what makes the layers “puff.” Ensure your pastry was still chilled (not room-temp soft) when it went in, and that your oven is fully preheated. Also, avoid using a glass or dark-colored baking sheet if possible, as they can affect browning and puffing.
Q: Can I use something other than cream cheese?
A: For sure! Ricotta cheese (drained well) mixed with a little sugar and lemon zest is a lovely, lighter alternative. A thick vanilla pastry cream is also a classic danish filling. Get creative with what you love!
Nutritional Information*
Here’s a general breakdown per slice (based on 8 slices, without optional glaze). Remember, this is a special treat, meant to be savored and enjoyed with friends and family!
- Calories: 240
- Total Fat: 15g
- Saturated Fat: 6g
- Cholesterol: 35mg
- Sodium: 160mg
- Carbohydrates: 22g
- Sugars: 8g
- Protein: 4g
*Please note: Nutritional information is an estimate provided by an online calculator and will vary based on specific ingredient brands and amounts used. It
will vary based on specific ingredient brands, portion sizes, and any substitutions you make.
Final Thoughts: Proof That You Can Make the Fancy Thing
And there you have it—the Strawberry Danish Braid of your dreams, baked right in your own kitchen. This is the kind of recipe I love sharing most because it flips that little voice in your head from “I could never make that” to “Wait… I totally nailed that.”
This braid isn’t about perfection. It’s about buttery layers, jammy strawberries, creamy filling, and the joy of pulling something beautiful from the oven that you made with your own hands. Maybe your braid is a little uneven. Maybe some filling sneaks out. That’s not a failure—that’s character. And I promise, once someone takes a bite, no one will be critiquing the braid lines.
So bake this for brunch. Bake it for friends. Bake it just for yourself on a quiet weekend morning. Let it remind you that impressive food doesn’t have to be complicated—it just has to be made with curiosity, confidence, and a little “what if?” energy.
If you try it, I’d love to see it. Tag me with #FoodMeld or leave a comment telling me how it turned out (and what twist you made your own). Until next time—keep mixing it up and baking boldly.
— Jackson 🍓🥐


