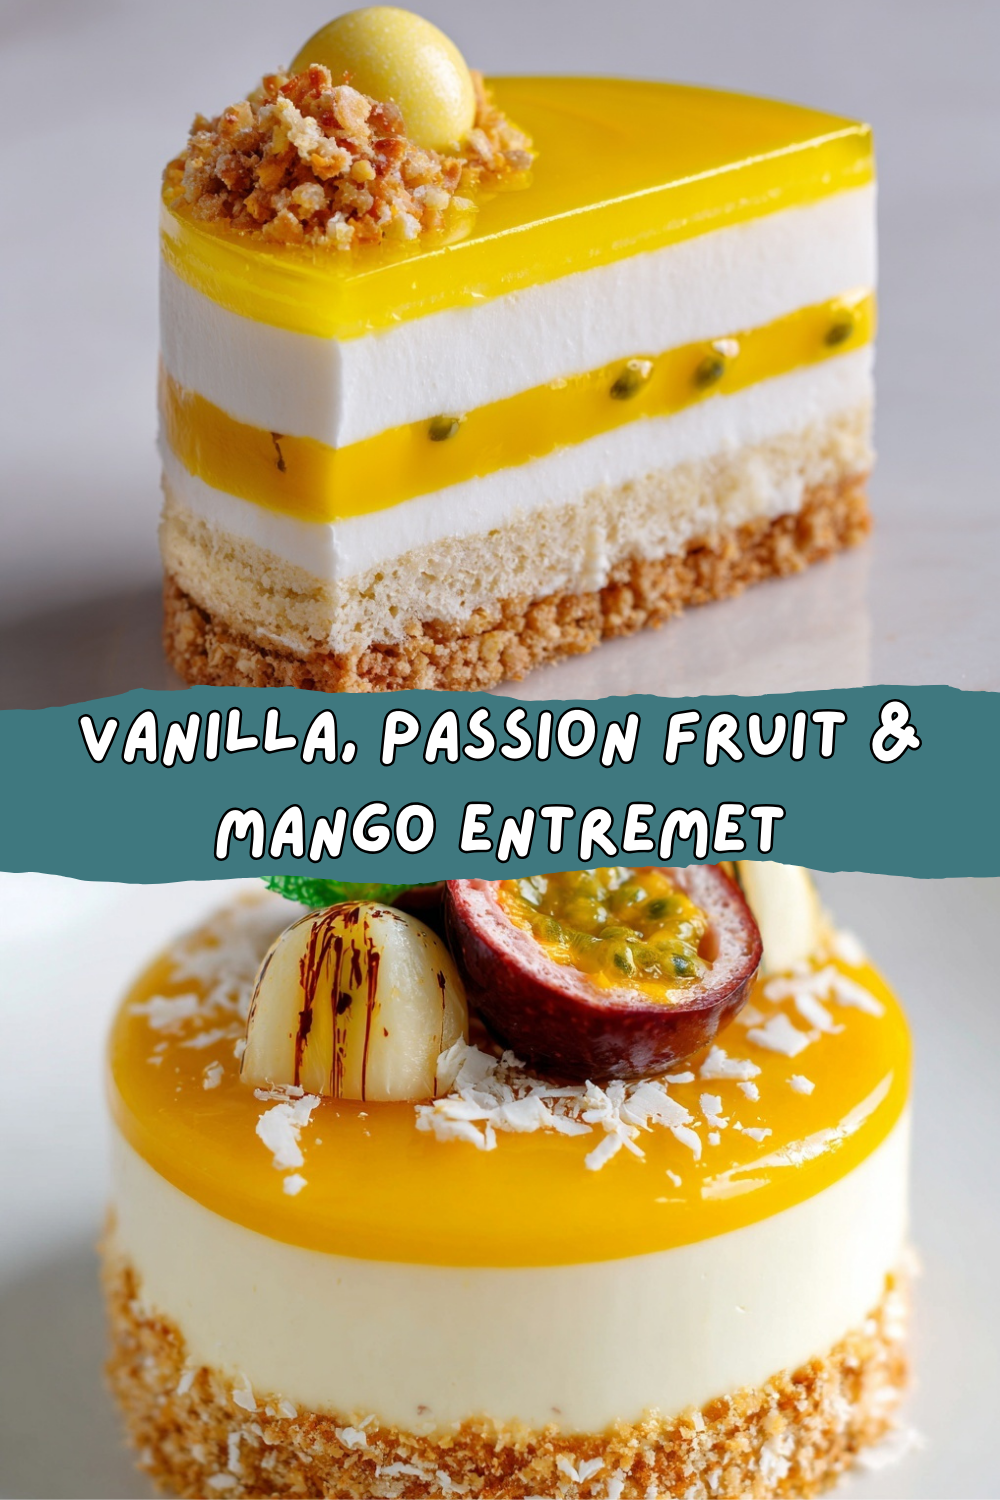
Sunshine on a Spoon: My Vanilla, Passion Fruit & Mango Entremet
Hey there, kitchen friend. Let’s talk about that moment. You know the one—when you take the last bite of a meal and think, “Wow. I wish I had something bright, something special, something just a little bit fancy to wrap this all up.” But then you picture yourself sweating over a complicated French pastry recipe, and you reach for the ice cream instead. I get it. I’ve been there. But what if I told you that “fancy” doesn’t have to mean “frustrating”? What if you could create a dessert that looks like it came from a patisserie window but feels like a fun, creative project in your own kitchen?
That’s exactly why I’m so excited to share this Vanilla, Passion Fruit & Mango Entremet with you today. This dessert is my edible definition of a perfect summer day. It’s all about balance: the creamy, comforting hug of vanilla mousse, the electric tang of passion fruit, the sweet, sun-ripened vibe of mango, and this irresistible, nutty-crunchy coconut base that gives you a little surprise in every bite. It’s light enough that you won’t feel weighed down, but every layer is so packed with flavor, it feels gloriously indulgent.
Now, I see you. You might be looking at the list of components and thinking, “Jackson, that’s a lot of steps.” And you’re not wrong! But here’s the Food Meld promise: we’re going to break it down, step-by-lovable-step. We’re not in a rush. We’re going to make components ahead, we’re going to taste as we go (chef’s privilege!), and we’re going to embrace the “fun, messy, and full of those ‘you’ve gotta try this’ moments” philosophy. This is a project of love, and the payoff? Unreal. So, grab your favorite mixing bowl, and let’s cook—well, more like assemble—something awesome together.
The Beach Trip That Inspired a Dessert
This recipe didn’t start in a fancy kitchen; it started on a rickety picnic table at a Florida beach, about fifteen years ago. My family and I had just spent the whole day in the sun, and we stopped at this tiny, no-frills fruit stand on the side of the road. They had these ripe mangoes that smelled like pure sunshine and a basket of wrinkly, purple passion fruits that looked otherworldly. We bought a bag of each, found a spot in the sand, and just dug in. The mango juice was running down to our elbows, and we were scooping the tart, seedy passion fruit pulp right from the shell. We paired it with these simple coconut macaroons my mom had packed.
That combination—the sweet, the tart, the creamy, the crunchy—it was a flavor fireworks show. It was messy, it was joyful, and it was the highlight of the day. This entremet is my attempt to bottle that feeling. To take that casual, perfect beach snack and dress it up for a dinner party, while keeping its soul completely intact. Every time I make it, I get a little glimpse of that sunny day. Food memory magic—that’s what we’re after.
Gathering Your Flavor Toolkit
Don’t let the professional terms scare you! An “entremet” is just a fancy word for a layered, molded dessert. Think of it as a flavor parfait with a PhD. Here’s everything you’ll need, with my tips to make it foolproof. Many of these purées and specialty items are easily found in the baking aisle of large grocery stores or online.
For the Coconut Crunch Base:
- White Chocolate (100g): Acts as our glue. It sets firm and adds a sweet creaminess. Chef’s Insight: Use a baking bar, not chips, for smoother melting.
- Toasted Coconut Flakes (50g): The star flavor! Toasting them yourself (350°F for 5-7 mins until golden) unlocks a nutty, deep coconut aroma you can’t buy.
- Feuilletine (50g): These are little crispy, crepe-like flakes. They add an incredible, delicate crunch. Easy Swap: Can’t find them? Crushed cornflakes or crispy rice cereal work in a pinch for texture.
For the Vanilla Madeleine Layer:
- Eggs (2 large), Sugar (70g), Butter (60g, melted & cooled), All-Purpose Flour (70g), Vanilla Bean Paste (1 tsp): This is a simple, classic sponge. Pro Tip: The vanilla bean paste gives you those gorgeous little specks and intense flavor. Pure extract works, too!
For the Exotic Crémeux (Fancy for “Creamy Filling”):
- Passion Fruit Purée (60g) & Mango Purée (60g): The heart of the tang! I love using frozen purées—they’re consistent and packed with flavor.
- Egg Yolks (2), Sugar (40g): This combo thickens our crémeux into a lush, custardy layer.
- Butter (50g, cubed & cold): Blended in at the end for unbelievable silkiness and richness.
For the Passion Mango Confit (A Firm Fruit Layer):
- Passion Fruit Purée (80g), Mango Purée (80g), Sugar (40g): Doubling down on our star flavors.
- Pectin NH or Gelatin (4g): This is what sets the confit so it cuts cleanly. Pectin gives a slightly jammier set, gelatin a clearer one. Both work!
For the Vanilla Mousse:
- Heavy Cream (300g): We’ll whip this to soft peaks for the airy body of the mousse.
- Milk (100g), Sugar (50g), Vanilla Bean (1 pod or 2 tsp paste): Our flavor base. Scrape those vanilla seeds!
- Gelatin Leaves or Powder (8g): Our stabilizer. If using leaves, soak in cold water first. Powder? Bloom it in a little cold water.
Let’s Build Some Magic: Step-by-Step
We’re going component-by-component. I recommend doing this over two days: Day 1 for the base, madeleine, crémeux, and confit. Day 2 for the mousse and assembly. It makes it a breeze!
Day 1: Prep Your Layers
1. Coconut Crunch Base: Melt the white chocolate gently (microwave in 20-sec bursts works). Stir in the toasted coconut and feuilletine. Divide this mixture among your entremet rings or silicone molds (about 2 inches in diameter), pressing it firmly and evenly into the bottom. This is your foundation! Chill until rock solid.
2. Vanilla Madeleine: Whisk eggs and sugar until pale and thick. Gently fold in the flour, then the melted butter and vanilla. Pour into a small, buttered loaf pan or madeleine mold. Bake at 350°F (175°C) for 12-15 minutes until golden and springy. Let cool, then trim to fit perfectly inside your molds, sitting right on top of the crunch base.
3. Exotic Crémeux: This is my favorite part. Whisk yolks and sugar. Heat the fruit purées just to a simmer. Slowly pour the hot purée into the yolk mixture, whisking constantly (this is called tempering—it prevents scrambled eggs!). Pour it all back into the pan and cook on low, stirring constantly, until it thickly coats the back of a spoon. Off heat, blend in the cold butter cubes until super smooth. Strain into a bowl, press plastic wrap on the surface, and chill until set, like a thick pudding.
4. Passion Mango Confit: Mix the sugar with your gelling agent (pectin or gelatin). Heat the purées, whisk in the sugar mix, and bring to a boil for a minute. Pour into a shallow dish (lined with plastic for easy removal) and chill until completely firm, like a fruit jelly.
Day 2: Mousse & The Grand Assembly
5. Vanilla Mousse: Whip your cream to soft peaks and pop it in the fridge. Heat milk, sugar, and vanilla (scraped bean and pod) until steaming. Off heat, stir in your bloomed gelatin until dissolved. Let this mixture cool until it’s just slightly warm to the touch (this is KEY—if it’s too hot, it’ll melt the cream). Slowly fold the vanilla milk into the whipped cream until you have a beautiful, smooth, cloud-like mousse.
6. Assemble the Towers: Have your molds with the set crunch base ready. Pipe or spoon a layer of the set crémeux over the base. Cut discs of the firm confit and place one on top. Now, pour or pipe the vanilla mousse to fill the mold to the top. Give it a little tap on the counter to settle. Freeze for at least 6 hours, preferably overnight. This is the secret to a clean unmolding!
7. The Grand Finale: To unmold, briefly run a warm towel around the outside of the rings or pop the silicone molds. If you’re feeling fancy, you can give them a quick coat of a simple mirror glaze or a dusting of freeze-dried mango powder. I love a simple decoration: little drops of leftover vanilla mousse and a tiny sprinkle of toasted coconut. Place them on a chilled plate and let them thaw in the fridge for 20-30 minutes before serving for the perfect creamy texture.
How to Serve This Showstopper
Presentation is part of the fun! Since these are individual desserts, you get to play. Serve them on simple white plates for a modern look, or on a vibrant, colorful plate to echo the tropical flavors. Let them thaw slightly so the mousse is creamy, not icy. A clean, hot knife dipped in water makes slicing through the layers a cinch. For an extra touch, you could add a tiny quenelle of mango sorbet on the side, or just a few fresh raspberries for a pop of color. The real magic is in revealing those beautiful, clean layers with your spoon. Encourage your guests to dig right through all of them for the full flavor meld experience!
Make It Your Own: Creative Twists
The template is yours to play with! Here are a few of my favorite spins:
- Berry Bliss: Swap the passion/mango for equal parts raspberry and lemon purée. Use a graham cracker crunch base instead of coconut.
- Tropical Piña Colada: Replace the mango purée with pineapple purée in both the crémeux and confit. Add a tiny splash of rum (or rum extract) to the mousse.
- Decadent Chocolate Passion: Make a dark chocolate crémeux instead of the fruit one. The contrast with the bright passion confit is insane.
- Dairy-Free Dream: Use a high-fat coconut milk to whip for the mousse (chill the cans first). Use dairy-free white chocolate and butter substitutes. It works beautifully!
- Easy Cheat’s Version: Skip the homemade confit and use a high-quality passion fruit or mango curd from a jar, chilled very firm. Simplify the crémeux into a simple fruit mousse layer.
Jackson’s Kitchen Notes
This recipe has evolved so much since my first attempt, which was… let’s say, structurally unsound. The mousse was too soft, the layers bled together, and it looked like a delicious beige puddle. The key lesson? Patience and temperature control. Letting each component set properly before adding the next is non-negotiable. And that tip about cooling the vanilla milk before adding it to the cream? I learned that the hard way after making sweet vanilla soup. Now, I always keep a bowl of the fruit purées in my freezer—they’re my secret weapon for impromptu “wow” desserts. Remember, even if a layer isn’t perfect, it will still taste incredible. Flavor first, always.
FAQs & Saving the Day
Q: My mousse is runny! What happened?
A: Two likely culprits: 1) The gelatin-milk mixture was too hot when folded into the cream, melting it. Or 2) The cream was under-whipped. It should be at soft peaks—thick but still silky. If it’s runny, you can try re-whipping it after it’s been in the fridge for 20 mins, but prevention is best!
Q: Can I make this in one big cake mold instead of individual rings?
A: Absolutely! Use a 6-inch springform pan. Line the sides with an acetate collar for super clean edges. Just note the freezing time will be longer (overnight).
Q: How far in advance can I make this?
A: This is the best part! Once assembled and frozen solid, the entremets will keep beautifully, well-wrapped, for up to 2 weeks. Thaw in the fridge for that perfect 20-30 minutes before serving.
Q: My confit didn’t set firmly. Can I fix it?
A> If it’s still loose after chilling, gently re-melt it and add a tiny bit more bloomed gelatin (1/2 tsp more). Re-chill. It’s a very forgiving component!
A Note on Nutrition & Indulgence
Let’s be real: this is a celebratory dessert, a labor of love meant to be savored. It’s rich, but the portions are intentionally individual and satisfying. The estimated nutrition per serving (~360 kcal) comes from using real ingredients: the fats from cream and butter carry flavor and create that luxurious mouthfeel, the sugars balance the intense tartness of the passion fruit, and the eggs provide structure and protein. Because the flavors are so vibrant and the texture is light, you feel truly satisfied without needing a huge slab. It’s about quality, not quantity. Enjoy every single bite guilt-free—you made it from scratch!
Your Turn to Create
And there you have it! Your guide to creating a dessert that’s sure to spark some serious “how did you make this?!” conversations. Remember, cooking—and especially baking—is an adventure. Some layers might be lopsided, your first unmolding might be a bit messy (mine always are!), but the flavor will be 100% there. That’s the Food Meld spirit. It’s not about perfect Instagram pics (though you’ll definitely get them); it’s about the joy of creating something beautiful and delicious with your own hands. So, embrace the process, taste everything along the way, and most importantly, share it with people you love. I can’t wait to hear how yours turns out. Tag me @FoodMeld if you share it—I love seeing your kitchen wins! Now, go forth and melt some flavors.
Happy cooking,
Jackson