Rolled Taco Dip: Your New Secret Weapon for Epic Gatherings
Hey there, Food Meld fam! Jackson here. Let’s talk about that magical moment at any party or game day spread. You know the one. It’s when someone puts down a dish, and within minutes, a happy, hungry crowd forms around it like moths to a delicious, cheesy flame. There’s a buzz, a flurry of chip-grabbing, and then… the ultimate compliment: “Oh my gosh, who made THIS? I need the recipe!”
Friends, that dish? That’s the power move we’re making today. I’m bringing you my version of the legendary Rolled Taco Dip. Now, don’t let the name fool you—there’s no tedious rolling involved here. We’re taking all the insane flavor of your favorite crunchy taquitos or flautas and turning it into a glorious, scoopable, layered dip situation. It’s bold, it’s comforting, and it’s got that “what if we tried this?” energy I live for: seasoned beef, a tangy, creamy layer, all the melty cheese, and those fresh, crunchy toppings that make every bite an adventure.
This isn’t just another dip. It’s a centerpiece. It’s the conversation starter. And the best part? It comes together in about 25 minutes with mostly pantry staples. Whether you’re feeding a hungry crew during the big game, needing a superstar for potluck day, or just facing a serious Tuesday night craving, this dip is your answer. So, grab your favorite skillet, and let’s cook up some fun—and a whole lot of flavor. Let’s get into it!
The Backyard Potluck That Started It All
This recipe takes me straight back to my aunt’s sprawling backyard in Texas. Every summer, she’d throw this massive, chaotic, wonderful potluck. The tables would groan under the weight of deviled eggs, three-bean salads, and at least four different versions of potato salad. But the spot everyone fought over? The “Snack Table.” It was the kingdom of chips and dip.
One year, my cousin Mia showed up with this unassuming glass dish. She called it her “Lazy Flauta Dip.” She layered it right there on the tailgate of her truck. I remember watching, skeptically, as she spread something creamy, then this amazing-smelling taco meat, and just piled on the cheese and veggies. It looked like a taco salad, but… deconstructed and dippable. The second she set it down, it was like a magnet. We demolished it. I spent the rest of the party begging her for the “method.” She laughed and said, “Jackson, there is no method! You just mix what tastes good!” That philosophy—simple, real, and packed with flavor—stuck with me. My Rolled Taco Dip is my tribute to that backyard chaos, that spirit of sharing, and the truth that the best food often comes from just mixing what tastes awesome together.
Gathering Your Flavor Arsenal
Here’s everything you need to build your dip masterpiece. I’ve added my little chef insights and swap ideas so you can make it perfectly yours.
- 1 lb ground beef (80/20 blend is perfect): This is our flavor foundation. The little bit of fat adds so much richness. Chef’s Swap: Ground turkey, chicken, or even a plant-based crumble work beautifully here for a lighter or vegetarian twist.
- 1 packet taco seasoning: Our instant flavor bomb. I use a standard 1 oz packet. Chef’s Insight: If you have a homemade blend, use about 3 tablespoons. It’s a great way to control the salt and heat!
- ½ cup water: This helps the seasoning cling to the meat and creates a saucy consistency that won’t dry out in the dip.
- 1 cup shredded cheddar or Mexican cheese blend: We’re using this in two places! Half gets mixed into the cream layer for gooey pockets, half gets sprinkled on top for that iconic melt. Chef’s Tip: For the love of all things cheesy, shred it yourself if you can! Pre-shredded bags have anti-caking agents that can make melting less smooth.
- 1 cup sour cream & 4 oz cream cheese, softened: The dynamic duo of creaminess! The sour cream brings tang, the cream cheese brings lush body and helps everything hold together. Key move: Let that cream cheese sit out for 30 minutes. Softening it is non-negotiable for a silky, lump-free blend.
- ½ cup salsa or Rotel (drained slightly): This is where personality comes in! Salsa gives a smoother flavor, while Rotel (diced tomatoes with green chilies) gives little pops of heat and texture. I’m a Rotel fan for that extra “zing.”
- ½ cup chopped green onions, ½ cup diced tomatoes, 1 cup shredded lettuce (optional): The Freshness Brigade! The lettuce adds a great crunch but can get soggy if the dip sits for hours, so it’s optional. The tomatoes and green onions are a must for me.
- Your Favorite Tortilla Chips for Serving: The vehicle for flavor! Get a sturdy chip—a hearty restaurant-style tortilla chip or a slightly thicker round chip can handle a hefty scoop without breaking.
Let’s Build This Flavor Layer Cake!
Okay, team. Aprons on, music up. We’re doing this in stages, and it’s so simple you’ll have it memorized after one try.
Stage 1: The Flavor-Packed Base
Grab your trustiest skillet and put it over medium-high heat. Crumble in your ground beef. We’re going to cook this, stirring occasionally, until it’s beautifully browned and no pink remains. This is where we build our first layer of flavor, so don’t rush it! Once it’s done, carefully drain off the excess fat. Now, sprinkle that taco seasoning all over the beef, pour in the ½ cup of water, and give it a good stir. Reduce the heat to a simmer and let it bubble away for 3-5 minutes, until the sauce thickens and coats every bit of meat. Take it off the heat and let it cool for a few minutes. Why cool it? So it doesn’t melt our creamy layer immediately when we assemble! Trust me on this.
Stage 2: The Iconic Creamy Layer
While the beef is cooling, let’s make magic in a bowl. In a medium mixing bowl, plop in your softened cream cheese, sour cream, and that ½ cup of salsa or Rotel. Now, here’s a pro tip: reserve a handful (about ¼ cup) of your shredded cheese and toss it in here too! It makes the cream layer even more decadent. Use a hand mixer or just some serious elbow grease with a spatula to beat it all together until it’s completely smooth, creamy, and uniform. No cream cheese lumps allowed!
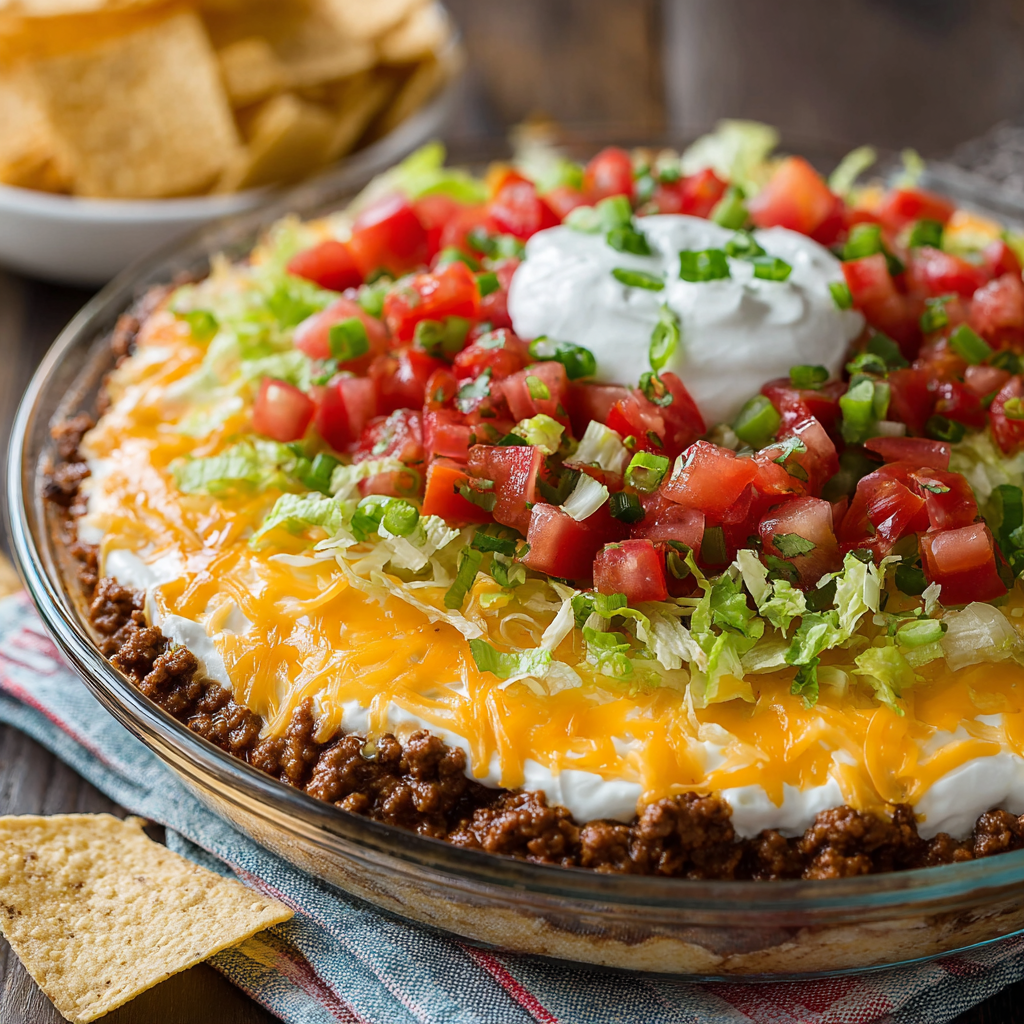
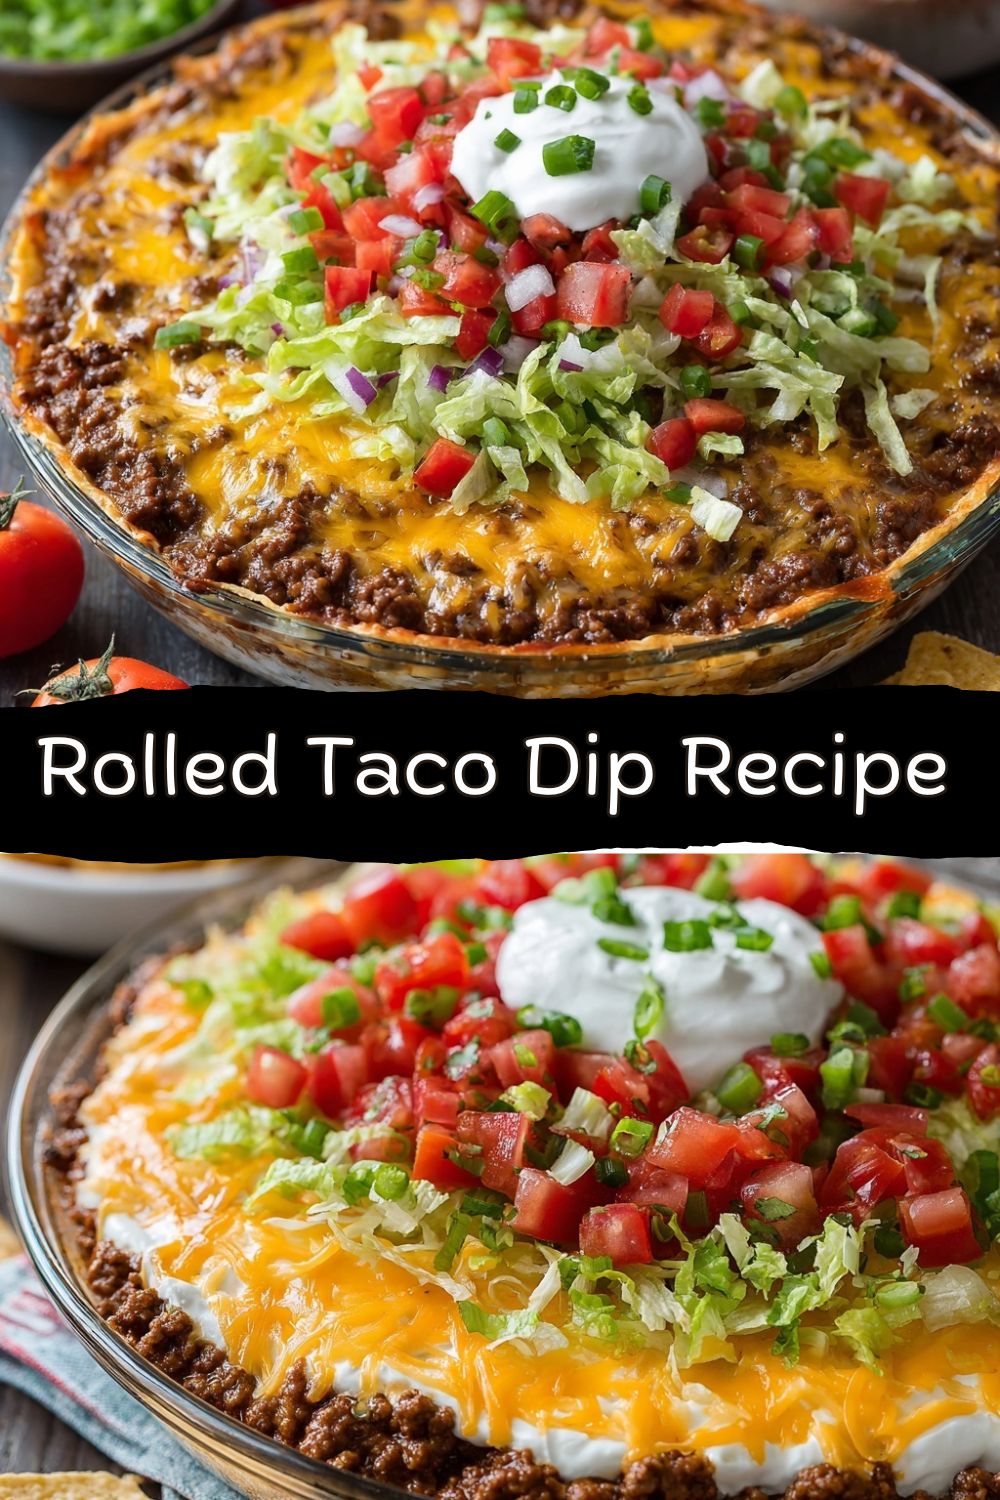
Stage 3: The Grand Assembly
Get your serving dish—a 9×9 square dish or a 9-inch pie plate works great for height, but a 9×13 will give you more surface area for chips to access. First, spread the entire creamy mixture evenly across the bottom. This is our blank canvas. Next, spoon the slightly cooled taco meat over the cream layer and spread it into an even layer. Now, the cheese! Sprinkle the remaining shredded cheese generously over the warm meat—the residual heat will start to melt it just perfectly. Finally, artfully scatter your green onions, diced tomatoes, shredded lettuce (if using), and any other toppings (olives, jalapeños, you do you!).
Stage 4: The Crucial Patience Step
I know, I know. You want to dive in. But cover that beautiful creation with plastic wrap and let it chill in the fridge for at least 15-30 minutes. This lets the flavors really get to know each other and firms up the layers, making it the perfect scoopable consistency. It’s worth the wait, I promise.
How to Serve It Like a Pro
Presentation is part of the fun! Don’t just plop the dish on the table. Give it a little love. I like to take it out of the fridge about 10 minutes before serving to take the extreme chill off. Surround the dish with an abundant, colorful arsenal of tortilla chips. Mix it up—some sturdy rounds, some triangle chips, maybe even a few scoops on the side. Garnish the top with a final sprinkle of fresh cilantro or a few extra jalapeño slices for color. For a bigger party, I sometimes set out small bowls of extra toppings like guacamole, pico de gallo, or hot sauce so folks can customize their dip experience. Place it in the center of everything and watch the magic happen.
Mix It Up! Your Dip, Your Rules.
The beauty of this framework is its flexibility. Here are a few of my favorite twists:
- The “Seven-Layer” Upgrade: Add a layer of refried beans (mixed with a little hot sauce) under the beef, and a layer of chunky guacamole on top of the beef before the cheese. Instant classic.
- Buffalo Chicken Swap: Use shredded rotisserie chicken mixed with ½ cup of buffalo sauce instead of taco beef. For the creamy layer, use ranch dressing mixed with the cream cheese. Top with blue cheese crumbles and celery sticks for serving!
- Fully Loaded Nacho Style: After adding the cheese, pop the whole dish under the broiler for 2-3 minutes until the cheese is bubbly and browning. THEN add your cold toppings. Serve immediately for a hot-and-cold sensation.
- Lighter & Brighter: Use ground turkey, light sour cream, and neufchâtel cheese. Load up on the fresh tomato, lettuce, onion, and even some corn or black beans for extra fiber.
- “Spicy Meld” Special: Use spicy ground sausage, a hot taco seasoning packet, and pepper jack cheese. Mix chopped pickled jalapeños into the cream layer. It’s not for the faint of heart!
Jackson’s Kitchen Notes & Stories
This recipe has evolved more than my music taste since that first backyard potluck. I’ve learned that letting the meat cool is the secret to distinct layers. I’ve also learned—the hard way—that using a super watery salsa can make the cream layer runny. Drain it well! One funny fail: I once tried to “get ahead” and assembled the entire dip the night before a football party, including the lettuce. Big mistake. We ended up with a delicious, but sadly soggy, salad-dip hybrid. Now I prep the components separately and do the final assembly an hour before guests arrive. Live and learn, right? The dip forgives almost everything.
Your Questions, Answered
Q: Can I make this ahead of time?
A: Absolutely! You can cook the meat and make the cream mixture up to 2 days ahead. Store them separately in the fridge. Assemble, top with cheese and veggies, and chill 1-2 hours before serving for the absolute best texture.
Q: My cream cheese layer is lumpy! How do I fix it?
A: The #1 culprit is not-softened cream cheese. If you’re in a pinch, you can soften it in the microwave in 10-second bursts. If you have lumps, let the whole mixture sit for 10 more minutes to warm up slightly, then beat it vigorously again. A hand mixer is your best friend here.
Q: The dip seems watery after sitting out. What happened?
A: This usually comes from the tomatoes/salsa or the lettuce releasing liquid. To prevent this, always drain your salsa/Rotel well in a fine mesh strainer, and consider adding the lettuce only to the portion you’ll eat immediately, or serving it on the side.
Q: Can I bake this dip?
A: You bet! Assemble without the fresh toppings (tomato, lettuce, green onion). Cover with foil and bake at 350°F for 20 minutes, then uncover, add the rest of the cheese, and bake for 5-10 more minutes until bubbly. Add cold toppings after baking.
Nutritional Information (A Peek Under the Hood)
Please note: This is an estimated breakdown for informational purposes, based on the standard recipe using 80/20 beef and full-fat dairy. Actual values will vary with specific ingredients and substitutions.
Per Serving (Approx. ⅛ of the recipe, not including chips):
Calories: ~320 | Protein: 16g | Carbohydrates: 10g | Dietary Fiber: 1g | Sugars: 3g | Fat: 24g (Saturated Fat: 12g) | Cholesterol: 80mg | Sodium: ~650mg*
*The sodium is largely from the taco seasoning packet. Using a low-sodium packet or homemade blend can significantly reduce this.
Let’s Keep the Party Going!
And there you have it! Your new secret weapon for stress-free, flavor-maximum entertaining. This Rolled Taco Dip is more than just a recipe; it’s a reminder that the best food brings people together, sparks joy, and doesn’t have to be complicated to be incredible. I love seeing your spins on it, so when you make it, tag me @FoodMeld and show me your creations! Did you add black beans? Try it with chorizo? Use rainbow chips? I want to see it all.
Remember, in our kitchens, there are no mistakes, just delicious discoveries. So have fun with it, make it yours, and enjoy every messy, cheesy, unforgettable bite. Until next time, keep melding those flavors, friends!
Happy dipping,
Jackson


