Your New Favorite Side Dish is Rooted in Flavor
Hey friends, Jackson from Food Meld here. Let’s talk about the unsung heroes of the produce aisle: the humble, often dusty, incredibly delicious root vegetables. I’m telling you, if you’ve ever thought parsnips were just “white carrots” or beets were a one-way ticket to earthy-town, you are in for a massive, flavor-packed surprise. We’re about to transform these kitchen rockstars into a side dish so good, it might just steal the show from the main course.
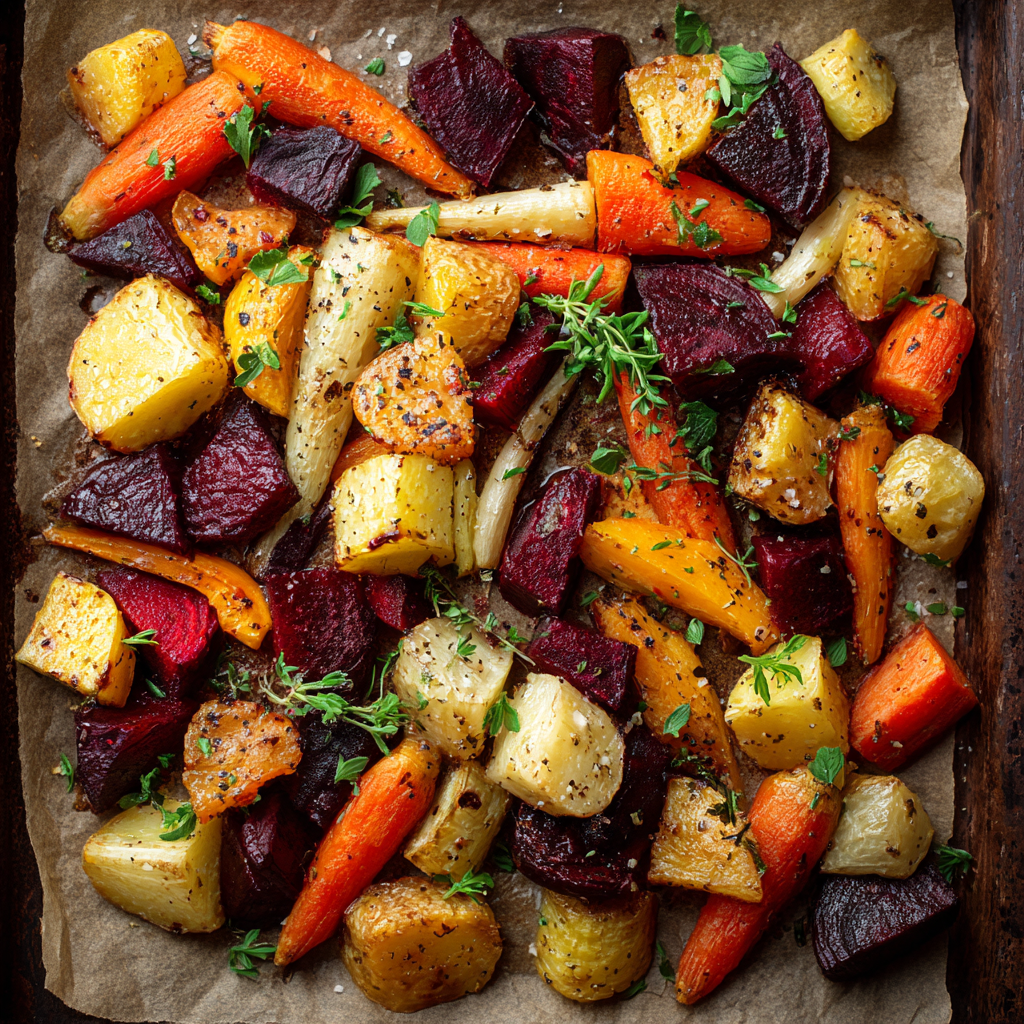
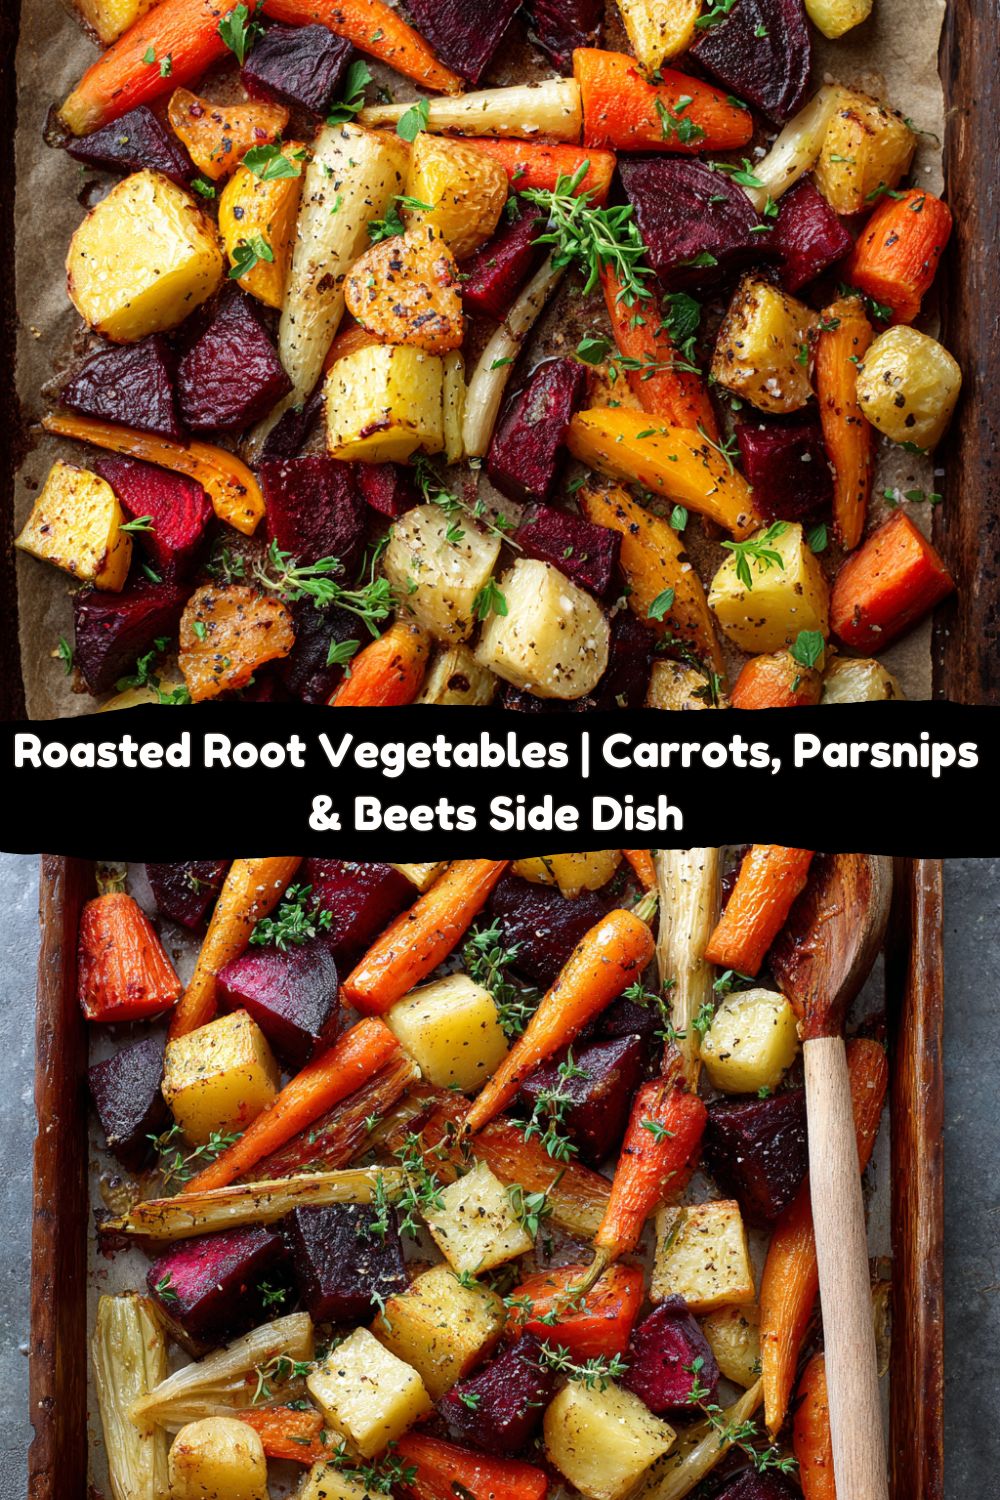
Picture this: a sheet pan loaded with vibrant orange carrots, creamy parsnips, and deep ruby-red beets. They all get a slick of good olive oil, a generous sprinkle of salt and pepper, and a kiss of herbal thyme. Then, we let the oven work its magic. What comes out is nothing short of a masterpiece. The edges caramelize into crispy, sweet bits, while the insides become meltingly tender. It’s a symphony of textures and natural sugars that will make your taste buds sing. This isn’t just a recipe; it’s a lesson in how a few simple ingredients and a little heat can create something truly unforgettable. So, grab your favorite knife and let’s turn your kitchen into a flavor lab. We’re roasting up a storm today!
A Pan of Roots and Memories
This recipe takes me right back to my grandma’s kitchen in Georgia. It wasn’t fancy, but man, could that woman cook. Her garden was a jungle of goodness, and in the fall, she’d march out back and pull up these gnarly, dirt-caked treasures. As a kid, I’d wrinkle my nose at the beets—they stained everything!—but I’d always hang around because I knew what was coming.
She’d roast them in her ancient, well-seasoned sheet pan, and the smell that would waft through her screen door was pure magic. It was the smell of warmth, of home, of love. She’d always sneak me a piece of caramelized parsnip straight from the pan, and it was like tasting candy from the earth. That’s the power of food, right? It’s not just fuel; it’s a time machine. This dish is my modern, slightly tweaked homage to her. It’s my way of keeping that memory alive and sharing that same feeling of comfort with you. Every time I make it, I can almost hear her saying, “Don’t be shy with the salt, boy!”
Gathering Your Root Vegetable All-Stars
This is where the fun begins. The beauty of this dish is its simplicity, so using the best ingredients you can find makes a world of difference. Here’s your shopping list:
- 2 parsnips, peeled and cut into chunks: Don’t skip the parsnips! They look like pale carrots but have a unique, almost nutty and spicy sweetness that becomes incredible when roasted. Chef’s Insight: Look for parsnips that are small to medium-sized; the huge ones can sometimes have a tough, woody core you might want to cut out.
- 3 carrots, peeled and cut into chunks: The classic. They bring a familiar, hearty sweetness and that gorgeous orange color to the party. Substitution Tip: Any color carrot works! Try a bunch of rainbow carrots for an extra visual pop.
- 2 medium beets, peeled and cut into wedges: The star of the show for me. They have an earthy, profound sweetness that is just unmatched. Chef’s Warning: They will stain your hands and cutting board! I like to wear disposable gloves when handling them. It’s a game-changer.
- 2 tablespoons olive oil: This is our cooking medium and what helps everything get crispy and golden. Use a good extra-virgin olive oil for the best flavor.
- 1 teaspoon fresh thyme (or ½ tsp dried): Fresh is fantastic if you have it—it gives a lovely, fragrant piney note. But dried thyme works beautifully too in a pinch! Substitution Tip: Rosemary, herbes de Provence, or even a little dried oregano would be delicious here.
- Salt and black pepper, to taste: Non-negotiable. Season generously! The salt will heighten all the natural flavors and help draw out moisture for better caramelization.
- Optional: drizzle of balsamic glaze for serving: This is my secret weapon. A tiny drizzle right at the end adds a hit of tangy sweetness that cuts through the earthiness and makes the whole dish sing. Highly recommend!
Let’s Get Roasting: Your Foolproof Guide
Okay, team. Let’s fire up the oven and make some magic. Follow these steps, and you’ll have a perfect pan of roasted goodness every single time.
Step 1: Preheat and Prep. Crank that oven to 400°F (200°C). This high heat is crucial for getting those crispy edges we’re after. While it’s heating, line a large, rimmed baking sheet with parchment paper. This isn’t just for easy cleanup (though that’s a huge bonus); it also prevents any beet juice from staining your pan and helps everything cook evenly without sticking. Chef’s Hack: If you want EXTRA crispiness, preheat the empty sheet pan in the oven for 5-10 minutes. Adding the veggies to a hot pan gives them an instant sear.
Step 2: The Chop Shop. This is the most important step for even cooking. Peel all your veggies. Then, chop your parsnips and carrots into roughly 1-inch chunks. For the beets, I like to cut them into wedges—cut the beet in half, then each half into quarters or sixths, depending on size. The goal is to get everything to a similar size and shape so they cook at the same rate. Nobody wants a burnt carrot next to a rock-hard beet! Chef’s Insight: Don’t stress about perfection. Rustic, uneven chunks have more character and more surface area for browning!
Step 3: The Flavor Toss. Dump all your beautiful chopped veggies into a large mixing bowl. Drizzle with the 2 tablespoons of olive oil. Sprinkle over the thyme, a good amount of salt (start with ¾ tsp kosher salt), and a few cracks of black pepper. Now, get your hands in there! Toss everything together until every single piece is glistening with oil and coated in seasoning. This hands-on approach is the best way to ensure even coverage. Chef’s Tip: If you’re worried about beet stains, you can toss the beets in a separate, small bowl with a little oil first, then add them to the other veggies. But I’m a rebel and just go for it!
Step 4: Spread & Roast. Pour the veggies onto your prepared baking sheet and spread them out into a single, even layer. This is key! If you crowd the pan, the veggies will steam instead of roast, and we won’t get that beautiful caramelization. Give them some space to breathe. Pop the pan into your preheated oven and set a timer for 20 minutes.
Step 5: The Halfway Flip. When the timer goes off, pull the pan out (carefully!). You’ll already see some browning happening. Use a spatula to stir and flip the veggies. This ensures that all sides get a chance to hit the hot pan and turn golden brown and delicious. Put the pan back in the oven for another 15-20 minutes.
Step 6: The Grand Finale. Your veggies are done when they are tender enough to easily pierce with a fork and have deep, caramelized spots. The total time is usually between 35-40 minutes. If you’re using the balsamic glaze, drizzle it over the hot veggies right on the pan. It will sizzle and create a gorgeous, light glaze. Serve immediately!
How to Serve These Roasted Beauties
This dish is a total showstopper, so let’s plate it like one! I love serving these veggies family-style, right in the middle of the table on a big, beautiful platter. The vibrant colors are part of the appeal, so don’t hide them!
For a simple weeknight dinner, they are the perfect hearty side next to a perfectly seared chicken breast, a juicy pork chop, or a piece of flaky white fish like cod or halibut. The sweetness of the veggies pairs amazingly with the savory protein.
For a holiday or fancy dinner party, they are an absolute must. They add a stunning pop of color to a traditional Thanksgiving or Christmas spread. Pair them with roast turkey, glazed ham, or a herb-crusted prime rib. They also shine on a vegetarian or vegan feast plate alongside a hearty lentil loaf or some creamy mashed potatoes.
And don’t forget the leftovers! Toss them while still cold into a bed of greens for a killer salad (a little goat cheese and walnuts take it over the top), or warm them up and fold them into a frittata or grain bowl for an easy lunch.
Mix It Up: Creative Twists on the Classic
Once you’ve mastered the base recipe, the world is your oyster! Here are a few of my favorite ways to play with this dish:
- The Spice Route: Add ½ teaspoon of smoked paprika and a pinch of cayenne pepper to the oil before tossing. It gives a warm, smoky, slightly spicy vibe that is incredible with the sweet veggies.
- Maple-Glazed Wonder: Whisk 1 tablespoon of pure maple syrup into the olive oil before tossing with the veggies. The maple caramelizes in the oven and creates an insanely good sweet and savory glaze. Perfect for the holidays!
- Allium Lover’s Dream: Add a whole peeled shallot, cut into quarters, or a small red onion, cut into chunks, to the mix. They roast up and become sweet and tender. For the last 5 minutes of cooking, sprinkle over 2 tablespoons of raw pepitas (pumpkin seeds) for a nutty crunch.
- Citrus Zest: Right after they come out of the oven, zest a little orange or lemon right over the top. The bright, fresh citrus aroma cuts through the richness and elevates the whole dish instantly.
- Root Vegetable Swap: Don’t limit yourself! Sweet potatoes, turnips, rutabaga, or even chunks of delicata squash (seeds removed) are all fantastic additions or substitutions. Use what looks good at the market!
Jackson’s Kitchen Notes
This recipe has been a staple on my table for years, and it’s evolved in the most delicious ways. I’ll never forget the first time I made it for a big potluck. I was so proud, but I made one crucial mistake: I didn’t toss the beets separately. The entire pan turned a shocking, uniform shade of pink! It was still delicious, but it definitely got some looks. Now I know the separate-toss trick, or I just embrace the pink—it’s all flavor in the end!
Over time, I’ve learned that the type of sheet pan matters. A good, heavy-duty, light-colored pan conducts heat evenly and prevents burning. If you only have a thin, dark pan, just keep a closer eye on it toward the end of cooking. Trust your eyes and your fork more than the timer. Cook until they’re perfect for YOU.
Your Questions, Answered
Q: My vegetables came out soggy instead of crispy. What did I do wrong?
A: The most common culprit is overcrowding the pan! If the veggies are piled on top of each other, they steam instead of roast. Use two pans if you need to, or roast in batches. Also, make sure your oven is fully preheated—a hot oven is non-negotiable for that initial sear.
Q: How do I prevent the beets from staining all the other vegetables?
A: Ah, the classic beet dilemma! You have two options: 1) Toss the beets with a bit of oil in a separate small bowl first, then add them to the other tossed veggies on the sheet pan and give everything one very gentle mix. Or 2) Roast the beets on their own corner of the pan, slightly separated from the carrots and parsnips. They’ll still taste amazing together.
Q: Can I make this ahead of time?
A: Absolutely! You can chop the vegetables a day ahead of time. Keep them submerged in water in airtight containers in the fridge to prevent browning (this is especially good for parsnips and potatoes). You can also fully roast them, let them cool, and store them in the fridge for 3-4 days. Reheat in a 350°F oven for 10-15 minutes to bring back the crispiness. Microwaving will make them soft.
Q: My veggies are cooking unevenly. Some are burnt, some are raw!
A: This almost always comes down to the size of the chop. Try to be more consistent with your knife cuts next time. Also, that halfway stir is CRUCIAL for moving the pieces around from the hot outer edges of the pan to the cooler center. Don’t skip the stir!
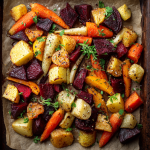
Roasted Root Vegetables (Parsnips, Carrots & Beets)
- Total Time: 55 minutes
- Yield: 4 - 6 1x
Description
Colorful, earthy, and naturally sweet, these roasted root vegetables are a vibrant side dish that celebrates seasonal produce. Caramelized edges, tender centers, and a touch of olive oil and herbs make this one a standout on any fall or holiday table.
Ingredients
2 parsnips, peeled and cut into chunks
3 carrots, peeled and cut into chunks
2 medium beets, peeled and cut into wedges
2 tablespoons olive oil
1 teaspoon fresh thyme (or ½ tsp dried)
Salt and black pepper, to taste
Optional: drizzle of balsamic glaze for serving
Instructions
Preheat oven to 400°F (200°C). Line a baking sheet with parchment paper.
In a large bowl, toss parsnips, carrots, and beets with olive oil, thyme, salt, and pepper.
Spread evenly on the baking sheet without overcrowding.
Roast for 35–40 minutes, stirring halfway, until tender and golden-brown at the edges.
Finish with a drizzle of balsamic glaze, if using. Serve warm or at room temperature.
- Prep Time: 15 minutes
- Cook Time: 40 minutes
Nutrition
- Calories: 120 / Serving
- Fat: 6g / Serving
- Carbohydrates: 15g / Serving
- Protein: 2g / Serving
Eating Well, Feeling Good
This dish isn’t just a treat for your taste buds; it’s a powerhouse of nutrition. Root vegetables are packed with vitamins, minerals, and fiber. Here’s a quick breakdown of the goodness you’re getting:
Carrots are famous for their beta-carotene (which converts to Vitamin A), great for eye health and immunity. Parsnips are an excellent source of Vitamin C, K, and folate, along with both soluble and insoluble fiber to aid digestion. Beets are truly a superfood, containing nitrates that can help support blood pressure, as well as folate, manganese, and powerful antioxidants.
Using olive oil, a cornerstone of the Mediterranean diet, adds heart-healthy monounsaturated fats. This dish is naturally gluten-free, vegan, and incredibly satisfying. It’s proof that eating your veggies can be the most delicious part of your meal.
Ready to Rock Your Roasting Pan?
And there you have it, friends! My ultimate guide to a dish that’s so much more than the sum of its parts. It’s comfort food that’s actually good for you. It’s a burst of color on a gray day. It’s a connection to memories and a creator of new ones around your own table.
I hope this recipe gives you the confidence to grab those root veggies and make something awesome. Remember, cooking is supposed to be fun. Don’t stress about the perfect chop or a little pink staining. Embrace the mess, taste as you go, and make it yours. That’s what Food Meld is all about.
I’d love to hear how it goes for you! Tag me on social @FoodMeld with your colorful creations. Now, go preheat that oven and let’s cook something unforgettable together.