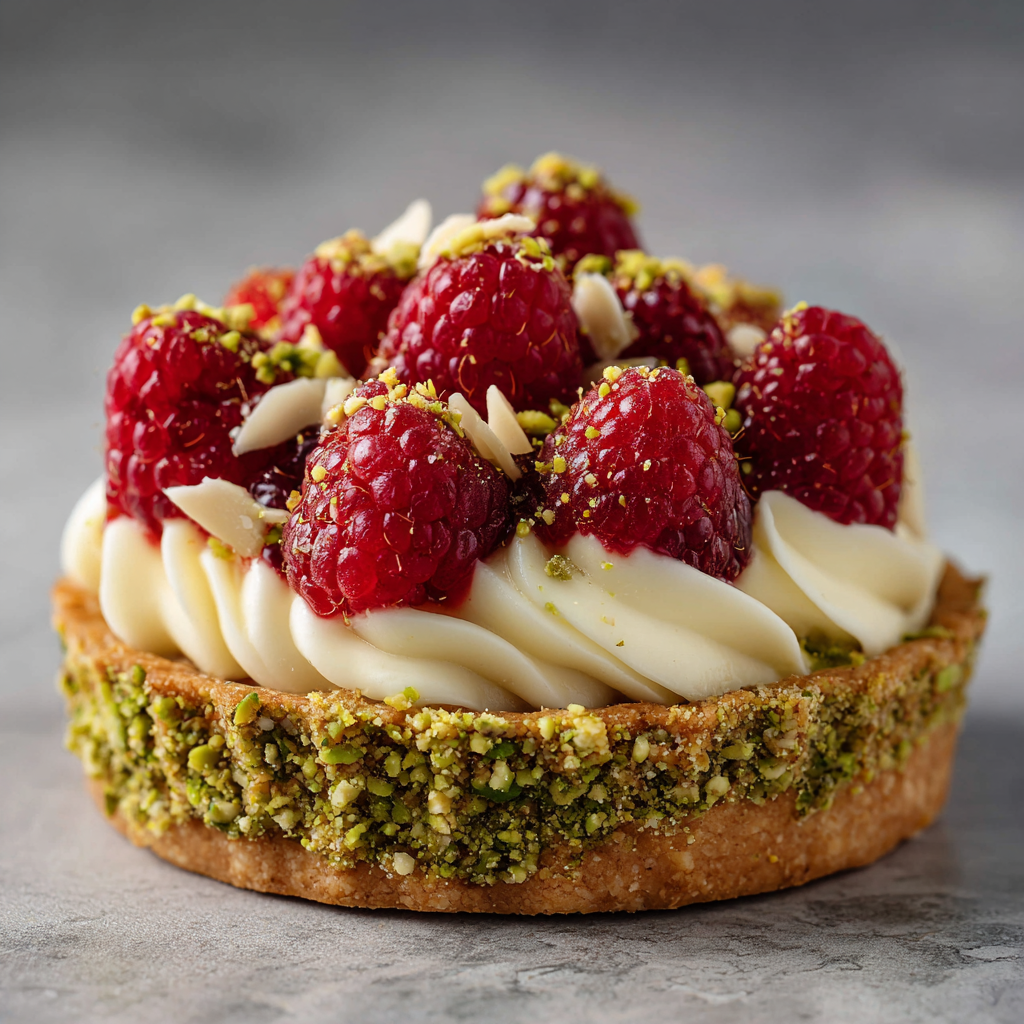
Let’s Make Something Unforgettable: The Raspberry Pistachio Tart
Hey friends, Jackson here from Food Meld. Pull up a stool and let’s chat for a second. You know that feeling when you see a dessert in a fancy bakery case, all pristine and perfect, and you think, “Wow, I could never make that at home”? Yeah, let’s toss that thought right out the kitchen window. Today, we’re taking that elegant dessert daydream and turning it into our delicious, totally-doable reality. We’re talking about a Raspberry Pistachio Tart with the dreamiest Creamy Vanilla Filling you’ve ever tasted.
This isn’t just a tart; it’s a symphony of textures and flavors that sings. Imagine a buttery, nutty crust that crumbles just right, a layer of bright, jammy raspberries that adds a tangy punch, and a cloud-like vanilla filling so smooth it feels like a hug for your taste buds. And the best part? It looks like a million bucks but comes together with a “what if we tried this?” kind of ease. No fancy pastry degree required, just a love for good food and a willingness to get a little creamy filling on your thumb (licking it off is a chef’s perk, I promise).
Whether you’re aiming to impress at your next dinner party, need a show-stopper for a special celebration, or just want to treat yourself to a slice of edible artistry on a Tuesday afternoon, this recipe is your new best friend. It’s the perfect Food Meld creation: familiar comfort (hello, creamy tart!) meets a creative, globally-inspired twist (pistachios and raspberries? Yes, please!). So, grab your food processor and your favorite mixing bowl. We’re about to cook—or, more accurately, chill—something awesome together.

A Sunny Morning & The Tart That Started It All
This recipe has a little story, as the best ones often do. It started on a trip to a farmers’ market years ago, back when I was just figuring out what Food Meld could be. I stumbled upon a stall with the most vibrant, ruby-red raspberries I’d ever seen, right next to a guy selling bags of gorgeous, green pistachios. On a whim, I bought both, thinking I’d just snack on them. But on the drive home, all I could think was, “These two need to be in something together. Something… grand.”
I got into my kitchen, fired up by that “what if” energy I love so much. A pie felt too heavy. A parfait felt too simple. I wanted layers. I wanted elegance that didn’t require a pastry bag. I started pulsing pistachios for a crust, cooking down those berries until they glistened, and whipping up a filling that was equal parts cream cheese stability and whipped cream dreaminess. The first time I unmolded that tart and saw those gorgeous layers, I knew it was a keeper. It tasted like that sunny market morning—bright, nutty, surprisingly sophisticated, but deeply comforting. It’s been a star of the blog ever since, and every time I make it, I think of that happy, flavor-chasing accident. Now, let’s make your own version!
Gathering Your Flavor Crew: Ingredients & Insights
Here’s everything you’ll need. Think of this as assembling your all-star flavor team. I’ve added my little chef insights and swap ideas so you can make this tart your own.
For the Pistachio Crust:
- 1 1/2 cups (190g) pistachios, raw or lightly roasted: This is the foundation! Raw pistachios give a pure, sweet nut flavor, but lightly roasted (unsalted) will add a deeper toastiness. Chef’s Insight: If you can only find salted, just rinse them quickly and pat *very* dry before using, and maybe skip any added salt elsewhere.
- 1 tbsp pure maple syrup: Our natural binder and a hint of caramel-like sweetness. Sub Tip: Honey or agave nectar works beautifully here too.
- 1 tbsp coconut oil, melted: This helps the crust hold together. Chef’s Insight: If you’re not a coconut fan, don’t worry—the flavor is very subtle. You can use an equal amount of unsalted butter instead for a richer note.
For the Raspberry Layer:
- 1 1/2 cups fresh or frozen raspberries: Frozen are totally fine and often more economical! They work perfectly for the cooked layer. Chef’s Insight: Save a few perfect fresh ones for the top garnish if you can.
- 2 tbsp granulated sugar: Just enough to sweeten and help the berries release their juices. Adjust based on your berries’ tartness.
- 1 tsp fresh lemon juice: The brightening agent! It makes the raspberry flavor pop and balances the sweetness.
For the Creamy Vanilla Filling:
- 8 oz (225g) full-fat cream cheese, softened: The backbone of our filling. For ultimate luxury, you can use mascarpone cheese. Pro Tip: Let it sit on the counter for a good 30-60 minutes. Soft cheese whips like a dream; cold cheese fights you.
- 1 cup (240ml) heavy cream, cold: For that light, airy volume. Make sure it’s straight from the fridge.
- 1/3 cup (65g) granulated sugar: Sweetens the deal. Powdered sugar can also be used and will dissolve even easier.
- 1 1/2 tsp pure vanilla extract: Don’t skimp! This is where the “creamy vanilla” magic happens. A scrape of vanilla bean paste would be next-level amazing.
For the Topping:
- 1/4 cup chopped pistachios: For that final crunchy, nutty flourish.
- A handful of fresh raspberries: The jewel-like finish that makes everyone say “wow.”
Step-by-Step: Building Your Masterpiece
Alright, team, let’s get our hands in the game. Follow these steps, and you’ll have a flawless tart. I’m talking you through it like you’re right here in my kitchen.
Step 1: The No-Bake Pistachio Crust. Throw your pistachios into a food processor. Pulse them until they resemble coarse sand—you want a little texture, not pistachio butter. Drizzle in the maple syrup and melted coconut oil. Pulse again until the mixture looks like damp sand and starts to clump together when you pinch it. Chef’s Hack: No food processor? A good blender on “pulse” works, or you can even chop the nuts very finely by hand and mix in a bowl. Pour the crumbs into a 9-inch tart pan with a removable bottom. Use the bottom of a measuring cup or a glass to press the mixture firmly and evenly across the bottom and up the sides. This firm press is the secret to a crust that holds its shape! Pop it in the freezer for at least 20 minutes to set solid.
Step 2: The Jammy Raspberry Heart. While the crust chills, let’s make the raspberry layer. In a small saucepan, combine the raspberries, sugar, and lemon juice. Cook over medium heat, stirring often, for about 8-10 minutes. The berries will break down, release their juices, and the mixture will bubble and thicken slightly. Chef’s Tip: You’re not making a thick jam here, just a cohesive, spreadable layer. Once thickened, remove it from the heat and let it cool completely. I sometimes spread it on a plate and pop it in the fridge to speed this up. A hot raspberry layer will melt our beautiful filling later, so patience is key!
Step 3: The Dreamy Vanilla Cloud Filling. This is the fun part. First, in a large bowl, beat the softened cream cheese with an electric mixer until it’s completely smooth and fluffy, about 1-2 minutes. Add the sugar and vanilla extract, and beat again until fully combined and silky. Now, in another clean, cold bowl (a cold bowl helps cream whip faster!), pour the heavy cream. Whip it on medium-high speed until you get soft to medium peaks—that means the cream holds its shape when you lift the beaters but the tip gently folds over. Big Chef Hack: Don’t over-whip it to stiff peaks here; we’re going to fold it, and softer peaks integrate more smoothly. Now, gently fold about 1/3 of the whipped cream into the cream cheese mixture to lighten it. Then, carefully fold in the remaining whipped cream until no white streaks remain. Be gentle to keep all that airy volume!
Step 4: The Grand Assembly. Time to bring it all together! Pull your rock-solid crust from the freezer. Spread about half of the creamy vanilla filling evenly over the bottom. Next, spoon your cooled raspberry layer over this, spreading it gently into an even layer. Finally, carefully dollop and spread the remaining cream filling over the raspberries, sealing them in. Use an offset spatula or the back of a spoon to make beautiful swoops and swirls on the surface.
Step 5: The Chill & Finale. Carefully transfer the tart to the refrigerator. Let it chill for a minimum of 3-4 hours, but honestly, overnight is even better. This long chill is non-negotiable—it allows the flavors to meld and the tart to slice perfectly. Just before serving, sprinkle the chopped pistachios around the edge and arrange those fresh raspberries in the center. Gently remove the outer ring of the tart pan, slice, and prepare for the applause.
Serving It Up With Style
Presentation is part of the fun! For those “you’ve gotta try this” moments, here’s how I like to serve it. Slide the tart (off the metal base) onto a cake stand or a simple serving plate. The green and red against a white plate is stunning. When slicing, dip your sharp knife in hot water and wipe it dry between each cut for those pristine, clean slices.
This tart is rich, so a small slice goes a long way. I love serving it with a tiny drizzle of extra raspberry sauce (just blend and strain some fresh berries with a touch of sugar) on the plate, or even a light dusting of powdered sugar. A cup of strong coffee or a glass of dessert wine like a Moscato d’Asti are the perfect partners to cut through the creaminess. It’s a dessert that stands proudly on its own, no fancy plating needed.
Make It Yours: Fun Flavor Twists
The “Meld” in Food Meld means this recipe is a fantastic starting point for your own creativity. Here are a few spins to try:
- Chocolate Drizzle Dream: Add 2 tbsp of unsweetened cocoa powder to the crust mixture. Then, after topping with pistachios, drizzle the whole tart with melted dark chocolate for a decadent finish.
- Lemon-Zested Bliss: Add the zest of one lemon to the creamy filling for a vibrant citrus kick that pairs amazingly with the raspberries.
- Berry Medley: Swap the raspberry layer for a mix of blackberries and blueberries, or use all strawberries for a classic feel.
- Dairy-Free Delight: Use a high-quality vegan cream cheese and coconut cream (chilled overnight, use the solid part) instead of heavy cream. The crust is already naturally dairy-free with coconut oil!
- Honey-Almond Swap: Use almonds instead of pistachios for the crust and swap the maple syrup for honey. A beautiful, different nutty flavor profile.
Jackson’s Chef Notes & Kitchen Stories
This recipe has evolved since that first farmers’ market batch. I used to bake the crust, but I found the no-bake version not only easier but also better preserved that fresh, vibrant pistachio flavor. Trust me on this one. One time, I was filming a video for the blog and went to unmold the tart before it had fully set… let’s just say we had a very delicious, albeit very *deconstructed*, raspberry pistachio “pile” instead of a tart. We ate it with spoons and laughed the whole time. The lesson? Patience, young grasshopper. Let the fridge do its work. Also, wearing a dark shirt when chopping pistachios is a pro-move—those little green flecks love to fly!
FAQs & Quick Fixes
Q: My crust is too crumbly and won’t hold together when I slice. What happened?
A: You likely needed to press it more firmly into the pan or add just a touch more binder. Next time, press with serious conviction! Also, make sure you’re using a tart pan with a removable bottom for easy, clean removal that doesn’t disturb the crust.
Q: Can I make this ahead of time?
A> Absolutely! This is a perfect make-ahead dessert. Assemble it completely 1-2 days in advance. Just wait to add the fresh raspberry and chopped pistachio topping until right before serving so they stay bright and crunchy.
Q: My filling seems a bit soft/runny. How can I fix it?
A> This usually means the cream was under-whipped or the tart didn’t chill long enough. For next time, ensure your cream and bowl are very cold. If it’s too late, just pop the sliced servings in the freezer for 15-20 minutes before serving to firm up beautifully.
Q: Can I use a different pan?
A> You can use a 9-inch springform pan in a pinch—the crust will just be thicker on the bottom with no sides. A regular pie dish works too, but you won’t get those elegant, clean sides when serving.
Nutritional Information (A Quick Note!)
Hey, we’re all about balance here at Food Meld—enjoying the incredible things we make, mindfully. This is a celebratory dessert, rich and satisfying. This estimated info is per slice (based on 8 servings):
- Calories: ~390 kcal
- Fat: ~28g (Includes healthy fats from those wonderful pistachios!)
- Carbohydrates: ~30g
- Protein: ~7g
- Fiber: ~4g (Thanks, nuts and berries!)