Your New Favorite Dessert is a Spoonful of Sunshine
Hey friends, Jackson here from Food Meld. Let’s get straight to the good stuff: have you ever had one of those desserts that just instantly makes everyone at the table smile? The kind where spoons are clinking against the baking dish before it’s even had a chance to cool down properly? That’s the magic we’re diving into today with this Pineapple Cream Cheese Cobbler.
Now, I’m all about bold, comforting food, and this cobbler is the definition of a flavor hug. It’s not your average fruit cobbler. We’re taking sweet, juicy pineapple and giving it a best friend in the form of rich, tangy cream cheese. The result? A golden, buttery crust that gives way to a bubbling, tropical filling with little pockets of creamy, melty goodness. It’s like a pineapple upside-down cake and a cheesecake had a beautiful, delicious baby.
The best part? This recipe is a total kitchen win for everyone. If you’re a beginner, you’ll be shocked at how easy it is. If you’re a seasoned pro, you’ll appreciate the sheer genius of the “do not stir” method. It’s the kind of dessert that looks like you fussed for hours, but secretly comes together in about 10 minutes of active prep. So, preheat that oven, grab your favorite 9×13 dish, and let’s cook something awesome together. This Pineapple Cream Cheese Cobbler is about to become your go-to for potlucks, family dinners, and those “I just need something sweet” moments.

A Taste of the Tropics in a Snowy Kitchen
This recipe always takes me back to one particularly gray and slushy February afternoon. I was visiting my grandma, and the world outside her kitchen window was just… blah. Everything was shades of gray and brown. But inside? Inside, Grandma was whipping up a taste of pure sunshine. She had a can of pineapple chunks open, and the second that sweet, tangy scent hit the air, the whole mood of the house lifted.
She was making her “Famous February Fix,” which was basically this cobbler’s wonderful ancestor. I remember watching, mesmerized, as she poured the batter over the melted butter and told me, in that no-nonsense way of hers, “Now, don’t you dare stir it, Jackson. The magic happens all on its own.” I was skeptical, but when that dish came out of the oven, golden and bubbling, it was like she’d captured summer in a baking dish. We ate it warm, with melting scoops of vanilla ice cream, and for that hour, we forgot all about the cold. That’s the power of food, isn’t it? It’s not just fuel; it’s a time machine and a mood-lifter. This cobbler is my little homage to her—a bold, comforting flavor bomb that chases the blues away.
Gathering Your Sunshine Squad: The Ingredients
One of the things I love most about this recipe is its beautiful simplicity. You probably have most of this in your pantry and fridge right now. Let’s break down the team of all-stars that make this cobbler unforgettable.
- 1 stick (½ cup) butter: This is the foundation of our rich, golden crust. It melts right in the baking dish, creating a luscious layer that the batter bakes into. I use unsalted butter to control the salt level, but salted works in a pinch—just maybe reduce the added salt a tiny bit.
- 1 egg, lightly beaten: Our binding agent! The egg gives the cobbler topping structure and a lovely, cake-like texture. Make sure it’s lightly beaten before you add it to the other wet ingredients for an even mix.
- 1 cup milk: This adds moisture and creates the batter’s liquid base. Whole milk will give you the richest result, but 2% works great, too. For a dairy-free twist, unsweetened almond or oat milk are fantastic substitutes.
- 1 cup all-purpose flour: The backbone of our cobbler topping. It’s reliable and creates that perfect, tender cake. For a gluten-free version, a 1:1 gluten-free flour blend works like a charm.
- 1 cup sugar: Sweetness to balance the tang of the pineapple and cream cheese. It’s the perfect amount to make the dessert indulgent without being overly sweet.
- 2 tsp baking powder: This is our leavening hero! It’s what gives the cobbler its lift and airy texture, allowing it to rise up through the fruit and create that beautiful, craggy top. Make sure yours is fresh for the best rise.
- ½ tsp salt: Don’t skip this! Salt is a flavor enhancer. It makes the sweet flavors pop and balances the richness of the butter and cream cheese.
- 2 cans (20 oz each) pineapple chunks, drained: The star of the show! I use canned for convenience and consistent sweetness, but if you have fresh pineapple, by all means, chop it up! Just make sure to drain it really well—excess liquid can make the cobbler soupy.
- 8 oz cream cheese, cut into small pieces: The “secret” ingredient that takes this from great to unforgettable. The little pieces soften and melt into creamy pockets throughout the cobbler. For the best results, use full-fat cream cheese and make sure it’s cold when you cut it—it’s much easier to handle.
Let’s Build Some Magic: Step-by-Step Instructions
Alright, team, it’s go time. This is where the fun happens. Preheat your oven to 350°F (175°C). Grab your trusty 9×13 inch baking dish—I’m a big fan of glass here because you can see the beautiful golden edges, but metal works perfectly, too.
- Melt the Butter, Right in the Pan! Place the entire stick of butter in your baking dish and pop it into the preheating oven. Keep a close eye on it! You just want it melted, not browned. This little hack saves you from dirtying a saucepan and infuses the whole dish with buttery goodness from the bottom up. Chef’s Hack: If you’re in a hurry, you can melt the butter in the microwave and then pour it into the dish. Easy.
- Whisk Together the Wet Team. While the butter is melting, grab a medium-sized bowl. Add your lightly beaten egg and milk. Give them a good whisk until they’re fully combined and friendly. This is our wet base.
- Bring in the Dry Crew. To the same bowl, add your flour, sugar, baking powder, and salt. Now, whisk it all together until you have a smooth, slightly thick batter. A few small lumps are totally fine—we’re not looking for perfection, just a well-combined mixture. Chef’s Tip: Don’t overmix! Once the flour is incorporated, you can stop. Overmixing can lead to a tougher crust.
- The “Do Not Stir” Moment of Truth. Your butter should be beautifully melted and fragrant by now. Carefully take the hot dish out of the oven. Now, pour your batter directly over the melted butter. Here’s the crucial part: DO NOT STIR. I know it goes against every instinct, but trust me. This is what creates the magical layers—the butter will bubble up around the edges, and the batter will bake up through it, creating an incredible, self-saucing, buttery crust.
- Arrange the Pineapple & Cream Cheese. Now for the fun part! Scatter your well-drained pineapple chunks evenly over the top of the batter. Then, take your little cubes of cold cream cheese and dot them all over the pineapple. You want little pockets of creamy surprise in every bite. Chef’s Insight: The cream cheese will sink a little, and that’s exactly what we want. It’ll nestle into the cobbler and get all soft and warm.
- Bake to Golden Perfection. Carefully place the dish back into the oven and bake for 45 minutes. You’re looking for a deep golden-brown top, bubbling edges, and a house that smells like a tropical paradise. To test for doneness, you can insert a toothpick into the cobbler part (not through a cream cheese spot); it should come out clean.
- Rest is Best. I know it’s tempting to dive right in, but let the cobbler rest for about 15-20 minutes after pulling it out of the oven. This allows the filling to set slightly, so you get perfect, beautiful scoops instead of a runny mess. It’s worth the wait, I promise!
How to Serve This Slice of Sunshine
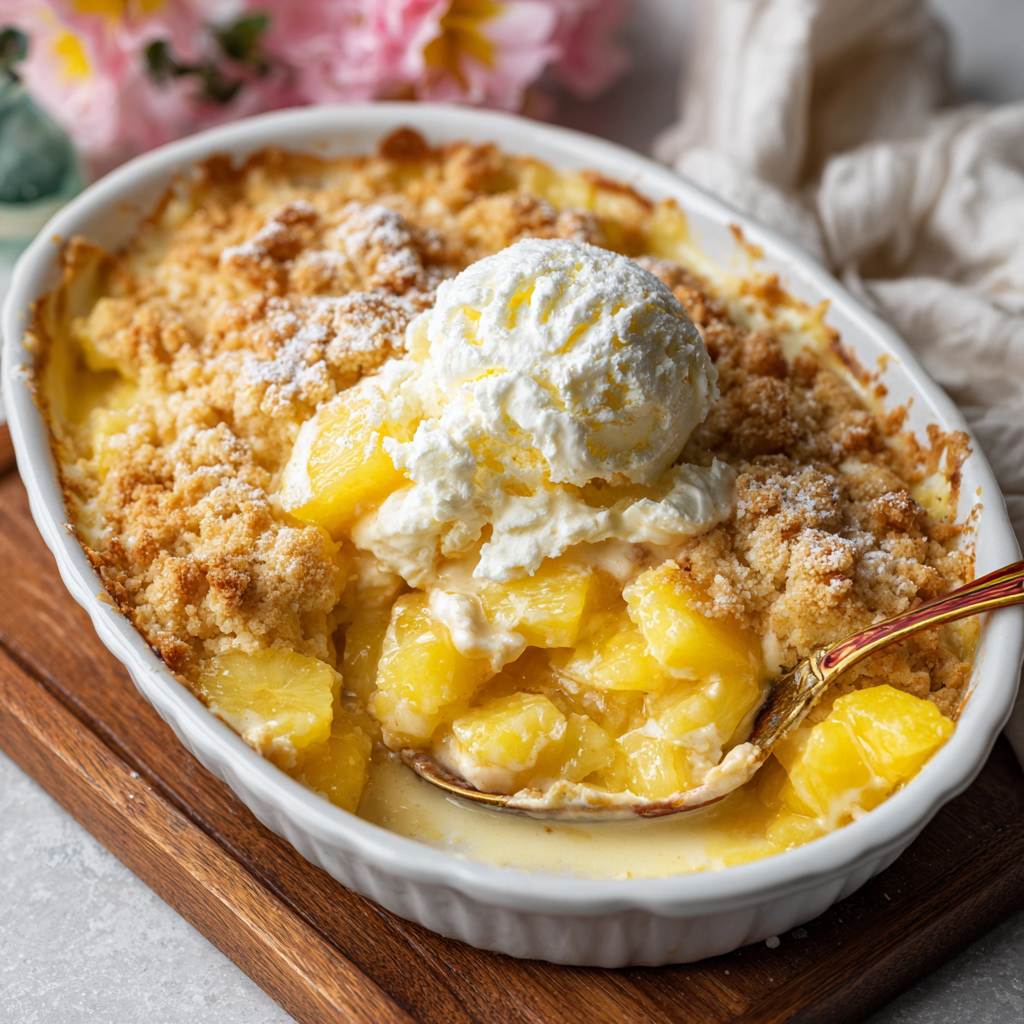
Presentation is part of the fun! I love serving this cobbler right from the baking dish at the table—it’s rustic, inviting, and gets everyone excited. Use a big spoon to scoop down to the bottom, making sure you get some of that buttery crust, the juicy pineapple, and a melty piece of cream cheese in every serving.
Now, let’s talk toppings. This is where you can really make it yours:
- Classic Vanilla Bean Ice Cream: This is non-negotiable for me. The contrast of the warm cobbler and the cold, creamy ice cream is a match made in heaven. The vanilla echoes the cream cheese flavor beautifully.
- Freshly Whipped Cream: For a slightly lighter touch, a big dollop of homemade whipped cream is divine. Add a tiny splash of vanilla or even a teaspoon of dark rum to the cream as you whip it for an extra flavor kick.
- A Sprinkle of Toasty Goodness: For a little texture, try sprinkling the top with some toasted coconut flakes or chopped macadamia nuts right before serving. It adds a wonderful crunch and leans into the tropical vibe.
Make It Your Own: Fun Recipe Variations
One of my core food philosophies is “what if we tried this?” So feel free to get creative and mix it up! Here are a few of my favorite twists on this classic:
- Peach & Cream Cheese Cobbler: Swap the pineapple for two cans of sliced peaches (drained well). It’s a Southern-inspired twist that’s equally comforting.
- Pina Colada Style: Add a 1/2 cup of sweetened shredded coconut to the batter, and use coconut milk instead of regular milk. You’ll feel like you’re on vacation with every bite.
- Berry Bliss: Not a pineapple fan? Use a mix of berries instead! A bag of frozen mixed berries (no need to thaw, but maybe add 5 extra minutes to the bake time) works wonderfully. The tartness of the berries with the cream cheese is incredible.
- Boozy & Bold: For a grown-up version, toss your drained pineapple chunks with a tablespoon of dark rum or Malibu coconut rum before scattering them over the batter.
- Lemon Zest Zing: Brighten the whole dish by adding the zest of one lemon to the batter. The lemon cuts through the sweetness and makes the pineapple flavor even more vibrant.
Jackson’s Kitchen Notes & Stories
This recipe has evolved a bit since my grandma first showed it to me. I’ve found that using cold cream cheese straight from the fridge is the best way to get those distinct, melty pockets. If it’s too soft, it just kind of disappears into the filling. I also learned the “hard way” about draining the pineapple. One time I was in a rush and didn’t drain it well enough. Let’s just say my “cobbler” was more of a “soup.” Still tasty, but not the texture we’re going for! It’s a forgiving recipe, but that’s one step you don’t want to skip. Over the years, this has become my most-requested potluck dish. I always bring copies of the recipe because someone always asks for it.
Your Questions, Answered!
I’ve made this cobbler a zillion times, and I’ve heard all your awesome questions. Here are the most common ones:
Q: My cobbler is really soupy in the middle. What happened?
A: The most common culprit is not draining the pineapple well enough. Fruit canned in juice (not heavy syrup) is best, and give it a really good press in a colander. Also, make sure you bake it for the full 45 minutes—the bubbling should be active around the edges. And that rest time is crucial for the filling to set!
Q: Can I make this ahead of time?
A: Absolutely! You can assemble the entire cobbler, cover it tightly, and keep it in the fridge for up to 24 hours before baking. You might need to add 5-10 minutes to the bake time since it’s going into the oven cold. It’s best served the day it’s made, but leftovers (if you have any!) are still delicious reheated the next day.
Q: Can I use fresh pineapple instead of canned?
A: You bet! Fresh pineapple is a fantastic choice. Just make sure to chop it into chunk-sized pieces and, you guessed it, drain off any excess juice. The flavor will be a bit brighter and more tropical.
Q: Why shouldn’t I stir the butter and batter together?
A> I know it’s tempting! But this “no-stir” method is the secret to the cobbler’s unique texture. As it bakes, the batter rises up through the butter, creating a cakey top, while the butter forms a rich, almost sauce-like layer underneath the fruit. Stirring would combine them and you’d lose that magical separation.
Nutritional Info (Because Knowledge is Power!)
Let’s keep it real—this is a dessert, and it’s meant to be enjoyed as a treat! But I believe in transparency, so here’s a rough breakdown per serving (based on 12 servings). Remember, these are estimates and can vary based on your specific ingredients.
- Calories: ~310
- Fat: 17g
- Carbohydrates: 37g
- Sugar: 23g
- Protein: 4g
To lighten it up a bit, you can use a lower-fat milk, reduce the sugar by 1/4 cup, or use a reduced-fat cream cheese. It’ll still be delicious, though I’m a firm believer in enjoying the full-flavor experience sometimes! It’s all about balance.
Let’s Keep the Conversation Going!
And there you have it! My go-to recipe for bringing a little joy and a lot of flavor to the table. This Pineapple Cream Cheese Cobbler is more than just a dessert; it’s a reminder that cooking should be fun, a little messy, and always, always packed with love.
I’d love to hear how your cobbler turns out! Did you add a twist? Did it become an instant family favorite? Tag me on social @FoodMeld or leave a comment below and tell me all about it. Your kitchen stories are my favorite thing. Now go forth, bake with confidence, and enjoy every single bite.
Until next time, keep mixing it up!
– Jackson


