Mini Chocolate-Covered Strawberry Cakes: Your New Favorite Bite of Love
Hey friends, Jackson here from Food Meld. Let’s get real for a second. We’ve all been there: staring at a recipe that looks stunning but feels like it requires a culinary degree and a sous chef. You want to make something special—for a date night, a Galentine’s brunch, or just because Tuesday deserves a little glitter—but the thought of a towering, fussy layer cake makes you want to just… buy a box of chocolates instead. I hear you. I’ve been you.
But what if I told you the magic of a decadent dessert, the kind that makes people’s eyes light up, could be hiding in a simple sheet pan? That the classic romance of chocolate-covered strawberries could be leveled up into something even more shareable, more fun, and honestly, more delicious? That’s where these Mini Chocolate-Covered Strawberry Cakes come in.
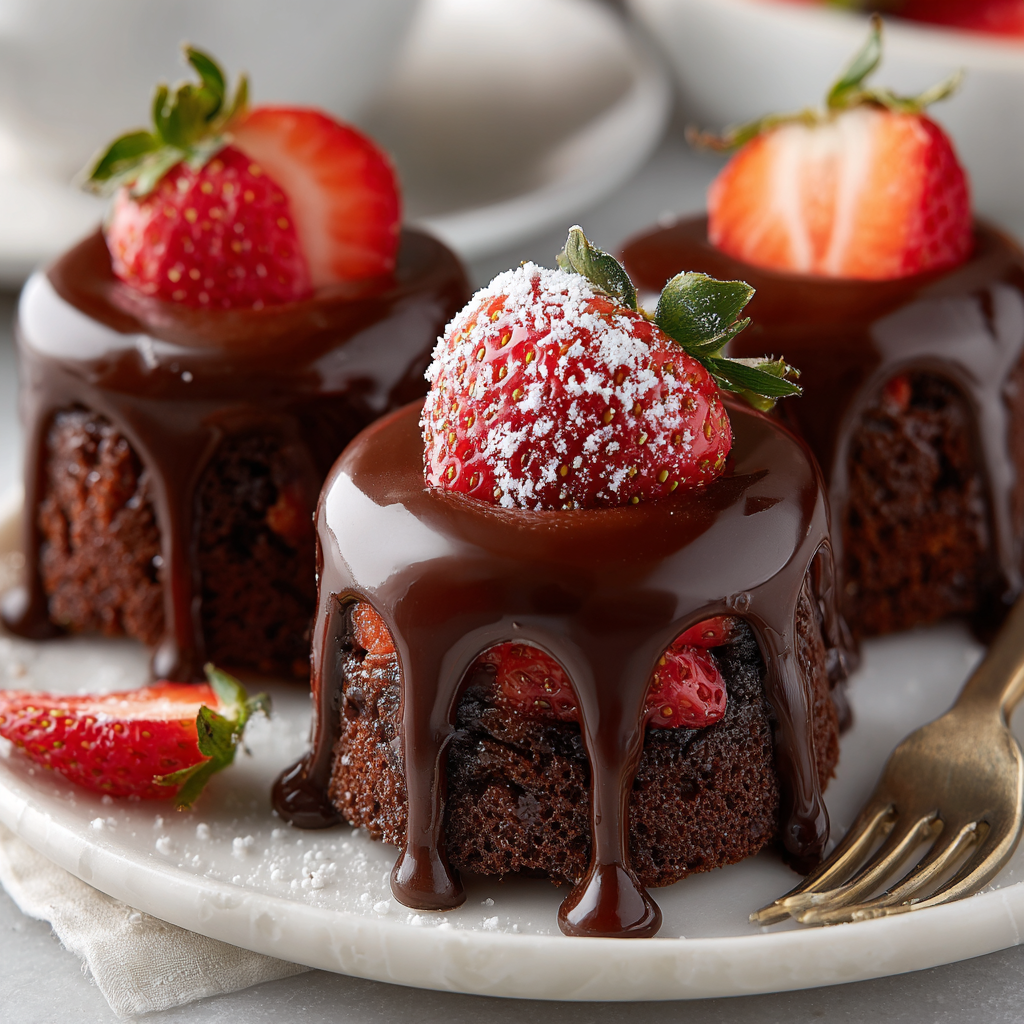
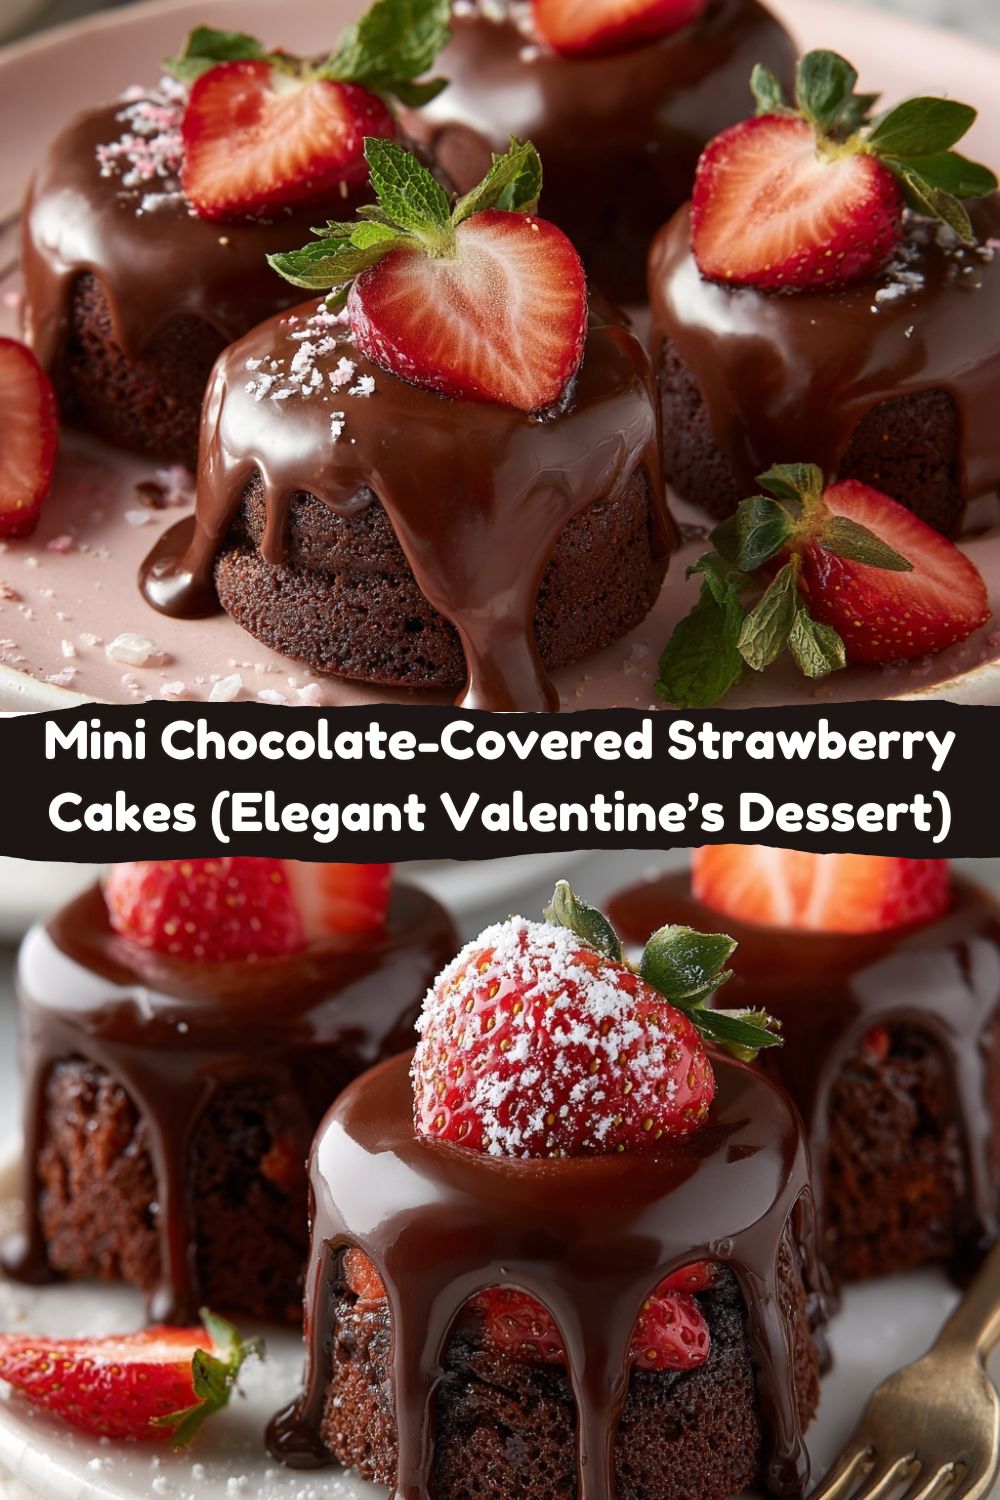
Imagine this: tender, rich chocolate sponge. A cloud-like filling bursting with real strawberry flavor. All of it wrapped in a sleek, shiny cloak of dark chocolate ganache. They’re elegant enough for the fanciest occasion, but because we’re building them from a single-batch sheet cake, they’re totally approachable. No fancy piping skills required, just a willingness to have a little fun. This is what Food Meld is all about: taking bold, comforting flavors and presenting them in a way that makes you think, “Hey, I can totally do that.” So tie on your apron, and let’s turn your kitchen into the site of a delicious, bite-sized romance. Let’s cook something awesome.
The Cake That Started With a Mess (As All Great Things Do)
This recipe takes me straight back to my grandma’s linoleum kitchen floor, which I’m pretty sure had a permanent dusting of flour. Every Valentine’s Day, she’d make my grandpa the same thing: a humble, from-a-box chocolate cake. But her signature move was slicing fresh strawberries and letting them macerate in a little sugar until they swam in their own ruby-red syrup. She’d spoon that juicy mess right over the top of each slice.
One year, I was “helping” (read: making a colossal mess) and decided the strawberries shouldn’t just go *on* the cake, they should be *in* it. My child-brain solution? I poked holes in the warm cake and poured the strawberry syrup right in. It created a soggy, glorious, concentrated pocket of berry bliss. Grandma just laughed and said, “Well, Jackson, you’ve just invented something.” These mini cakes are the grown-up, slightly more refined version of that kitchen experiment. They capture that perfect marriage of rich chocolate and bright, sweet-tart strawberry, but in a portable, two-bite package that feels like a celebration. It’s a reminder that the best food ideas often start with a little curiosity and a willingness to make a beautiful mess.
Gathering Your Flavor Crew: Ingredients & Insights
Here’s everything you’ll need to build these little flavor bombs. I’ve added my chef notes because knowing the “why” behind an ingredient makes you a more confident cook!
For the Chocolate Cake:
- 1 cup all-purpose flour: The sturdy-but-tender backbone. For a slightly denser, fudgier crumb, you can swap in cake flour.
- 1/2 cup unsweetened cocoa powder: This is your flavor anchor. Use a good quality one—it makes all the difference. Dutch-processed will give a deeper, smoother chocolate note.
- 1 teaspoon baking soda: Our leavening agent. It reacts with the acidity in the buttermilk and cocoa to give the cake its perfect rise.
- 1/4 teaspoon salt: Never skip this! Salt is the ultimate flavor enhancer; it makes the chocolate taste more chocolaty.
- 1/2 cup buttermilk: The secret to super-moist cake. Chef Hack: No buttermilk? Mix 1/2 cup milk with 1/2 tablespoon lemon juice or vinegar. Let it sit for 5 minutes until it curdles slightly. Good to go!
- 1/2 cup vegetable oil: Keeps the crumb incredibly moist compared to butter. A neutral oil like canola or grapeseed works perfectly.
- 2 large eggs: Bring them to room temperature! This helps them incorporate smoothly for a uniform batter.
- 3/4 cup granulated sugar: Sweetens and tenderizes. The hot water will help dissolve it completely.
- 1 teaspoon vanilla extract: The supporting actor that makes the chocolate star shine brighter.
- 1/2 cup hot water: This is the game-changer. It “blooms” the cocoa powder, intensifying its flavor, and creates a thin batter that bakes up surprisingly light and springy.
For the Strawberry Filling:
- 1 cup fresh strawberries, chopped: The star of the show! We’re using real fruit here, not extract, for that bright, authentic flavor. Frozen and thawed berries work in a pinch—just drain the excess liquid well.
- 2 tablespoons sugar: This draws out the strawberries’ natural juices and creates a quick maceration, concentrating their sweetness.
- 1/2 cup heavy cream: We’ll whip this into stiff peaks for structure. Make sure it’s very cold.
- 1/4 cup cream cheese, softened: This is my twist. It adds a subtle tang and, more importantly, stabilizes the whipped cream so your filling doesn’t turn into a runny puddle.
- 1/2 teaspoon vanilla extract: A little extra layer of flavor magic.
For the Chocolate Ganache:
- 1/2 cup heavy cream: Heating the cream is what melts the chocolate into that silky-smooth dream coating.
- 1/2 cup semi-sweet chocolate chips: The higher the quality, the shinier and tastier your ganache. Chopped baking chocolate bars work great too.
Let’s Build Some Bite-Sized Magic: Step-by-Step
Don’t let the fancy look fool you—this is a straightforward process. Read through once, then just go for it!
- Preheat & Prep: Crank that oven to 350°F (175°C). Grease a quarter sheet pan (about 9×13 inches) or line it with parchment paper. The parchment is a lifesaver for easy cake removal. I just give the pan a quick spray even with parchment—it’s insurance.
- Mix the Dry Team: In a medium bowl, whisk together the flour, cocoa powder, baking soda, and salt. Get them totally combined so you don’t get a pocket of baking soda in one bite. This is your flavor base.
- Whisk the Wet Team: In a larger bowl, whisk the eggs and sugar together until they’re just blended and look a little pale. Then, whisk in the oil, buttermilk, and vanilla. It’ll look a bit separated—that’s totally fine.
- The Grand Meld: Here’s where the magic happens. Add your dry ingredients to the wet ingredients and whisk until just combined. The batter will be thick. Now, slowly pour in the hot water while whisking. It will thin out dramatically into a smooth, pourable liquid. This is exactly what you want! Pro Tip: Don’t overmix once you add the flour. A few lumps are better than a tough cake.
- Bake & Cool: Pour the batter into your prepared pan and tilt it to spread evenly. Bake for 15-18 minutes. You’ll know it’s done when the top springs back lightly to the touch and a toothpick inserted in the center comes out with a few moist crumbs (not wet batter). Let the cake cool completely in the pan on a wire rack. Patience is key here—a warm cake will crumble when you cut it.
- Prep the Strawberry Filling: While the cake cools, toss your chopped strawberries with the 2 tablespoons of sugar in a small bowl. Let them sit and get juicy for at least 15 minutes. Then, use a fork to lightly mash them—you want texture, not puree. In a chilled bowl, whip the heavy cream to stiff peaks. In another bowl, beat the softened cream cheese and vanilla until smooth. Gently fold the mashed berries and their juices into the cream cheese, then fold in the whipped cream. Cover and pop it in the fridge to firm up a bit.
- Cut the Cake Rounds: Once your cake is completely cool, use a 2-inch round cookie cutter (or the rim of a small glass) to cut out as many rounds as you can. You should get 16-20. These will be paired to make your mini cakes!
- Assemble the Layers: Match up your cake rounds in pairs of similar size. Spread or pipe a generous tablespoon of the strawberry filling onto the flat side of one round in each pair. Gently press the matching round on top to make a little cake sandwich. Place them on a parchment-lined tray and refrigerate for 20-30 minutes. This chills the filling and makes the next step much cleaner.
- Make the Ganache Glamour: Place your chocolate chips in a heatproof bowl. Heat the heavy cream in a small saucepan over medium heat until it just begins to simmer (small bubbles around the edges). Immediately pour the hot cream over the chocolate chips. Let it sit, untouched, for 3 minutes. Then, gently stir from the center outward until you have a smooth, glossy, dark pool of deliciousness.
- The Grand Finale – Chocolate Dip: Remove your chilled mini cakes from the fridge. One by one, carefully spoon the warm ganache over the top of each cake, using the spoon to guide it down the sides. Let the excess drip off. You can also hold a cake on a fork and lower it into the ganache for full coverage. Return them to the parchment-lined tray. Let the ganache set at room temperature for about an hour, or in the fridge for 15 minutes if you’re in a hurry.
How to Serve These Little Showstoppers
Presentation is half the fun! You’ve created something beautiful, so let it shine.
- The Simple Elegant Plate: Place one or two cakes on a simple white plate. Dust the very edges with a light sifting of powdered sugar or cocoa powder for contrast. Add a single, perfect fresh strawberry or a tiny mint leaf on the side.
- The Dessert Board Star: Making these for a party? Arrange them on a beautiful wooden board or platter. Scatter a few extra whole strawberries, some raspberries, and maybe even a few extra chocolate chips around them. It creates a gorgeous, abundant feel.
- The Special Delivery: These are the *perfect* gift. Place a single cake in a small, clear bakery box or on a pretty napkin-lined small plate. It’s a personalized dessert that says “I thought about you” more than any store-bought treat ever could.
Chef’s Serving Tip: Let them sit out for 10-15 minutes before serving if they’ve been in the fridge. This takes the chill off the ganache and lets the strawberry filling’s flavor bloom fully.
Make It Your Own: Creative Twists & Swaps
The “Meld” in Food Meld means making recipes work for you. Here are some delicious ways to play with this formula.
- The Raspberry Rendezvous: Swap the strawberries for raspberries. Their sharper tang cuts through the rich chocolate beautifully. You could even add a tiny bit of Chambord liqueur to the filling (just a teaspoon!).
- Orange Chocolate Dream: Add 1 teaspoon of orange zest to the cake batter. For the filling, use the cream cheese and whipped cream base but fold in a tablespoon of good-quality orange marmalade (minus the big peel pieces) instead of the strawberries.
- Mocha Moment: For true coffee lovers, dissolve 1 tablespoon of instant espresso powder in the hot water before adding it to the cake batter. The coffee flavor makes the chocolate taste even deeper and more complex.
- Dairy-Free & Decadent: Use a plant-based milk + acid for the buttermilk swap. For the filling, use chilled coconut cream (the solid part from a can) whipped with a little powdered sugar instead of dairy cream, and a dairy-free cream cheese. Use full-fat coconut milk heated for the ganache with dairy-free chocolate chips.
- Nutty Crunch: Add a textural surprise! After you spread the strawberry filling, press a few finely chopped toasted hazelnuts or almonds onto the exposed filling before topping with the second cake round. The nuttiness with strawberry and chocolate is divine.
Jackson’s Kitchen Notes & Stories
This recipe is a living thing in my kitchen. The first time I tested it, I tried making the cakes as individual cupcakes. They were good, but they lacked that elegant, uniform “mini cake” look. The sheet-pan method was the breakthrough—consistent height, super easy assembly, and zero waste (those cake scraps are the chef’s treat!).
One hilarious fail involved trying to use frozen strawberries without draining them. The filling was so wet it turned the cake layers to mush—a delicious, pink, messy mush. It tasted amazing but looked like a dessert crime scene. That’s how I learned the importance of draining or using fresh berries. Remember, friends, kitchen fails are just R&D for your next win. Embrace them!
Your Questions, Answered (Before You Even Ask!)
Q: Can I make any part of this ahead of time?
A: Absolutely! The cake can be baked, cooled, wrapped tightly, and kept at room temp for a day. The strawberry filling can be made and refrigerated a day ahead. Assemble and ganache the cakes up to 6 hours before serving. Store them in a single layer in the fridge.
Q: My ganache is too runny/thick. How do I fix it?
A: Ganache is all about ratio and temperature. If it’s too runny, let it cool at room temp, stirring occasionally, until it thickens to a pourable but coating consistency. If it’s too thick and gloopy, gently reheat it for 5-second bursts in the microwave, stirring between each, or whisk in a teaspoon of warm cream at a time until it loosens up.
Q: I don’t have a cookie cutter. What can I use?
A: No problem! The rim of a small glass or even a clean, empty can (like from tuna or tomato paste, with both ends removed and washed well) works perfectly. You can also cut the cake into small squares with a sharp knife—they’ll be just as tasty!
Q: Can I freeze these mini cakes?
A: You can, but with a caveat. The strawberry filling may release a little water when thawed, slightly softening the cake. For best results, freeze the un-ganached, assembled cakes on a tray until solid, then wrap well. Thaw in the fridge overnight, then spoon the ganache over them fresh the day you want to serve.
A Quick Note on Nutrition
Approximate values per mini cake (based on a yield of 10). Nutrition will vary by brands and portion size.
-
Calories: ~320
-
Total Fat: 19g
-
Saturated Fat: 11g
-
Carbohydrates: 34g
-
Sugars: 24g
-
Fiber: 3g
-
Protein: 5g
-
Sodium: 210mg
These Mini Chocolate-Covered Strawberry Cakes are meant to be savored, not rushed. They’re rich, satisfying, and indulgent enough that one truly feels like a complete dessert. Real strawberries, dark chocolate, and a tender cocoa cake make every bite count—no need for seconds (but no judgment if you go there).
Final Thoughts
And there you have it—proof that a truly special dessert doesn’t need to be complicated to be memorable. These Mini Chocolate-Covered Strawberry Cakes are everything I love about Food Meld: classic flavors, a creative twist, and just enough elegance to make an ordinary day feel like an occasion.
Whether you’re making them to impress someone you love, treating friends, or simply giving yourself a well-deserved moment of indulgence, I hope they bring a little joy to your kitchen. Don’t worry about perfection—every swirl, drip, and crumb is part of the charm.
If you make these, share them, tweak them, and make them your own. And if you catch yourself sneaking an extra one from the fridge late at night… well, that’s just between us.
Until next time, keep cooking boldly, keep playing with flavor, and keep the love flowing.
—Jackson


