Why Homemade Cream Cheese Beats the Store-Bought Stuff Every Time
Hey friends, Jackson here from Food Meld! Let’s get real for a sec: have you ever stared at that bland brick of store-bought cream cheese and thought, “Is this really as exciting as it gets?” Spoiler alert—it’s not. Today, we’re ditching the plastic tubs and making magic happen with just four simple ingredients and zero fancy equipment. I’m talking about homemade cream cheese so velvety, so alive with tangy personality, it’ll make your everything bagel do a happy dance. And the best part? You probably have everything you need in your kitchen right now.
I know what you’re thinking: “But Jackson, isn’t cream cheese one of those things you just… buy?” Heck no! Once you taste the difference—that bright, fresh flavor and cloud-like texture—you’ll be ruined for life. Plus, it’s stupid easy. We’re talking 15 minutes of active work, friends. This isn’t some fussy cheese-making marathon; it’s a quick kitchen hack that feels like uncovering a delicious secret. Imagine slathering this on warm toast, swirling it into mashed potatoes, or blowing minds at your next brunch. Ready to transform milk and cream into pure gold? Let’s get our hands creamy.
The Bagel Shop Epiphany That Started It All
Picture this: 8-year-old me, sticky-fingered and wide-eyed, pressed against the glass counter of Benny’s Bagel Emporium in Savannah. My granddad would take me every Sunday after church, and I’d always get the same thing—a sesame bagel piled with cream cheese so high it looked like a snowcap. One morning, old man Benny caught me watching him whip a fresh batch. He winked, handed me a spoonful straight from the bowl, and BAM. That tangy, creamy thunderbolt hit me like a flavor revelation. “Kid, store stuff’s glue compared to the real deal,” he rasped. “Fresh cheese tastes like alive.”
Years later, when I started Food Meld, Benny’s words echoed in my head during a cream cheese frosting disaster (store-bought made it clumpy—ugh). I dug into food science, tested ratios for weeks, and finally nailed this simple method. Now, every time I drain those curds, I’m back at Benny’s counter, tasting that first glorious bite. Homemade isn’t just better—it’s a delicious time machine.

Your Cream Cheese Dream Team
Makes 1½ cups | Prep: 15 min | Drain: 1 hour
- 4 cups whole milk – The backbone! Full-fat is non-negotiable for richness. Sub with 2% in a pinch, but skip skim—it’s too lean. Chef insight: Pasteurized is fine, but avoid UHT (ultra-pasteurized)—it resists curdling!
- 2 cups heavy cream – Your secret weapon for luxe texture. For lighter results, use half-and-half, but expect a slightly grainier spread.
- 3 tbsp white vinegar or lemon juice – Acid is the magic curd-maker! Vinegar yields a cleaner tang; lemon adds brightness. Hot tip: Fresh lemon? Double the joy. Bottled works too!
- ½ tsp salt (optional) – Enhances flavor beautifully. Omit if using for sweet apps, or try smoked salt for a wild twist!
Why these work: The combo of milk + cream gives that perfect spreadable density—all cream makes it too buttery; all milk feels lean. Acid separates curds (the cheese!) from whey (the liquid). Salt? Just a flavor elevator.
Let’s Make Some Creamy Magic: Step-by-Step
- Heat it up slow & low. Combine milk and cream in a heavy-bottomed saucepan over medium-low heat. Stir occasionally with a wooden spoon until it hits 180°F (just before boiling—tiny bubbles at the edges!). Chef hack: No thermometer? Dip a clean finger in. It should feel painfully hot but not scalding. Takes about 12-15 mins. WHY: Gentle heating prevents scorching and encourages even curd formation.
- Acid attack! Turn off the heat. Drizzle in vinegar or lemon juice while stirring gently for 10 seconds. Watch the alchemy—curds instantly form! Let it sit undisturbed for 15 minutes. Chef commentary: If your mixture looks thin, add 1 extra tsp acid. It should resemble chunky cottage cheese in cloudy whey. No panic if it’s subtle—straining does the heavy lifting.
- Drain like a pro. Line a sieve or colander with 2 layers of cheesecloth (or a clean cotton tea towel). Place over a bowl. Pour in the curds and whey. Let gravity work for 1 hour. Pro tip: Save that whey! It’s liquid gold for smoothies, bread dough, or cooking rice. Fridge it for up to 2 weeks.
- Blend to bliss. Scrape curds into a blender or food processor. Add salt if using. Blend 2-3 minutes until absurdly smooth, scraping sides halfway. Texture check: Wipe a dab on your thumb—it should feel silky, not gritty. Too thick? Add 1 tsp whey. Too thin? Blend longer; proteins will bind!
- Chill out. Transfer to an airtight container. Refrigerate 4 hours (or overnight) to firm up. Truth bomb: Fresh cheese tastes mild initially. The tang deepens beautifully after 24 hours!
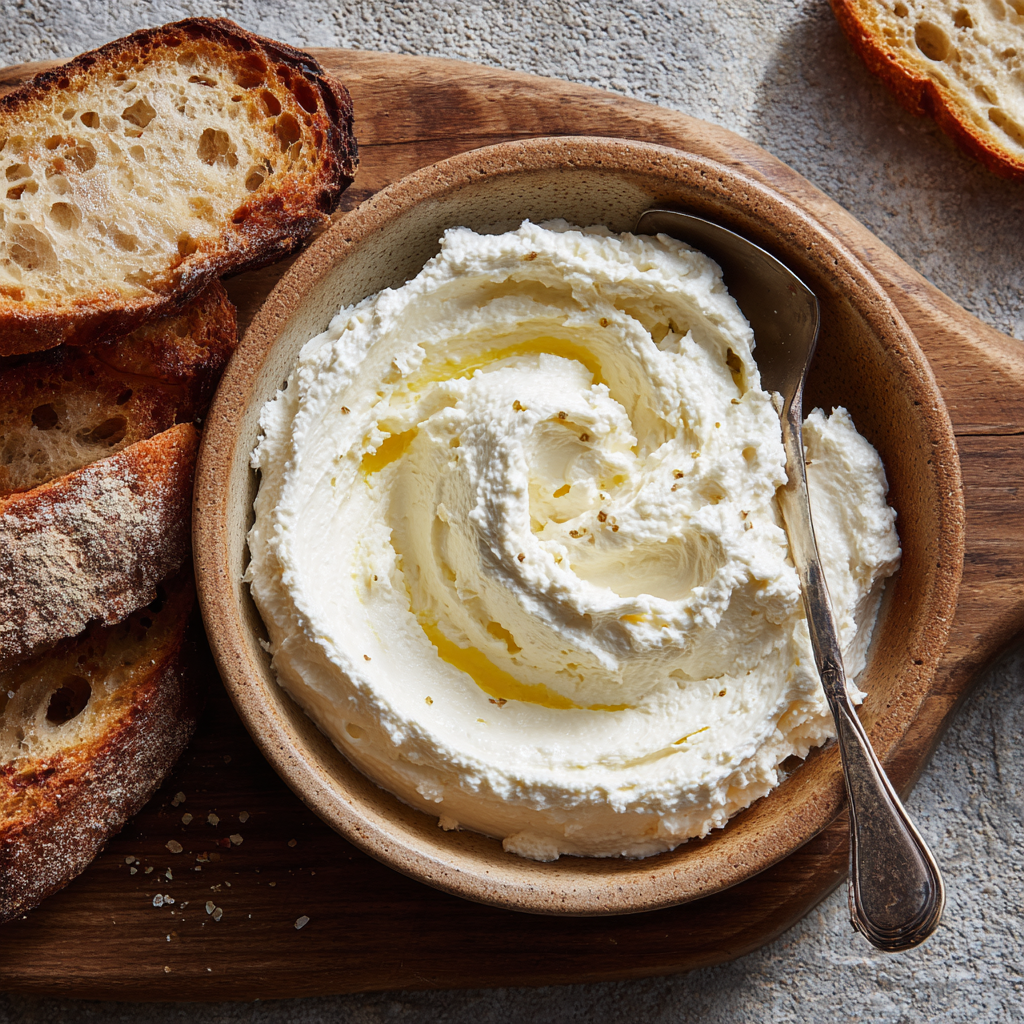
Beyond the Bagel: Serving Your Masterpiece
Obviously, schmear it generously on toasted everything bagels with lox and capers. But why stop there? Swirl a ribbon of hot pepper jelly into a bowl for a knockout party dip with pretzels. Dollop onto warm blintzes with berry compote. Or go savory: thin it with a splash of cream for the creamiest scrambled eggs of your life. My favorite? Smear it on grilled corn with chili powder and lime—trust me, it’s a game-changer.
5 Funky Flavor Twists to Try
- Everything Spice Bomb: Fold in 2 tbsp everything bagel seasoning post-blend.
- Berry Honey Whipped: After chilling, whip with 3 tbsp honey and ¼ cup mashed raspberries.
- Garlic & Herb: Mix in 2 roasted garlic cloves + 1 tbsp each fresh dill and chives.
- Vegan Vibes: Swap dairy for full-fat coconut milk + 1 tsp agar powder (heat, acidify, and strain as usual).
- Smoky Maple Bacon: Crumble 3 cooked bacon strips into cheese + 1 tbsp maple syrup.
Jackson’s Real Talk & Recipe Evolution
Okay, confession: Batch #1 of this was a grainy, sad puddle. Why? I used ultra-pasteurized milk (never again!) and rushed the draining. But hey—kitchen fails make the best stories! Over 63 batches (yes, I counted), I learned three big things: 1) Patience during draining = silkiness, 2) Blending warm curds (not cold) prevents grittiness, and 3) Your acid choice changes the personality. Lemon feels brunchy; vinegar is deli-style perfection.
This recipe’s beauty? It’s a blank canvas. My wife once sneaked in beet powder for pink “Valentine Cheese”—genius! Now, I always make a double batch. Half gets devoured fresh; the other half I flavor on Day 2 when the tang peaks. Pro move: Freeze it in muffin tins for 1-oz portions ready to jazz up weeknight dinners!
Your Cream Cheese Questions—Answered!
Q: Can I use apple cider vinegar?
A: Totally! It adds a fruity hint. Avoid balsamic—it overpowers and dyes the cheese.
Q: My curds are tiny/not forming. Help!
A: Two likely culprits: 1) Milk wasn’t hot enough (needs 180°F). 2) You used ultra-pasteurized dairy. Fix: Reheat to 180°F and add 1 extra tbsp acid. Still no curds? Sadly, start over with different milk.
Q: Why is my cream cheese grainy?
A: Usually from under-blending or cold curds. Solution: Blend longer (up to 5 mins)! If still grainy, warm the mixture slightly by placing the blender jar in warm water for 5 mins before re-blending.
Q: How long does it last?
A: 2 weeks in the fridge! Always use clean utensils to scoop. No preservatives = shorter life than store-bought, but oh-so-worth-it.
Nutrition Facts (Per 2 tbsp)
Calories: 90 | Fat: 9g (Saturated: 6g) | Carbs: 1g | Protein: 1.5g | Sodium: 60mg (with salt)
Print
Homemade Cream Cheese
- Total Time: 1 hour 15 minutes
- Yield: 1½ cups 1x
Description
This creamy, tangy spread is surprisingly simple to make and incredibly satisfying. With just a few ingredients and no fancy equipment, you’ll have fresh cream cheese that tastes better than anything store-bought. Ideal for bagels, dips, and spreading on everything!
Ingredients
4 cups whole milk
2 cups heavy cream
3 tablespoons white vinegar or lemon juice
½ teaspoon salt (optional)
Instructions
In a saucepan, heat milk and cream over medium heat until just about to boil.
Turn off the heat and stir in vinegar or lemon juice. Let it sit for 10–15 minutes until curds form.
Pour the mixture through a cheesecloth-lined strainer to remove the whey. Let drain for at least 1 hour.
Transfer the curds to a blender or food processor and blend until smooth and creamy. Add salt if desired.
Store in the fridge in an airtight container.
- Prep Time: 15 minutes
- Drain Time: 1 hour
Nutrition
- Calories: 90 per 2 tbsp
- Sodium: 60mg per 2 tbsp
- Fat: 9g per 2 tbsp
- Saturated Fat: 6g per 2 tbsp
- Carbohydrates: 1g per 2 tbsp
- Protein: 1.5g per 2 tbsp
Final Thoughts: Cream Cheese, Reimagined
At the end of the day, homemade cream cheese isn’t just about ditching the plastic tub—it’s about reclaiming flavor. It’s soft, luscious, and bursting with character, unlike the waxy blandness we’ve come to accept from store shelves. Once you taste that tangy richness made right in your own kitchen, there’s no going back.
The beauty? It’s beginner-friendly, budget-smart, and wildly customizable. Whether you’re schmearing it on a bagel, swirling it into pasta, or leveling up your frosting game, this is the kind of simple luxury that makes you feel like a food wizard. Plus, it’s a conversation starter—because who makes their own cream cheese? You do now.
So here’s your nudge: trust the process, embrace the curds, and get a little messy in the name of deliciousness. Cream cheese this fresh doesn’t just elevate your food—it elevates your kitchen confidence.
— Jackson 🥯✨


