Spooky, Chewy, and Oh-So-Gooey: Your New Halloween Cookie Obsession
Hey there, Food Meld family! Jackson here, coming at you from a kitchen that currently looks like a candy corn factory exploded. And you know what? I wouldn’t have it any other way. It’s that magical time of year when the air gets crisp, the leaves start to turn, and we all get a free pass to embrace our inner goblin, ghoul, or gourmet cookie monster.
If you’re like me, you believe the best Halloween memories aren’t just made while trick-or-treating—they’re made in the kitchen. The smell of something sweet baking in the oven, the laughter as you decorate with little ones (or just your fun-loving adult friends), and the pure joy of biting into a treat that’s equal parts delicious and delightfully spooky. That’s the energy we’re bringing today.
We’re taking the undisputed champion of cookies—the classic chocolate chip—and giving it a full Halloween makeover. Imagine: your favorite chewy, buttery, soft-centered cookie, packed with melty chocolate chips, but then we crank the fun dial to eleven. We’re talking vibrant Halloween M&Ms in every bite, playful candy eyeballs staring back at you, and a dough that’s just begging to be mixed, scooped, and devoured. This recipe is my go-to for party platters, for surprising the neighbors, or for just satisfying that late-night monster munchies craving. It’s simple, it’s real, and it is absolutely packed with flavor and fun. So, preheat those ovens, grab your favorite mixing bowl, and let’s cook something awesome together.
The Cookie That Started It All: A Sweet (and Sticky) Memory
This recipe takes me right back to my grandma’s linoleum-floored kitchen. Every Halloween, she’d let my cousins and me go absolutely feral with cookie decorations. Her base recipe was a simple, perfect chocolate chip cookie, but the real magic was in the “meld.” She’d clear the entire table and lay out bowls of sprinkles, tubes of icing, and every kind of candy you could imagine. It was a free-for-all of creativity, and it was glorious.
I remember one year, I was so determined to create the ultimate monster cookie that I used about half a jar of green sprinkles and so many candy eyes it looked like a spider egg sac. It was a mess. It was hideous. And it was the most delicious, proudest creation of my seven-year-old life. That’s the spirit I’ve tried to bottle with this recipe. It’s not about perfection; it’s about the joy of creating something uniquely yours. It’s about getting your hands a little dirty, laughing when an eyeball falls off, and, most importantly, sharing the delicious, spooky results with people you love. That’s the heart of Food Meld, right there.
Gathering Your Monster-Making Supplies
This is a double batch, my friends, because these cookies disappear faster than a ghost in the night. Trust me, you’ll want extras for your cookie jar, your freezer, and for bribing… I mean, generously sharing with your friends. Here’s what you’ll need:
- 2 cups unsalted butter, softened – This is the foundation of flavor and that perfect chewy-yet-crispy texture. Chef’s Insight: “Softened” means cool to the touch but your finger can leave a gentle indent. Don’t melt it! If you forget to take it out of the fridge, cut it into chunks and it will soften faster.
- 2 cups brown sugar & 1 cup granulated sugar – The brown sugar brings that deep molasses moisture for a chewy center, while the white sugar helps create those gorgeous crispy edges.
- 4 large eggs – They bind everything together. Make sure they’re at room temperature to create a smoother, more emulsified dough.
- 4 tsp vanilla extract – The secret weapon! It enhances all the other flavors. Don’t be shy with it.
- 5 cups all-purpose flour – The structure of our cookie. Pro Tip: For a more consistent result, fluff your flour with a spoon, scoop it into your measuring cup, and level it off. Don’t pack it in!
- 2 tsp baking soda & 2 tsp salt – The baking soda is our leavening agent for the perfect rise, and the salt is absolutely crucial. It cuts the sweetness and makes the chocolate flavor pop. Don’t skip it!
- 2½ cups semi-sweet chocolate chips – The classic. I like a mix of semi-sweet and dark chocolate for a richer flavor, but use your favorite!
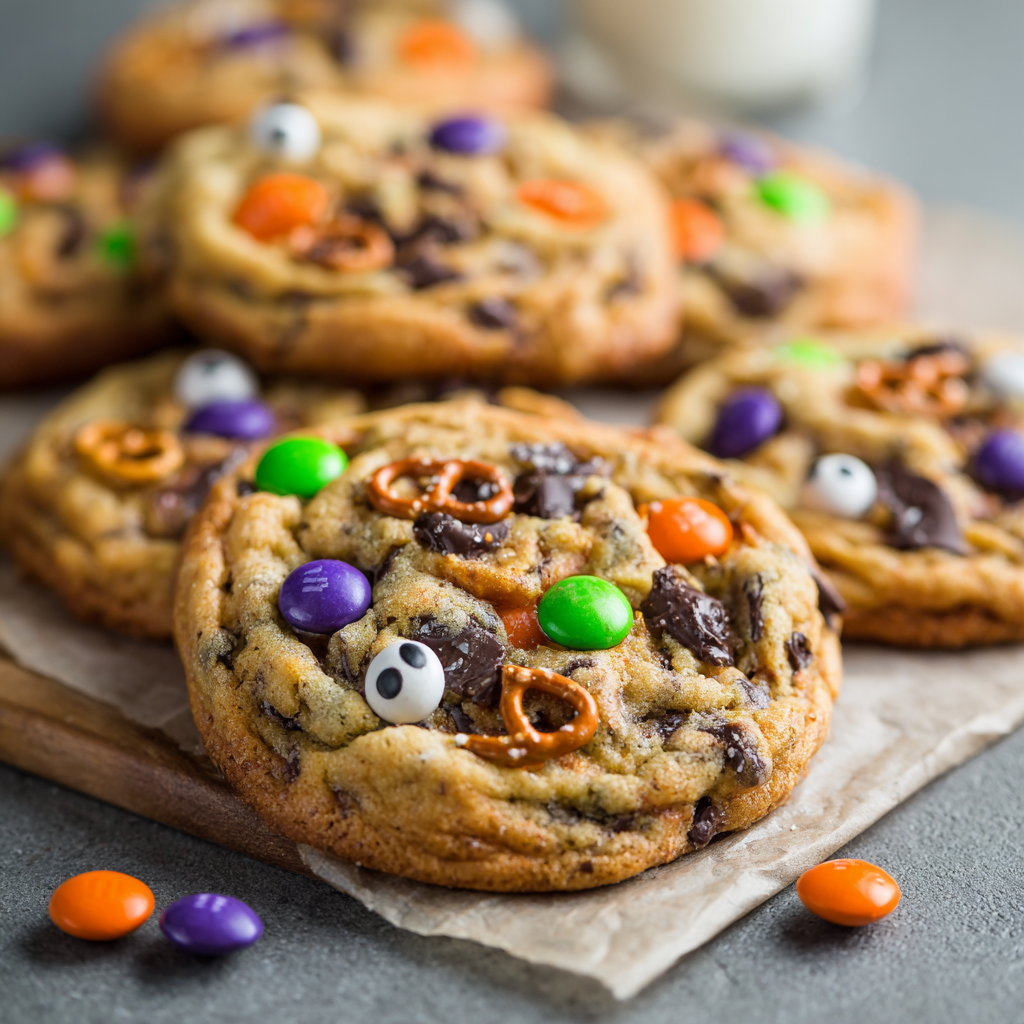
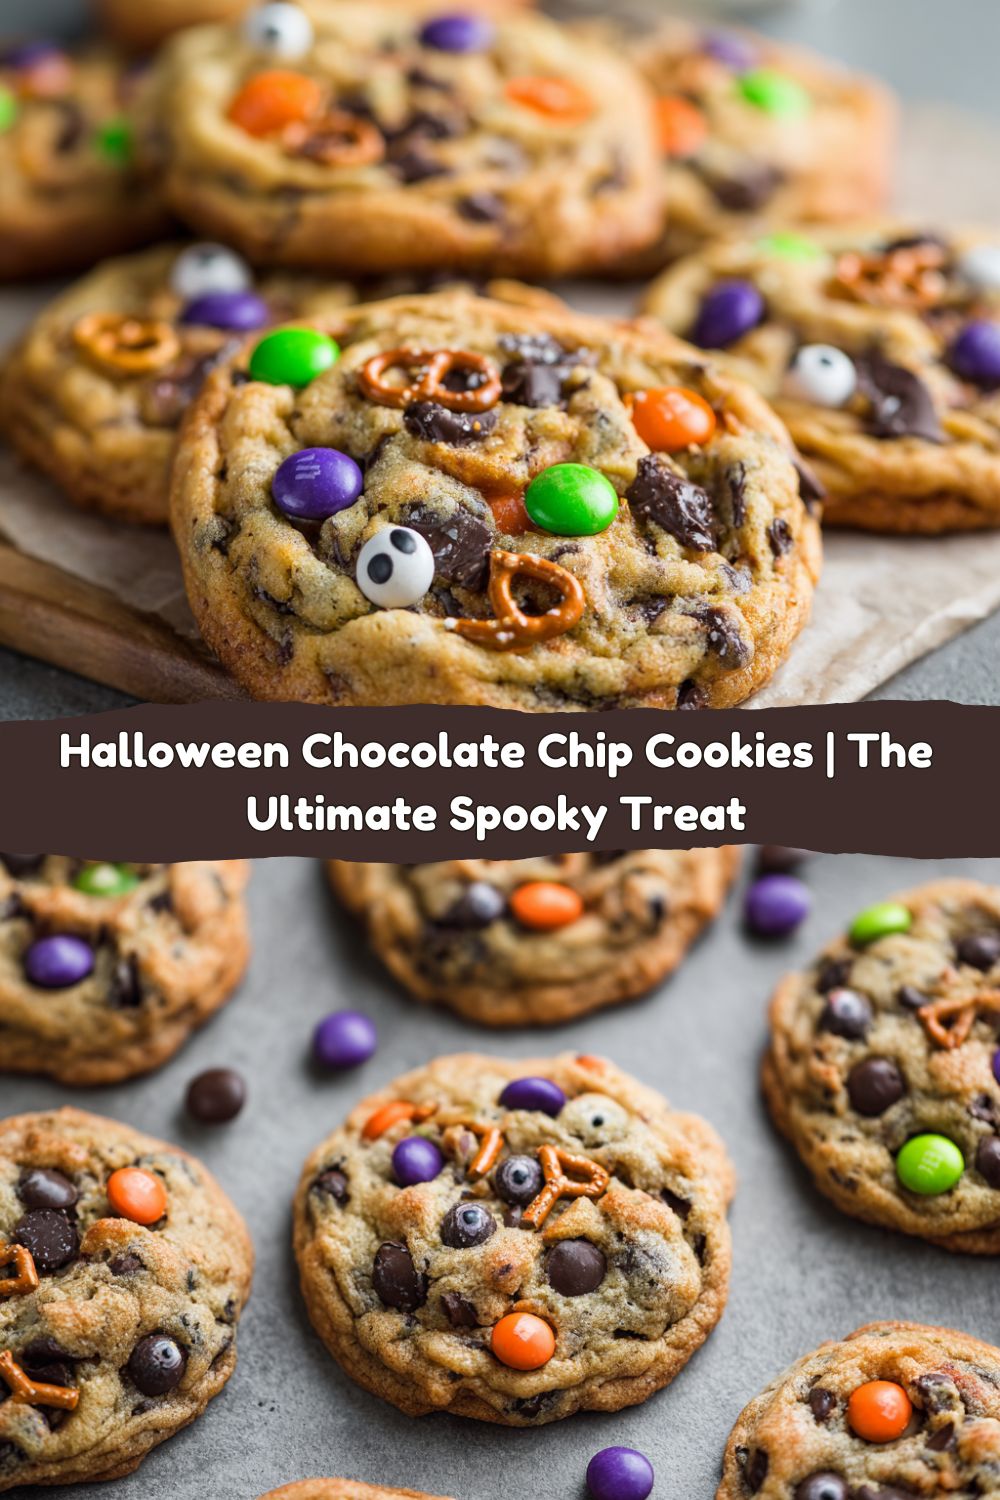
- 1½ cups Halloween M&Ms – This is where the festive color comes in! Those orange, purple, green, and black candies make every cookie a celebration.
- 1 cup candy eyeballs – The pièce de résistance! These are non-negotiable for maximum spooky factor. You can find them in the baking aisle or online.
Optional Twists & Swaps:
- Allergic to eggs? A flax egg (1 tbsp ground flax + 3 tbsp water per egg) works great here.
- Want a gluten-free version? A 1:1 gluten-free baking flour blend will work perfectly.
- Out of M&Ms? Chopped-up Reese’s Pieces or Halloween-colored chocolate bars are a fantastic substitute.
Let’s Make Some Magic: The Step-by-Step Spell
Okay, team, let’s do this. Put on some spooky tunes, and let’s get mixing. This is a straightforward process, but I’ve packed in all my best tips to ensure cookie perfection.
Step 1: Preheat & Prep
Preheat your oven to 350°F (175°C). Line your baking sheets with parchment paper. Chef’s Hack: This is the single best trick for preventing sticking and making cleanup a breeze. No parchment? A silicone baking mat works wonders, too.
Step 2: Cream the Butter & Sugars
In a large bowl, cream together the softened butter, brown sugar, and granulated sugar. Use a hand mixer or stand mixer with the paddle attachment on medium speed. Do this for a good 2-3 minutes until the mixture is light, fluffy, and pale in color. Why this matters: This step incorporates air into the dough, which is key for the perfect texture. Don’t rush it!
Step 3: Add Eggs & Vanilla
Beat in the eggs, one at a time, making sure each is fully incorporated before adding the next. Then mix in the vanilla extract. Scrape down the sides of the bowl with a spatula to ensure everything is homogenous.
Step 4: Combine the Dry Ingredients
In a separate bowl, whisk together the flour, baking soda, and salt. Why whisk? This evenly distributes the baking soda so you don’t get a bitter, concentrated bite in one cookie. Gradually add the dry ingredients to the wet ingredients, mixing on low speed until just combined. The second you no longer see dry flour, STOP. Overmixing is the enemy of a tender cookie!
Step 5: The Fun Part: The Fold-In
Now, using your trusty spatula, gently fold in the semi-sweet chocolate chips and the Halloween M&Ms. If you’re adding any optional twists like cinnamon or chopped pretzels, now’s the time. If you’re using food coloring, add a few drops and fold until you get a swirled or uniform color—your choice! Pro Tip: Reserve a handful of the M&Ms and chocolate chips to press onto the tops of the cookie dough balls right before baking. This makes them look bakery-level gorgeous.
Step 6: Scoop & Decorate
Use a cookie scoop or a tablespoon to portion the dough into 1.5-inch balls. Place them about 2 inches apart on your prepared baking sheets. Now, press your reserved chocolate chips and M&Ms onto the tops of the balls. Finally, gently press 3-5 candy eyeballs into each dough ball. Chef’s Note: Pressing them in now ensures they stay put during baking. If you just drop them on top, they might roll off!
Step 7: Bake to Perfection
Bake for 10-12 minutes. The cookies are done when the edges are set and golden brown, but the centers still look soft and slightly underdone. This is the most important tip! They will continue to cook on the hot baking sheet. For a super chewy cookie, lean towards the 10-minute mark.
Step 8: The Patience Test
Let the cookies cool on the baking sheet for at least 5 minutes. I know it’s hard, but this allows them to set up properly. Then, transfer them to a wire rack to cool completely… or, you know, just grab a glass of milk and enjoy one warm and gooey right then and there. I won’t tell.
How to Serve These Spooky Sensations
Presentation is part of the fun! Pile these cookies high on a rustic wooden board or a classic black platter for maximum Halloween vibes. For a party, create a “monster mouth” by placing a row of cookies on a platter and using red icing to drizzle “blood” between them. They’re perfect stacked high in a jar as a centerpiece, bundled into cellophane bags as the ultimate trick-or-treat gift for neighbors, or simply served on a napkin with a mischievous grin. The only wrong way to serve them is to not serve them at all!
Mix It Up: Creative Halloween Twists
This recipe is a fantastic canvas for your creativity. Here are a few of my favorite ways to mix it up:
- Pumpkin Spice & Everything Nice: Add ½ tsp of cinnamon or a full teaspoon of pumpkin pie spice to the dry ingredients for a warm, autumnal flavor.
- Salty-Sweet Monster: Fold in 1 cup of roughly chopped pretzels or potato sticks for an incredible salty crunch that contrasts the sweet chocolate.
- Double Chocolate Decadence: Replace ½ cup of the flour with ½ cup of unsweetened cocoa powder for the ultimate deep, dark chocolate experience.
- Gluten-Free Ghoul: Swap the all-purpose flour for your favorite 1:1 gluten-free baking blend. The results are just as spooktacular!
- Nutty Creature Feature: Add 1 cup of toasted walnuts or pecans for a rich, nutty flavor and extra texture.
Jackson’s Chef Notes & Kitchen Stories
This recipe has evolved so much from my grandma’s original. I’ve tweaked the sugar ratios over the years for that ideal chew, and I firmly believe the double dose of vanilla is non-negotiable. One of my favorite kitchen fails was the time I accidentally used salted butter and forgot to adjust the salt. They were… aggressively salty. My friends still joke about my “salted caramel pretzel monster cookies” that were just a happy accident gone wrong!
A word on the eyeballs: they hold up surprisingly well in the oven, but they can sometimes get a little “crazed” looking (little cracks in the icing). I think it just makes them look more monster-like, so I love it! If you want them perfect, you can always press a few fresh ones into the warm cookies right when they come out of the oven. The most important note? Have fun with it. Cooking should be joyful, not stressful. So if your cookies aren’t perfectly round or one has way more eyeballs than the others, who cares? They’ll taste incredible.
FAQs: Your Cookie Questions, Answered
Q: My cookies spread too much and got flat! What happened?
A: This is usually one of three things: 1) Your butter was too warm or melted. It should be softened but still cool. 2) Your baking sheet was still warm from a previous batch. Always use a cool sheet. 3) You might need a touch more flour. If your dough feels overly sticky, add another 2-3 tablespoons of flour next time.
Q: Can I make the dough ahead of time?
A: Absolutely! This dough is fantastic for chilling. Scoop the dough balls, place them on a tray, and freeze them solid. Then, toss them into a freezer bag. You can bake them straight from frozen—just add 1-2 minutes to the bake time. Hello, fresh cookies anytime!
Q: My candy eyes melted/deformed in the oven. How do I prevent that?
A: Some brands are more heat-stable than others. Pressing them firmly into the dough ball so they are mostly submerged helps protect them. You can also do what I mentioned above and press fresh ones into the hot cookies right after they come out of the oven—they’ll stick perfectly.
Q: Can I use milk chocolate chips instead of semi-sweet?
A: Of course! Use whatever chocolate you love best. Milk chocolate will make for a sweeter cookie, while dark chocolate will give a richer, less sweet result. It’s all about your preference.

Halloween Chocolate Chip Cookies
- Total Time: 30 minutes
- Yield: 36 - 40 Cookies 1x
Description
These Halloween Chocolate Chip Cookies are everything you love about the classic, but with a spooky twist! Soft centers, crispy edges, loads of chocolate chips—and bursts of Halloween colors, candy eyes, and themed M&Ms. We’ve doubled the batch for parties, trick-or-treat trays, or late-night monster munching.
Ingredients
2 cups unsalted butter, softened
2 cups brown sugar
1 cup granulated sugar
4 eggs
4 tsp vanilla extract
5 cups all-purpose flour
2 tsp baking soda
2 tsp salt
2½ cups semi-sweet chocolate chips
1½ cups Halloween M&Ms (orange, purple, green, etc.)
1 cup candy eyeballs
Optional twists:
½ tsp cinnamon or pumpkin spice (for fall warmth)
1 cup chopped pretzels (for salty crunch)
A few drops of orange or purple food coloring (for the dough)
Instructions
Preheat oven to 350°F (175°C). Line baking sheets with parchment paper.
In a large bowl, cream together butter, brown sugar, and granulated sugar until light and fluffy.
Beat in eggs and vanilla until well combined.
In another bowl, whisk flour, baking soda, and salt. Gradually add dry ingredients to wet until a soft dough forms.
Fold in chocolate chips, Halloween M&Ms, and any mix-ins (pretzels, food coloring, etc.).
Scoop dough into 1.5-inch balls and place on baking sheets. Press candy eyeballs into the tops of each cookie.
Bake 10–12 minutes, until edges are golden and centers are soft. Cool on tray 5 minutes, then transfer to a rack.
- Prep Time: 15 minutes
- Cook Time: 15 minutes
Nutrition
- Calories: 230 / Cookie
- Sugar: 18g / Cookie
- Sodium: 180mg / Cookie
- Fat: 12g / Cookie
- Saturated Fat: 7g / Cookie
- Carbohydrates: 30g / Cookie
- Protein: 2g / Cookie
Nutritional Information
*This is an estimate provided for informational purposes only. I’m a chef, not a dietitian!
Per Cookie (based on 40 cookies): Calories: ~230 | Fat: 12g | Saturated Fat: 7g | Carbohydrates: 30g | Sugar: 18g | Protein: 2g | Sodium: 180mg
Final Thoughts
At the end of the day, these cookies aren’t just about sugar, butter, and candy eyeballs—they’re about the joy of getting a little messy, laughing at the wonky ones, and sharing something homemade with the people you love. Halloween only comes once a year, but the spirit of spooky fun (and chewy, gooey cookies) is something we can keep alive any time we want.
So fire up that oven, blast a Halloween playlist, and let your inner cookie monster run wild. Whether you pile them high for a party platter, wrap them up for trick-or-treat gifts, or sneak one warm straight off the sheet pan, these cookies deliver big flavor, big fun, and big smiles.
Here’s to spooky bakes, sticky fingers, and the sweet kind of memories that last way past October 31st. Now go make some magic, friends—you’ve got monsters to feed!


