Why This Trifle is About to Become Your Go-To Dessert
Hey friends, Jackson here from Food Meld. Let’s talk about a dessert that looks like you spent all day in a fancy pastry kitchen but secretly comes together with more “assembly” than “actual stress.” I’m talking about this Fresh Fruit & Vanilla Cream Trifle. Imagine this: soft, buttery cake, clouds of vanilla-speckled cream, and layers of juicy, sun-ripened berries all piled high in a glass bowl where everyone can see the gorgeous stripes of deliciousness. It’s the kind of dessert that makes people’s eyes light up the second you bring it to the table.
But here’s my favorite part—it’s genuinely easy. This isn’t about perfect piping or tempering chocolate. It’s about layering awesome things that taste amazing together. Whether you’re hosting a summer BBQ, need a show-stopper for a birthday brunch, or just want to treat your family to something special on a Tuesday night, this trifle has your back. It’s forgiving, flexible, and absolutely packed with flavor. It’s the dessert embodiment of my whole philosophy: cooking should be fun, a little messy, and always, always end with a “wow, you made this?!” moment. So, grab your biggest glass bowl (or even some individual jars!), and let’s build something beautiful and delicious together.
The Trifle That Won Over My Grandma’s Bridge Club
This recipe takes me straight back to my grandma’s linoleum kitchen, the smell of baking cake mixing with the sweet scent of strawberries from the farmer’s market. She was the queen of “making do,” but when her bridge club came over, she’d pull out all the stops. Her version of this trifle was made with day-old biscuits, hand-whipped cream, and whatever fruit was almost too ripe. She’d let me help layer it, my small hands carefully arranging the berry slices on the sides of her precious cut-glass bowl.
I’ll never forget the sound of twelve ladies going silent when she presented it, followed by the chorus of “Oh, Mabel!” and the clinking of spoons. That moment taught me something powerful: impressive food isn’t about the most expensive ingredients; it’s about heart, color, and the joy of sharing. My version is a direct descendant of hers—a little more refined maybe, but with the same soul. It’s a dessert that feels like a hug, and isn’t that what we all need sometimes?
Gathering Your Flavor Building Blocks
Here’s the beautiful part—you only need a handful of simple ingredients to create pure magic. I’ll walk you through each one with some tips to make it your own.
- 4 cups cubed pound cake or sponge cake: This is your trifle’s foundation. I often use a good store-bought all-butter pound cake to save time—it holds up beautifully against the cream. Chef’s Insight: Stale cake is actually a trifle’s best friend! It soaks up the flavors without getting soggy. Got leftover cake from a birthday? This is its glorious destiny.
- 2 cups fresh mixed berries (strawberries, blueberries, raspberries): The star of the show! Use what’s in season and looks brightest. Substitution Tip: No fresh berries? Frozen (thawed and well-drained) work in a pinch, or try sliced peaches, mango, or even passionfruit for a tropical twist.
- 1 1/2 cups heavy whipping cream: Please, for the love of fluffy clouds, make sure your cream and your bowl are cold. It whips faster and higher. Chef’s Hack: Pop your metal mixing bowl and beaters in the freezer for 15 minutes before you start.
- 1/2 cup vanilla pudding or custard: This is my secret weapon for a stable, luscious cream that won’t weep. Use a high-quality store-bought refrigerated custard or make a quick pudding from a mix. Chef’s Insight: This little bit of pudding gives the whipped cream body and a deeper vanilla flavor that just plain whipped cream can’t match.
- 2 tablespoons sugar: Just enough to sweeten the cream and balance the tart berries.
- 1 teaspoon pure vanilla extract: Don’t skimp! The good stuff makes all the difference. See a tiny black speck in your cream? That’s the flavor gold.
- Optional: mint leaves or extra berries for garnish: The final flourish! A few bright green mint leaves or a single perfect berry on top makes it look professionally styled.
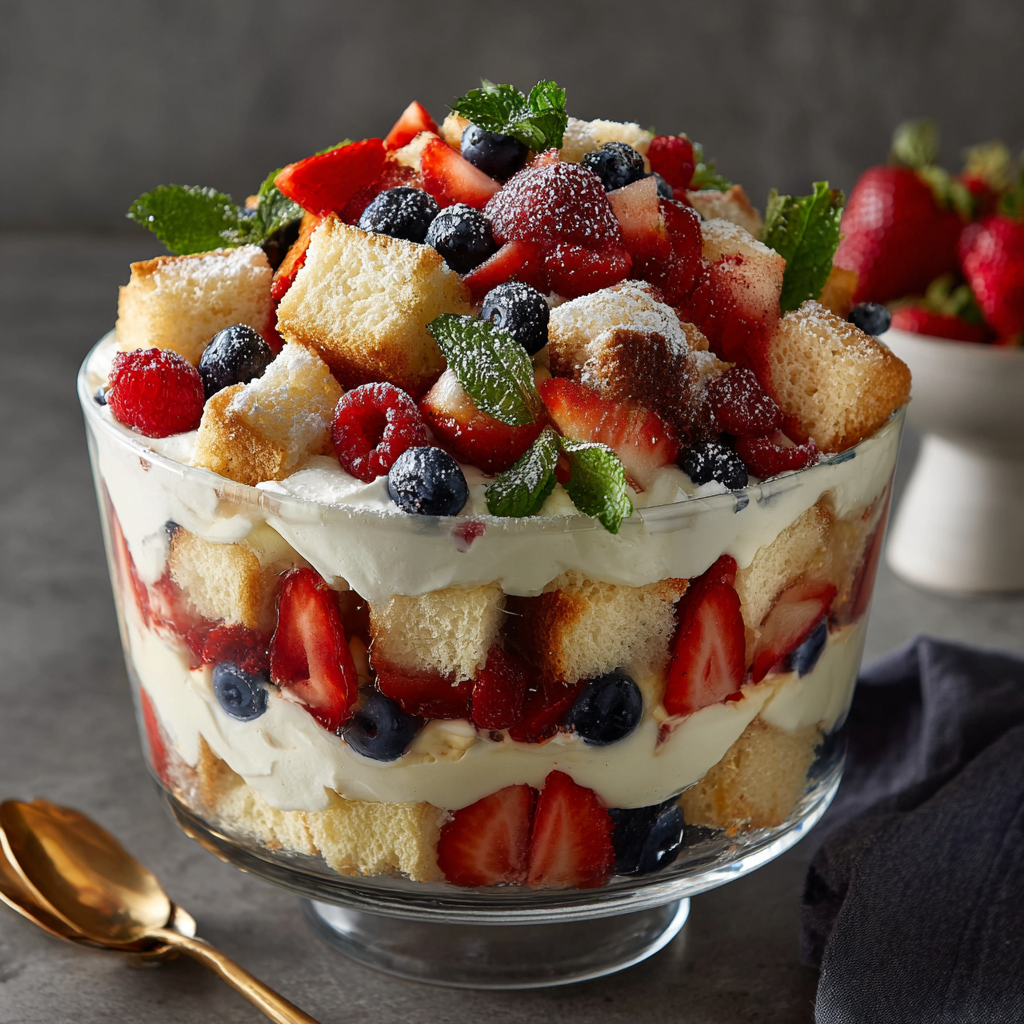
Let’s Build Some Delicious Layers!
Ready? This is the fun part. We’re not just making dessert; we’re creating edible art. Put on some music, and let’s get layering.
- Whip the Dreamy Cream. In that chilled bowl, pour in your cold heavy cream, sugar, and vanilla extract. Using a hand mixer or stand mixer fitted with the whisk attachment, beat on medium-high speed. Watch it transform from liquid to soft, billowy peaks. Pro Tip: Stop when the peaks gently fold over when you lift the beaters. Don’t go to stiff peaks, or it’ll be grainy. Now, gently fold in the vanilla pudding with a spatula until just combined. This is your vanilla cream—taste it (you know you want to) and congratulate yourself.
- Prep Your Components. Cube your cake into 1-inch pieces. Hull and slice your strawberries. Have your berries and cream assembly-line ready. Chef’s Hack: If you want a “wow” factor, take a handful of berry slices and press them against the inside of your clear trifle bowl for the first layer. It creates a stunning fruit-lined wall when you look at it from the outside.
- Layer #1: The Foundation. Start with a layer of cake cubes at the bottom of your dish. No need to be too neat—just create an even base. I like to gently press them down just a touch.
- Layer #2: The Creamy Blanket. Dollop a generous amount (about a third) of your vanilla cream over the cake. Use the back of a spoon to spread it into an even layer, making sure to push it to the edges so you see a clean white stripe.
- Layer #3: The Fruity Burst. Scatter a handful of mixed berries over the cream. Get a mix of colors and sizes in there for visual pop.
- Repeat and Conquer. Do it all again! Cake, cream, berries. Usually, two full cycles of layers are perfect, but let your dish be your guide. You want to end with a beautiful, swoopy top layer of vanilla cream.
- The Grand Finale. Artfully arrange a few of your most perfect berries and mint leaves on top of the final cream layer. This is your masterpiece moment.
- The Crucial Chill. Cover the trifle with plastic wrap and refrigerate for at least 1 hour, but ideally 2-3. This step is non-negotiable. It lets the cake soften just slightly and the flavors meld into one incredible, cohesive dessert.
How to Serve It Like a Pro
Presentation is half the fun with a trifle! For a big gathering, place the whole bowl right in the center of the table and let people ooh and aah. To serve, use a large, deep spoon to dig all the way down to the bottom, ensuring everyone gets every glorious layer in one scoop. For a more individual touch, layer the components in clear mason jars or fancy glasses for personal parfaits—these are awesome for picnics or parties where people are mingling. No matter how you serve it, pair it with a cup of good coffee, a glass of sparkling wine, or just the happy anticipation of your friends and family. It’s a dessert that serves up joy by the spoonful.
Make It Your Own: 5 Flavor Twists to Try
The basic formula is your canvas. Here’s where you can get creative and really mix it up!
- Lemon Berry Sunshine: Add the zest of one lemon to your whipped cream. Use lemon curd instead of vanilla pudding, and layer with blueberries and raspberries. Bright, tangy, and utterly refreshing.
- Tropical Escape: Swap the pound cake for cubes of angel food cake. Use mango, pineapple, and kiwi for the fruit. Fold a tablespoon of toasted coconut into the cream for a piña colada vibe.
- Chocolate-Covered Strawberry: Use chocolate pound cake. Add a tablespoon of unsweetened cocoa powder to the cream as you whip it. Layer with only strawberries and maybe a drizzle of chocolate sauce between layers.
- Boozy Berry Bliss (For the Grown-Ups): Lightly brush your cake cubes with a mixture of 2 tablespoons of Chambord, Grand Marnier, or a nice sherry before layering. It adds an incredible depth of flavor.
- Dairy-Free Dream: Use a vegan pound cake or brownie. Chill a can of full-fat coconut milk overnight, scoop out the solid cream, and whip it with sugar and vanilla. Fold in dairy-free vanilla pudding. It’s just as decadent!
A Few Notes From My Kitchen to Yours
This recipe has evolved so much from my grandma’s biscuit version. I’ve made it for probably a hundred different occasions now, from fancy engagement parties to casual “I need dessert now” emergencies. One time, I was in such a hurry I used chocolate chip muffins for the cake layer and just went with it—it was a hilarious, delicious mess that everyone loved. That’s the spirit! Don’t be afraid to play. The trifle is forgiving. The only real mistake is not letting it chill—that time in the fridge is what turns separate ingredients into one harmonious dessert. Also, if your layers get a little messy as you build? Who cares! It all tastes the same, and it always looks beautiful because YOU made it.
Your Trifle Questions, Answered
Q: Can I make this trifle the night before?
A: You can! Assemble it completely, cover tightly, and refrigerate overnight. The cake will be softer and more custard-like, which is actually delicious. Add any fresh berry garnish on top right before serving so they don’t get mushy.
Q: My cream is runny/won’t whip up. What happened?
A> This is almost always a temperature issue. Was your cream or bowl not cold enough? If it’s truly not whipping, you can try salvaging it by chilling everything again and re-whipping. To prevent it, ensure your cream has a fat content of at least 36% and is very cold.
Q: What’s the best dish to use?
A> A straight-sided, clear glass bowl is classic. But don’t let that stop you! I’ve used a large clear vase, a punch bowl, and even a 9×13 baking dish with a glass lid. The goal is to see the layers, so clear is best.
Q: Can I use Cool Whip instead of homemade cream?
A> You can, for sure. Thaw it, fold in the vanilla pudding, and use it as your cream layer. It’s stable and sweet. But for flavor and that “from-scratch” pride, I’ll always champion real whipped cream.
Nutritional Information*
Alright, let’s keep it real. This is a celebration dessert, and it’s meant to be enjoyed as such. Here’s a rough breakdown per serving (based on 8 servings), but remember, your actual calories may vary based on specific ingredients and cake used. The fresh fruit brings vitamins, antioxidants, and a touch of natural sweetness to the party!
- Calories: ~300
- Protein: 4g
- Carbohydrates: 28g
- Fat: 18g
- Fiber: 2g (Thank you, berries!)
*This is an estimate provided for informational purposes. For precise dietary needs, please calculate using your exact ingredients and brands.
Let’s Keep the Fun Going!
And there you have it—your guide to creating a dessert that’s as fun to make as it is to eat. This Fresh Fruit & Vanilla Cream Trifle is more than just a recipe; it’s a confidence-builder. It proves that you don’t need fancy skills to create something spectacular. You just need good ingredients, a little layering love, and the willingness to dig in with a big spoon.
I hope this recipe brings as much joy to your table as it has to mine over the years. Remember, the best dishes are the ones shared with people you love. So, make a trifle, call some friends, and create your own “Oh, Mabel!” moment. I’d love to see your creations! Tag me @FoodMeld on Instagram so I can cheer you on. Now, go cook something awesome. Talk soon, friends.
– Jackson


