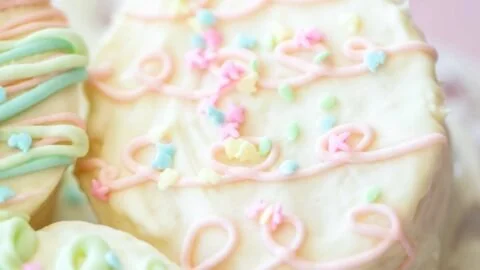
Easter Egg Mini Snack Cakes: A Sweet Celebration!
Spring has sprung, and you know what that means—Easter is just around the corner! 🌷 As flowers bloom and the weather warms up, it’s time to gather friends and family for some festive fun. And what better way to celebrate than with these adorable Easter Egg Mini Snack Cakes?
Picture this: vibrant pastel colors, deliciously soft cake, and a sweet surprise tucked inside. These delightful little treats are perfect for both kids and adults, making them the star of any Easter brunch or family gathering. But it’s not just about the taste; it’s about creating lasting memories in the kitchen. Whether you’re on egg hunt duty or prepping a picnic, these mini cakes will bring smiles to everyone’s faces.
Now, let me take you back to my childhood, where my love for baking began—right in my grandma’s kitchen. Every Easter, she would whip up delightful treats for the family, and one of my favorites was her special mini cakes filled with chocolate or berry goodness. I still remember the way the powdered sugar danced in the sunlight as we dusted the finished cakes, giggling with excitement. Those moments ignited my passion for baking and led me to create my own unique spin on mini cakes for Easter.
So grab that apron and let’s roll up our sleeves—these Easter Egg Mini Snack Cakes are not only a feast for the taste buds but also a canvas for creativity. With a bit of love and a sprinkle of sprinkles, you’ll have a delightful dessert that’s as playful as your Easter celebrations.
Personal Story
Every holiday, my grandmother would transform her kitchen into a sweet wonderland. Easter was no exception. I can still hear the whir of the mixer, the gentle clinking of measuring cups, and the sweet aroma of vanilla wafting through her cozy home. One of our cherished traditions was baking these little cakes that looked like Easter eggs, each one filled to the brim with surprises.
One year, I decided I wanted to take the creative lead. I envisioned cakes that didn’t just taste good, but also looked spectacular. With my grandma’s guidance, we decided to dye the cake batter with lovely pastel colors. When we finally cut into them and revealed the colorful insides, we squealed with joy! To me, those mini cakes represented not just a sweet treat but the celebration of spring, family, and love.
As I grew older, I found that cooking and baking were the perfect forms of expression. Now, I’m thrilled to share my own twist on those classic mini cakes, bringing together nostalgia and deliciousness in one little bite. Let’s make some unforgettable flavors together!
Ingredients
Here’s what you’ll need to make these delightful Easter Egg Mini Snack Cakes:
-
1 ½ cups all-purpose flour
The backbone of your cakes! You can use whole wheat flour for a healthier option, though they may be denser. -
1 cup granulated sugar
Sweetens the deal! If you’re looking for a less processed sweetener, coconut sugar can be a great substitute. -
½ cup unsalted butter, softened
Adds richness and flavor. Make sure it’s softened to room temperature for easy mixing or opt for a plant-based butter for a vegan version. -
2 large eggs
Provides structure and stability. For an egg-free option, you can use a flax egg (1 tablespoon of flaxseed meal mixed with 2.5 tablespoons of water). -
½ cup whole milk
Ensures a moist cake texture. Almond milk or oat milk work perfectly as dairy swaps. -
1 ½ teaspoons baking powder
Provides the necessary lift. Be sure it’s fresh; old baking powder can ruin your cake’s fluffiness. -
½ teaspoon vanilla extract
Brings a lovely aroma and flavor. You can switch it up with almond extract for a nutty twist! -
Colorful candy eggs (such as Cadbury Mini Eggs)
The surprise inside! Feel free to use any candy that fits the Easter theme—chocolate-covered cherries or jelly beans are fun alternatives. -
Powdered sugar for dusting
A finishing touch! If you’re feeling adventurous, you can mix in some cocoa powder for a chocolatey twist.
Ready to dive in? Let’s gather these ingredients and get to baking!
Step-by-Step Instructions
Now that we have all our ingredients ready, it’s time to dive into the fun stuff—making these charming little cakes! Follow these steps, and don’t worry; I’ll sprinkle in some cheeky tips along the way!
Step 1: Preheat Your Oven
Preheat your oven to 350°F (175°C) and grease a mini muffin pan (this will make around 24 mini cakes).
Step 2: Cream the Butter and Sugar
In a mixing bowl, beat the softened butter and granulated sugar together until light and fluffy, about 3-4 minutes. This is where magic happens! The air gets trapped, creating a fluffy texture. Pro tip: Scrape down the sides of the bowl halfway through for even mixing.
Step 3: Add in Eggs and Vanilla
Add the eggs one at a time, mixing well after each addition. Then pour in the vanilla extract and mix until combined. This mixture should be smooth and creamy.
Step 4: Combine Dry Ingredients
In a separate bowl, whisk together the flour and baking powder. This step ensures the baking powder is evenly distributed. Gradually add the dry ingredients to the butter mixture, alternating with the milk, starting and ending with the flour. Mix until just combined—don’t overmix! Trust me, this will keep your cakes light and airy.
Step 5: Color Your Batter
Here comes the fun part! Divide your batter into separate bowls and add food coloring to create your desired pastel shades. It doesn’t have to be perfect—embrace the swirls! For that nostalgic childhood feel, I love a mint green, soft pink, and sunny yellow.
Step 6: Fill the Muffin Pan
Scoop a tablespoon of each colored batter into the greased muffin pan, leaving a little space for the cakes to rise. Place a candy egg in the center of each scoop of batter. This will ensure a delightful surprise inside!
Step 7: Bake Those Cakes
Bake in your preheated oven for about 12-15 minutes or until a toothpick inserted in the center comes out clean. Your kitchen will smell amaze-balls at this point.
Step 8: Cool and Dust with Sugar
Once baked, let the mini cakes cool in the pan for about 5 minutes before transferring them to a wire rack. Allow them to cool completely, then gently dust with powdered sugar.
Step 9: Admire and Serve!
Stand back and admire your colorful creations before devouring! These mini cakes are not just a treat for the belly but also a feast for the eyes.
Serving Suggestions
Presentation is key! Here are a few ideas on how to serve your Easter Egg Mini Snack Cakes to make them even more festive:
- Nestled in Easter grass: Place your mini cakes on a bed of colorful Easter grass on a platter for a fun and whimsical look.
- Decorative cupcake liners: Use vibrant cupcake liners to add extra flair before serving.
- Accompany with coffee or tea: Serve these alongside freshly brewed coffee or tea for a delightful afternoon treat.
- Drizzle with chocolate: For an extra indulgent touch, drizzle some melted chocolate over the top before dusting with powdered sugar.
Feel free to get creative with your plating—the key is to make these little balls of joy as visually appealing as they are delicious!
Recipe Variations
Here are some creative twists and variations to make these mini snack cakes even more fun:
-
Fillings Galore: Instead of candy eggs, try filling them with fruit preserves, peanut butter, or even cream cheese for a tangy surprise!
-
Chocolate Version: Substitute some of the flour with cocoa powder to create rich chocolate mini cakes. Add chocolate chips for an extra treat!
-
Nutty Add-In: Mix in some crushed walnuts or pecans for added texture and flavor. Great for those who appreciate a bit of crunch!
-
Fruit Flavored: Substitute the vanilla with citrus zest (lemon or orange) and fold in some mini chocolate chips for a refreshing twist.
-
Gluten-Free: Use a 1:1 gluten-free flour substitute to cater to gluten sensitivities without losing any deliciousness!
Chef’s Notes
I always enjoy experimenting with different flavors and colors in my baking, and that’s the beauty of these snack cakes—you can truly make them your own. Each year, I like to brainstorm new themes for them. Last Easter, I went for a rainbow theme and incorporated all the colors—talk about a showstopper!
Baking should always be fun! Don’t be afraid to throw on some music, dance a little, and let your creativity run wild as you whip up these treats. It’s this joyful spirit that makes cooking so special.
FAQs and Troubleshooting
Q: My cakes are too dry. What did I do wrong?
A: Dry cakes are often the result of overmixing or overbaking. Make sure not to mix your batter too long and always check for doneness a few minutes before the recommended baking time.
Q: How can I make these cakes without eggs?
A: You can replace each egg with a flax egg (1 tablespoon of flaxseed meal mixed with 2.5 tablespoons of water) or unsweetened applesauce for a vegan-friendly treat!
Q: Can I freeze these mini cakes?
A: Absolutely! Freeze them in an airtight container. They can be thawed at room temperature or microwaved for a few seconds for a quick treat.
Q: What should I do if my batter is too thick?
A: If your batter seems too thick, add a pinch more milk to loosen it up. You want it to be smooth and easily scoopable.
Nutritional Info
Each mini snack cake clocks in at approximately 150 calories. Here’s a breakdown:
- Total Fat: 7g (Saturated Fat: 4g)
- Carbohydrates: 20g
- Sugar: 10g
- Fiber: 0.5g
- Protein: 2g
Keep in mind that swapping for alternative ingredients may shift these values a bit, but that’s the fun of baking—tailoring it to suit your tastes and dietary needs!
Final Thoughts
As we wrap up our baking journey, I hope these Easter Egg Mini Snack Cakes inspire you to create sweet memories in the kitchen. Whether you’re celebrating with family or looking for a cute treat to bring to a gathering, I promise these little cakes will bring joy and smiles all around.
Remember, baking isn’t just about flour and sugar; it’s about the love and creativity you pour into every bite. So let your personality shine, and enjoy every moment of the process. I can’t wait to hear how your creations turn out! Happy baking and Happy Easter! 🐣💖
Now, let’s get cooking, and don’t forget to save some for yourself—after all, you deserve that sweet treat too! 🍰✨
Print
Easter Egg Mini Snack Cakes
- Total Time: 30 minutes
- Yield: 24 mini cakes 1x
- Diet: Vegetarian
Description
Delightful mini cakes filled with colorful surprises, perfect for Easter celebrations.
Ingredients
- 1 ½ cups all-purpose flour
- 1 cup granulated sugar
- ½ cup unsalted butter, softened
- 2 large eggs
- ½ cup whole milk
- 1 ½ teaspoons baking powder
- ½ teaspoon vanilla extract
- Colorful candy eggs (such as Cadbury Mini Eggs)
- Powdered sugar for dusting
Instructions
- Preheat your oven to 350°F (175°C) and grease a mini muffin pan.
- In a mixing bowl, beat the softened butter and granulated sugar together until light and fluffy, about 3-4 minutes.
- Add the eggs one at a time, mixing well after each addition. Then pour in the vanilla extract and mix until combined.
- In a separate bowl, whisk together the flour and baking powder. Gradually add the dry ingredients to the butter mixture, alternating with the milk.
- Divide your batter into separate bowls and add food coloring to create your desired pastel shades.
- Scoop a tablespoon of each colored batter into the greased muffin pan, placing a candy egg in the center of each scoop.
- Bake for about 12-15 minutes or until a toothpick inserted in the center comes out clean.
- Let the mini cakes cool in the pan for about 5 minutes before transferring them to a wire rack. Dust with powdered sugar before serving.
- Admire your creations and enjoy!
Notes
Feel free to get creative with fillings and toppings! Consider using fruit preserves or drizzling with melted chocolate.
- Prep Time: 15 minutes
- Cook Time: 15 minutes
- Category: Dessert
- Method: Baking
- Cuisine: American
Nutrition
- Serving Size: 1 mini cake
- Calories: 150
- Sugar: 10g
- Sodium: 150mg
- Fat: 7g
- Saturated Fat: 4g
- Unsaturated Fat: 3g
- Trans Fat: 0g
- Carbohydrates: 20g
- Fiber: 0.5g
- Protein: 2g
- Cholesterol: 30mg
Keywords: Easter, mini cakes, snack cakes, dessert, baking