Cheesy Steak Quesadillas – Leftovers Never Tasted So Good
I’m here to tell you that those leftovers aren’t just a reheating project—they’re a golden ticket. They’re the secret head-start to one of the most delicious, crispy, melty, and downright satisfying meals you can make in under 20 minutes. I’m talking about Cheesy Steak Quesadillas.
This isn’t just throwing meat and cheese in a tortilla. This is a flavor revival mission. We’re taking that already-amazing steak, giving it a new best friend in the form of perfectly sautéed onions and peppers, wrapping it all in a blanket of gooey, melted cheese, and crisping it up in a hot skillet until it’s golden perfection. It’s the ultimate “cook once, eat twice” win, and it’s about to become your go-to move for quick lunches, effortless dinners, or the most popular snack on game day.
So, grab that leftover steak, and let’s turn yesterday’s triumph into today’s crispy, cheesy masterpiece. Trust me, you’ll start planning for leftovers.
The Grill Mishap That Started It All
This recipe has a special place in my heart because it was born from what I thought was a kitchen fail. Years ago, I was grilling for a big group of friends. I got a little… enthusiastic with the seasoning on a massive flank steak. Let’s just say I channeled my inner salt-bae a bit too heavily. The steak was flavorful but, whoa, intense on its own.
Instead of letting it go to waste, I stared at the leftovers the next day with a mission. I needed to balance it out, mellow the salt, and add some creamy, crunchy, fresh elements. I sliced it thin, piled it with mild Monterey Jack and sweet, soft onions, and let the hot skillet work its magic. The tortilla crisped, the cheese melted into every nook, and that powerful steak flavor transformed into the perfect, balanced bite. My friends who’d eaten it the night before said the quesadilla version was even better. A happy accident that taught me a killer lesson: leftovers aren’t an ending; they’re your first, best ingredient for something new.
Gathering Your Flavor Team
Here’s the beautiful part: you need just a few key players, and most are probably already in your kitchen. This is about building layers of texture and taste.
- 2 cups cooked steak, thinly sliced – This is your star! Sirloin, ribeye, flank, tri-tip—it all works. The key is to slice it against the grain and keep it thin. It makes every bite tender. Chef’s Insight: No leftover steak? No panic. Pick up a pre-cooked steak from the grocery store deli, or quickly sear a small, thin-cut steak (like a skirt or hanger steak) just for this. It’s still faster than starting from scratch on most dinners!
- 1½ cups shredded cheese – I love a blend. A mix of sharp cheddar for punch and Monterey Jack for that legendary meltability is my go-to. A “Mexican blend” from the store is a perfect shortcut. Pro Tip: Always shred your own cheese if you have an extra minute. Pre-shredded cheese has anti-caking agents that can make it a little less silky when it melts. For the ultimate melt, go for the block!
- 4 large flour tortillas (10-inch) – The vessel for our masterpiece. Flour tortillas get that perfect pliable-yet-crispy texture. Burrito-size gives you plenty of room to fill and fold.
- 1 tablespoon oil or butter – For that essential golden crisp. I use a neutral oil like avocado or canola for a higher smoke point, but butter… oh, butter gives you that irresistible, rich, almost nutty browning. Can’t go wrong.
- 1 medium onion, thinly sliced (Optional, but HIGHLY recommended) – Sweet yellow or white onions are perfect. Sautéing them transforms their sharp bite into a sweet, soft, caramelized wonder that pairs magically with the savory steak.
- 1 bell pepper, thinly sliced (Any color!) – Adds sweetness, color, and a little body. I love the red ones for their sweetness.
- To Serve: Sour cream, salsa, guacamole, hot sauce, pico de gallo – This is where you make it your own. The cool, creamy contrast of sour cream or guac is a must for me. A dash of hot sauce? Always.
Let’s Build Some Crispy Magic
Ready for the fun part? Fire up the stove, and let’s get cooking. This moves fast, so have everything prepped and within arm’s reach—we call this your *mise en place* (everything in its place).
- Wake Up the Veggies (If Using): Heat a drizzle of oil in a large skillet over medium heat. Toss in your sliced onions and peppers with a tiny pinch of salt. The salt helps them release their moisture. We’re not going for full caramelization (unless you want to!), just softening them and getting a little color, about 5-7 minutes. Once they’re sweet and tender, scoop them out into a bowl. Why we do this: Cooking them first ensures they’re perfectly tender. If you put them in raw, they might still be crunchy when your cheese is melted.
- Prep Your Station: Lay out your tortillas. Have your sliced steak, shredded cheese, and sautéed veggies ready to go. This is assembly line time! Little Chef Hack: Sprinkle a light layer of cheese on the tortilla *first*, before the steak. This first cheese layer acts like delicious glue, helping to anchor the fillings so they don’t all tumble out when you take a bite.
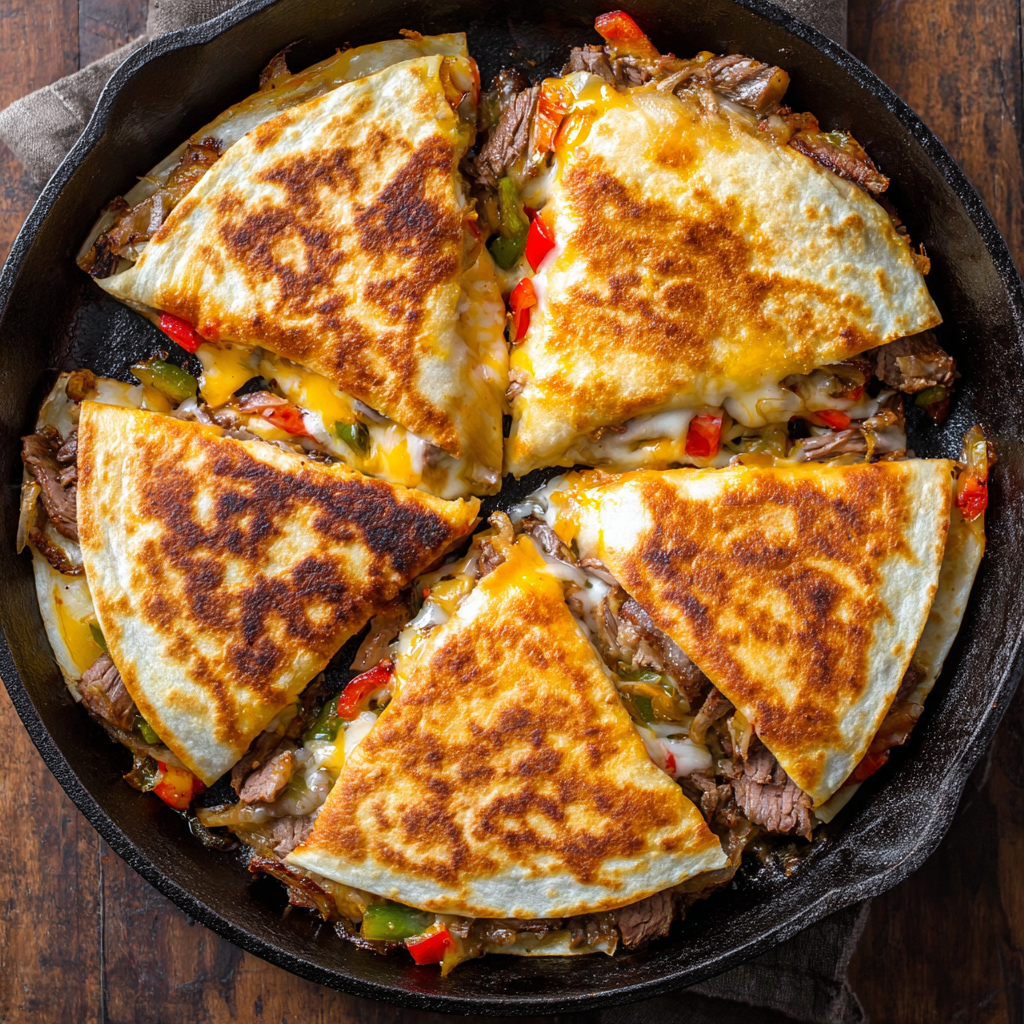
- The Art of the Fill & Fold: On one half of each tortilla, start your layers: a good pinch of cheese, then a generous scattering of steak and veggies, then another healthy pinch of cheese on top. That top layer of cheese is crucial—it melts and binds everything together from above. Don’t overfill! Leave a small border around the edge. Gently fold the bare half of the tortilla over the filling to create a perfect half-moon. Press down lightly.
- Crisp to Perfection: Wipe out your skillet or grab a clean one (a griddle is amazing for this). Heat it over medium heat and add your oil or butter. Once it shimmers, carefully add one or two quesadillas (don’t crowd the pan). Cook for 2-3 minutes on the first side, until it’s gorgeously golden brown and you can see the cheese starting to melt through the tortilla. The Flip: This is the moment of truth! Slide your spatula under the quesadilla, confidently lift, and flip it in one smooth motion. Cook for another 2-3 minutes on side two. You should hear a gentle, satisfying sizzle the whole time.
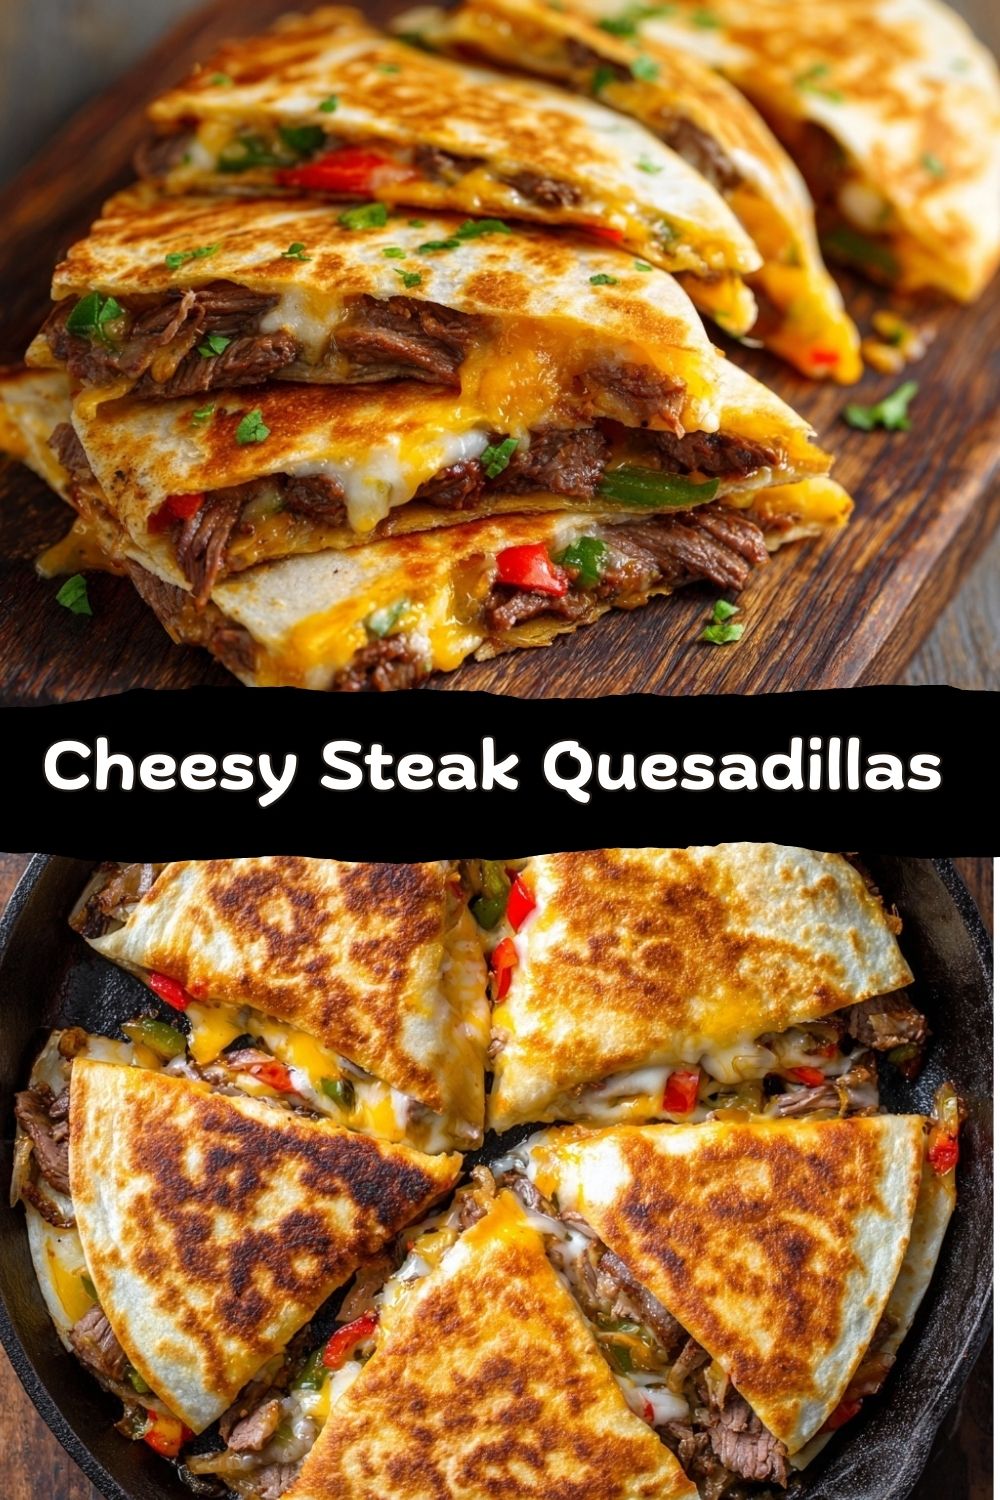
- The Rest & The Cut: As each quesadilla finishes, transfer it to a cutting board. Let it rest for just 60 seconds. I know, it’s hard! But this lets the molten cheese settle slightly so it doesn’t completely erupt when you cut it. Then, use a sharp knife or pizza cutter to slice it into 2 or 3 wedges. That sound of the crispy tortilla cracking? That’s the sound of success.
How to Serve These Beauties
Presentation is part of the fun! I like to arrange the wedges on a big platter, slightly fanned out so everyone can see that cheesy, steak-filled interior. Put all your dipping sauces and toppings in little bowls in the center—it encourages people to dig in and customize.
For a full meal, keep it simple and fresh. A crisp, simple side salad with lime vinaigrette cuts through the richness perfectly. If you’re feeding a hungry crowd, a big pot of cilantro-lime rice or some simply seasoned black beans turns this from a snack into a feast. And don’t forget the drinks—an ice-cold Mexican lager, a zesty margarita, or just a big pitcher of agua fresca is the perfect partner for this crispy, cheesy masterpiece.
Mix It Up & Make It Yours
The basic blueprint is foolproof, but the canvas is yours to paint. Here are a few of my favorite twists:
- Southwest Fiesta: Add a can of drained black beans and some roasted corn to the filling. Swap in pepper jack cheese and finish with a dollop of chipotle crema.
- Philly Cheesesteak Style: Use provolone or Cheez Whiz (no judgment!) for cheese, and add sliced mushrooms to the onion & pepper sauté. Serve with a side of garlic mayo for dipping.
- Breakfast Steak-Out: Got leftover steak *and* leftover breakfast potatoes? Chop the potatoes, add them in with the steak, and use a melty cheese like Gouda. Serve with a fried egg on top. Game changer.
- Spicy & Bright: Mix some chopped pickled jalapeños into the cheese. After cooking, top with fresh pico de gallo and a squeeze of lime juice right before eating.
- Lighter Swap: Use low-carb tortillas, reduce the cheese slightly, and load up on extra peppers, onions, and even some spinach. The steak is already a lean protein powerhouse!
A Few Things I’ve Learned Along the Way
This recipe has been a staple in my kitchen for years, and it’s evolved. My biggest lesson? Medium heat is your friend. High heat will burn the tortilla before the cheese has a chance to melt and the steak to warm through. Patience gives you that perfect golden brown, not black.
Also, I used to be a “cheese-only-on-top” guy. But that bottom layer of cheese I mentioned earlier? That was a revelation from a late-night snack experiment. It prevents the dreaded “empty pocket” where the fillings pull away from the tortilla. Every bite is now the perfect bite. And finally, don’t be shy with the dipping sauces. The cool creaminess against the hot, crispy quesadilla is what creates that “you’ve gotta try this” moment we live for at Food Meld.
Your Questions, Answered
Q: My cheese isn’t melting before the tortilla burns. What am I doing wrong?
A: Your heat is too high! Dial it back to a solid medium. The cooking should be a gentle, steady sizzle. Also, make sure your cheese is shredded finely or thinly sliced—large chunks take forever to melt. Covering the skillet with a lid for the last minute of cooking can also trap steam and help melt the cheese without further browning the tortilla.
Q: Can I make these ahead of time?
A: You can prep the filling ahead (store steak, cheese, and cooked veggies separately in the fridge) and assemble just before cooking. I don’t recommend cooking them fully ahead, as they lose their crispness. However, you can cook them, let them cool completely, then re-crisp in a 375°F oven or air fryer for a few minutes. They won’t be *quite* as perfect as fresh, but still darn good.
Q: What’s the best way to reheat leftover steak *for* this recipe?
A: Great question! To keep it tender, I gently warm the sliced steak in a skillet with a tiny splash of beef broth or water over low heat, just until it’s no longer cold. This adds a little moisture and prevents it from drying out or overcooking. Microwaving can often make it rubbery.
Q: My quesadilla is leaking fillings everywhere when I flip/cut it. Help!
A> You’re likely overfilling, my friend! Show that tortilla some mercy. Leave a ½-inch border, and remember the cheese-glue method (cheese on bottom AND top). Also, ensure your skillet is properly hot before adding—this helps seal the tortilla edge quickly on contact.
Nutritional Info (A Friendly Breakdown)
Okay, let’s talk real talk about what’s in this deliciousness. Remember, these numbers are an estimate based on specific ingredients (like a 10-inch tortilla and a blend of cheeses). Your mileage may vary based on your brands and add-ons!
Per Serving (1 quesadilla):
Calories: ~420 | Protein: 28g | Carbs: 25g | Fat: 24g | Fiber: 2g | Sodium: ~620mg
This is a protein-packed meal, thanks to the steak and cheese! The carbs come mainly from the tortilla. To lighten it up, you can use a high-fiber/low-carb tortilla, go easy on the cheese, and load up on the veggie fillings (onions and peppers add very few calories but tons of flavor and nutrients). The sodium can creep up from the cheese and seasoned steak, so if you’re watching that, use low-sodium cheese and be mindful of how your original steak was seasoned. It’s all about balance and making it work for you!
The Last Bite
And that’s it, friends! The secret to making leftovers feel like a brand-new, exciting meal. These Cheesy Steak Quesadillas are more than a recipe—they’re a mindset. They’re about looking at what you have in your fridge not as an obligation, but as an opportunity to get creative, have fun, and make something incredibly tasty with minimal effort.
I hope this recipe becomes your new kitchen superpower. The next time you see that container of steak, I want you to smile, because you know what’s coming. Crispy, cheesy, savory magic in just minutes.
Give it a try, tweak it with your favorite flavors, and let me know how it goes! Tag me @FoodMeld or drop a comment on the blog. I love seeing your creations. Now go forth and meld some flavor!
Until next time, keep cooking something awesome,
Jackson


