Butterscotch Squares: Your New Favorite Bite of Sweet Nostalgia
Hey friends, Jackson from Food Meld here! Let’s talk about something important: that moment when a serious sugar craving hits, and nothing but a rich, decadent, homemade treat will do. You’re not reaching for a fancy, five-layer cake, are you? Nah. You’re craving something simpler, something that feels like a warm hug from your grandma’s kitchen. You’re dreaming of something buttery, deeply caramelized, and so melt-in-your-mouth good that you have to close your eyes for a second after the first bite.
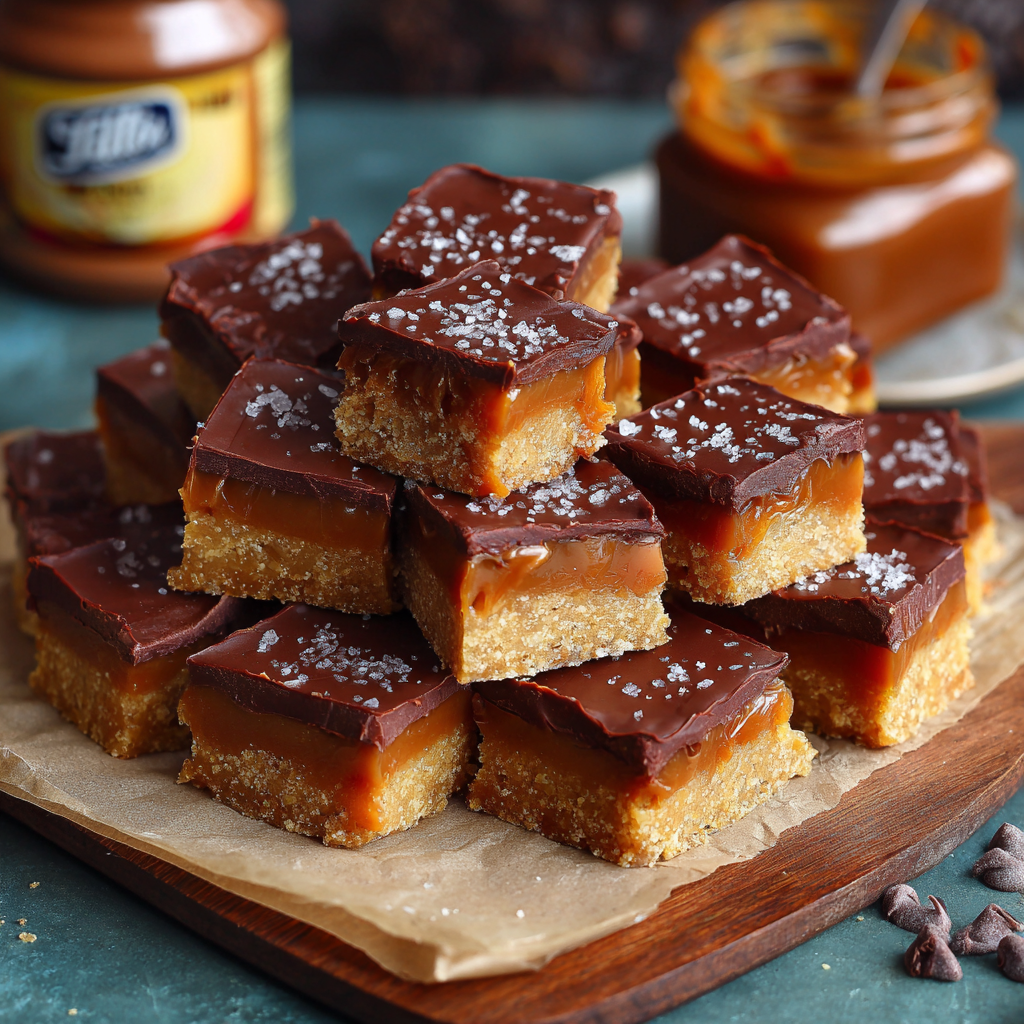
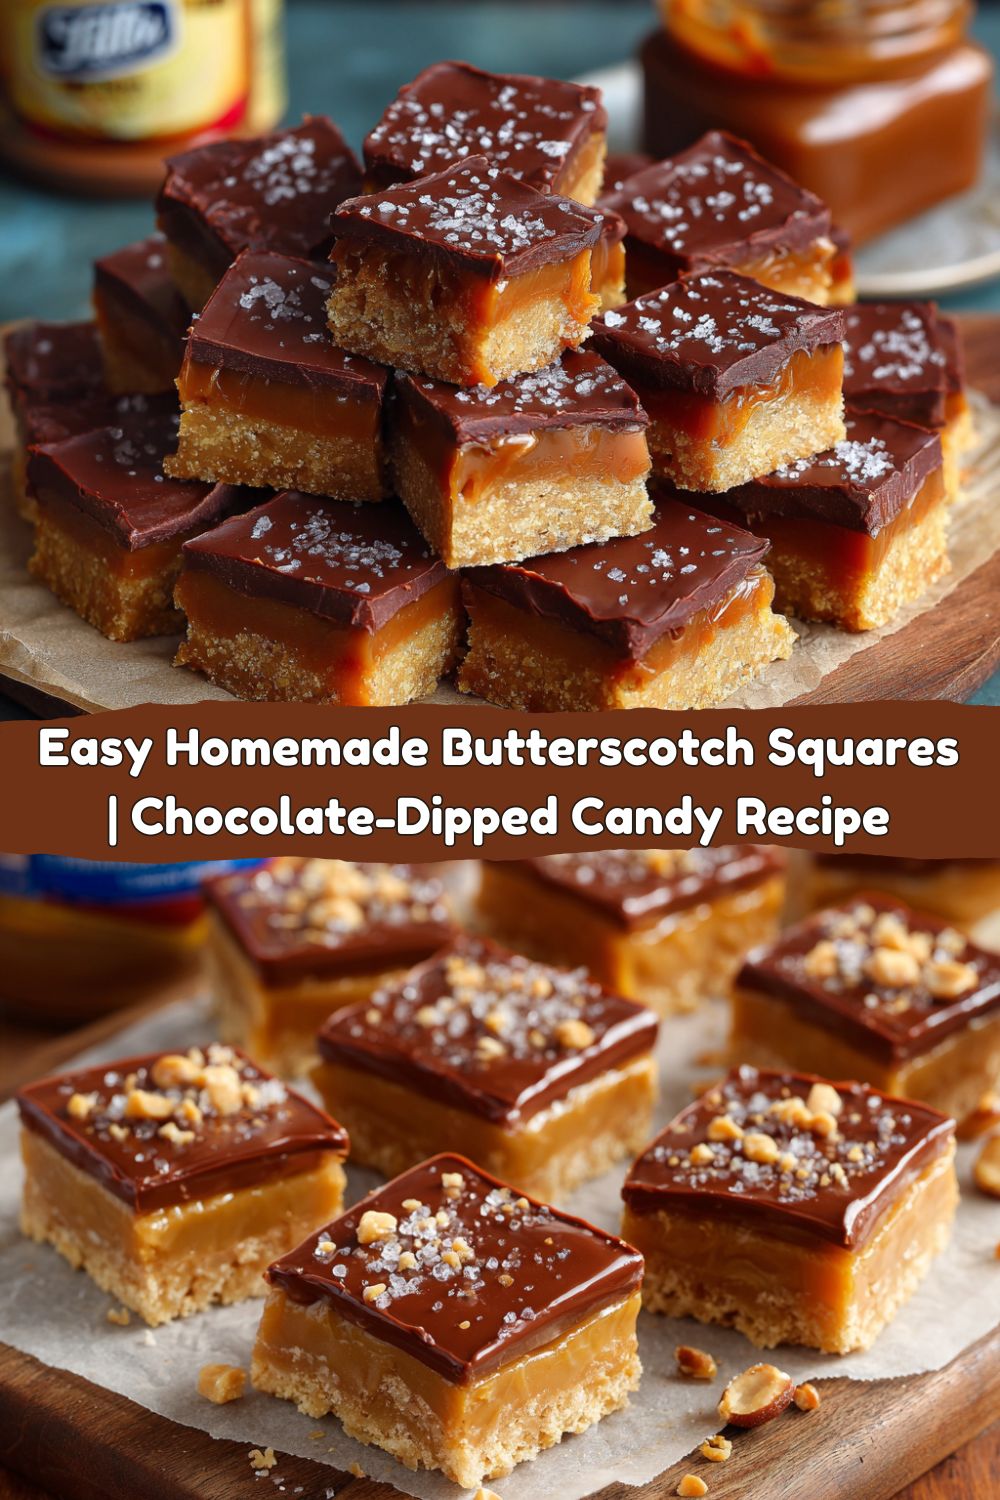
That, my friends, is the magic of a perfect Butterscotch Square. We’re not talking about the hard, cellophane-wrapped candies from the drugstore checkout line. Oh no. We’re making the real deal—soft, chewy, and brimming with that deep, toffee-like flavor that only real butter and brown sugar can create. And because we believe everything is better with chocolate, we’re dipping these golden beauties halfway into a glossy coat of melted chocolate. It’s the perfect contrast: sweet and salty, creamy and chewy, nostalgic and totally new. This recipe is surprisingly simple, doesn’t require any fancy equipment, and is guaranteed to create those “you’ve gotta try this” moments we live for. So, grab your favorite heavy-bottomed saucepan and let’s cook something awesome together.
A Sticky-Fingered Lesson in Sweetness
This recipe takes me right back to my Aunt Louise’s kitchen, a place that always smelled like cinnamon, coffee, and whatever incredible thing she’d just pulled from the oven. She was the queen of “church lady” desserts—the kind of treats she’d pile high on a paper plate for every potluck and family gathering. One sweltering summer afternoon, I was “helping” her (which, at age eight, mostly meant licking spoons) when she decided to teach me her famous butterscotch squares.
I remember watching, mesmerized, as the butter and brown sugar melted together into a molten, fragrant lava. She handed me the wooden spoon and said, “Now, Jackson, you stir and don’t you stop. This is a lesson in patience.” Of course, my arm got tired, and I sneaked a break. Almost immediately, I got a scary, angry hiss from the pot and a tiny scorched spot on the bottom. Aunt Lou just laughed, took over stirring, and said, “See? Good things come to those who stir!” That little lesson stuck with me. The payoff was immense: cutting the cooled slab into perfect little squares and watching her expertly dip each one in chocolate. That first bite, a little wonky from my uneven dipping, was pure magic. It taught me that the best recipes aren’t just about the ingredients; they’re about the stories, the patience, and the love you stir into them.
Gathering Your Butterscotch Brigade
This is a simple, powerhouse list. Using high-quality ingredients here makes a world of difference because each one plays a starring role. Here’s what you’ll need:
- 1 cup (2 sticks) unsalted butter – This is the foundation of our flavor. Unsalted lets us control the salt level. Chef’s Insight: Please use real butter! Margarine just won’t give you that rich, authentic taste. For a next-level flavor, try a European-style butter with a higher fat content.
- 2 cups packed brown sugar – Pack it in there! This is where that deep, molasses-kissed caramel flavor comes from. Dark brown sugar will give you a more intense, almost toffee-like flavor, while light brown sugar is a bit milder and sweeter. I’m a dark brown sugar guy myself.
- ½ cup light corn syrup – Don’t panic! This isn’t here just for sweetness. Its real job is to prevent the sugar from crystallizing, ensuring our squares are gloriously smooth and chewy, not grainy. Substitution Tip: You can swap this for golden syrup if you have it on hand.
- 1 (14 oz) can sweetened condensed milk – The secret weapon for ultra-creamy, fudge-like texture. This magical milk adds a luscious richness that is absolutely non-negotiable.
- 1 tsp pure vanilla extract – A flavor enhancer that rounds out all the sweet, buttery notes. Use the real stuff—your taste buds will thank you.
- A generous pinch of fine sea salt – This is critical! It balances the sweetness and makes the butterscotch flavor pop. Trust me on this.
- 12 oz semi-sweet or milk chocolate chips (for dipping) – Semi-sweet is my go-to for a perfect bittersweet contrast against the sweet base. Milk chocolate is a dream if you want a sweeter, more classic vibe. Chef’s Hack: A tablespoon of coconut oil mixed into the melting chocolate will make it dip smoother and set with a beautiful snap.
- Optional: chopped nuts or flaky sea salt for topping – For a little crunch or a fancy salty-sweet finish.
Let’s Make Some Magic: Step-by-Step
Okay, team! Let’s fire up the stove. This process is all about low, steady heat and consistent stirring. Put on some good music and enjoy the process—it’s basically aromatherapy.
Step 1: Line & Prep
Grab an 8×8” or 9×9” baking pan. Lining it with parchment paper is the best trick ever—it creates a sling that lets you lift the entire cooled slab out for super clean, easy cutting. Let the parchment overhang on two opposite sides. Give the exposed sides a very light greasing to be extra safe. Set this aside.
Step 2: Make the Butterscotch Base
Find your heaviest, deepest saucepan. Heavy-bottomed is key here—it distributes heat evenly and prevents hot spots that can cause scorching. Melt the butter over medium heat. Once it’s foamy, add the packed brown sugar and corn syrup. Stir with a wooden spoon or heatproof spatula until the sugar dissolves and the mixture looks like a smooth, bubbly sauce. This should take about 3-4 minutes. Now, slowly pour in the entire can of sweetened condensed milk and add that pinch of salt. Stir it all together until it’s one happy, homogenous family.
Step 3: Cook to Soft-Ball Stage
This is the part where Aunt Lou’s lesson comes in. Bring the mixture to a low boil. Now, reduce the heat to medium-low to maintain a steady, gentle bubble. You must stir this constantly and scrape the bottom and sides of the pan to prevent burning. This is an arm workout, but it’s so worth it. You’ll cook this for about 10-15 minutes. The mixture will thicken and darken to a beautiful golden-brown caramel color. The most accurate way to know it’s done? Use a candy thermometer! You’re aiming for 240°F (115°C), also known as the “soft-ball stage.” If you don’t have a thermometer, do the cold water test: drop a small bit of the mixture into a glass of ice water. If you can form it into a soft, pliable ball that flattens when you take it out, it’s ready.
Step 4: Finish & Pour
As soon as it hits that magic temperature, immediately pull the pot off the heat! Stir in the vanilla extract—it will sizzle and smell amazing. Now, carefully pour your gorgeous, molten butterscotch into your prepared pan. Try to pour it evenly. Don’t scrape the pot just yet—any stubborn bits at the bottom might be overcooked and could make the whole batch grainy. Just let it go; it’s a sacrifice for the greater good.
Step 5: The Patience Game (Let it Cool!)
This is the hardest part. You must let this cool completely at room temperature. Rushing this by putting it in the fridge can cause the chocolate to sweat later when you dip it. Give it a good 2-3 hours. Go for a walk, watch a movie, do some laundry. When it’s firm to the touch, it’s ready.
Step 6: Cut & Dip
Use your parchment paper sling to lift the entire butterscotch slab onto a cutting board. Use a sharp knife to cut it into squares—I usually go for a 6×6 grid to get 36 perfect little bites. Now, for the chocolate! Melt your chocolate chips in a double boiler or in 20-second bursts in the microwave, stirring between each burst until smooth. If using, stir in that tablespoon of coconut oil for a perfect dipping consistency. Using a fork or dipping tools, dip each square halfway into the chocolate, let the excess drip off, and place it on a parchment-lined baking sheet. While the chocolate is still wet, sprinkle on your toppings if you’re using them. Let the chocolate set completely at room temperature. You can speed this up with a quick 10-minute chill in the fridge.
How to Serve These Golden Gems
These butterscotch squares are stars all on their own, but presentation is half the fun! For a casual family treat, just pile them high on a rustic wooden board or in a simple ceramic bowl—let their homemade charm shine through. If you’re bringing them to a party or gifting them (lucky friends!), place them in mini paper candy cups. It makes them look professional and keeps them from sticking together.
For a next-level dessert experience, crumble one square over a scoop of high-quality vanilla bean ice cream. The contrast of the cold ice cream with the chewy, room-temperature butterscotch is a religious experience. They also pair beautifully with a cup of strong black coffee to cut through the sweetness or a cold glass of milk for the ultimate nostalgic trip. However you serve them, be prepared to hand out the recipe!
Mix It Up: Creative Twists on the Classic
Once you’ve mastered the classic, it’s time to play! Here are a few of my favorite ways to mix it up:
- Nutty Crunch: Stir ½ cup of finely chopped toasted pecans, walnuts, or almonds into the butterscotch mixture right before you pour it into the pan. The toasty, nutty flavor is a classic pairing for a reason.
- Salty-Sweet Supreme: After dipping the squares in chocolate, immediately sprinkle the top with a few flakes of Maldon sea salt. This is my personal favorite—it elevates the entire flavor profile.
- Espresso Edge: Add ½ to 1 teaspoon of instant espresso powder to the mixture along with the sweetened condensed milk. The coffee doesn’t make it taste like coffee; it just deepens the chocolate and caramel flavors incredibly.
- Layer It Up: Press a simple graham cracker crust (graham cracker crumbs mixed with a little melted butter and sugar) into the bottom of your pan before pouring the butterscotch on top. It adds a wonderful textural contrast.
- Bourbon Bliss: For the adults, replace the vanilla extract with 1-2 tablespoons of good bourbon. It adds a wonderful warm, oaky note that’s just incredible.
Jackson’s Chef Notes & Kitchen Stories
This recipe has been through a few iterations in my kitchen. The first time I made it alone, I was so confident I didn’t need the thermometer. I went by color alone and ended up with a pan of butterscotch *bricks*. We literally had to chisel them out! They were still tasty, but they could have doubled as hockey pucks. That humble pie taught me to always trust the thermometer.
Over time, I’ve learned that a slow and steady cook is absolutely the way to go. Rushing this recipe over high heat is a one-way ticket to Scorchtown. I also highly recommend using a silicone spatula for stirring—it gets into the corners of the pot better than a spoon and ensures nothing gets left behind to burn. This recipe is forgiving, but it rewards patience and attention. Don’t be afraid of it! Even if your squares are a little softer or a little harder than planned, they’ll still be delicious. That’s the beauty of homemade candy.
Butterscotch Square FAQs: Your Questions, Answered
Q: My mixture turned out grainy. What happened?
A: Graininess is almost always caused by sugar crystals forming during cooking. This can happen if you didn’t fully dissolve the sugar at the beginning, if you stirred too vigorously after the mixture came to a boil (just gentle, constant stirring is key), or if a stray sugar crystal from the side of the pan fell in. Using a pastry brush dipped in water to wash down the sides of the pan after you add the sugar can help prevent this.
Q: Can I make these without a candy thermometer?
A: You can, using the cold water test I mentioned. However, for absolute beginners, a thermometer is a small investment that takes all the guesswork out and guarantees perfect results every single time. It’s my #1 recommended tool for this recipe.
Q: Why did my butterscotch layer separate or get oily?
A: Separation usually means the heat was too high, causing the fats to break away from the sugars. Next time, keep your heat at a steady medium-low and maintain a gentle bubble, not a rolling boil.
Q: How should I store these, and how long do they last?
A: Keep them in an airtight container at cool room temperature for up to a week. You can layer them between sheets of parchment paper so they don’t stick. They can also be refrigerated, but bring them to room temperature before serving for the best texture and flavor. They also freeze beautifully for up to 3 months!
Nutritional Information*
Alright, let’s keep it real. This is a dessert, through and through. It’s a treat meant to be savored and enjoyed in moderation. Here’s a rough breakdown per square (based on 36 squares, not including optional toppings):
Estimated per square: ~150 kcal | 7g fat | 21g carbs | 1g protein
*Please note that this is an estimate generated using a nutrition calculator and will vary slightly based on specific ingredients and brands used. The main contributors are the butter, brown sugar, and chocolate. For a slightly lighter version, you could use a reduced-fat sweetened condensed milk, but I’m a firm believer in going for the full-fat, real-deal experience for a special treat like this. Life’s too short for bad dessert!
Final Thoughts: Share the Sweetness
And there you have it! My go-to recipe for the most incredible, buttery, brown sugary Butterscotch Squares that are just begging to be dipped in chocolate. This recipe is a testament to the fact that the most unforgettable desserts often come from the simplest ingredients and a little bit of patience. It’s a project that’s incredibly satisfying and fills your kitchen with the most incredible aroma.
I hope this recipe brings as much joy to your kitchen as it has to mine over the years. It’s a crowd-pleaser, a perfect gift, and a delicious way to create your own kitchen stories. Don’t forget to tag me @FoodMeld on Instagram if you make them—I love seeing your creations! Now, go forth, melt some butter, and make something unforgettable.
Happy cooking,
Jackson


