Beef Tataki: Your New Go-To for “Fancy But Easy” Dinners
Hey friends, Jackson from Food Meld here. Let’s talk about one of my all-time favorite kitchen magic tricks: creating a dish that looks like it came from a high-end restaurant but is secretly so simple, you can pull it off on a busy weeknight. I’m talking about Beef Tataki.
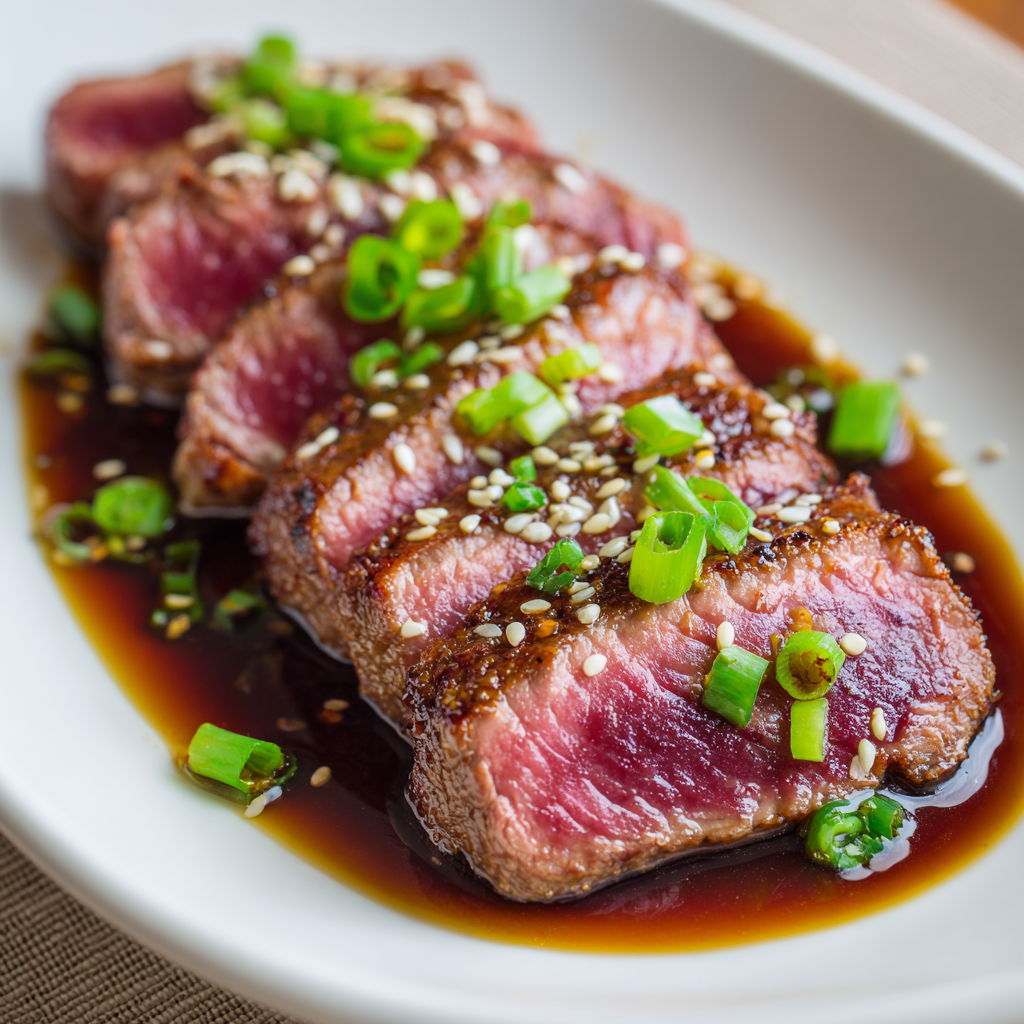
If you’ve never had it, prepare to have your mind (and taste buds) blown. Imagine a gorgeous piece of beef fillet, seared in a screaming hot pan until it has this incredible, savory crust, while the inside stays a beautiful, cool, ruby red. We slice it paper-thin, drizzle it with a zingy, umami-packed dipping sauce, and finish it with a sprinkle of green onions. It’s elegant, it’s light, and it is an absolute flavor explosion.
I know what you might be thinking: “Jackson, searing a whole piece of beef fillet sounds intimidating!” But trust me on this one. This is one of those recipes where the technique does all the heavy lifting. We’re not messing around with complex cooking times or a million steps. It’s sear, rest, slice, and devour. I’ve added a few of my own “what if we tried this?” twists to the classic recipe—a kiss of sesame oil and a pinch of chili in the sauce—to give it an extra layer of aroma and balance that I know you’re going to love. So, grab your favorite pan, and let’s cook something awesome together.
The Night I Fell in Love with Beef Tataki
My love affair with Beef Tataki started in the most unlikely of places: a tiny, six-seat izakaya (that’s a Japanese pub) tucked away down a side street in Austin, Texas. I was with a couple of chef friends, and we were all exhausted after a long weekend of pop-up dinners. We just wanted good food and good conversation. We ordered a bunch of small plates to share, and when the tataki landed on the counter, it was a thing of beauty—almost too pretty to eat. Almost.
I took that first bite, and it was a total “you’ve gotta try this” moment. The contrast was everything. The warm, crispy sear gave way to the cool, melt-in-your-mouth tender beef. The sauce was tangy, salty, and bright, cutting through the richness perfectly. We ended up ordering two more plates and spent the rest of the night trying to deconstruct it, talking about the sear, the sauce, the slice. It was one of those messy, fun, and deeply inspiring food moments that I live for. It reminded me that the best dishes aren’t always the most complicated ones; they’re the ones that balance flavor and texture in a way that just feels right. This recipe is my homage to that night.
Gathering Your Flavor Arsenal
Here’s everything you’ll need to create this masterpiece. Don’t sweat it if you need to make a swap or two—I’ve got you covered with some chef insights and substitution hacks.
- 600g (about 1.3 lbs) Beef Fillet (Tenderloin): This is the star of the show! Beef fillet is incredibly tender and lean, with minimal marbling, which is perfect for a quick sear and a rare center. Chef’s Insight: If fillet is a bit pricey, a nice sirloin or strip steak can work in a pinch, but you’ll get the best texture from the tenderloin.
- ½ tsp Salt & ¼ tsp Black Pepper: The dynamic duo. We’re keeping it simple here to let the beef’s natural flavor shine. A good coarse sea salt is my go-to for a better texture.
- 1 tbsp Garlic Paste or 2 cloves grated garlic: This is our flavor booster for the crust. The paste or grated garlic creates a paste that clings to the meat and infuses the sear with an incredible aroma. Sub Tip: No fresh garlic? A half-teaspoon of garlic powder will do the job.
- 1 tbsp Neutral Cooking Oil (like canola, avocado, or grapeseed): We need an oil with a high smoke point to get that pan ripping hot without burning. Save your extra virgin olive oil for finishing!
- 2 tbsp Finely Chopped Green Onions: These are for that fresh, sharp, colorful finish. They add a pop of color and a burst of freshness that lifts the whole dish.
For the “Food Meld” Dipping Sauce (The Twist!)
- 3 tbsp Soy Sauce: The base of our umami bomb. It’s salty, deep, and savory.
- 2 tbsp Ponzu: This citrus-soy sauce is a game-changer. It adds a beautiful tangy brightness. Sub Tip: No ponzu? No problem! Just mix 1 tbsp soy sauce with 1 tbsp fresh lemon or lime juice.
- 1 tsp Rice Vinegar: A little extra acidity to make the flavors pop. White wine vinegar works too.
- 1 tsp Sesame Oil (our twist!): This is my secret weapon. It adds a nutty, toasty aroma that makes the sauce smell and taste incredible.
- ½ tsp Mirin (optional): A touch of sweet Japanese rice wine to round out the sharp edges. If you don’t have it, a tiny pinch of sugar will balance the acidity.
- Pinch of Chili Flakes (our twist!): Just a hint of warmth in the background. It’s not about making it spicy, just about adding another layer of complexity.
Let’s Get Cooking: Your Step-by-Step Guide to Perfect Tataki
Okay, team. This is where the magic happens. Read through these steps once, and you’ll see just how straightforward this whole process is. I’m throwing in all my little chef hacks to make sure you nail it on the first try.
- Prep the Star Player. First things first, take your beef fillet out of the fridge and pat it completely dry with paper towels. This is non-negotiable, folks! A dry surface is the secret to getting that incredible, caramelized crust instead of a steamy, gray exterior. Now, rub it all over with the salt, pepper, and that glorious garlic paste. Let it sit for just 5-10 minutes to come slightly closer to room temperature. Chef’s Hack: Don’t let it sit out too long! We just want to take the chill off so it sears better and cooks more evenly.
- The Big Sear. Place a heavy-bottomed skillet (cast iron is my MVP here) over high heat and let it get seriously hot. Add your neutral oil—it should shimmer almost immediately. Now, carefully place your seasoned beef fillet in the pan. You should hear a confident, loud sizzle! This is the sound of flavor being born. Sear it for 30-45 seconds on each side, including the ends, using tongs to turn it. We’re aiming for a deep brown, crispy crust on all sides while the center stays completely rare. Chef’s Hack: Don’t be tempted to move it around! Let it sit and develop that beautiful crust.
- The Cool Down. Once your beef is beautifully seared, immediately take it out of the pan. This is a crucial step! We need to stop the cooking process dead in its tracks. Quickly wrap the hot beef tightly in foil or plastic wrap. I know plastic wrap on hot meat feels weird, but it works! Then, pop it into the fridge for 15-20 minutes. This does two things: it chills the interior, ensuring a cool, rare center, and it firms up the meat, making it a dream to slice thinly later.
- Whisk the Wonder Sauce. While the beef is chilling, let’s make the sauce that will tie everything together. Simply combine all the sauce ingredients—soy, ponzu, rice vinegar, sesame oil, mirin (if using), and chili flakes—in a small bowl. Give it a good whisk. Taste it! This is your moment to adjust. Want more tang? A splash more vinegar. More heat? Another pinch of chili. Make it yours.
- The Grand Finale: Slicing & Serving. Take your chilled, firmed-up beef out of the fridge and unwrap it. Now, using the sharpest knife you own, slice the beef against the grain into thin, ¼-inch slices. Slicing against the grain is the ultimate tenderizing hack—it shortens the muscle fibers, so every single bite is melt-in-your-mouth tender. Arrange those beautiful pink-and-brown slices on a plate, drizzle generously with the dipping sauce, and finish with a vibrant sprinkle of those chopped green onions.
How to Plate It Like a Pro
You’ve made this stunning dish; now let’s show it off! Presentation is part of the fun. I love serving Beef Tataki family-style on a large, flat platter, fanning the slices out so you can see that perfect gradient from crust to center. Drizzle the sauce artistically over the top, letting some pool at the bottom for extra dipping, and then scatter those green onions like confetti.
What to serve with it? This dish is incredibly versatile. For a light, refreshing meal, serve it over a simple bed of mixed greens or shredded daikon radish. The dressing from the salad will mingle beautifully with the tataki sauce. Want to make it a full dinner? A side of steamed jasmine rice or a creamy potato salad Japanese-style (potato sarada) is absolutely fantastic. And you can’t go wrong with a small, chilled glass of sake or a crisp, dry white wine to wash it all down. It’s the perfect start to a multi-course meal or the star of a sophisticated appetizer spread.
Mix It Up: Creative Twists on Your Tataki
Once you’ve mastered the classic, it’s time to play! Here are a few of my favorite ways to mix it up and make this recipe your own.
- The Citrus Blast: Add some fresh zest to the party! Incorporate the finely grated zest of one lime or yuzu (if you can find it) right into the dipping sauce. Serve the tataki with thin slices of the citrus fruit on the side. The bright, aromatic oils take it to a whole new level.
- Aromatic Herb Garden: Before the final chill, roll the seared beef fillet in a mixture of finely chopped fresh herbs. Think cilantro, mint, and Thai basil. When you slice it, you’ll have a gorgeous green-and-brown spiral. So pretty and fresh!
- Spicy Sriracha Mayo Drizzle: For those who like a little creaminess and heat, whip up a quick sriracha mayo by mixing 2 tbsp mayo with 1 tsp sriracha and a squeeze of lime. Drizzle this over the plated tataki along with the primary soy-based sauce.
- Sesame Crusted: For extra nutty flavor and texture, after searing (but before wrapping), roll the hot beef in a plate of toasted white and black sesame seeds. The seeds will stick to the surface and create a fantastic crunchy coating.
- Tuna Tataki (Pescetarian Swap): Not in the mood for beef? This method works brilliantly with a thick, sushi-grade tuna steak. Follow all the same steps for searing and chilling, and you’ve got a stunning Tuna Tataki.
Jackson’s Kitchen Notes & Stories
This recipe has become a staple in my house, especially when I’m having friends over and want to impress without spending the whole night in the kitchen. It’s evolved a bit from that first taste in the izakaya. My biggest “aha!” moment was realizing the power of the post-sear chill. The first time I made it, I was too impatient and tried to slice it warm. Let’s just say it was more of a “beef crumble” than elegant slices! Lesson learned. Now, I never skip the fridge time.
Another fun story: I once made this for my grandma, who is a staunch “well-done steak only” kind of woman. I didn’t tell her it was rare in the middle, I just served it. She took one bite, her eyes went wide, and she said, “Now, Jack, this is how beef should taste.” A total victory! It just goes to show that sometimes, the best way to expand our food horizons is with a little bit of delicious deception.
Your Questions, Answered!
I’ve gotten a lot of questions about this recipe over the years. Here are the most common ones to help you troubleshoot like a pro.
Q: My beef turned out more medium than rare inside. What happened?
A: No worries, it happens! The two most common culprits are: 1) The pan wasn’t hot enough, so it took longer to form a crust, cooking the inside more. Or 2) The beef wasn’t dry enough before searing, which creates steam. Next time, make sure your pan is ripping hot and your beef is patted bone-dry. Also, remember that a 30-45 second sear per side is just a guide—if your fillet is very thick, it might need a few seconds more, but if it’s thinner, it might need less.
Q: Can I make this ahead of time for a party?
A> Absolutely! This is a fantastic make-ahead dish. You can sear the beef, wrap it, and let it chill in the fridge for up to 4 hours before you plan to slice and serve. You can also make the dipping sauce a day or two in advance. Just slice the beef right before serving to keep it looking fresh and beautiful.
Q: I’m nervous about slicing it so thin. Any tips?
A> The chill is your best friend here—it firms up the beef dramatically, making it so much easier to slice. But the real MVP is a sharp knife. A dull knife will tear and squish the meat. Use a long, thin-bladed knife (like a slicing or carving knife) and use a gentle sawing motion. Don’t press down hard! Let the sharpness of the knife do the work for you.
A Quick Bite on Nutrition
Now, I’m a chef, not a nutritionist, but I always like to have a general idea of what I’m putting into my body. This Beef Tataki is a fantastic option if you’re looking for something that feels indulgent but is actually pretty lean and balanced.
Per serving (based on 4 servings), you’re looking at roughly 310 calories, 22g of protein, 21g of fat, and 3g of carbs. The beef fillet is a great source of high-quality protein and iron. Because we’re serving it rare and slicing it thin, a little goes a long way in terms of satisfaction. The sauce, while flavorful, is relatively low in calories and sugar, especially if you skip the optional mirin. It’s naturally gluten-free if you use tamari instead of standard soy sauce. All in all, it’s a light, protein-packed dish that’s perfect for a satisfying yet non-heavy meal.
Final Thoughts Before You Dig In
And there you have it! My go-to recipe for a dish that never fails to wow. I hope this guide shows you just how accessible and fun “fancy” cooking can be. The beauty of Beef Tataki is in its simplicity and the powerful contrast of temperatures and textures. It’s a testament to the idea that you don’t need a million ingredients to create something unforgettable.


