Forget Everything You Knew About Fried Chicken. This is Karaage.
Hey friends, Jackson from Food Meld here. Let’s get something straight right off the bat: we all love a good piece of fried chicken. It’s a universal language of comfort and crunch. But today, I’m taking you on a quick trip to Japan to meet its cooler, crispier, and honestly, more addictive cousin: Chicken Karaage.
Imagine this: bite-sized pieces of juicy, dark-meat chicken, marinated in a powerful punch of soy, ginger, and garlic until it’s singing with umami. Then, it’s coated in a magical, feather-light dusting of potato starch and fried not once, but twice, until it achieves a shatteringly crisp crust that gives way to the most tender, flavorful interior you’ve ever experienced. This isn’t just frying; it’s an art form. And the best part? It’s deceptively simple to master in your own kitchen.
I’m a firm believer that the best recipes are the ones that seem fancy but are secretly built for a weeknight. Karaage is the poster child for that philosophy. It’s the kind of food that makes you feel like a kitchen rockstar with minimal effort. So, if you’re tired of the same old dinner routine and ready to create one of those “you’ve gotta try this” moments for your family or friends, you’re in the right place. Let’s ditch the intimidation, roll up our sleeves, and cook something truly awesome together.

The Bite That Changed My Game
My love affair with karaage didn’t start in a fancy Tokyo restaurant. Nope. It started in a cramped, steam-filled izakaya (that’s a Japanese pub) tucked away on a side street, where I was on a mission to try everything on the menu. A plate of golden-brown, irregularly shaped chicken chunks landed on my table, smelling faintly of soy and ginger. It looked unassuming. I squeezed a lemon wedge over it, took a bite, and my entire perspective on fried chicken did a complete 180.
The sound was the first thing that got me—a delicate, glass-like crackle that was so different from the heavy crunch of Southern-style batter. Then, the flavor hit me. It was savory, deeply savory, with a brightness from the ginger that cut through the richness perfectly. The chicken itself was unbelievably juicy. I must have looked like a fool, sitting there with my eyes wide, nodding to myself. I immediately started dissecting it, trying to figure out the secrets. Was it the marinade? The coating? That double-fry technique? That moment of delicious discovery is the exact “what if we tried this?” energy I try to bring to Food Meld every single day.
Gathering Your Flavor Arsenal
Here’s the beautiful part: the ingredient list is short and sweet. But each one plays a starring role in creating that iconic karaage flavor and texture. Let’s break it down.
- 600 g Boneless Chicken Thighs (skin-on preferred): This is non-negotiable for me. Thighs have more fat, which means they stay incredibly juicy and flavorful through the frying process. The skin? That’s your ticket to an extra layer of crispiness and flavor. Trust me on this. Chef’s Insight: If you only have breasts, that’s okay, but be extra careful not to overcook them, as they can dry out faster.
- 3 tbsp Soy Sauce: The backbone of our umami marinade. It’s salty, savory, and gives the chicken its beautiful golden-brown color.
- 2 tbsp Sake: This Japanese rice wine adds a subtle sweetness and complexity, and it helps tenderize the meat. Substitution Tip: If you can’t find sake, a dry sherry or even a splash of white wine will work in a pinch.
- 1 tbsp Mirin: A sweet rice wine that balances the saltiness of the soy sauce and adds a lovely glaze. Substitution Tip: No mirin? Mix 1 tbsp of white wine with a tiny pinch of sugar.
- 1½ tbsp Grated Fresh Ginger & 2 cloves Garlic, grated: The dynamic duo! They provide that aromatic, zesty punch that makes karaage so distinct. Grating them is key—it creates a paste that clings to the chicken and infuses every single bite.
- 1 tbsp Sesame Oil: Just a tablespoon adds a wonderful, nutty fragrance that makes the marinade smell incredible.
- ½ tsp Salt & ½ tsp Pepper: The essential seasonings to build a solid flavor base.
- ½ cup Potato Starch: This is the secret weapon for that shatteringly crisp, light crust. It fries up much crispier and less heavy than all-purpose flour. Chef’s Insight: You can use cornstarch for a very similar result, but potato starch gives it that classic, airy texture I love.
- Vegetable Oil, for frying: Use a neutral oil with a high smoke point, like canola, peanut, or avocado oil.
- Lemon Wedges & Japanese Mayo, to serve: The perfect accompaniments. The lemon cuts the grease, and the rich, tangy mayo is a dream dip.
Let’s Get Frying: Your Step-by-Step Roadmap to Crispy Bliss
Okay, team. This is where the magic happens. Follow these steps, and you’ll have perfect karaage on your first try. I’ve packed this section with all my little hacks to set you up for success.
- Marinate with Feeling. In a medium-sized bowl, whisk together the soy sauce, sake, mirin, grated ginger, grated garlic, sesame oil, salt, and pepper. Now, add your bite-sized chicken pieces. Get your hands in there and massage that marinade into every nook and cranny. This isn’t a gentle toss; it’s a flavor infusion mission. Cover the bowl and let it hang out in the fridge for at least 30 minutes. Chef’s Hack: Want next-level flavor? Let it marinate for up to 4 hours, or even overnight. The longer it sits, the more profound the flavor will be.
- The Perfect, Feather-Light Coat. When you’re about 10 minutes away from frying, take the chicken out of the fridge. Pour your potato starch into a shallow dish or a plate. Now, here’s a pro move: drain off any excess marinade from the chicken bowl. You don’t want it swimming; just lightly coated. Working in small batches, toss the chicken pieces in the potato starch, making sure each piece is thoroughly and evenly coated. Then, place them on a wire rack. Chef’s Insight: Letting the coated chicken sit on a rack for 5-10 minutes before frying helps the starch adhere and creates a crisper final product.
- Fry #1: The Cook. Pour about 1.5 to 2 inches of oil into a heavy-bottomed pot (like a Dutch oven) and heat it to 170–180°C (340–360°F). If you don’t have a thermometer, test it by dropping a small piece of potato starch into the oil—if it sizzles and floats to the top immediately, you’re good to go. Carefully lower your first batch of chicken into the oil. Don’t crowd the pot! Fry in small batches for about 3-4 minutes, just until they’re a pale golden color and cooked through. Remove them with a slotted spoon or spider strainer and let them rest on a wire rack set over a baking sheet for at least 2 minutes. Chef’s Hack: This resting period is crucial! It allows the internal steam to redistribute and the temperature to even out, setting the stage for the second fry.
- Fry #2: The Crisp. After all the chicken has had its first fry and a little rest, crank up the heat and bring your oil to about 190°C (375°F). We’re going back in! Fry the chicken a second time, in batches again, for just 60-90 seconds. Watch them closely—they will transform into a deep, irresistible, golden-brown and become impossibly crisp. This double-fry method is the key to karaage that stays crispy for ages.
- The Grand Finale. As soon as the chicken comes out of the oil for the second time, transfer it to a wire rack (not paper towels!) to drain. Chef’s Hack: Using a rack instead of paper towels prevents the bottom from getting steamy and soggy. You worked hard for that crunch—protect it! Give them a very light sprinkle of salt while they’re still piping hot.
How to Serve Your Masterpiece
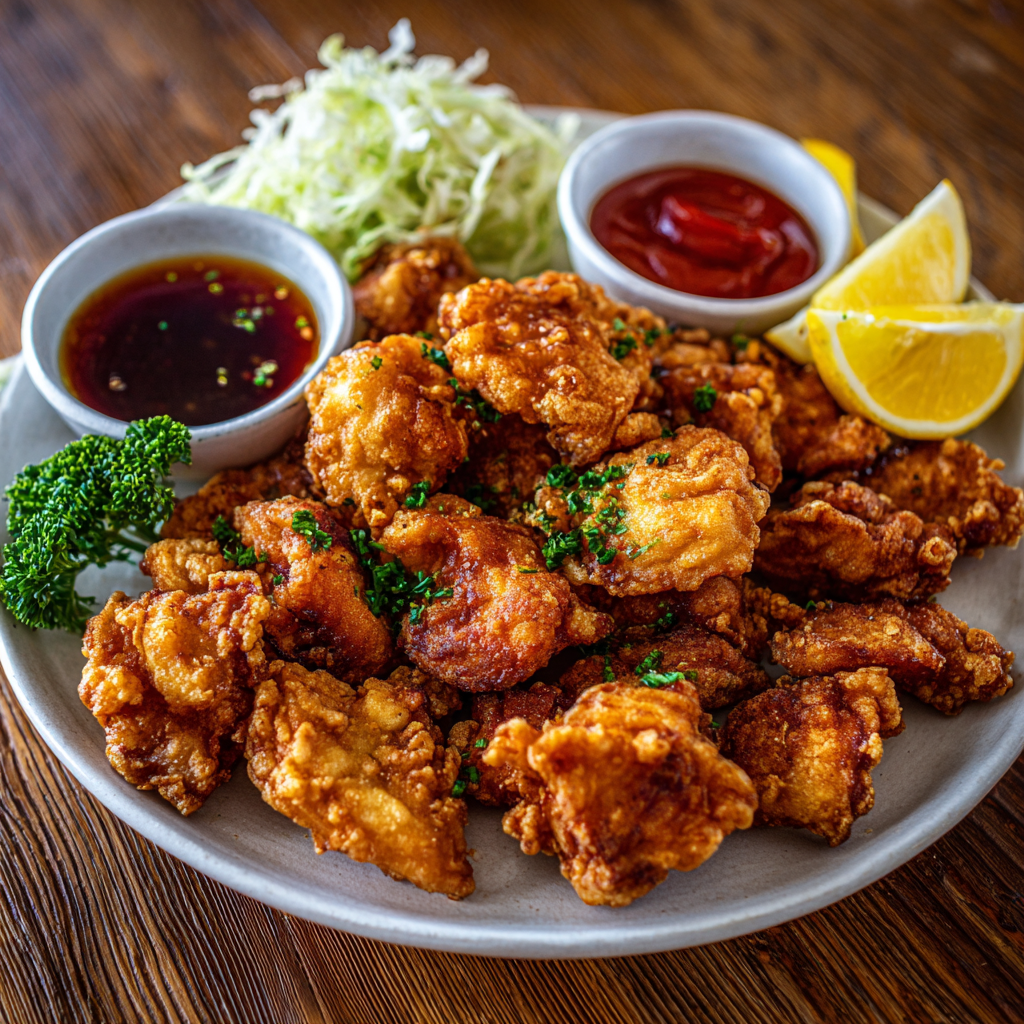
You’ve created a thing of beauty. Now, let’s do it justice on the plate. The classic, no-fuss way is to pile that golden mountain of karaage high on a plate, tuck a couple of lemon wedges on the side, and add a generous dollop of Japanese mayo (Kewpie is the gold standard, if you can find it). Squeeze that lemon over the top right before you eat—the acidity is a game-changer.
But let’s get creative! For a full izakaya-style experience at home, serve it on a bed of finely shredded cabbage. The cool, crisp cabbage is the perfect textural and flavor contrast to the hot, savory chicken. Want to make it a meal? A big bowl of steamed Japanese rice and a simple miso soup turn it into a feast. Feeling fusion? Stuff a few pieces into a soft, steamed bao bun with some pickled veggies and a drizzle of spicy mayo. However you serve it, the most important rule is: serve it hot and eat it immediately!
Mix It Up: Your Karaage, Your Rules
Once you’ve mastered the classic, the world is your fried-chicken oyster. Here are a few of my favorite twists to keep things exciting.
- The Spicy Kick: Add 1-2 teaspoons of chili paste (like Gochujang) or a big pinch of shichimi togarashi (Japanese seven-spice) directly to the marinade. It gives you a slow, building heat that’s incredibly addictive.
- The Extra-Crunchy Combo: For an even lighter, airier, and crispier crust, try a 50/50 mix of potato starch and rice flour. The texture is out-of-this-world good.
- Lemon & Shiso Brightness: Finely chop a few fresh shiso leaves (if you can find them) and the zest of one lemon, and mix them into the potato starch before coating. It adds a beautiful, fragrant, citrusy note.
- Gluten-Free & Lower-Carb Friendly: This recipe is naturally gluten-free if you use tamari instead of soy sauce! To make it lower-carb, you can skip the starch coating and bake or air-fry the marinated chicken, though you’ll lose the classic crispy shell.
- Karaage Tacos: Yes, we’re going there! Take two corn tortillas, add a layer of shredded cabbage, a few pieces of karaage, a drizzle of sriracha mayo, and a sprinkle of fresh cilantro. It’s a Food Meld fusion favorite.
Jackson’s Kitchen Notes & Stories
This recipe has become a staple in my house, and it’s evolved in the funniest ways. The first time I made it, I was so impatient I skipped the resting step between the first and second fry. The result? Chicken that was crispy for about 30 seconds before it went soft. Lesson learned the hard way! Now, I use that resting time to clean up and get my sides ready—it’s a perfect kitchen rhythm.
I’ve also found that the best karaage pieces are the slightly uneven, craggy ones. Don’t stress about making every piece a perfect cube. Those rough edges fry up into the most delicious, crispy bits. And my final piece of advice? Always make more than you think you need. It disappears faster than you can say “seconds, please.”
Your Karaage Questions, Answered!
I’ve gotten a lot of questions about this recipe over the years. Here are the big ones to help you troubleshoot.
- Q: Can I bake or air-fry this instead?
A: You can! For baking, place the coated chicken on a wire rack over a baking sheet, spray generously with oil, and bake at 200°C (400°F) for 15-20 minutes, flipping halfway. For air-frying, cook at 200°C (400°F) for 10-15 minutes, shaking the basket halfway. The texture won’t be *quite* as shatteringly crisp as deep-frying, but it’s a fantastic and healthier alternative. - Q: My coating fell off! What did I do wrong?
A: This usually happens for one of two reasons: 1) Your oil wasn’t hot enough when you added the chicken, or 2) You didn’t shake off the excess marinade before coating. Make sure your oil is at the right temp (test it with a bit of starch!) and that the chicken is just moist, not dripping, before it hits the potato starch. - Q: Why is my chicken dark brown too quickly?
A: Your oil is too hot! The outside is burning before the inside has a chance to cook. Lower the heat and use a thermometer if you have one. The first fry should be a gentle, steady bubble. - Q: Can I make this ahead of time?
A: You can marinate the chicken up to a day ahead, which actually makes the flavor better. But for the best texture, fry it just before you’re ready to serve. If you must, you can do the first fry an hour or two ahead, let it cool, and then do the second, quick fry right before serving to re-crisp.
Nutritional Info (For Your Peace of Mind)
Look, we’re eating fried chicken. It’s a treat, and it’s meant to be enjoyed! But I also believe in being transparent. Here’s a rough breakdown per serving (assuming you use about 2 tbsp of oil absorbed during frying). Remember, these are estimates and can vary based on your specific ingredients and oil absorption.
- Calories: ~380 kcal
- Protein: ~28 g (Chicken thighs are a great source of protein!)
- Fat: ~20 g
- Carbohydrates: ~15 g (Mostly from the potato starch coating)
- Sodium: ~600 mg
To lighten it up, serve with a big green salad or lots of shredded cabbage, and remember that baking or air-frying are great options for a lower-fat version.
You’ve Got This!
And there you have it. The secrets to making truly unforgettable, authentic Chicken Karaage right in your own kitchen. This recipe is more than just a list of ingredients and steps; it’s a passport to a flavor experience that’s fun, a little messy, and 100% rewarding.


