
Your New Holiday Showstopper is Here!
Hey friends, Jackson from Food Meld here! Is there anything that screams “holidays” more than a tall, frosty glass of eggnog? That rich, creamy, spiced-up goodness is basically liquid celebration. But what if I told you we could take that iconic flavor and transform it into the most epic, show-stopping, conversation-halting dessert you’ll ever make? Enter: The Holiday Eggnog Cheesecake.
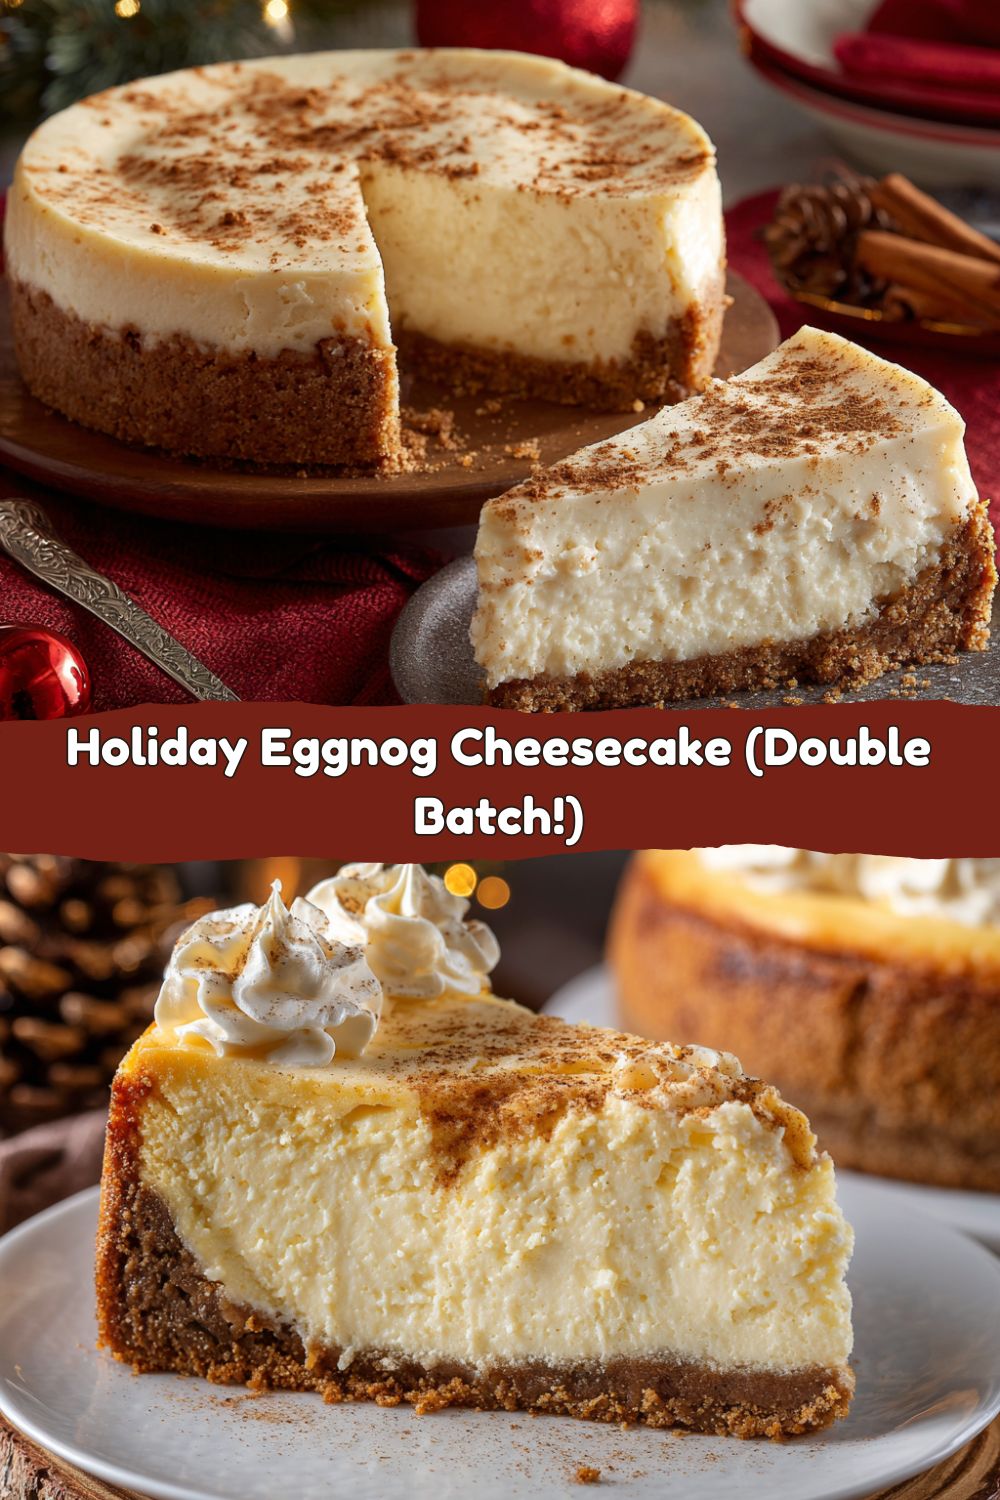
This isn’t just any cheesecake. We’re talking about a velvety-smooth, impossibly creamy filling that’s spiced with warm nutmeg and a hint of rum, all nestled into a buttery, cinnamon-kissed graham cracker crust. It’s like all the coziest feelings of the season decided to get together and throw a party in your mouth. And because ‘tis the season for sharing (and let’s be real, you’ll want to show this off), we’re making a double batch—two gorgeous cheesecakes! One for your festive gathering and one to proudly keep all to yourself… no judgment here.
I’ve tested this recipe more times than I can count, and I’ve packed it with all my best chef hacks to ensure your bake is absolutely foolproof. We’re going for perfection: no cracks, just pure, unadulterated creamy bliss. So, preheat that oven, grab your favorite mixing bowl, and let’s cook something awesome together. This Holiday Eggnog Cheesecake is about to become your newest delicious tradition.
A Spoonful of Nostalgia: My Grandma’s Eggnog Tradition
This recipe takes me right back to my Grandma Lou’s kitchen. Every year, on the first weekend of December, she’d pull out her big, speckled enamel pot and whip up her famous homemade eggnog. The whole house would smell like nutmeg and happiness. Us kids weren’t allowed the “grown-up” version, of course, but she’d always save a little un-spiked portion for me, topped with a mountain of whipped cream.
One year, I must have been about ten, I decided I was going to be a “big kid” and help her. I grabbed the nutmeg grinder and went to town… except I didn’t know when to stop. We ended up with what she called “Fire-breathing Dragon Nog.” It was… potent. But we laughed until we cried, and she taught me right then and there that the best recipes aren’t about perfection; they’re about the joy you stir into them. This cheesecake is my tribute to her—that same classic, comforting eggnog flavor, but in a form so decadent and shareable, it’s bound to make some new memories in your kitchen, too.
Gathering Your Flavor Arsenal
Here’s everything you’ll need to create this holiday magic. Remember, quality ingredients make a difference, especially in a simple recipe where each flavor really shines!
For the Crust (x2):
- 2 cups graham cracker crumbs: You can buy pre-crumbled or crush whole crackers in a zip-top bag. This is the classic base for a reason—it’s sweet, sturdy, and perfectly crumbly.
- 6 tbsp melted butter: Unsalted is best here so we can control the salt level. This is the glue that holds our crunchy foundation together.
- 4 tbsp white sugar: A little extra sweetness to caramelize slightly as it bakes.
- ½ tsp cinnamon + 2 generous pinches of salt: My signature twist! The cinnamon adds warm holiday vibes, and the salt balances the sweetness and enhances every other flavor. Don’t skip the salt!
For the Filling (One Double Batch):
- 6 (8 oz) packages cream cheese, softened: This is NON-NEGOTIABLE. Take it out at least 2 hours ahead. Room temp cheese blends smoothly and avoids a lumpy batter. Full-fat is the way to go for that luxuriously creamy texture.
- 2 cups white sugar: Sweetens the deal without overpowering the eggnog flavor.
- 1½ cups eggnog: Use the good stuff from the dairy aisle! The richer the eggnog, the richer your cheesecake.
- 6 tbsp all-purpose flour: Our secret weapon! A little flour helps stabilize the filling, giving it structure and making it less likely to crack. You’ll never taste it.
- 4 large eggs, room temperature: Another room-temp superstar. Cold eggs can cause the cream cheese to seize up. They act as the binder for our creamy filling.
- ½ tsp ground nutmeg: The quintessential eggnog spice. Freshly grated is even more amazing if you have it!
- ½ tsp rum extract OR 1 tbsp dark rum: This is the “authentic flavor boost.” The extract gives a stronger, non-alcoholic rum flavor, while the real deal adds a subtle, sophisticated depth. Your choice!
Let’s Build Some Cheesecake Magic: Step-by-Step
Follow these steps, and you’ll be a cheesecake champion. I’m giving you all my best tips along the way!
- Prep Like a Pro: Preheat your oven to 325°F (163°C). Take your two 9-inch springform pans and wrap the bottom and sides tightly in a double layer of heavy-duty aluminum foil. This is CRUCIAL for our water bath later—it keeps the water from seeping in and making our crust soggy. Lightly grease the inside of the pans or line the bottoms with a round of parchment paper for extra insurance.
- Make the Crust: In a medium bowl, mix the graham cracker crumbs, sugar, cinnamon, and salt for one crust. Pour in the melted butter and stir until the mixture looks like wet sand and holds together when you pinch it. Divide the mixture evenly between the two pans and press it firmly into an even layer on the bottom and about halfway up the sides. I like to use the bottom of a measuring cup to really pack it down. Pre-bake the crusts for 8-10 minutes. This toasts them up, giving extra flavor and a sturdier base. Let them cool on a rack while you make the filling.
- Create the Creamy Filling: In your food processor or stand mixer fitted with the paddle attachment, beat the softened cream cheese on medium speed for a full 3-4 minutes. Seriously, set a timer. This is the #1 tip for an ultra-smooth, lump-free cheesecake. Scrape down the sides and bottom of the bowl. Add the sugar and flour and beat for another 2 minutes until completely combined. Pour in the eggnog, nutmeg, and rum extract (or rum), and mix on low until just incorporated.
- Incorporate the Eggs: With the mixer on the lowest possible speed, add the eggs one at a time, mixing until each yolk just disappears into the batter. Do not overmix after adding the eggs! Overbeating incorporates too much air, which can cause the cheesecake to puff up and then fall and crack. Once the last egg is in, stop mixing. Give the bowl a final scrape and stir by hand to ensure everything is homogenous.
- The Water Bath (Bain-Marie): This is the chef’s secret to preventing cracks! It creates a steamy oven environment for gentle, even cooking. Place your foil-wrapped springform pans into a large, deep roasting pan. Carefully pour the batter evenly into the two prepared crusts. Then, place the roasting pan on your oven rack and pour hot water into the larger pan until it comes about halfway up the sides of the springform pans.
- Bake to Perfection: Bake for 60-70 minutes. The edges will look set, but the center will still have a slight jiggle—like Jell-O—when you gently shake the pan. That’s exactly what we want! It will firm up as it cools. If the center is still liquidy, give it more time.
- The All-Important Cool Down: This is where patience is key. Turn off the oven, crack the door open about an inch, and let the cheesecakes cool slowly inside the oven for 1 hour. This gradual temperature change prevents shocking the delicate custard, which is the main cause of cracking. After an hour, remove them from the water bath, take off the foil, and let them cool completely to room temperature on a wire rack. Then, cover them and refrigerate for at least 6-8 hours, but preferably overnight. This sets the flavor and texture perfectly.
How to Serve This Holiday Masterpiece
Okay, it’s been overnight. The wait is over! To serve, run a thin, sharp knife under hot water, wipe it dry, and carefully slide it around the edge of the springform pan to loosen the cheesecake. Then, unclasp and remove the ring.
For the prettiest slices, repeat the hot knife trick between each cut. Now, for the fun part: garnishing!
- Classic Elegance: A dollop of freshly whipped cream, a light dusting of nutmeg or cinnamon, and maybe a delicate curl of cinnamon stick.
- Eggnog Drizzle: Reduce some extra eggnog in a saucepan with a teaspoon of sugar until it’s slightly syrupy. Let it cool and drizzle it over each slice.
- Festive Flash: A sprinkle of crushed peppermint, a few fresh cranberries, or a dusting of edible gold glitter for serious holiday glam.
Serve it cold straight from the fridge. It’s rich, so thin slices are totally acceptable (and recommended, so it serves more people!).
Mix It Up! Creative Twists on the Classic
Feel like playing? Here are a few of my favorite ways to change up this recipe:
- Gingerbread Spice Crust: Swap the graham crackers for ginger snap crumbs. It adds a warm, spicy molasses flavor that pairs incredibly with the eggnog filling.
- Boozy Adult Version: Up the ante by adding 2 tablespoons of bourbon, spiced rum, or brandy to the filling instead of the 1 tbsp. The alcohol flavor will be subtle but present.
- Chocolate Swirl: Melt ½ cup of semi-sweet chocolate chips with a splash of eggnog. After pouring the batter into the crust, dollop the chocolate mixture on top and use a knife to swirl it beautifully through the batter.
- Dairy-Free Delight: Use your favorite plant-based cream cheese and eggnog. I’ve had great success with oat-based and almond-based versions for this!
- Individual Mini Cheesecakes: Line a muffin tin with liners, press in the crust, and fill ⅔ full with batter. Bake for 20-25 minutes. Perfect for parties!
Jackson’s Chef Notes & Kitchen Stories
This recipe has evolved from a one-pan experiment that, I’ll admit, once ended in a buttery lake all over my oven floor (foil wrapping is now law in my kitchen). The double batch idea came after one too many holiday parties where a single cheesecake disappeared in about 90 seconds flat, leaving a crowd of sad, dessert-less people.
My biggest tip? Don’t stress the small stuff. So what if it has a tiny crack? That’s what whipped cream is for! The flavor is what everyone will remember. The beauty of this dessert is that it actually gets better after a day or two in the fridge, making it the ultimate make-ahead stress-free holiday dessert.
FAQs & Troubleshooting
Q: My cheesecake cracked! What did I do wrong?
A: Ah, the classic cheesecake woes! The most common culprits are: overmixing the batter after adding the eggs (incorporates too much air), not using a water bath (cooks too harshly), or cooling it too quickly (causes it to contract rapidly). Even if it cracks, it will still taste incredible—just cover it with toppings!
Q: Can I make this without a springform pan?
A: It’s tricky but possible. A deep 9-inch cake pan lined with parchment paper (with overhanging edges for lifting) can work, but a springform is highly recommended for easy removal.
Q: How long will it keep in the fridge?
A: Tightly wrapped, it will stay delicious for up to 5 days. You can also freeze it for up to 2 months. Thaw it overnight in the refrigerator before serving.
Q: Why is the center of my cheesecake still wobbly after the bake time?
A: That’s perfect! It will continue to set as it cools. As long as it’s not liquidy, that jiggle is what you’re aiming for. It will firm up beautifully in the fridge.
Nutritional Information*
*Please note: This is an estimated nutritional breakdown per slice, based on a serving size of 1/24th of the total recipe (two cheesecakes). Values can vary based on specific brands and ingredients used.
Per Serving (Approx.): Calories: ~410 | Total Fat: 28g | Saturated Fat: 16g | Cholesterol: 125mg | Sodium: 280mg | Total Carbohydrates: 30g | Dietary Fiber: 0g | Sugars: 25g | Protein: 6g
This is a rich, decadent dessert meant to be enjoyed in celebration. Savor every delicious bite!
Final Thoughts
Well, there you have it, my friends—my ultimate Holiday Eggnog Cheesecake. This recipe is a labor of love, packed with nostalgia, flavor, and all the tips you need to make it perfectly. It’s more than just a dessert; it’s a centerpiece, a conversation starter, and a hug on a plate.
I hope you have as much fun making it as I do. Remember, the best kitchens are messy, the best recipes are shared, and the best moments are often found gathered around a table with good food and great people. So from my kitchen to yours, happy holidays and happy baking!
If you make this (and you totally should), tag me @FoodMeld on social media! I love seeing your creations. Now, let’s cook something awesome together!
– Jackson


