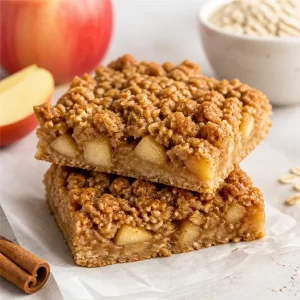
Banana Oatmeal Bars: A Comforting Twist on a Classic Snack
Hey there, food friends! It’s Jackson Walker here, and today we’re diving into the deliciously comforting world of Banana Oatmeal Bars. Yes, you heard that right—these bars are not just any ordinary snack; they’re a hug in your hand, a burst of flavor, and a slice of nostalgia that takes me back to my childhood in the South.
Picture this: it’s a lazy Sunday morning, and the air is thick with that sweet, warm aroma of ripe bananas and cinnamon wafting through the house. Those were the days when my grandmother would whip up a batch of her famous banana bread, a family favorite that never failed to bring us all together. We’d gather around the kitchen table, laughter filling the air as we savored every last crumb. Those memories laid the foundation for my love of bold, comforting food, and today I’m excited to share my twist on that classic comfort—Banana Oatmeal Bars!
These easy-to-make bars are perfect for breakfast on the go, a midday snack, or even a sweet treat after dinner, and I promise you, they’ll quickly become your new go-to recipe! With just a handful of simple ingredients, you can whip up a batch that’s not only bursting with flavor but is also packed with wholesome goodness. Plus, they’re a fantastic way to use up those overripe bananas sitting on your countertop begging for attention.
So grab your mixing bowl and let’s make something unforgettable together. Trust me; you’ll want to keep these bars in your kitchen rotation!
Personal Story
Growing up in a Southern household, food always played a central role in our family traditions. My grandma had a knack for knowing just what to make to lift our spirits—her banana bread was legendary, and it’s one of those things that can transport me back in time. I remember scampering into her kitchen, my nose twitching at the delightful scents permeating the air.
She had a way of making cooking feel like magic; simple ingredients would transform into something spectacular. One Sunday she decided on a whim to experiment with her famous banana bread, and instead, she mixed it into bar form—because why not? She also added oats for some heartiness and left out the sugar, relying instead on the natural sweetness of the bananas.
When she pulled those Banana Oatmeal Bars out of the oven, I can still see the excitement in her eyes, and I can still taste that first bite. It was chewy, sweet, and savory all at once—everything I loved about breakfast wrapped up in a neat little package. She called them “easy snacks for school,” and they quickly became a staple in our home. Fast forward to today, I’ve put my own spin on these bars, making them easy, fun, and definitely unforgettable. Let’s get cooking!
Ingredients
Here’s what you’ll need to whip up a batch of these delicious Banana Oatmeal Bars. Let’s break it down:
-
2 ripe bananas
The star of the show! Ripe bananas are naturally sweet and help bind the bars together. If you don’t have ripe ones, you can speed up the process by placing them in a brown paper bag to trap the ethylene gas. Need a substitute? Applesauce works wonderfully too! -
2 cups rolled oats
Rolled oats provide a hearty texture and are a great source of fiber. They give the bars their chewy goodness. If you’re looking for a gluten-free version, make sure to grab certified gluten-free oats! -
1/2 teaspoon cinnamon
This warm spice adds that comforting, inviting flavor profile to our bars. You can experiment with other spices like nutmeg or pumpkin pie spice if you’re feeling adventurous! -
1/4 cup honey or maple syrup
The sweetener brings everything together; it’s what makes the bars delightful. Substitute with agave syrup or a little bit of brown sugar if you’re out! -
1/4 cup nut butter (optional)
This adds a creaminess and depth of flavor, plus a boost of healthy fats! Peanut butter, almond butter, or even sunflower seed butter are great choices here. -
1/2 teaspoon vanilla extract
Trust me, this is the magic ingredient that takes the flavor to the next level! You can also use a different flavor extract, like almond or coconut, if you’re feeling whimsical. -
1/4 teaspoon salt
A pinch of salt enhances flavors and balances out the sweetness of the bananas.
Step-by-Step Instructions
Now that we have our ingredients ready, let’s get down to business! Remember, cooking should be fun, so let’s dig in.
Step 1: Preheat Your Oven
First things first, let’s preheat that oven to 350°F (175°C). This ensures our bars bake evenly and come out perfectly golden on top.
Step 2: Mash Those Bananas
In a large mixing bowl, using a fork or a potato masher, mash those ripe bananas until they’re nice and smooth. Leave a few small lumps for texture if you like! This step not only adds sweetness but also moisture to your bars.
Step 3: Mix in the Goodness
To the mashed bananas, add the rolled oats, cinnamon, honey or maple syrup, nut butter, vanilla extract, and salt. Stir everything together until you have a well-combined, sticky mixture. Don’t be shy here—give it a good mix! Here’s a chef hack: if your nut butter is a bit stiff, pop it in the microwave for about 10 seconds to make it easier to mix in.
Step 4: Prepare Your Baking Dish
Next, grab an 8-inch square baking dish and line it with parchment paper (you can also spray it with non-stick spray if you prefer). This keeps your bars from sticking and makes clean-up a breeze.
Step 5: Spread and Flatten
Now it’s time to transfer your mixture to the prepared baking dish. Use a spatula or your hands to evenly spread the mixture out, pressing it down firmly to create an even layer. The better you pack it, the better the bars will hold together after baking!
Step 6: Bake to Perfection
Pop the dish in your preheated oven and bake for 25-30 minutes, or until the edges are golden brown. The top should look set but not overly dry. Here’s a little tip: check your bars at the 20-minute mark—every oven is slightly different, so keep an eye on those beauties.
Step 7: Cool and Cut
Once baked, remove from the oven and let it cool in the dish for about 10 minutes. Then, lift the parchment paper to remove the bars and cool them on a wire rack. Once they have cooled completely, use a sharp knife to cut them into squares or rectangles, whatever shapes your heart desires!
Serving Suggestions
These Banana Oatmeal Bars are perfect as is, but let’s take it up a notch, shall we? Serve them warm with a drizzle of honey, a dollop of Greek yogurt, or even a sprinkle of nuts or chocolate chips on top for an extra bite of flavor. Pair them with a steaming cup of coffee or a refreshing smoothie for a delightful breakfast or snack combo. You can also wrap them individually for a grab-and-go option that’s perfect for busy mornings or afternoon cravings.
Recipe Variations
Feeling creative? Here are some fun twists you can try with your Banana Oatmeal Bars:
-
Choco-Banana Bliss: Add 1/2 cup of chocolate chips to the mixture for a deliciously decadent treat.
-
Nutty Delight: Mix in 1/2 cup of chopped nuts like walnuts or pecans for a nice crunch.
-
Berry Fusion: Fold in some fresh or frozen berries like blueberries or raspberries for a fruity twist.
-
Crunchy Granola: Toss in 1/2 cup of granola for added texture and flavor.
-
Spiced Pumpkin: Replace the bananas with pumpkin puree (about 1 cup) and add pumpkin spice for a fall-friendly version.
Chef’s Notes
In my kitchen, recipes are often a work in progress, and that’s part of the fun, right? I remember when I first started making these bars, I used to add way too much sweetener, thinking more was better. After a few batches (and a fair few sugar-induced giggles), I realized that those ripe bananas are sweet enough on their own! Less is more sometimes, especially when trying to keep things wholesome. So don’t be afraid to adjust ingredients to make this recipe your own—cooking is all about experimentation!
FAQs and Troubleshooting
Here are a few common questions I’ve received and solutions for potential hiccups along the way:
Q: Can I use quick oats instead of rolled oats?
A: Yes, you can! However, the texture will be slightly different—quick oats will yield a softer bar. Just be sure to keep an eye on the baking time, as they may bake faster!
Q: My bars are too crumbly. What went wrong?
A: A crumbly texture often means there wasn’t enough moisture in the mixture. Next time, try mashing the bananas more thoroughly or adding a splash of plant-based milk or a little more nut butter to bind things together.
Q: How do I store these bars?
A: Store the bars in an airtight container at room temperature for up to three days. For longer storage, they can be frozen for up to three months—just wrap them individually in plastic wrap and place them in a freezer bag!
Q: Can I make these bars vegan?
A: Absolutely! Just swap out the honey for maple syrup, and you’re good to go!
Nutritional Info (per bar)
(Assuming the recipe yields 12 bars)
- Calories: ~120
- Protein: 3g
- Carbohydrates: 18g
- Fiber: 2g
- Sugars: 6g
- Fat: 4g
- Sodium: 50mg
(These values can vary slightly based on ingredient brand and quantity.)
Final Thoughts
And there you have it—delicious, easy, and fun Banana Oatmeal Bars that are sure to put a smile on your face! Cooking is about sharing stories, flavors, and love, and I hope you find joy in making these bars as much as I do.
Remember, the best recipes come with a little bit of creativity and a sprinkle of love. So don’t hesitate to make this recipe your own! Whether it’s adding your favorite nut butter or trying a new fruit, the possibilities are endless.
Thanks for joining me in this delicious adventure! Embrace the messiness, celebrate those “you’ve gotta try this” moments, and most importantly—enjoy every bite. Until next time, let’s keep mixing it up in the kitchen together! Happy cooking!
Print
Banana Oatmeal Bars
- Total Time: 40 minutes
- Yield: 12 bars 1x
- Diet: Vegetarian
Description
These Banana Oatmeal Bars are a comforting and delicious twist on a classic snack, perfect for breakfast, a midday snack, or a sweet treat.
Ingredients
- 2 ripe bananas
- 2 cups rolled oats
- 1/2 teaspoon cinnamon
- 1/4 cup honey or maple syrup
- 1/4 cup nut butter (optional)
- 1/2 teaspoon vanilla extract
- 1/4 teaspoon salt
Instructions
- Preheat your oven to 350°F (175°C).
- Mash the ripe bananas in a large mixing bowl.
- Mix in the rolled oats, cinnamon, honey or maple syrup, nut butter, vanilla extract, and salt.
- Prepare an 8-inch square baking dish with parchment paper.
- Spread the mixture evenly in the prepared baking dish.
- Bake for 25-30 minutes, until the edges are golden brown.
- Cool in the dish for 10 minutes, then cut into squares.
Notes
These bars can also be topped with honey, Greek yogurt, nuts, or chocolate chips for extra flavor.
- Prep Time: 10 minutes
- Cook Time: 30 minutes
- Category: Snack
- Method: Baking
- Cuisine: American
Nutrition
- Serving Size: 1 bar
- Calories: 120
- Sugar: 6g
- Sodium: 50mg
- Fat: 4g
- Saturated Fat: 1g
- Unsaturated Fat: 3g
- Trans Fat: 0g
- Carbohydrates: 18g
- Fiber: 2g
- Protein: 3g
- Cholesterol: 0mg
Keywords: Banana Oatmeal Bars, Snack, Healthy Recipe, Vegetarian, Breakfast, Easy Recipe