Grilled Cheese Roll-Ups: Elevating a Classic, One Crunch at a Time
Hey there, fellow food lovers! I’m Jackson Walker, and today we’re diving into the delicious world of comfort food with a fun twist. Remember those rainy afternoons when you came home from school and the sweet aroma of toasty bread and melted cheese filled the kitchen? Well, we’re about to take that nostalgia and crank it up a notch. Buckle up, because we’re making Grilled Cheese Roll-Ups, a dish that transforms the beloved grilled cheese sandwich into a crunchy, delightful, finger-food treat!
These crispy goodies are not just your average sandwich; they’re rolled up, toasted to golden perfection, and made for dipping. Packed with the gooey goodness of melted cheese and buttery flavor, Grilled Cheese Roll-Ups make an awesome snack, party appetizer, or a secret weapon for your next family dinner. Plus, they’re super easy to make, which means you won’t have to stress about cooking after a long day. If you’re ready to impress your friends or simply enjoy a bite of childhood happiness, let’s get started!
But let’s be honest; cooking is more than just following a recipe. It’s about the stories we share, the laughs we have, and the simple joy of creating something from scratch. So grab your favorite spatula, roll up those sleeves, and let’s turn our kitchens into a flavorful playground where comfort meets creativity. You bring the cheese, I’ll bring the fun—it’s time to learn how to make these savory Grilled Cheese Roll-Ups!
Personal Story
Growing up in the South, a grilled cheese sandwich was an absolute staple in my family. It was the ultimate comfort food—easy to whip up and perfect for those days when the weather couldn’t decide if it was raining or shining. I can vividly recall Saturday afternoons spent in the kitchen with my mom, trying to perfect the ultimate grilled cheese. She had her secrets (butter on the outside was definitely one of them!), and I had my creative ideas, often suggesting we add whatever we could find in the fridge.
One day, I noticed a pack of deli ham peeking out at me, and I said, “Hey, what if we rolled up the bread with cheese and ham inside?” My mom raised an eyebrow but was game to try anything that sounded like culinary adventure. From that afternoon on, Grilled Cheese Roll-Ups became a staple for family gatherings and parties. The sizzle of the butter in the skillet mixed with our laughter and the occasional cheese pull created memories I cherish to this day. In cooking, as in life, it’s all about experimenting and having fun. So, let’s channel that playful spirit together!
Ingredients
Here’s what you’ll need to whip up some Grilled Cheese Roll-Ups that’ll make everyone ask for seconds:
-
6 slices of bread: I love using white or whole wheat bread for that classic taste, but feel free to substitute with sourdough or gluten-free bread. Just keep in mind that the toastiness will vary.
-
1 cup thinly shredded cheese: Cheddar is my go-to because it melts wonderfully, but you can also use mozzarella, pepper jack for a little kick, or a mix for a flavor fiesta! Pro tip: buy shredded cheese to save time, but if you want to grate your own, it will melt even better.
-
6 thinly sliced ham (optional): This brings an extra layer of flavor! If you’re feeling adventurous, try prosciutto or turkey instead. For a vegetarian option, skip the meat, or replace it with your favorite roasted veggies.
-
2 tablespoons of butter: This is what gives our roll-ups that irresistible golden crust. Feel free to use margarine or olive oil if you want a dairy-free alternative.
Step-by-Step Instructions
Now that we’ve got our ingredients prepped, let’s jump into the cooking process. Here’s how to roll up your sleeves and create these tasty treats:
-
Prep the Bread: Start by flattening each slice of bread using a rolling pin or a heavy pan. This helps the bread roll up more easily. Trust me, it makes a difference!
-
Layer the Cheese (and Ham): Place about 2 tablespoons of shredded cheese in the center of each slice. If you’re using ham, add it on top of the cheese. Be careful not to overfill to ensure a clean roll-up.
-
Roll It Up: Carefully roll up the bread tightly, starting at one edge. You can secure it with a toothpick if needed, but usually, the bread holds together well on its own.
-
Melt Butter: In a non-stick skillet over medium heat, add 1 tablespoon of butter. Allow it to melt and coat the pan evenly.
-
Sear the Roll-Ups: Place the roll-ups seam-side down into the skillet. Sear for about 2-3 minutes until golden brown and crispy. Use tongs to turn them over and add the second tablespoon of butter to the pan to brown the other side.
-
Finish Cooking: Cook for an additional 2-3 minutes until both sides are crispy and the cheese is melted. Remove from the skillet and let cool for a minute. (Try not to burn your mouth on that delicious cheese!)
-
Slice and Serve: Cut each roll-up in half or into bite-sized pieces. They’re perfect for sharing—or not, I won’t judge if you want to keep them all for yourself.
Serving Suggestions
To serve these delightful Grilled Cheese Roll-Ups, I recommend putting them on a fun platter with some colorful dipping sauces. A classic tomato soup is a top-tier choice, but if you want to mix it up, consider adding a spicy ranch or some zesty marinara. You can even sprinkle some fresh herbs or grated parmesan on top for an elevated look. Presentation is key, after all!
Want to make it extra special? Pair these roll-ups with a light salad or some crunchy veggies on the side. It not only balances out the meal but adds a splash of color to your plate. Let the flavors mingle, and you’ll have a feast fit for a gathering or a simple evening treat!
Recipe Variations
Who says you have to stick to the basics? Here are a few creative twists to elevate your Grilled Cheese Roll-Ups:
-
Pesto Delight: Spread a layer of pesto inside the bread before adding cheese. It adds a fresh, herby flavor that you won’t be able to resist!
-
Spicy Kick: Add sliced jalapeños or a sprinkle of chili flakes to the cheese for a fiery version that’ll wake up your taste buds.
-
Caprese Version: Swap ham for fresh basil leaf and slices of tomato. You’ll have a cheesy, ooey-gooey Caprese delight!
-
Mac and Cheese Roll-Ups: Make a batch of your favorite mac and cheese and use that in place of shredded cheese. Talk about a comfort food overload!
-
Breakfast Style: Add scrambled eggs and cheese for a breakfast version that’s perfect for brunch gatherings.
Chef’s Notes
I’ve been rolling these up for years, and they’ve seen a lot of experimentation. The beauty of Grilled Cheese Roll-Ups is how versatile they are! One summer, I went on a kick of adding different cheese blends, and let me tell you—smoked gouda takes these roll-ups to another level.
Also, sometimes the simplest things turn out to be the most special. I’ve hosted plenty of impromptu gatherings where these roll-ups were the star at the table. They sparked laughter, conversation, and, of course, a few friendly debates about who made the best filling.
FAQs and Troubleshooting
-
Why isn’t my cheese melting?
- This might be due to the cheese not being shredded fine enough or the heat being too low. Always make sure to use shredded cheese, which melts more evenly than slices.
-
How can I keep them from unrolling?
- Ensure you roll them tightly and place them seam-side down in the pan. If you’re still having issues, a toothpick can help hold the rolls together while cooking.
-
Can I prepare these ahead of time?
- Absolutely! You can roll them up in advance and store them in the fridge. Just pop them in the skillet when you’re ready to cook them.
-
What do I do if they’re burning before the cheese melts?
- Lower the heat! Cooking them slowly allows the cheese to melt while getting that perfect crispy exterior.
Nutritional Info
Here’s a breakdown of nutritional info per serving (based on one roll-up without accompaniments):
- Calories: Approximately 150
- Protein: 6g
- Carbohydrates: 19g
- Fat: 7g
- Fiber: 1g
- Sugars: 1g
Enjoying your food isn’t just about flavor; it’s also important to be aware of what’s on your plate. Grilled Cheese Roll-Ups can be a fun part of a balanced diet, especially when paired with fresh veggies or a light salad.
Final Thoughts
Cooking should always be a delightful journey, not a chore. Grilled Cheese Roll-Ups embody that perfect blend of nostalgia, creativity, and flavor. Whether you’re making them for a crowd or just indulging yourself, these rolled-up cheesy treats are bound to bring smiles and happy bellies to the table.
So remember, cooking is all about enjoying every bite and creating memories in the kitchen together. Now it’s your turn—get rolling, experiment with flavors, and most importantly, have a blast! Come back and let me know how your Grilled Cheese Roll-Ups turned out. Until next time, happy cooking, my friends!
Print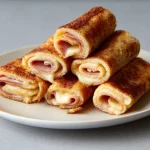
Grilled Cheese Roll-Ups
- Total Time: 16 minutes
- Yield: 4 servings 1x
- Diet: Vegetarian
Description
A fun twist on the classic grilled cheese sandwich, these crispy roll-ups are packed with melted cheese and make for a delightful finger food.
Ingredients
- 6 slices of bread (white, whole wheat, sourdough, or gluten-free)
- 1 cup thinly shredded cheese (Cheddar, mozzarella, or pepper jack)
- 6 thinly sliced ham (optional)
- 2 tablespoons of butter
Instructions
- Prep the bread: Flatten each slice using a rolling pin or heavy pan.
- Layer the cheese (and ham): Place 2 tablespoons of shredded cheese in the center of each slice, add ham if using.
- Roll it up: Carefully roll the bread tightly from one edge.
- Melt butter: In a non-stick skillet over medium heat, melt 1 tablespoon of butter.
- Sear the roll-ups: Place roll-ups seam-side down in the skillet, sear for 2-3 minutes until golden brown.
- Finish cooking: Flip, add the remaining butter, and cook until both sides are crispy and cheese is melted.
- Slice and serve: Cut each roll-up in half or into bite-sized pieces.
Notes
Serve with dipping sauces like tomato soup, spicy ranch, or marinara. Experiment with different cheeses and fill-ins for unique flavors!
- Prep Time: 10 minutes
- Cook Time: 6 minutes
- Category: Snack
- Method: Pan-frying
- Cuisine: American
Nutrition
- Serving Size: 1 roll-up
- Calories: 150
- Sugar: 1g
- Sodium: 300mg
- Fat: 7g
- Saturated Fat: 4g
- Unsaturated Fat: 2g
- Trans Fat: 0g
- Carbohydrates: 19g
- Fiber: 1g
- Protein: 6g
- Cholesterol: 15mg
Keywords: grilled cheese, roll-ups, snack, comfort food, easy recipe