Coffee & Salted Caramel Tart: Your New Go-To Showstopper Dessert
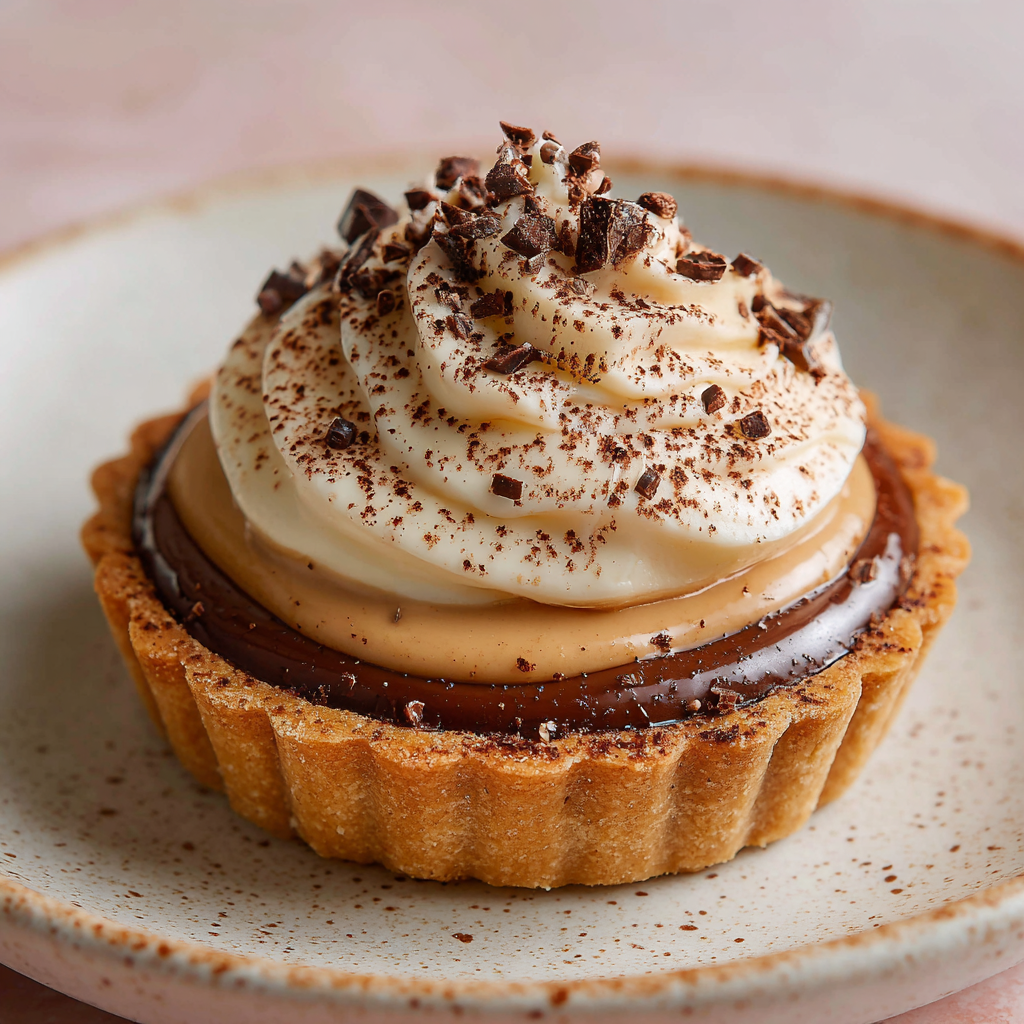
This Coffee & Salted Caramel Tart with Vanilla Whipped Ganache isn’t just a dessert; it’s an experience. It’s the love child of your favorite upscale patisserie and your coziest neighborhood cafe. We’ve got a buttery, crisp shell holding a secret layer of hazelnut-coffee praliné, a river of deep, salty-sweet caramel, a silky-smooth coffee crémeux, and a cloud of vanilla whipped ganache that’s lighter than air. It’s bold, it’s comforting, and it looks like you spent a fortune and three days making it.
But here’s the Food Meld promise: we’re breaking it down, step-by-joyful-step. No intimidation, just clear guidance and a few chef-approved shortcuts. This is for the Sunday baker who wants to impress, for the dinner party host ready to level up, and for anyone who believes that coffee and dessert belong together in holy matrimony. So, tie on your apron, put on some good music, and let’s cook something awesome together.

The Café Counter Inspiration
This tart’s soul comes from a tiny, steamy-windowed café I used to haunt in my early twenties. I was a line cook, perpetually tired, and my reward after a double shift was their “Mocha Dream” tart. It wasn’t fancy by today’s standards, but to me, it was magic. The barista, a gruff guy named Leo, would see me coming and just slide one across the counter with a nod.
I’d sit there, still smelling of fryer oil, and just be for ten minutes. The bitter coffee cut through the sweet, the crust crumbled perfectly, and it just… fixed everything. Years later, I wanted to recreate that feeling—but with my own twist. More caramel, a touch of fancy with the crémeux, and that fluffy ganache top because why not have fun with it? This recipe is my love letter to those quiet, restorative moments and the humble desserts that make them special.
Gathering Your Flavor Arsenal
Don’t let the components scare you! We’re building in layers, and each one is simple. Read through these notes—they’re your cheat sheet for success and swaps.
- Sweet Shortcrust Pastry (Pâte Sucrée): You can absolutely use a store-bought all-butter pie dough for a shortcut. But if you’re making it, the key is cold butter and not overworking it. That’s the secret to a tender, flaky, snappy shell.
- Hazelnut Praliné: This is just caramelized sugar mixed with toasted hazelnuts, blitzed into a paste. It adds an incredible nutty depth. Find it in the baking aisle or online. No praliné? A good-quality Nutella will work in a pinch, but reduce the sugar elsewhere as it’s sweeter.
- Instant Coffee or Espresso Powder: Use the good stuff here—it’s the backbone of the flavor. I prefer a fine espresso powder for its intense, pure coffee punch. Instant granules will work; just make sure they dissolve completely.
- Milk Chocolate (for Praliné Layer): We’re using milk chocolate here to sweeten and set the praliné. Its creaminess plays nice with the nuts. A dark chocolate (60%) would make it more adult and bitter, which is also delicious!
- Heavy Cream & Milk: Full-fat is non-negotiable for the crémeux and ganache. It’s about texture and stability. For the dairy-free crew, canned full-fat coconut cream is your best swap for the crémeux.
- Egg Yolks: Our crémeux thickener and richness booster. Get them to room temperature for easier blending.
- Gelatin: A little sheet of gelatin gives the crémeux its gorgeous, sliceable yet silky set. If you only have powdered, use about 1 teaspoon, bloomed in 2 tbsp cold water.
- Sugar (for Caramel): White granulated sugar is perfect. Watch it like a hawk—it goes from golden to burnt in seconds!
- Butter & Sea Salt (for Caramel): Unsalted butter lets you control the salt level. And for the salt, use a flaky sea salt for finishing. Its texture and clean saltiness are irreplaceable.
- White Chocolate (for Ganache): Use a baking bar, not chips. Chips have stabilizers that can make your ganache grainy.
- Vanilla Bean or Paste: The speckles from a real bean or a quality paste make this feel extra special. In a pinch, a clear, pure vanilla extract works.
Let’s Build Some Magic: Step-by-Step
Part 1: The Foundation (Tart Shell & Praliné)
1. Blind Bake Your Shell: Roll your dough and fit it into a 9-inch tart pan with a removable bottom. Press it in well, trim the edges, and freeze for 20 minutes. This prevents shrinkage! Bake at 375°F (190°C) with parchment and pie weights for 15 mins, then remove weights and bake 10 more mins until golden. Let it cool completely. Chef’s Hack: If a little crack appears, don’t panic! The praliné layer will seal it.
2. Coffee Praliné Layer: In a heatproof bowl, melt the milk chocolate in short bursts in the microwave. Stir in the hazelnut praliné and a heaping teaspoon of espresso powder until it’s a smooth, fragrant paste. Spread this evenly over the bottom of your cooled tart shell. This isn’t just flavor—it’s a moisture barrier to keep the crust crispy. Pop it in the fridge to set.
Part 2: The Heart (Salted Caramel & Coffee Crémeux)
3. Salted Caramel Time: This is the fun/scary part that makes you feel like a pro. In a medium, light-colored pot (so you can see the color!), heat the sugar over medium heat. Don’t stir—just swirl the pan occasionally. When it’s a deep amber color, carefully whisk in the butter (it will bubble violently!). Once incorporated, slowly drizzle in the warm heavy cream, whisking constantly. Let it bubble for 1 minute, then remove from heat and stir in your salt. Let this cool for about 15 minutes until just warm, then pour over the set praliné layer. Back to the fridge to set up.
4. Silky Coffee Crémeux: Bloom your gelatin sheet in ice water. In a saucepan, heat the milk, cream, and coffee extract. In a separate bowl, whisk egg yolks and sugar until pale. Slowly, and I mean slowly, pour the hot milk mixture into the yolks while whisking non-stop (this is called tempering—it prevents scrambled eggs!). Pour everything back into the pan and cook on low heat, stirring constantly with a spatula, until it thickly coats the back of the spoon. Off the heat, squeeze out the gelatin and whisk it in until dissolved. Strain through a fine sieve for ultimate silkiness. Let it cool for 10 minutes, then gently pour over the set caramel layer. Chill for at least 3 hours, until completely firm.
Part 3: The Crown (Vanilla Ganache Montée)
5. Whip It Good: Chop the white chocolate finely. Heat half the cream with the vanilla bean seeds (or paste) until just simmering. Pour it over the white chocolate, let it sit for 2 minutes, then whisk until smooth. Whisk in the remaining cold cream. Cover and chill for at least 4 hours, or overnight. When the tart is set and you’re ready to serve, whip this chilled mixture with a mixer until it holds soft peaks—like a dreamy, stable whipped cream. Pipe or dollop it generously over the tart.
Plating Your Masterpiece
You’ve done the hard work; now let’s make it pretty! I like to use a fine-mesh sieve to dust a light snowfall of cocoa powder or even more espresso powder over the top of the whipped ganache. It looks professional and hints at the flavors inside.
Run a thin, sharp knife under hot water, dry it, and slice. Clean the knife between cuts for pristine slices. Serve on simple, clean plates. This tart is rich, so small slices are perfect. A few toasted hazelnuts or a tiny sprinkle of flaky salt on the plate adds a great touch. It pairs beautifully with a glass of cold milk, a neat bourbon, or, of course, a strong cup of black coffee.
Make It Your Own: Fun Twists & Swaps
- Nutty Switcheroo: Swap the hazelnut praliné for almond or pistachio praliné. Each brings a totally different, delicious personality.
- Chocolate Base: Add 2 tbsp of cocoa powder to your tart dough for a chocolate crust. It’s a no-brainer with these flavors.
- Boozy Kick: Add a tablespoon of bourbon, Kahlúa, or Frangelico to the caramel after it’s off the heat for a grown-up twist.
- Dairy-Free Delight: Use coconut cream for both the crémeux and ganache, a vegan butter for the caramel, and a high-quality vegan white chocolate. The coffee and caramel flavors will still shine.
- Mini Tart Party: Use mini tart pans for individual servings. They’re adorable and reduce chilling time!
Jackson’s Notebook Scribbles
The first time I tested this, I was so focused on the layers I completely forgot to sweeten the crémeux. Let me tell you, bitter is an understatement! My partner took one bite and his face did a thing I’ll never forget. We laughed for ten minutes. It was a great reminder to taste every component as you go.
This recipe has evolved from a simpler coffee tart. The praliné layer was a “what if we tried this?” moment that added a necessary textural crunch and nuttiness. And the whipped ganache? That came from wanting something less sweet and more ethereal than a standard buttercream. Don’t be afraid to play with it yourself!
Your Questions, Answered
Q: My caramel seized up when I added the butter/cream. What happened?
A: This usually means the cream was too cold, shocking the sugar. Make sure your cream is warm (heat it in the microwave for 30 seconds). If it seizes, just put the pot back on low heat and whisk constantly until it all melts back together.
Q: Can I make this ahead of time?
A: Absolutely! The fully assembled tart (without the whipped ganache top) will keep beautifully in the fridge for 2 days. Make the ganache base a day ahead, chill it, and whip it right before serving. You can also freeze the naked, filled tart (without ganache) for up to a month. Thaw in the fridge overnight.
Q: My crémeux isn’t setting! It’s still runny.
A> Two likely culprits: 1) It wasn’t cooked to a thick enough consistency before adding the gelatin. It should coat the spoon. 2) The gelatin wasn’t fully dissolved. Make sure you whisk it vigorously into the hot mixture. If it’s still soupy after 4 hours, you can gently re-warm it (don’t boil!), add another half-sheet of bloomed gelatin, and re-chill.
Q: Is there a substitute for gelatin?
A> For a vegetarian option, you can use agar-agar. Use about 1 teaspoon powder, dissolved in the hot milk mixture before combining with the yolks. Note: It sets firmer and faster than gelatin.
A Note on Nutrition & Indulgence
Let’s be real: this is a celebration dessert. It’s rich, it’s decadent, and it’s meant to be savored in moderation. Each serving (based on 8 slices) packs about 430 calories, with 29g of fat, 34g of carbs, and 6g of protein. The fats come from quality sources like butter, cream, nuts, and eggs, which provide satiety and flavor you just can’t get from low-fat substitutes. The carbs are primarily from sugar, which is the point here—it’s a treat! My philosophy is to make indulgent things mindfully and wonderfully, and enjoy every single bite without guilt. Life’s too short for bad dessert.
You’ve Got This
Look at you, ready to conquer a tart that looks like it came from a Parisian window. I’m so proud. Remember, cooking—especially baking—is about the journey as much as the destination. If your layers aren’t perfectly even, or your caramel is a shade lighter than mine, it doesn’t matter. It will still taste incredible because you made it.
This Coffee & Salted Caramel Tart is my invitation to you to play in the kitchen, to embrace a little challenge, and to create those “you’ve gotta try this” moments for the people you love. So take a photo, tag me @FoodMeld, and share your victory. Now, go enjoy every single messy, fun, flavorful bite. Until next time, friends—keep mixing it up.
Jackson


