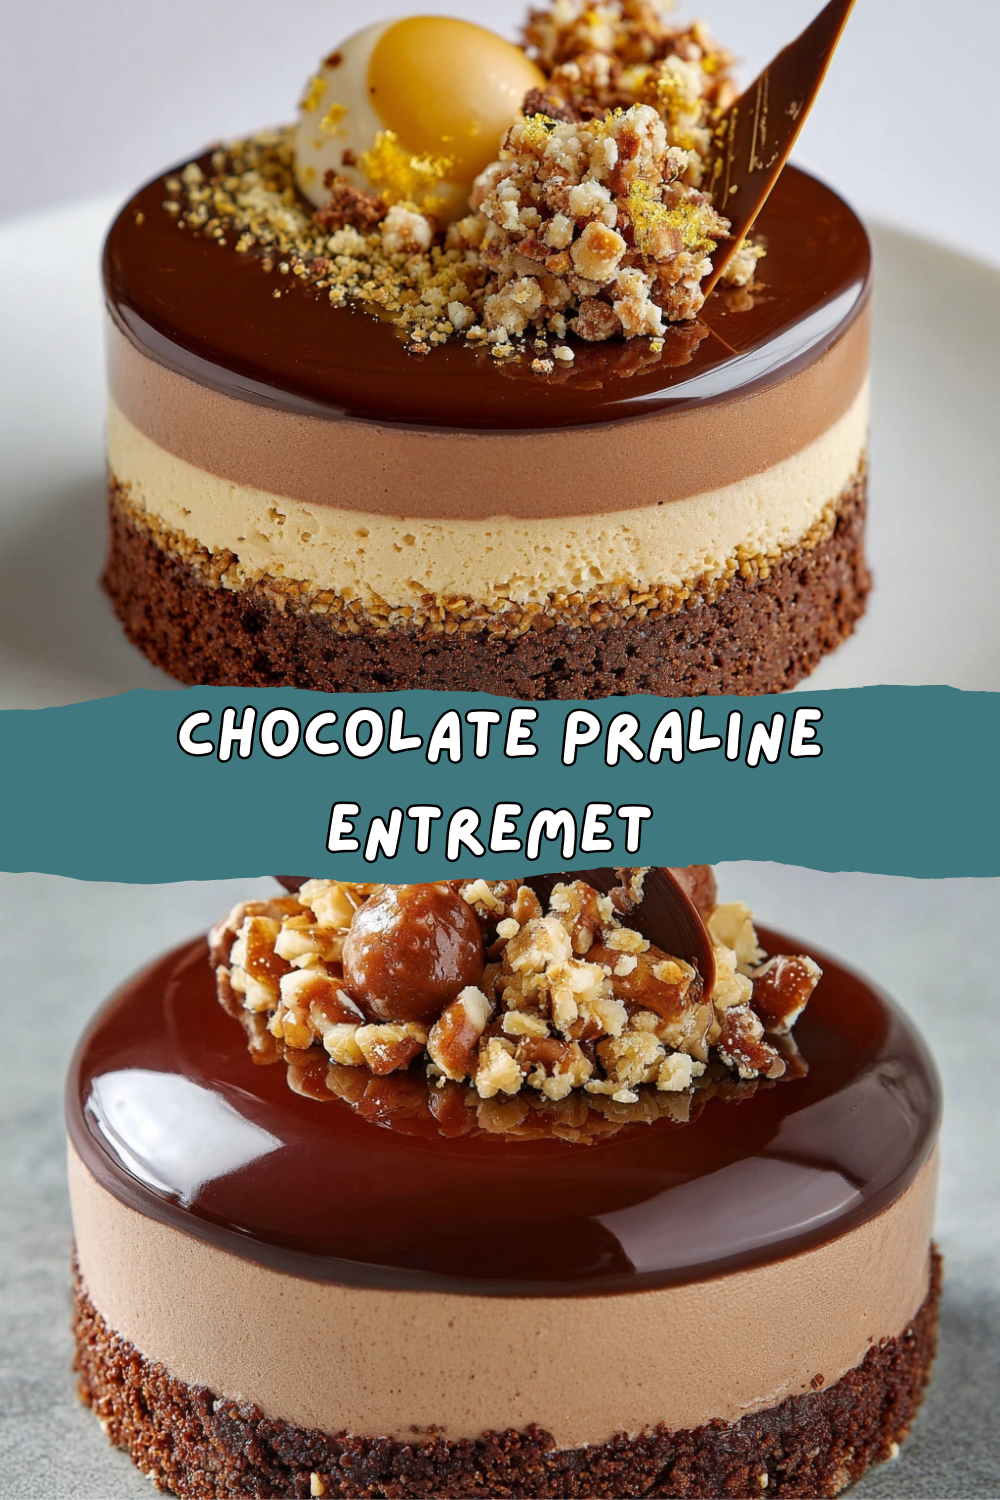
Let’s Build a Flavor Symphony: The Chocolate Praline Entremet
Hey there, friend. Jackson here. Pull up a stool and let’s talk about one of those kitchen moments we all have: that sudden, undeniable craving for something spectacular. Not just a brownie or a scoop of ice cream, but a dessert that feels like an event. A dessert that makes you pause after the first bite, close your eyes, and just whisper, “Wow.” Ever been there? I know I have. But then, you look at those towering, glossy masterpieces in patisserie windows and think… “That’s a chef’s magic. Not for my kitchen.”
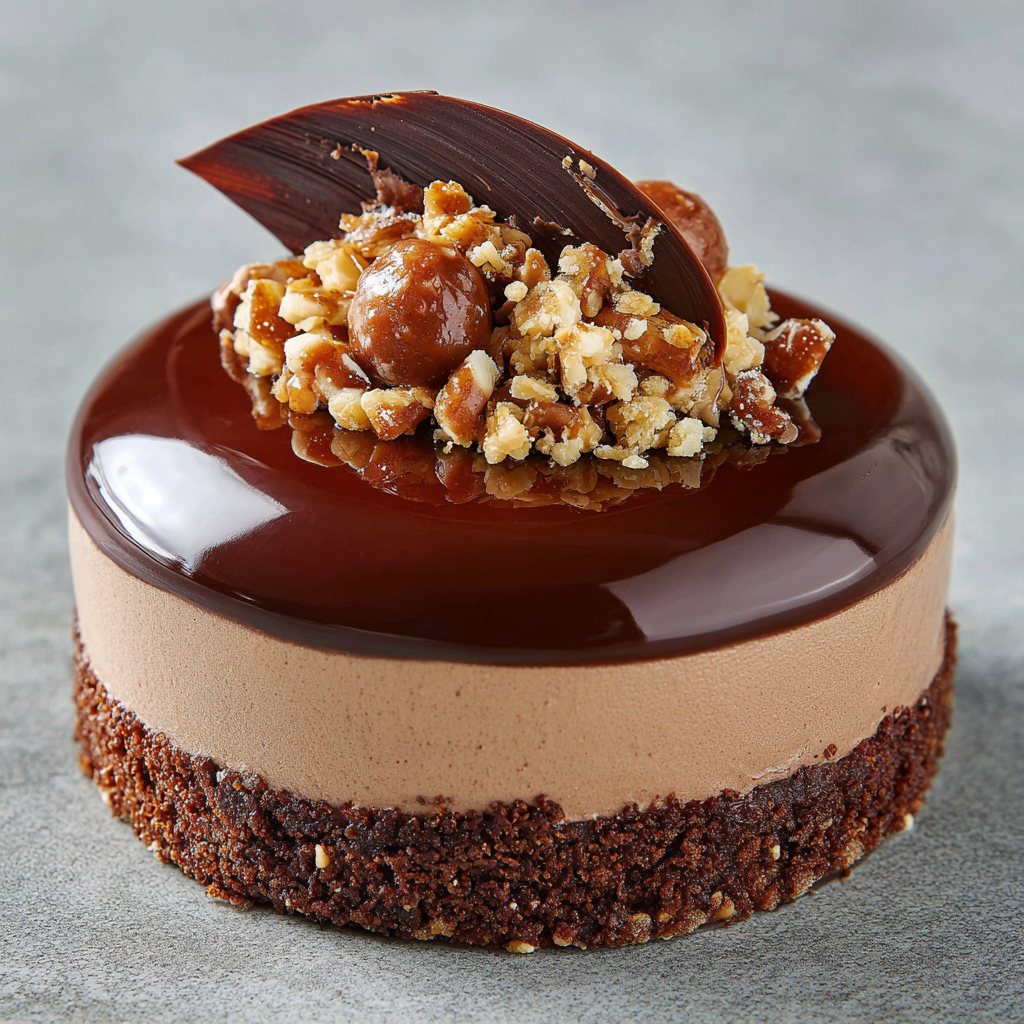
Well, I’m here to tell you that magic is just a series of simple, totally-doable steps. Today, we’re demystifying one of my all-time favorite projects: the Chocolate Praline Entremet. Don’t let the fancy name fool you. An “entremet” is just a layered, mousse-based dessert, and it’s the perfect playground for flavor and texture. We’re talking layers of fudgy brownie, a crackly gianduja crunch, a ribbon of pure nutty praline, a silky vanilla crémeux, all wrapped in a cloud of the most decadent dark chocolate mousse. It’s a symphony in dessert form.
This is a Food Meld special through and through—taking the elegant techniques from French patisserie and melding them with the bold, comforting flavors I love (hello, praline and brownie!). It’s a project, sure. A fun, rewarding, “look-what-I-made!” kind of project. I’ll be with you for every step, sharing all my tips and “learned-it-the-hard-way” hacks. We’re going to move slowly, keep things chill, and build something unforgettable, one delicious layer at a time. Ready to turn your kitchen into the coolest patisserie in town? Let’s do this.
The Praline Connection: A Taste of Home
Before we dive into the ingredients, I’ve gotta tell you where my love for this flavor combo started. It takes me right back to my grandma’s kitchen in Georgia. She wasn’t making French entremets, but she was a praline queen. That scent of toasting pecans and caramelizing sugar is one of my core memory smells. She’d pour the molten candy onto wax paper, and we’d have to wait an eternity for it to cool and crack into those perfect, buttery shards.
When I first started experimenting with patisserie, that taste was my North Star. I wanted to capture that deep, toasty, sweet-and-salty nuttiness but in a new, elegant form. Swapping pecans for hazelnuts in the praline paste gave it a more classic European feel, but the soul of it—that pure, unadulterated nut joy—is straight from my grandma’s countertop. Building this dessert feels like connecting those dots: my Southern roots finding a new expression through a global technique. Every time I taste that praline layer, it’s a little high-five from the past, reminding me that the best flavors always have a story.
Gathering Your Flavor Arsenal
Here’s everything you’ll need. Think of this as gathering your building blocks. I’ve added my chef notes and swaps to make your life easier. Pro tip: Read through this whole list before you start—it makes the process so much smoother!
- For the Brownie Base:
- 80g Dark Chocolate (70%): The foundation’s flavor. A good 70% gives depth without being bitter. No need for the super fancy stuff here, but choose one you enjoy eating.
- 60g Butter: Unsalted, always. We control the salt. This gives that rich, fudgy texture.
- 2 Eggs: Room temperature! This is non-negotiable for a smooth, well-emulsified batter.
- 70g Granulated Sugar: Sweetens and helps create a slight crust.
- 40g All-Purpose Flour: Just enough to bind it. We want it dense, not cakey.
- For the Croustillant Gianduja (The Crunch!):
- 80g Gianduja or Hazelnut Chocolate Spread: Gianduja is chocolate-hazelnut bliss. Nutella works in a pinch, but seek out a higher-quality spread if you can—it makes a difference.
- 40g Feuilletine or Crushed Wafers: The “croustillant” (crunch)! Feuilletine are delicate, crispy crepe flakes. Can’t find them? Plain cream-filled wafer cookies (like Piroulines), crushed fine, are a perfect sub.
- For the Praline Layer:
- 100g Hazelnut Praline Paste: The star of the show. It’s just caramelized hazelnuts ground into a smooth paste. You can find it online or in specialty stores. Almond praline paste works beautifully too!
- For the Vanilla Crémeux:
- 200ml Whole Milk: Full fat for the creamiest texture.
- 2 Egg Yolks: Richness and thickening power.
- 40g Sugar: To sweeten and stabilize.
- 1 tsp Vanilla Bean Paste: I prefer paste for those gorgeous little specks. A good extract works too.
- 3g Gelatin Powder (or 1 sheet): This sets the crémeux to a soft, sliceable consistency. Bloom it in cold water first!
- For the Chocolate Mousse:
- 200g Dark Chocolate (again, 55-70%): Melts into the body of the mousse. Chop it fine for even melting.
- 300ml Whipping Cream (35% fat): Divided. Part goes into the melted chocolate, the rest gets whipped.
- 4g Gelatin Powder (or 1.5 sheets): The secret to a mousse that holds its shape beautifully for hours.
The Build: One Happy Layer at a Time
We’re building from the bottom up. Don’t rush. Enjoy the process of creating each little component—that’s where the fun is!
- The Brownie Base:Preheat your oven to 170°C (340°F). Line a small pan (about 6×6 inch) with parchment. Melt the chocolate and butter together gently (microwave in 20-sec bursts or use a double boiler). Whisk the eggs and sugar in a separate bowl until just combined—we’re not looking for foam here. Pour the warm (not hot!) chocolate mixture into the eggs, whisking constantly. Gently fold in the flour until no streaks remain. Pour into the pan and bake for 12-15 minutes. It should look set but still be a little soft in the center. Let it cool completely in the pan, then cut a circle or square to fit the bottom of your chosen mold (a 7-inch ring or springform is perfect). Chef Hack: Slightly under-baking it keeps it extra fudgy and easy to cut later.
- The Gianduja Crunch Layer:Gently melt the gianduja spread until it’s fluid. Stir in the crushed feuilletine or wafers until every flake is coated. Spread this mixture in a thin, even layer over your cooled brownie base. Pop it in the fridge to set firm. This layer is your secret textural weapon—that amazing crunch in every bite!
- The Praline Heart:Simple but powerful. Take your praline paste and give it a good stir if it’s separated. Spread a thin, even layer over the now-set crunch layer. Back into the fridge it goes. This is that pure, nutty flavor bomb waiting to be discovered.
- The Vanilla Crémeux:Bloom your gelatin in a bowl of cold water. Heat the milk and vanilla in a saucepan until just steaming. In a separate bowl, whisk the egg yolks and sugar until pale. Slowly pour the hot milk into the yolk mixture, whisking constantly (this is called tempering—it prevents scrambled eggs!). Pour everything back into the pan and cook on medium-low heat, stirring constantly with a spatula, until it thickens enough to coat the back of the spoon. Remove from heat, squeeze excess water from your bloomed gelatin, and whisk it into the hot custard until fully dissolved. Strain through a fine sieve into a clean bowl (catches any bits). Press plastic wrap directly onto the surface and chill for 2-3 hours, stirring once or twice, until it’s a soft pudding consistency. Chef Hack: Set the bowl over an ice bath and stir for 10 minutes to speed up the initial chill.
- The Chocolate Mousse (The Big Hug):Bloom your gelatin. Chop the chocolate finely. Heat 100ml of the whipping cream until just about to boil. Pour it over the chopped chocolate and let it sit for 2 minutes, then stir gently from the center out until smooth and glossy. Add the bloomed, squeezed-out gelatin to the warm chocolate mixture and stir until melted. Let this cool to room temperature—it should feel just slightly warm to the touch. Whip the remaining 200ml of cream to soft peaks. Now, the key move: take a big scoop of the whipped cream and vigorously fold it into the chocolate to loosen it. Then, gently fold in the rest of the cream until no white streaks remain. Beautiful, silky mousse is yours!
- Assembly – The Grand Finale:Place your mold (ring or springform) on a serving plate. Place the brownie/crunch/praline layer inside. Spoon or pipe the set vanilla crémeux over the praline in an even layer. Now, pour or spoon the chocolate mousse over everything, making sure it seeps down the sides to encapsulate all the layers. Use an offset spatula to smooth the top. Give the plate a gentle tap on the counter to settle everything. Chill for at least 4 hours, but overnight is IDEAL for perfect, clean slicing.
Plating Your Masterpiece
The work is done, the chilling wait is over. Now for the reveal! If you used a springform, simply run a hot knife around the edge and release the ring. If you used a ring mold, gently warm the sides with a hairdryer or a hot towel for a few seconds and lift it straight up.
For a professional finish, you can pour a simple chocolate mirror glaze over the top before the final chill, but I love the rustic-elegant look of the bare mousse. Decorate with a sprinkle of crushed, toasted hazelnuts, a few delicate gold flakes, or some tempered chocolate shards. When slicing, use a sharp, hot knife (dip it in hot water and wipe it dry between each cut) for impeccably clean layers.
Serve this on its own—it’s rich and complete. But a tiny dollop of barely-sweetened whipped cream or a few fresh raspberries on the side never hurt anybody. The contrast is divine.
Make It Your Own: Food Meld Twists
The framework is yours to play with! Here are a few of my favorite riffs on this classic:
- Salted Caramel Swap: Replace the praline paste layer with a thick, spoonable salted caramel sauce. The salty-sweet punch against the dark chocolate is unreal.
- Peanut Butter Cup Vibe: Use peanut butter praline paste (or just smooth peanut butter mixed with a little icing sugar) and swap the gianduja for a peanut butter-chocolate spread. Top with chopped salted peanuts.
- Citrus Brightness: Infuse the milk for the crémeux with the zest of an orange or a lemon. It cuts through the richness beautifully.
- Mocha Version: Add a tablespoon of instant espresso powder to the brownie batter and the chocolate mousse for a deep coffee flavor.
- Dairy-Free/Vegetarian Friendly: Use high-quality dairy-free chocolate and coconut cream. Swap the gelatin for agar-agar (following package instructions for setting power). The texture will be slightly different but still delicious.
Jackson’s Kitchen Notes
This recipe has evolved so much since my first attempt, which… let’s just say looked more like a delicious chocolate puddle than a layered dessert. I learned the hard way that letting each component cool to the right temperature is everything. If your mousse mixture is too warm when you fold, it deflates the cream. Too cold, and it seizes up and gets grainy. Room temp is the sweet spot!
Also, don’t stress if your layers aren’t picture-perfect. Mine weren’t for a long time! The flavor is 100% there regardless. Every time I make this now, I think of it as a chance to slow down, be precise, and create something with my hands. It’s my favorite kind of kitchen therapy. And the look on someone’s face when they take that first, multi-layered bite? That’s the real reward.
Your Questions, Answered
- Q: My mousse seemed thin/runny. What happened?A: Two likely culprits: 1) The chocolate/cream (ganache) base was too warm when you folded in the whipped cream, melting it. Or 2) The cream was under-whipped. It should be at soft peaks—thick and billowy, but not stiff and grainy. Chill the runny mousse for 30 mins, it may firm up. If not, consider it a delicious pour-over sauce for ice cream (live and learn!).
- Q: Can I make this ahead of time?A: Absolutely! That’s the beauty of it. The whole entremet can be assembled and kept in the fridge for up to 2 days, or frozen (tightly wrapped) for a month. Thaw overnight in the fridge before serving.
- Q: I can’t find praline paste or feuilletine. Any other subs?A: For praline paste, you can make a quick version by blending toasted hazelnuts with a little caramel or even using a high-quality, smooth hazelnut butter. For feuilletine, cornflakes or crisp rice cereal lightly crushed will give crunch, but the flavor will be neutral.
- Q: My crémeux is too firm/too soft.A: This is a calibration game based on your gelatin strength and chilling time. Too firm? Use Use a touch less gelatin next time (reduce by about 0.5g) or stir it once or twice as it cools to loosen it slightly before assembly.
Too soft? It likely needed more chill time, or your gelatin strength was lower. Let it set longer in the fridge before layering. If it’s still loose, you can gently rewarm it and whisk in a tiny bit more bloomed gelatin, then chill again.
A Note on Indulgence & Balance
Let’s be honest — this is not an everyday dessert. It’s a celebration piece. A “someone got promoted,” “it’s the holidays,” or “we just felt like it” kind of dessert.
Per slice (based on 8 servings), you’re looking at roughly:
Calories: ~420 kcal
Fat: 30 g
Carbohydrates: 32 g
Protein: 6 g
It’s rich, yes. But because it’s layered and intensely flavored, a smaller slice is deeply satisfying. This is about quality over quantity — savoring every silky, crunchy, nutty bite.
One Last Word Before You Slice
Here’s the thing about an entremet:
It looks complicated.
It sounds fancy.
It feels like something “other people” make.
But at its heart? It’s just layers.
A brownie.
A crunch.
A cream.
A mousse.
One simple step at a time.
The magic isn’t in perfection — it’s in patience. In letting things set. In trusting the process. In not panicking if a layer isn’t ruler-straight.
And when you cut into it and see those distinct bands of chocolate, praline, vanilla… when someone takes a bite and just goes quiet for a second…
That’s your moment.
That’s when you realize you didn’t just make dessert.
You built a flavor symphony.
And you did it in your own kitchen.
Now grab that hot knife, wipe it clean between slices, and serve it like the rockstar you are.
— Jackson


