Valentine Hot Chocolate Bombs – Melty, Magical & Made with Love
Hey friends, Jackson here from Food Meld! Let’s be real for a second. Valentine’s Day can sometimes feel a little… predictable. Box of chocolates? Check. Fancy dinner reservation? Maybe. But what if we could create a little bit of pure, unadulterated magic right in our own kitchens? I’m talking about the kind of moment that makes eyes light up and phones come out to snap a picture. That’s exactly what we’re doing today with these show-stopping Valentine Hot Chocolate Bombs.
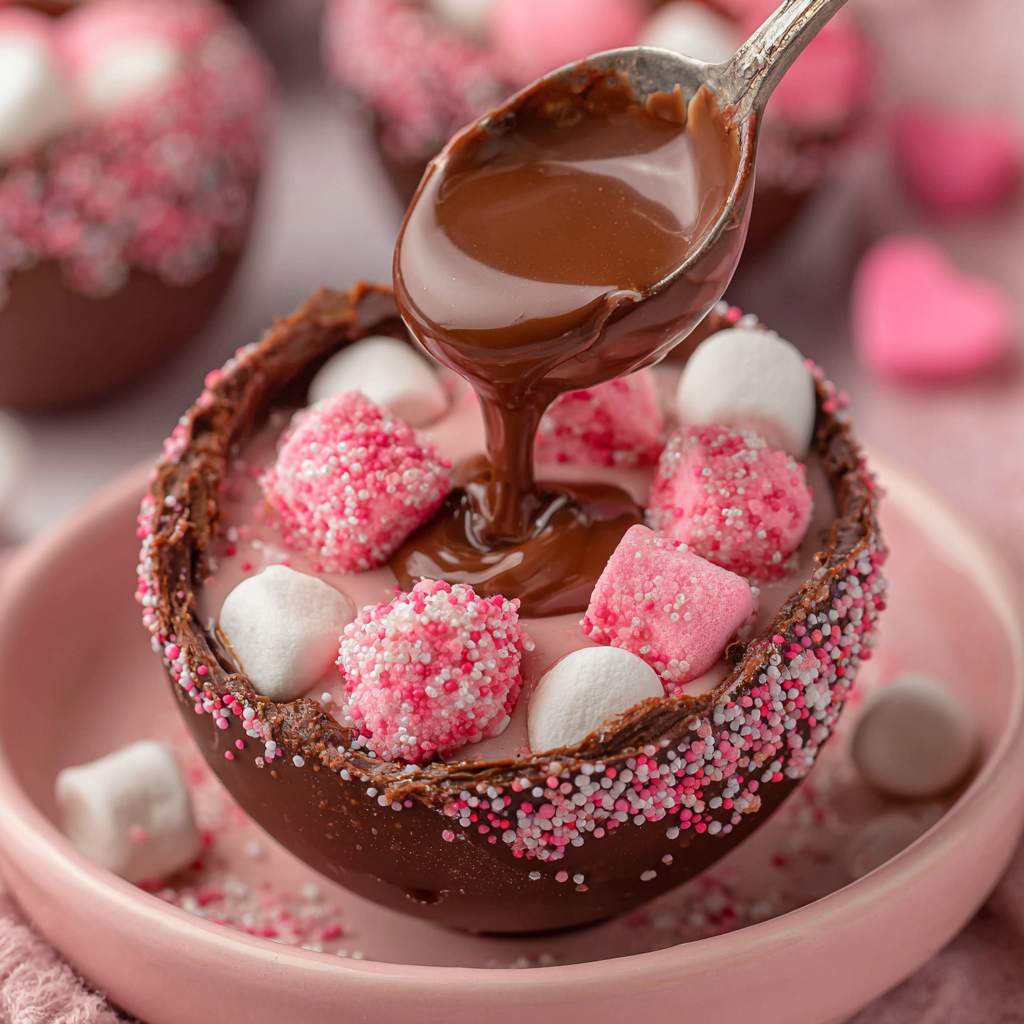
Imagine this: a gorgeous, glossy chocolate sphere, delicately decorated with hearts and sprinkles, sitting at the bottom of your favorite mug. You pour steaming hot milk over the top, and for a second, nothing happens. Then, a tiny crack appears. Suddenly, the whole thing gives way, melting into a rich, chocolatey whirlpool, releasing a shower of sweet cocoa powder and adorable heart-shaped marshmallows. It’s a performance in a mug, my friends, and you are the director.
I know they look like something only a professional pastry chef could pull off, but I’m here to show you just how simple and downright fun they are to make. We’re keeping things real, a little messy (that’s part of the charm!), and packed with so much flavor and love. This isn’t just a recipe; it’s an experience. It’s a hug in a mug, a sweet surprise for your significant other, your Galentine’s crew, or heck, for yourself! Because you deserve a little magic, too. So, grab your favorite mixing bowl and let’s cook something awesome together.

A Little Spark of Magic
This whole hot chocolate bomb craze takes me right back to my grandma’s kitchen on a frigid winter morning. She didn’t call them “bombs,” of course. She had this old, chipped mug she’d plop a giant, homemade chocolate truffle into. She’d pour her scalding-hot milk over it, and we’d watch together, completely mesmerized, as this dense ball of chocolate slowly, magically, unfurled into the most decadent drinking chocolate you’ve ever tasted.
She’d always wink and say, “Jackson, the secret’s in the melt.” She wasn’t just talking about the chocolate. She was talking about that moment of anticipation, that shared silence as we watched the transformation happen. It turned a simple morning drink into a tiny, memorable event. That’s the spirit I want to bring to these Valentine’s bombs. They’re my modern, flashier take on my grandma’s simple wisdom. They’re not just about the sugar and cocoa; they’re about creating a moment of pure, joyful connection. And let me tell you, that’s a flavor that never gets old.
Gathering Your Magical Ingredients
Here’s the beautiful part: you only need a handful of simple ingredients to create this wow-factor treat. I’ll walk you through each one and give you my best chef hacks for substitutions.
- 1 ½ cups High-Quality Chocolate Chips or Melting Wafers: This is your shell, the star of the show! I highly recommend using chocolate melting wafers (like Ghirardelli or Candy Melts) if you’re a beginner. They’re specifically designed to melt smoothly and harden with a great snap, and they require no tempering. If you’re a chocolate purist, go for a good semi-sweet or milk chocolate bar, chopped fine. Chef’s Insight: The quality of your chocolate directly impacts the taste and shine of your final bomb. This is one time where splurging a little pays off!
- ½ cup Hot Cocoa Mix: The glorious, powdery surprise inside! Use your favorite store-bought brand for ease, or go the extra mile with a homemade mix. Substitution Tip: Feel free to get creative here! You can use a dark chocolate cocoa mix, a white chocolate powder, or even stir a pinch of cinnamon or espresso powder into your mix for a flavor boost.
- Mini or Heart-Shaped Marshmallows: Because what’s hot chocolate without marshmallows? The heart-shaped ones are obviously perfect for Valentine’s, but mini marshmallows work just as well and are easier to find. Chef’s Insight: If you’re feeling ambitious, homemade marshmallows cut into tiny hearts will absolutely blow people’s minds.
- Silicone Sphere Molds: Your essential tool! You can find these online or at any craft store. The silicone makes it super easy to pop out the hardened chocolate shells without breaking them.
- Edible Glitter, Sprinkles, or Drizzle (optional): This is where you get to be an artist! A little edible gold dust, some red and pink sprinkles, or a drizzle of white chocolate transforms these from simple spheres into gorgeous, gift-worthy creations.
Let’s Build Some Magic: Step-by-Step
Alright, team, this is where the fun begins. Put on some good music, clear off your counter, and let’s get our hands a little chocolatey. I’ll guide you through every step with all my best tips to ensure your bombs are perfect.
- Melt Your Chocolate Like a Pro: Place your chocolate wafers or chips in a microwave-safe bowl. Microwave on high for 30 seconds, then stop and stir. Repeat, microwaving in 15-20 second bursts, stirring vigorously each time, until the chocolate is completely smooth and glossy. Chef Hack: Do NOT be tempted to just blast it for a full minute! Burnt chocolate is grainy and unusable. Low and slow is the name of the game. You can also use a double boiler if you prefer.
- Create Your Chocolate Shells: Using a small spoon or a clean pastry brush, coat the inside of each cavity in your sphere mold with a layer of the melted chocolate. You want it thick enough that it won’t crack when you pop it out, but not so thick that your bombs become heavy giants. Pro Tip: After the first coat, use a small offset spatula or the back of a spoon to smooth the chocolate all the way up to the rim of the mold. This creates a flat edge that will make sealing the two halves together MUCH easier later.
- The Chill Out: Once all your mold cavities are coated, carefully tap the mold on the counter to release any air bubbles. Pop the whole tray into the refrigerator for about 10-15 minutes, or until the chocolate is completely firm to the touch.
- Second Coat for Strength: Remove the mold from the fridge. Now, add a second, thinner coat of melted chocolate to each shell. This double-coating method ensures your bombs are strong and less likely to crack or melt in your hands. Chill again for another 10 minutes until rock solid.
- The Big Reveal: This is the satisfying part! Gently flex the silicone mold from the bottom and pop out your beautiful, empty chocolate hemispheres. If they’re sticking, they might need another minute in the fridge.
- The Fun Part: Filling! Take half of your chocolate shells and line them up. Into each one, add about 1 tablespoon of your hot cocoa mix and a small handful of your heart-shaped marshmallows. Don’t overfill them, or you won’t be able to seal them shut!
- The Magic Seal: Here’s the trickiest part, but don’t worry, I’ve got you. Take a small, heat-proof plate and microwave it for 30-45 seconds until it’s warm to the touch (not scorching hot). Carefully pick up an empty chocolate shell and gently press its open edge onto the warm plate for just 2-3 seconds. This will slightly melt the rim. Immediately press it onto the rim of a filled half and hold it for a few seconds until it seals. Voilà! You have a complete chocolate sphere!
- Unleash Your Inner Picasso: Now for the decorations! Use your remaining melted chocolate like glue. Drizzle it over the top of your sealed bombs and immediately add sprinkles or edible glitter. You can also put a little melted chocolate in a Ziploc bag, snip a tiny corner off, and use it to pipe little hearts or designs. Let your creativity run wild!
How to Serve Your Masterpiece
The grand finale! Serving these bombs is all about the drama. Place one beautiful bomb into the bottom of a large, warm mug. Warm your milk—whole milk or even half-and-half will make it extra rich and creamy—until it’s steaming hot (but not boiling).
Now, for the main event. Slowly and dramatically pour the hot milk directly over the top of the chocolate bomb. Watch as the magic happens: the chocolate shell will glisten, crack, and finally surrender, releasing a cloud of cocoa and marshmallows in a delicious, swirling vortex. Hand the mug to your lucky valentine with a spoon and watch their face light up. The spoon is key for giving it a good stir and scooping up all that melted chocolatey goodness from the bottom. It’s a full-sensory experience!
Mix It Up! Creative Twists on the Classic
Once you’ve mastered the basic bomb, the flavor world is your oyster! Here are a few of my favorite twists to keep things exciting.
- The Salted Caramel Dream: Add a soft caramel candy (like a Rolo or a square of soft caramel) inside the bomb along with the cocoa mix. After sealing, drizzle with more chocolate and sprinkle with a tiny pinch of flaky sea salt.
- Peppermint Patty: Use dark chocolate for the shell and add ¼ teaspoon of crushed peppermint candies inside with the cocoa. It’s refreshing, cool, and super festive.
- Cookies & Cream: Fill your bomb with a white chocolate cocoa mix and a few crushed Oreo pieces. Use a white chocolate shell for the ultimate cookies-and-cream experience.
- Spicy Mexican Hot Chocolate: For the adventurous! Mix a pinch of cayenne pepper and a dash of cinnamon into your cocoa powder before filling the bombs. The sweet heat is unforgettable.
- Dairy-Free Delight: Super easy! Just use your favorite dairy-free chocolate (like Enjoy Life chips) and ensure your cocoa mix and marshmallows (like Dandies) are also vegan-friendly.
Jackson’s Chef Notes & Kitchen Stories
I’ve made a LOT of these bombs over the years, and let me tell you, my first batch was… a learning experience. Let’s just say I tried to seal them by carefully heating a knife blade over the stove. I ended up with more chocolate on my hands and the knife handle than on the bombs themselves! The warm plate method was a total game-changer. It’s a reminder that in the kitchen, sometimes the simplest solution is the best one.
This recipe has evolved from a finicky project into a relaxed, fun activity I love doing with friends. The best part is that they can be made days in advance! Just store them in an airtight container in a cool, dry place. They make the most heartfelt, handmade gift. I once made a giant batch for my entire neighborhood and left them on doorsteps—it was a blast.
FAQs & Troubleshooting: Your Questions, Answered!
Q: My chocolate shells cracked when I tried to remove them from the mold. What did I do wrong?
A: This usually means your shells were a bit too thin. No worries! Just pop the broken shell back into the mold, add another layer of melted chocolate over the crack (acting like glue), and chill again. For your next batch, make sure you’re doing that double-coat method—it builds serious shell strength.
Q: Can I use regular chocolate bars instead of melting wafers?
A: You absolutely can! Chop them up very finely for even melting. The main difference is that chocolate bars need to be “tempered” to get that super-snappy, glossy finish. If you don’t temper, they might melt easily in your hands and look a little streaky. For ease and guaranteed results, I always recommend melting wafers for beginners.
Q: My two halves won’t seal together! Help!
A: This is the most common hiccup. First, ensure your rims are as flat as possible from the molding stage. Second, make sure your plate is warm enough to melt the chocolate slightly—you should see a little sheen on the rim after you press it down. If it’s still not working, use a small amount of extra melted chocolate as “glue” around the inside rim before pressing the halves together.
Q: How far in advance can I make these?
A: They are perfect for making ahead! Stored properly in a cool, dry place (not the fridge, as condensation can make them sticky), they’ll stay perfect for up to two weeks. This makes them ideal for pre-Valentine’s prep or gift-giving.
Nutritional Info (Because We’re All Friends Here!)
Let’s keep it real—this is a treat, and it’s meant to be enjoyed as such! Here’s a rough breakdown per bomb (without the milk), so you can sip and savor knowingly. Remember, these values can change based on the specific brands of chocolate and cocoa mix you use.
- Calories: ~180
- Total Fat: 9g
- Carbohydrates: 24g
- Sugar: 20g
- Protein: 2g
Prep Details:
Prep Time: 25 mins
Cool Time: 15 mins
Total Time: ~40 mins
Yields: 6 beautiful bombs
Final Thoughts: You’ve Got This!
Well, there you have it. Your complete guide to creating pure, chocolatey magic. I hope you feel empowered and excited to get into the kitchen and try this. Remember, it’s not about perfection. A slightly lopsided bomb or a few rogue sprinkles just adds to the handmade charm. It’s the love and the fun you put into it that truly makes it special.
This Valentine’s Day, skip the store-bought clichés and give the gift of a delicious, unforgettable moment. I want to see your creations! Tag me @FoodMeld on social media so I can share in the fun. Now go forth, melt some chocolate, and make someone’s day a whole lot cozier. Happy cooking, friends!


