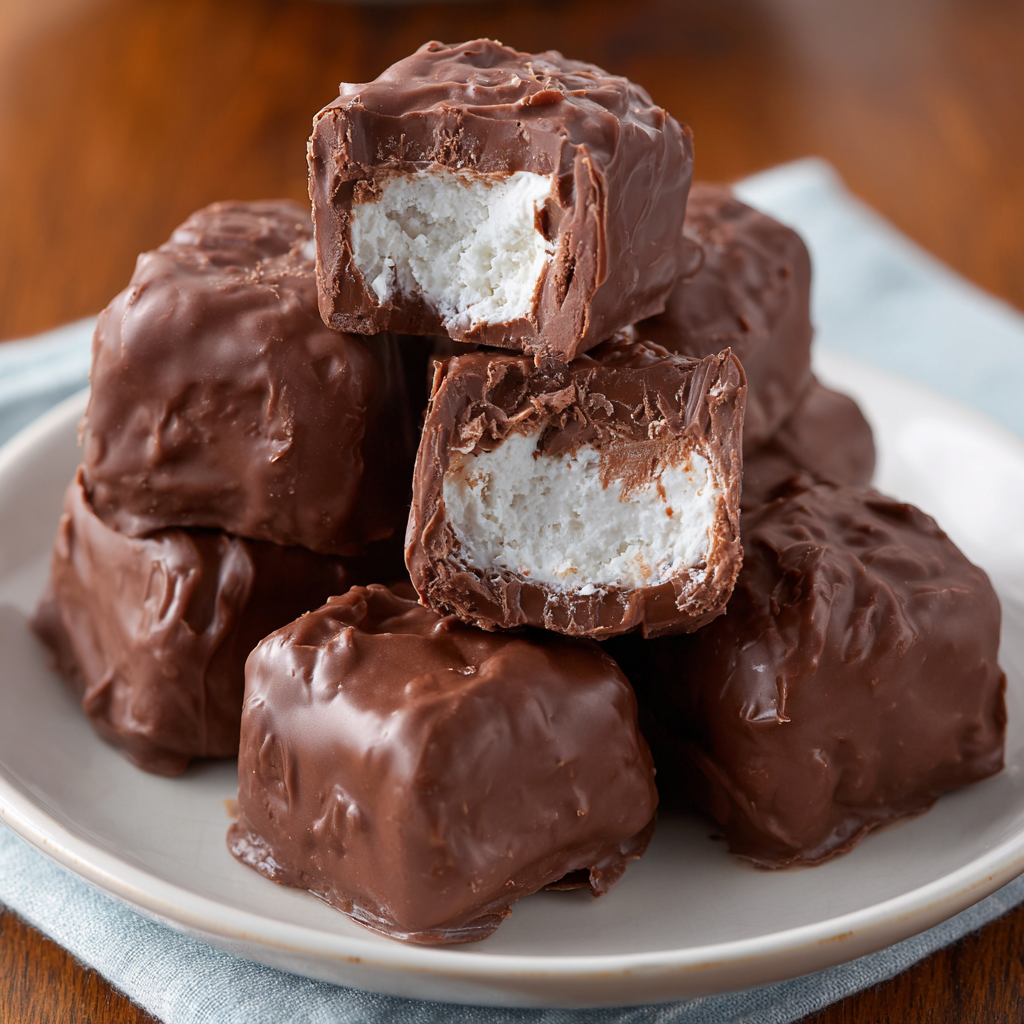
Forget the Candy Aisle: You’re Making Three Musketeers Bites Tonight!
Hey friends, Jackson here from Food Meld. Let’s cut right to the chase: you know that feeling when you’re hit with a serious chocolate craving? Not just any chocolate, but that specific, fluffy, melt-in-your-mouth goodness of a Three Musketeers bar? Yeah, me too. But what if I told you that you can whip up a whole batch of that exact same magic, right in your own kitchen, with just three simple ingredients and zero baking required? Welcome to your new favorite kitchen hack: Cool Whip Three Musketeers Bites.
These little squares of joy are the ultimate no-bake triumph. They’re cool, creamy, and coated in a satisfying snap of dark chocolate. The best part? They’re unbelievably easy. We’re talking about a recipe that’s more about assembly than actual cooking, perfect for a busy weeknight treat, a last-minute party platter, or when you just need a win in the kitchen. I’m all about those “you’ve gotta try this” moments, and friends, this is one of them. So, let’s ditch the complicated techniques and lean into the fun, messy, and incredibly delicious world of homemade candy. Get ready to impress yourself—and everyone you share these with. Let’s get melding!

The Candy Bar That Started It All
I have a vivid memory from being about eight years old, rummaging through my grandma’s pantry after a long day of playing outside. She always had a secret stash of candy bars tucked behind the cans of soup, and my mission was to find the prized Three Musketeers. There was something about that particular bar—it wasn’t as heavy as a Snickers, or as nutty as a Payday. It was just this perfectly light, airy, chocolatey cloud that melted on my tongue and made the whole world feel right. It was my victory candy.
Years later, when I started experimenting in the kitchen, I became obsessed with recreating that feeling. I tried complicated mousse recipes and fussy tempering techniques, but it never felt quite right. Then, one sweltering summer day when turning on the oven was out of the question, I had a “what if” moment. What if the secret to that fluffy texture was already sitting in my freezer? What if it was as simple as Cool Whip? That first batch was a revelation. It wasn’t just a copycat; it was a memory, made right in my own kitchen. And that, my friends, is the heart of Food Meld—taking a beloved flavor and finding a fun, simple, and unforgettable way to make it yours.
Gather Your A-Team: Just 3 Ingredients!
See? I told you it was simple. Here’s your shopping list. But don’t just toss them in the bowl—let’s talk about the *why* behind each one. A little chef’s insight goes a long way!
- 22 oz Milk Chocolate Chips (two 11 oz bags): This is the soul of our fluffy center. I like using good-quality chips like Ghirardelli or Guittard because they melt smoothly and have a rich flavor. Chef’s Insight: We’re melting this and letting it cool before mixing. This step is non-negotiable! If the chocolate is too hot, it’ll deflate our next star ingredient.
- 8 oz tub Cool Whip, thawed: This is the magic trick! Cool Whip gives us that signature airy, light-as-a-cloud texture that makes a Three Musketeers bar so unique. Substitution Tip: For a from-scratch vibe, you can use an equal amount of freshly whipped heavy cream sweetened with a tablespoon of powdered sugar. But honestly? Cool Whip holds its structure beautifully here, so I’m a fan.
- 24 oz Dark Chocolate Melting Wafers: This is our professional-looking coating. Melting wafers (like Candiquik or Ghirardelli melting chips) are formulated to melt smoothly and set with a perfect snap. Chef’s Hack: You can use more milk chocolate chips for dipping, but wafers are foolproof—no tempering required! The dark chocolate also gives a nice bitter contrast to the sweet center.
Let’s Build Some Bites: Your Foolproof Roadmap
Okay, team. Put on some good music, clear off your counter, and let’s do this. Follow these steps, and you’ll be a candy-making hero in no time.
Step 1: Melt the Chocolate (Like a Pro)
Grab a medium, microwave-safe bowl and dump in both bags of milk chocolate chips. Pop it in the microwave for 1 minute on high. Pull it out—it might not look melted, but trust the process! Give it a good stir. Now, microwave it for another 30 seconds. Stir again. You should be well on your way to smooth, silky chocolate. If you still see a few lumps, hit it for 15-second intervals, stirring in between, until it’s completely smooth. CRUCIAL STEP: Walk away. Let this chocolate cool down to room temperature. This should take about 15-20 minutes. If you rush this and add warm chocolate to the Cool Whip, you’ll end up with a soupy mess. Patience is your best friend here.
Step 2: The Gentle Fold (This is Where the Magic Happens)
While the chocolate is cooling, take your tub of Cool Whip out of the fridge—it needs to be fully thawed. Pour the cooled chocolate over the Cool Whip. Now, using a spatula, gently fold them together. “Folding” means you’re cutting down through the middle, sliding the spatula along the bottom of the bowl, and bringing it back up and over the top. Be gentle! We want to keep all that air in the Cool Whip. The mixture will thicken up and might look a little grainy at first—that’s totally normal. Just keep folding until it’s one uniform, delicious, chocolatey fluff.
Step 3: The First Freeze (The Quick Chill)
Grab an 8×8-inch square baking dish and line it with parchment paper, leaving some overhang on two sides. This is your “slingshot” for getting the slab out later. Scrape every last bit of the chocolate fluff into the pan and spread it into an even layer. Now, slide that pan into the freezer for a solid 30 minutes. This isn’t to freeze it solid, just to firm it up enough so we can cut neat squares.
Step 4: Slice and Dice (Time for Geometry)
Pull the pan out of the freezer. Using the parchment paper slingshot, lift the whole slab onto a cutting board. With a sharp knife, cut it into 6 rows by 6 rows to get 36 perfect little squares. If the knife gets sticky, just run it under hot water and dry it quickly. Place these squares onto a baking sheet lined with—you guessed it—more parchment paper. Pop this sheet back into the freezer for another 30 minutes. This second freeze is key for making them firm enough to dip without melting in your hands.
Step 5: The Chocolate Plunge (Get Messy!)
Time for the coating! Melt your dark chocolate wafers according to the package directions (usually 60 seconds, stir, then 30 more seconds). Now, using a fork or a dipping tool, drop a frozen square into the chocolate. Swirl it around to coat it completely, then lift it out, gently tapping the fork on the edge of the bowl to shake off any excess chocolate. Carefully place it back on the parchment-lined sheet. Repeat with all the squares! Don’t worry if they’re not perfect—homemade charm is what we’re going for.
Step 6: The Final Set (Almost There!)
Once all your bites are beautifully coated, you can let them set in the refrigerator for about 15 minutes or just leave them in the freezer for 5-10. You’ll know they’re ready when the chocolate shell is firm to the touch. Congrats, you did it!
How to Serve These Little Pieces of Heaven
Presentation is part of the fun! For a casual family treat, just pile them high on a fun plate or in a bowl. But if you’re bringing these to a party or giving them as a gift, let’s kick it up a notch. Arrange them in a single layer on a elegant platter and give them a light dusting of flaky sea salt or cocoa powder right before serving—it looks gorgeous and adds a tiny flavor pop. You can also package them in little mini-cupcake liners for a professional, bakery-style look. They’re perfect for potlucks, bake sales, or just keeping in the fridge for a sneaky midnight snack. Trust me, they won’t last long.
Mix It Up: Your Recipe, Your Rules
Once you’ve mastered the classic, the playground is open! Here are a few of my favorite twists to get your creative juices flowing:
- The Salty Swirl: Add a tablespoon of smooth peanut butter or almond butter to the milk chocolate when you melt it. The salty-sweet combo is insane.
- The Mint Marvel: Stir ½ teaspoon of peppermint extract into the fluffy filling mixture. It’s like a homemade Andes mint!
- Cookie Crunch: Gently fold in ½ cup of crushed Oreo cookies or graham crackers into the filling after you combine the chocolate and Cool Whip for a fun textural surprise.
- The Triple Threat: Use white chocolate melting wafers for the coating and drizzle with melted milk and dark chocolate. It’s a seriously impressive look.
- Boozy Bites (For the Grown-Ups): Add a tablespoon of Bailey’s, Kahlua, or Grand Marnier to the filling for a sophisticated kick. Just know it might make the filling a tad softer.
Jackson’s Kitchen Notes & Funny Stories
I’ve made this recipe more times than I can count, and it’s evolved in my kitchen. The first time I tried it, I was so impatient I didn’t let the chocolate cool. I ended up with chocolate soup and had to start over! Lesson learned. Now, I use that cooling time to clean up my station so I’m not left with a mountain of dishes later. Another pro-tip: if your kitchen is warm, work quickly when dipping and maybe only take a few squares out of the freezer at a time. They start to soften fast! The beauty of this recipe is its flexibility. It’s become my go-to “I need a dessert STAT” recipe, and it has never let me down. It’s a testament to the fact that the best food doesn’t have to be complicated.
Your Questions, Answered!
Q: My filling mixture seemed really runny and wouldn’t firm up. What happened?
A: The most common culprit is the melted chocolate was still too warm when you folded it in. Another possibility is the Cool Whip wasn’t fully thawed—if it’s still icy, it can create moisture. Don’t worry! Just pop the whole mixture (bowl and all) into the freezer for 20-30 minutes before trying to spread it into the pan.
Q: Can I make these ahead of time and how should I store them?
A: Absolutely! They are perfect for making ahead. Store them in an airtight container in the refrigerator for up to a week, or in the freezer for up to 3 months. They’re actually fantastic frozen—they have a great fudgy, ice-cream-like texture.
Q: The chocolate coating is too thick and clumpy. Help!
A: This usually means the melting wafers got a little too hot. Try adding a teaspoon of coconut oil or vegetable shortening to the melted wafers and stir until smooth. This will thin out the chocolate and make for a much smoother dipping experience.
Q: I’m not a fan of dark chocolate. What can I use instead?
A> No problem! You can use the same milk chocolate wafers for dipping, or even white chocolate. The world is your oyster! Just make sure you’re using proper melting wafers for the best results.
A Quick Note on Nutrition
Let’s be real, we’re not eating these for their health benefits—we’re eating them for pure, unadulterated joy! But for those who are curious or are tracking, here’s a general breakdown per piece (approximate). Remember, these values can change based on the specific brands of ingredients you use. The key with treats like this is moderation. They’re rich, sweet, and satisfying, so one or two is usually enough to hit the spot. Enjoy them mindfully as part of a balanced diet, and savor every single fluffy, chocolatey bite!
Per Piece (approximate):
Calories: 140 | Carbohydrates: 14g | Fat: 8g | Sugar: 12g | Protein: 1g
You’ve Just Made Candy Bar Magic!
And there you have it! You’ve officially leveled up your no-bake dessert game. These Cool Whip Three Musketeers Bites are proof that you don’t need fancy equipment or complicated recipes to create something truly special and delicious. They’re fun, they’re foolproof, and they pack a major flavor punch.
I hope this recipe brings a little bit of that childhood wonder back into your kitchen, along with the confidence to make it your own. Remember, cooking is an adventure. So, get in there, get a little messy, and most importantly, enjoy every single bite. I’d love to hear how your batches turn out! Tag me on social with #FoodMeld so I can see your awesome creations. Until next time, let’s keep cooking something awesome together!
Your friend in the kitchen,
Jackson


