Forget the Sandwich, Grab a Skillet: My High-Protein Tuna Melt Revolution
Hey there, kitchen friend. Let’s talk about that beautiful, unassuming can of tuna sitting in your pantry. You know the one. It’s been there a minute, whispering promises of a quick lunch, but maybe you’re just… tired of the same old salad or sandwich routine. I get it. I was right there with you, staring into the abyss of my own pantry, craving the gooey, comforting, nostalgic hug of a classic tuna melt but wanting something that felt a little more… now. A little more protein-packed, a little less carb-heavy, and a whole lot easier to get on the table.
That’s when the “what if” energy kicked in. What if we took everything we love about a diner-style tuna melt—the creamy filling, the sharp bite of cheese, that irresistible golden top—and transformed it into a one-pan skillet wonder? A dish that comes together in under 15 minutes, dirties exactly one bowl and one pan, and delivers a whopping 40 grams of protein per serving without skimping on flavor? Friends, that lightbulb moment led us here, to this glorious Tuna Melt Protein Skillet.
This isn’t just a recipe; it’s a dinner lifesaver. It’s for the nights you’re running on fumes but still want something genuinely satisfying. It’s for meal prep that you’ll actually look forward to. It’s comfort food that doesn’t weigh you down. We’re keeping it simple, real, and absolutely packed with the kind of flavor that makes you close your eyes for a second after the first bite. So, let’s ditch the bread for a sec (don’t worry, we’ll get some crunch in there) and cook something awesome together. Welcome to the skillet melt revolution.
The Diner Booth That Started It All
My love for the tuna melt runs deep, straight back to sticky vinyl booths and checkered floors. There was this little spot near my grandma’s house—the kind of place where the coffee was always hot and the waitress knew your name. My order was never a question: a tuna melt on rye, with a giant dill pickle spear on the side, and a mountain of crispy, greasy diner fries. It was the ultimate “treat yourself” meal after a long week.
But here’s the thing—as I got older and started spending more time in my own kitchen, I wanted to capture that feeling without the inevitable afternoon food coma. I started tinkering. The soul of the dish was in the creamy, savory tuna salad and that layer of molten, bubbling cheese. So, I thought, what if that *was* the dish? What if we built it right in a skillet, let the cheese get perfectly bronzed under the broiler, and scooped it up with something fresh and crunchy? The first time I tried it, pulling that skillet out with the cheese audibly sizzling, I knew we had something special. It had all the heart of that diner booth memory, but it felt fresh, fast, and fit right into my life now. That’s the magic of Food Meld—taking those familiar flavors and mixing them up into something new for your kitchen today.
Gathering Your Flavor Squad
Here’s the beautiful part: you probably have most of this already. This is simple, humble ingredient alchemy at its best. Let’s break it down.
- 2 cans (5 oz each) tuna in water, drained: The star of the show! I use water-packed for a cleaner taste and to control the fat content, but oil-packed will work in a pinch for a richer flavor. Go for solid white albacore if you can—it has a firmer texture and milder taste that really shines here.
- 1/2 cup plain Greek yogurt: This is our game-changing, protein-boosting secret weapon. It replaces heavy mayo, adding incredible creaminess and a pleasant tang. Use full-fat for ultimate richness, or non-fat to keep it lean. Chef’s Insight: If you’re skeptical, trust me. Once it’s mixed and melted with the cheese, you won’t miss the mayo one bit.
- 1/4 cup shredded cheddar or mozzarella (for the filling): We’re adding cheese inside *and* on top. This first portion melts right into the tuna mixture, creating an ultra-creamy, cohesive base. A sharp cheddar gives a great punch, while mozzarella is all about that epic stretch.
- 1 tablespoon Dijon mustard: Don’t skip this! Dijon adds a necessary sharpness and depth that cuts through the richness. It’s the flavor backbone. Yellow mustard can sub in a bind, but Dijon is truly worth it.
- 1 tablespoon chopped pickles or pickle juice (optional but highly recommended): This is my “Southern roots” tip. That briny, tangy pop is essential for a great tuna salad. Chop up some dill pickles for texture, or just splash in the juice for the flavor without the chunks.
- 1/4 cup diced onion or celery (for crunch): This is our fresh, crunchy element. Red onion adds a bit of bite, while celery is all about that classic flavor and refreshing crunch. Have both? Use a mix!
- Salt and pepper, to taste: Season as you go! Taste your mixture before it hits the pan.
- 1/2 cup shredded cheese (for topping): This is where the magic happens—the glorious, golden-brown top. Use the same cheese for consistency, or mix it up! A Monterey Jack and cheddar blend is fantastic.
- Optional Garnishes: This is your playground. A few dashes of hot sauce mixed in, fresh chopped parsley or chives on top, or thin tomato slices laid under the cheese topping before broiling.
Let’s Build This Skillet! (Step-by-Step)
Ready? This moves fast, so have everything prepped and your broiler heating. Let’s make some magic in one pan.
- Fire Up the Broiler: First thing’s first—move an oven rack to the top position, about 5-6 inches from the heating element, and turn your broiler to HIGH. Let it get nice and hot while you prepare the filling. This is key for that perfect, quick melt.
- Mix the Dreamy Filling: In a medium bowl, add your drained tuna. Use a fork to break it up into nice flakes. Now, add the Greek yogurt, the 1/4 cup of shredded cheese, Dijon, your chosen crunchy veg (onion/celery), pickle juice/chunks, and a good pinch of salt and pepper. Chef’s Hack: Mix gently but thoroughly. You want it creamy and combined, but don’t pulverize the tuna into paste—we want some texture in there!
- Warm it Through: Grab a small (8-10 inch) oven-safe skillet (cast iron is PERFECT for this). Lightly grease it with a bit of oil or butter over medium heat. Scoop your tuna mixture in and spread it into an even layer. Let it warm up for 3-4 minutes, giving it an occasional gentle stir. We’re not trying to cook it through, just taking the chill off and letting the flavors start to mingle. You’ll smell the mustard and onions—it’s a good sign!
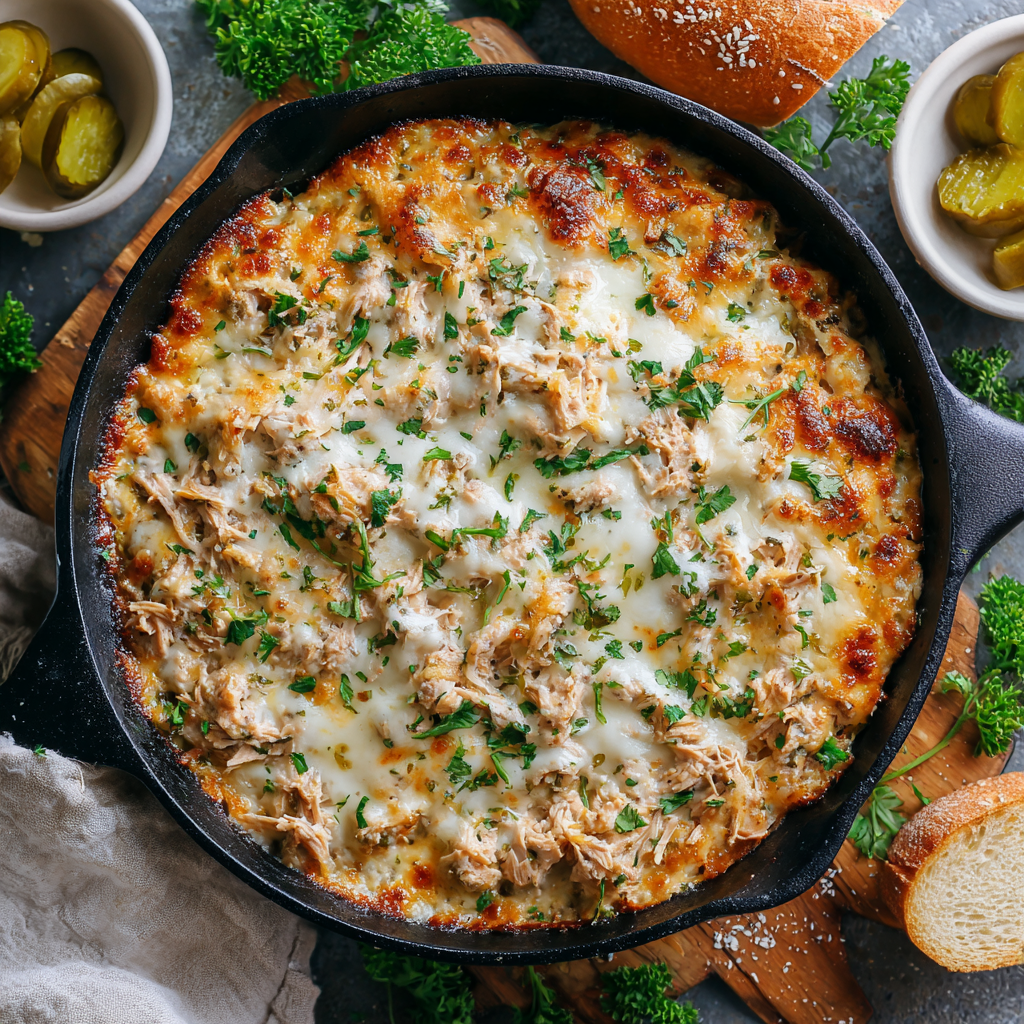
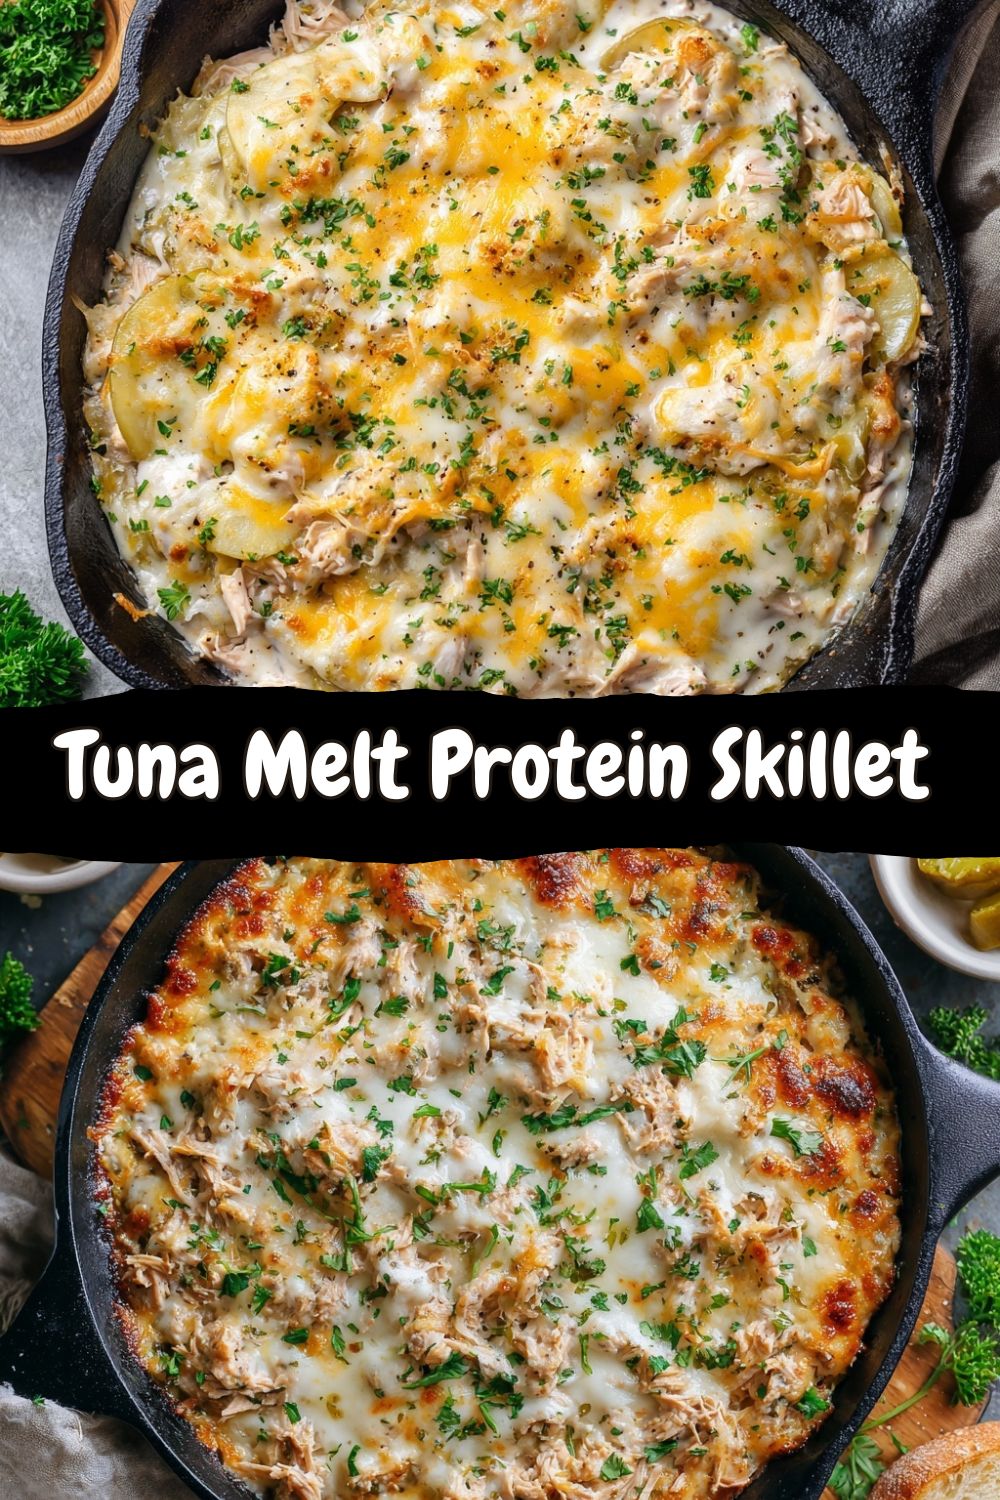
- Create the Golden Blanket: Now, smooth the mixture out into one even layer. Sprinkle the remaining 1/2 cup of cheese evenly over the entire surface, going all the way to the edges for maximum cheesy-crispy bits. Optional Pro Move: If you’re using tomato slices, lay them on the tuna first, *then* blanket them with cheese. The tomatoes get roasty and sweet underneath.
- The Big Melt: Carefully transfer your skillet from the stovetop to the oven, right under that preheated broiler. WATCH IT LIKE A HAWK. This is a 2-4 minute process, depending on your broiler’s power. You’re waiting for the cheese to fully melt, bubble, and develop gorgeous golden-brown spots. It happens fast, so don’t walk away!
- Serve with Joy: Use an oven mitt to pull the skillet out (the handle will be HOT!). Let it cool for just a minute. I love serving it right in the skillet at the table for that rustic, shareable vibe. Dig in!
How to Serve This Cheesy Masterpiece
Presentation is part of the fun! You’ve got options, depending on your mood and dietary style.
The Classic Scoop: The absolute easiest way. Grab a big spoon and scoop the cheesy tuna right onto plates. It’s rustic, honest, and totally delicious.
The High-Protein Vehicle: Since we packed the skillet with protein, let’s keep it going. Serve it alongside or scooped onto: toasted high-protein bread or a low-carb tortilla, whole-grain crackers (for that classic tuna melt feel), or crispy roasted potato halves.
The Fresh & Crunchy Route: To balance the richness, I love serving it with a big, simple side salad with a lemony vinaigrette. Or, go all-in on the crunch factor by using endive leaves, cucumber slices, or bell pepper strips as edible “scoops.” The cool crunch with the warm, cheesy filling is next-level.
Don’t Forget: A final sprinkle of fresh herbs (parsley, chives, dill) or a few extra cracks of black pepper right before serving makes it look and taste restaurant-worthy.
Make It Yours: 5 Flavor Twists to Try
This recipe is a fantastic blueprint. Once you master the basic method, the world (or at least your spice rack) is your oyster. Here are a few of my favorite spins:
- “Everything Bagel” Tuna Skillet: Mix 1 tablespoon of everything bagel seasoning into the tuna filling. Top with cheese and a final sprinkle of more seasoning before broiling. Serve with a schmear of cream cheese on the side. Unreal.
- Buffalo Blue Cheese: Swap the Dijon for 2 tablespoons of buffalo sauce. Use a blue cheese crumble (or gorgonzola) for half of the topping cheese. Finish with chopped celery and a drizzle of ranch or blue cheese dressing.
- Mediterranean Sunshine: Omit the pickles. Add 2 tablespoons of chopped sun-dried tomatoes (oil-packed, drained) and 1 tablespoon of chopped kalamata olives to the filling. Use a mozzarella and feta cheese blend for the top. Garnish with fresh oregano.
- Keto-Friendly & Extra Creamy: Replace the Greek yogurt with an equal amount of full-fat cream cheese, softened. It becomes insanely rich, decadent, and ultra-low-carb.
- Chicken of the Sea? Try Chicken of the Land: Not a tuna fan? This method works brilliantly with canned chicken, shredded rotisserie chicken, or even well-drained and crumbled extra-firm tofu for a vegetarian option (add a pinch of smoked paprika for depth).
Jackson’s Kitchen Notes
This recipe has become a weekly staple in my house, and it’s evolved a bit since that first experiment. My wife loves it with a layer of thinly sliced jalapeños under the cheese—spicy and amazing! I’ve also learned that while it’s best fresh, leftovers keep surprisingly well. The filling can be mixed and stored in the fridge for up to 2 days before you cook it, making dinner literally a 5-minute affair. Just spoon it into a skillet, top with cheese, and broil.
A funny story: I once was filming a video of this recipe and got so caught up chatting about the diner story that I completely forgot the skillet under the broiler. Let’s just say we achieved “extra crispy” that day. A friendly, smoky reminder to SET A TIMER, even for 2 minutes. Broilers don’t play around. But hey, even the slightly charred version was still pretty delicious—that’s the sign of a forgiving recipe!
Your Questions, Answered
Q: My skillet isn’t oven-safe. What can I do?
A: No problem! Simply mix and warm the filling in your regular skillet on the stove. Then, transfer the mixture to a greased, small baking dish or a pie plate, add the cheese topping, and broil it in that. You’ll get the same result with one extra dish to wash.
Q: The filling seems a bit dry. How can I fix it?
A: This usually means the tuna was packed very tightly or the Greek yogurt was extra thick. Easy fix: add another tablespoon of Greek yogurt, a splash of pickle juice, or even a tiny bit of mayo or olive oil until it reaches your preferred creaminess.
Q: Can I make this ahead for meal prep?
A: Absolutely! You have two great options: 1) Mix the filling and store it separately from the topping cheese for up to 2 days. Assemble and broil when ready. 2) Cook the entire skillet, let it cool, portion it, and store in the fridge for 3-4 days. Reheat in the microwave or back under the broiler for a few minutes to re-crisp the top.
Q: It tastes a little bland. How can I boost the flavor?
A: Seasoning is key! Make sure you’re using enough salt and pepper. Other instant flavor boosters: a pinch of garlic powder or onion powder in the mix, a squeeze of fresh lemon juice, a dash of smoked paprika, or a few shakes of your favorite all-purpose seasoning blend (like Tony Chachere’s or Trader Joe’s Everything But the Bagel).
Nutritional Information (A Quick Breakdown)
Okay, let’s talk numbers for a sec (per serving, based on 2 servings total, using non-fat Greek yogurt and cheddar cheese). This is why this dish feels so good: it’s packed with high-quality protein (about 40g!) to keep you full and fueled, and it’s naturally low in carbohydrates (around 6g net carbs). The fats (about 24g) come primarily from the cheese and the tuna, providing satiety and flavor. It’s a balanced, macro-friendly meal that truly satisfies.
Remember: These numbers can shift based on your specific ingredients (like using full-fat dairy or oil-packed tuna). If you’re tracking closely, always calculate based on the brands you use. But the core truth remains: this is a nutrient-dense, protein-powered meal that delivers serious comfort without the guilt.


