Sweet and Spicy Baked Cauliflower: Your New Favorite “Why Is This So Good?!” Recipe
Hey friends, Jackson here from Food Meld. Let’s talk about that magical moment when a humble vegetable transforms into something you literally cannot stop eating. You know the feeling—you’re picking at the “one last piece” on the serving platter, you’re stealing bites from the baking sheet while it cools, and you’re already planning when you can make it again. That’s the exact energy we’re bringing to the kitchen today with this Sweet and Spicy Baked Cauliflower.
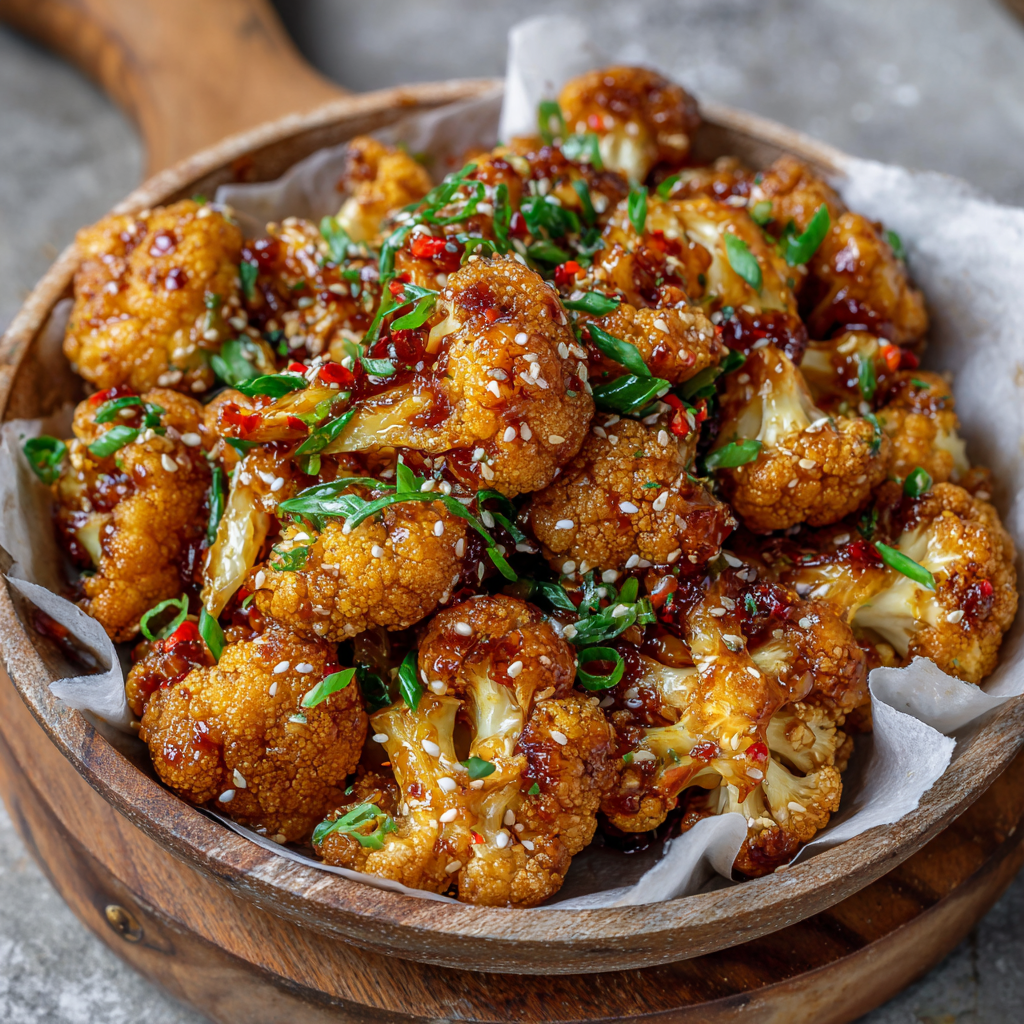
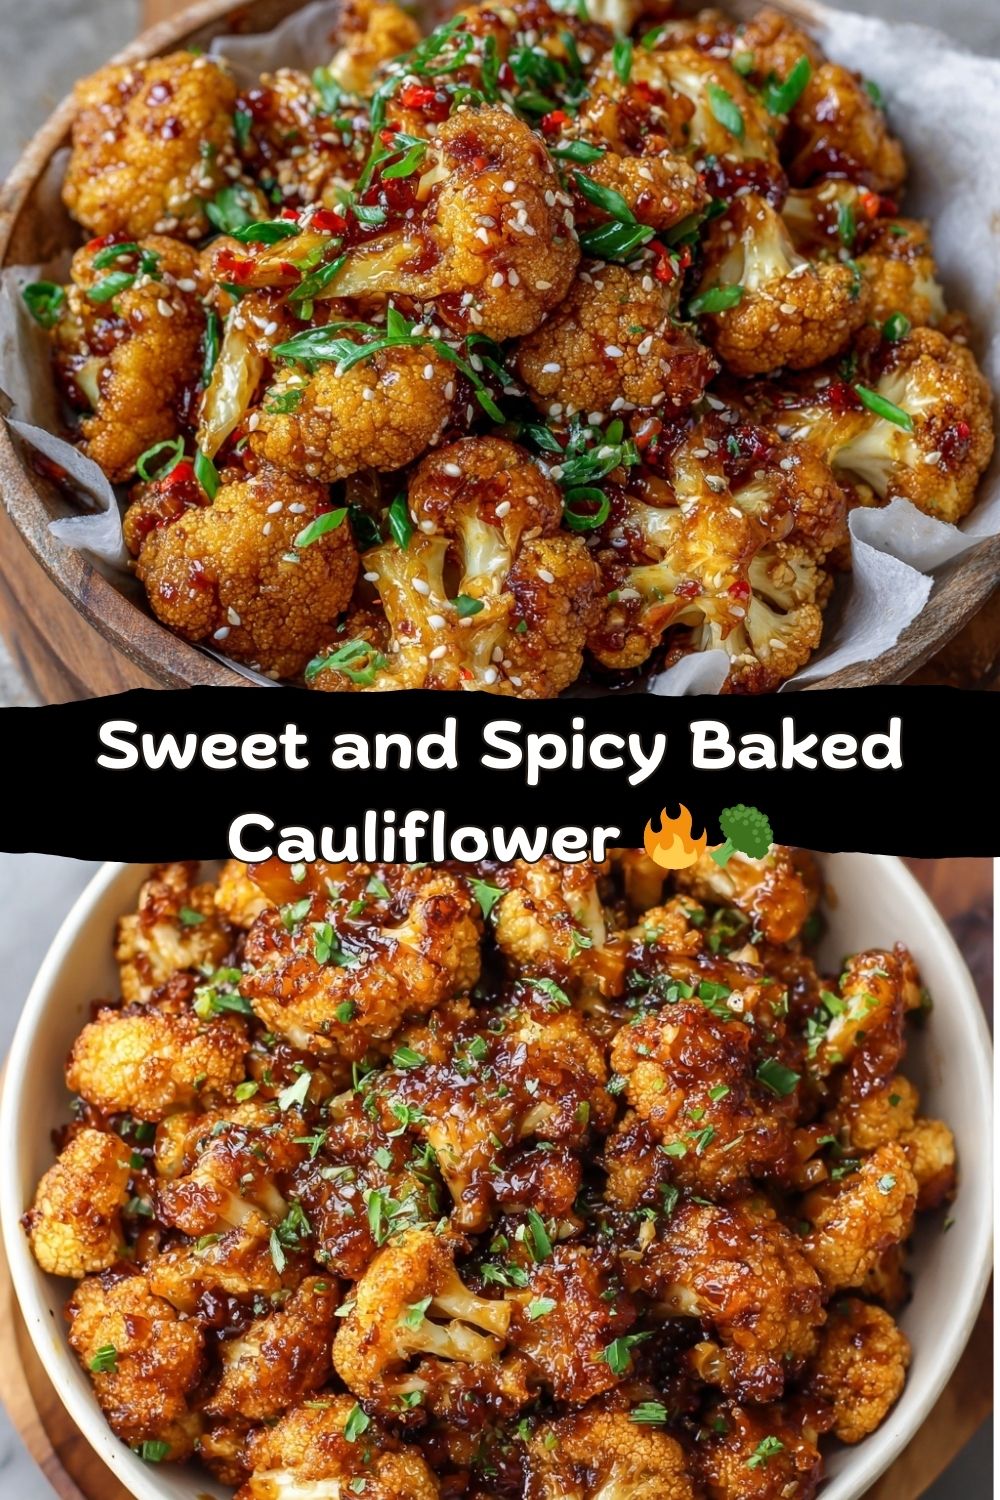
This isn’t just another side dish. This is crispy, caramelized florets, straight from a hot oven, tossed in a sticky, glossy sauce that hits every note: sweet, salty, spicy, and deeply savory. It’s the lighter, brighter, honestly-more-interesting cousin of takeout wings or orange chicken. And the best part? It comes together with one baking sheet, one saucepan, and about 45 minutes of your time. No deep fryer, no guilt, just pure, unadulterated flavor fun.
Whether you’re cooking for Meatless Monday, need a killer party appetizer, or are just tired of the same old roasted veggies, this recipe is your ticket to a seriously delicious time. We’re going to get that cauliflower crispy-edged and tender inside, whip up a 4-ingredient sauce that’s a total powerhouse, and bring it all together for a dish that’s guaranteed to spark those “you’ve gotta try this” moments. So, grab your favorite baking sheet and let’s turn a simple head of cauliflower into the star of the show. Let’s cook something awesome together!
The Roasted Veggie That Started It All
My love affair with transforming cauliflower started, of all places, in my grandma’s kitchen. Now, she was a Southern cook through and through, and her idea of a vegetable was usually simmered for hours with a ham hock (delicious, but heavy!). One winter, though, she simply tossed some cauliflower florets with oil, salt, and pepper and roasted them until the tips were almost black. That was it. She brought that bowl to the table, gave me a skeptical look, and said, “Try it. It’s just a vegetable.”
I took a bite. It was nutty, sweet, and had this incredible meaty texture I never knew a veggie could have. It was a revelation. That moment taught me that simplicity, plus high heat, equals magic. This Sweet and Spicy Baked Cauliflower is my loud, proud, flavor-packed homage to that first bite of perfectly roasted cauliflower. It takes that foundational magic and turns up the volume with a sticky glaze that makes it impossible to walk by the pan without snagging a piece. It’s the recipe I make when I want to prove to anyone—veggie skeptic or seasoned foodie—that plant-based eating can be the most exciting part of the meal.
Gather Your Flavor Arsenal
Here’s everything you need to create this crispy, sticky masterpiece. I’ve added my chef notes and swap ideas so you can make this recipe work with what you’ve got.
- 1 medium head cauliflower: This is our canvas. Look for a head that feels heavy for its size with tight, creamy-white florets and crisp green leaves. No brown spots! Chef’s Insight: Don’t throw out the core! Slice it thin and roast it too—it’s delicious.
- 2 tablespoons olive oil: Our crispy-maker. It helps conduct heat and encourages those gorgeous golden-brown edges. Avocado oil works great here too for its high smoke point.
- Salt and pepper to taste: The essential foundation. Season well at this stage—it makes all the difference in the depth of flavor.
For the “Can’t-Stop-Eating-It” Sauce:
- ¼ cup honey or pure maple syrup: This is our sweetness and sticky factor. Honey gives a floral note, while maple syrup adds a rich, almost caramel vibe. Easy Swap: For a vegan version, maple syrup is perfect. Agave nectar works in a pinch too.
- 2 tablespoons soy sauce: Our salty, umami backbone. Chef’s Tip: If you’re gluten-free, use tamari or a good coconut aminos. The flavor profile shifts slightly but is still fantastic.
- 1 tablespoon sriracha (adjust to taste): The “spicy” in our sweet and spicy! Start with a tablespoon for a gentle warmth, or go to 2+ for a serious kick. Fun Twist: Swap in Gochujang (Korean chili paste) for a deeper, fermented heat.
- 1 clove garlic, minced: The aromatic punch. Fresh is best here—that sharp bite mellows into something sweet and irresistible as it simmers.
- 1 teaspoon cornstarch + 1 tablespoon water (optional): This is our thickening magic trick. It turns the sauce from a loose glaze into a thick, lacquered coating that clings to every nook and cranny of the cauliflower.
Let’s Build Some Flavor: Your Step-by-Step Roadmap
Ready? Put on some tunes, preheat that oven, and let’s get into the beautiful, simple process of making this dish.
Step 1: Oven Prep & Cauliflower Chop. Crank your oven to 425°F (220°C). This high heat is non-negotiable—it’s the secret to crispy, not soggy, results. While it heats, line a large baking sheet with parchment paper (for easy cleanup!) or give it a light spray. Now, take your cauliflower head and chop it into bite-sized florets. Aim for uniformity so everything cooks evenly. Don’t be afraid of some flat edges—those caramelize the best! Toss them in a large bowl with the oil, salt, and pepper. Get your hands in there and massage it all together. Every surface should glisten.
Step 2: The Roast (aka “Develop the Crust”). Spread the florets in a single layer on your prepared sheet. Give them some breathing room! If they’re crammed together, they’ll steam instead of roast. Pop the tray into the hot oven and set your timer for 15 minutes. Chef’s Hack: Don’t open the oven door during this time! Let that hot air work its magic. When the timer goes, pull the tray out (carefully!), and use a spatula to flip the florets. This ensures all sides get golden and happy. Back in the oven they go for another 10-15 minutes, until they’re tender when pierced with a fork and have those beautiful browned, crispy bits.
Step 3: Sauce Simmer. While the cauliflower roasts, make your magic potion. In a small saucepan, combine the honey (or maple), soy sauce, sriracha, and minced garlic. Whisk it together and bring it to a gentle simmer over medium heat. Let it bubble and reduce for 2-3 minutes. You’ll smell the garlic mellowing and the sauce thickening slightly. Want it extra sticky? Mix the cornstarch and water in a tiny bowl until smooth (this is a “slurry”), then whisk it into the simmering sauce. Keep whisking for about 30 seconds to a minute until the sauce turns glossy and thickens. Remove it from the heat.
Step 4: The Big Toss & Final Caramelize. When your cauliflower is perfectly roasted, pull it out of the oven. Immediately transfer the hot florets to a large mixing bowl. Pour that gorgeous, glossy sauce over the top. Using a rubber spatula, gently but quickly toss, toss, toss until every single floret is coated in that sweet-spicy goodness. Pro Tip: Work fast while everything is hot—the sauce adheres better. For an extra layer of sticky caramelization, spread the sauced cauliflower back onto the baking sheet and slide it into the oven for just 5 more minutes. It’s worth the extra step, I promise!
How to Serve This Superstar
Presentation is part of the fun! You can serve this straight from the bowl, family-style, but let’s make it pop.
For a hearty main, spoon it over a big bed of fluffy jasmine rice or quinoa. The grains soak up any extra sauce beautifully. Add a simple side of steamed broccoli or snap peas for a complete, colorful plate.
As an appetizer or party snack, pile it high on a platter. Scatter thinly sliced green onions and a sprinkle of white or black sesame seeds over the top for color and a little crunch. Don’t forget to put out a bowl for discarded toothpicks—because these will disappear fast!
Feeling fancy? Crumble some creamy goat cheese or vegan feta over the warm cauliflower. The cool, tangy cheese against the hot, spicy-sweet glaze is a next-level combination.
Make It Yours: 5 Flavor Twists to Try
The basic recipe is a home run, but the kitchen is your playground! Here are a few of my favorite ways to mix it up.
- Korean-Inspired “Cauli-Wings”: Swap the sauce for 3 tbsp Gochujang, 2 tbsp maple syrup, 1 tbsp soy sauce, and 1 tsp toasted sesame oil. Garnish with sesame seeds and chopped kimchi.
- Lemon-Pepper Zing: Add the zest of one lemon and a big crack of black pepper to the sauce. Finish with a squeeze of fresh lemon juice after baking for a bright, zippy finish.
- Buffalo Cauli Bites: For a classic twist, toss the roasted florets in ⅓ cup of your favorite Buffalo hot sauce mixed with 2 tbsp of melted butter (or vegan butter). Serve with celery sticks and vegan ranch.
- “General Tso’s” Style: Add 1 tsp grated fresh ginger and a ½ tsp of Chinese five-spice powder to the sauce. Garnish with chopped, roasted peanuts for crunch.
- Protein-Powered Bowl: Turn it into a meal by adding a can of rinsed chickpeas to the baking sheet with the cauliflower (toss them in oil too!). Roast together for a fiber and protein boost.
Jackson’s Kitchen Notes & Stories
This recipe has been a Food Meld workhorse for years, and it’s evolved from a simple “toss and roast” into this sticky-glazed phenomenon. The biggest lesson learned? Patience with the roast. I used to pull the cauliflower out when it was “just tender,” but giving it those extra few minutes for the edges to truly darken makes all the difference in texture and flavor depth.
One funny fail turned win: I once accidentally used smoked paprika instead of sweet paprika in a dry rub version. It was so overwhelmingly smoky! To salvage it, I whipped up this sweet-spicy sauce to balance it out. The result was so good it became the recipe you’re reading now. Moral of the story? Some of the best dishes come from happy accidents and a willingness to taste and adjust. Don’t be afraid to play!
FAQs & Quick Fixes
Q: My cauliflower turned out soggy. What happened?
A: The most common culprits are overcrowding the pan (steam can’t escape) or not having the oven hot enough. Make sure your florets are in a single layer with space between them, and always preheat your oven fully. Using parchment paper instead of foil can also help—foil can sometimes trap moisture.
Q: Can I make this ahead of time?
A: You can roast the cauliflower ahead and keep it in the fridge for up to 2 days. Re-crisp it in a 400°F oven for 10 minutes before tossing with the freshly made sauce. I don’t recommend saucing it ahead of time, as it will lose its crisp texture.
Q: How do I adjust the spice level?
A: Start with 1 tsp of sriracha in the sauce, taste, and add more. You can also serve extra sriracha on the side for those who want more heat. For a kid-friendly version, you can use a mild BBQ sauce as the base and just add a pinch of garlic powder.
Q: My sauce is too thick/too thin. Help!
A: Too thick? Whisk in a teaspoon of warm water at a time until it’s pourable. Too thin? Mix another ½ tsp cornstarch with ½ tbsp water and whisk it into the simmering sauce; it should thicken in about 30 seconds.
Nutritional Info (Because You’re Curious!)
Here’s a general breakdown per serving (recipe makes about 4 servings as a side). Remember, this is an estimate and can vary based on your specific ingredients and portion size.
- Calories: ~160
- Total Fat: 7g
- Carbohydrates: 23g
- Dietary Fiber: 4g (That’s about 16% of your daily goal—nice!)
- Sugars: 14g (Primarily from the natural sugars in cauliflower and the honey/maple. You can reduce this slightly by using a sugar-free syrup alternative.)
- Protein: 3g
- Sodium: ~420mg (Using reduced-sodium soy sauce can lower this.)
At its heart, this is a veggie-forward dish that’s rich in Vitamin C, Vitamin K, and antioxidants. It’s a flavorful way to enjoy more plants on your plate!
Final Thoughts from My Kitchen to Yours
And that’s it, friends! You’ve now got the keys to making a dish that’s guaranteed to impress—yourself, your family, or a whole party crowd. This Sweet and Spicy Baked Cauliflower proves that “simple” doesn’t have to mean “boring.” It’s about layering bold flavors, embracing the magic of a hot oven, and creating something that’s genuinely fun to eat.
I hope this recipe becomes a regular in your rotation, a reliable fix for a craving, or your go-to trick for making veggies the most exciting part of the meal. Remember, cooking is about the journey—the sizzle, the smell, the taste-testing. So have fun with it, make it yours, and don’t forget to lick the sauce spoon (chef’s privilege).
If you make it, I’d love to hear how it turned out! Tag me on social @FoodMeld or drop a comment on the blog. Until next time, keep melding those flavors and cooking with joy.
Cheers,
Jackson


