Forget Everything You Thought You Knew About Meatloaf
Hey friends, Jackson here. Let’s be real for a second: when you hear “meatloaf,” you’re probably picturing a giant, somewhat intimidating, beige-ish loaf sitting in the middle of your grandma’s Sunday dinner table. It’s delicious, sure, but it’s not exactly what you’d call a party starter. Right?
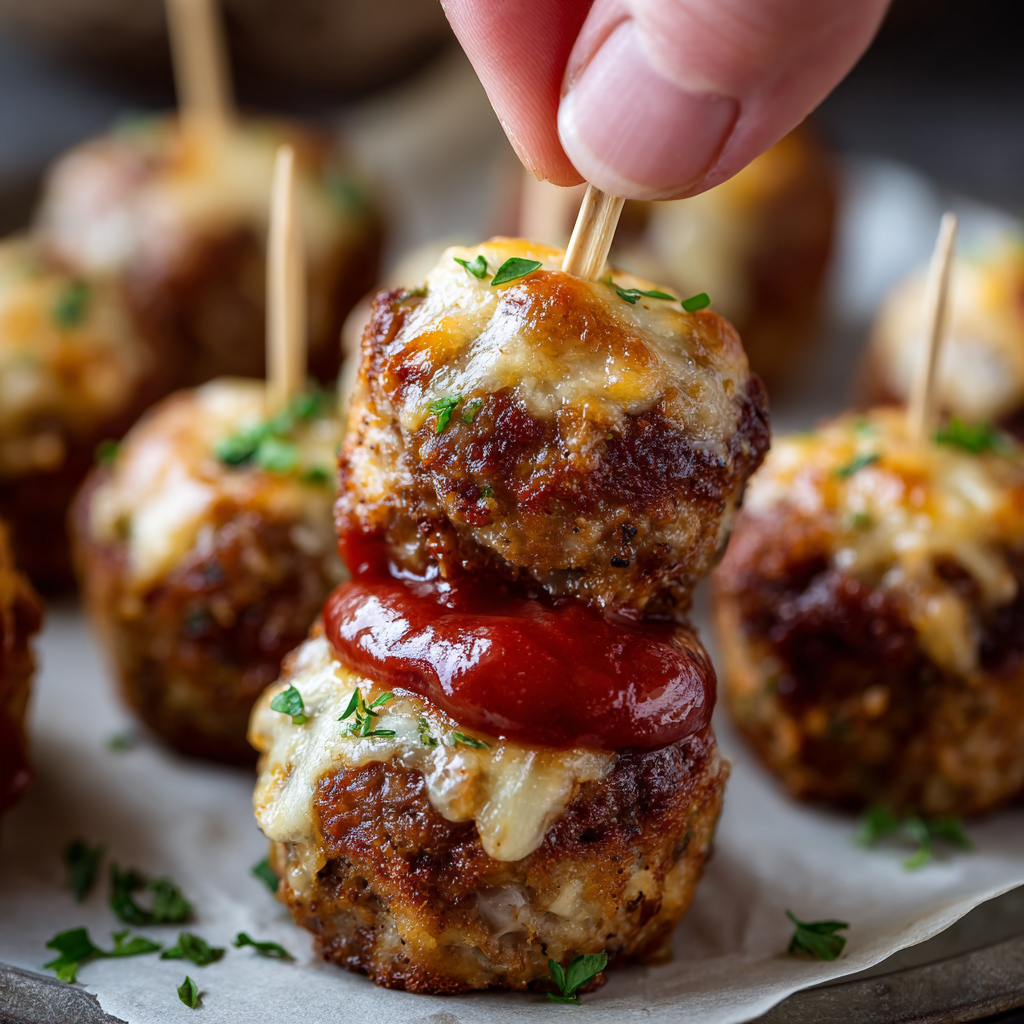
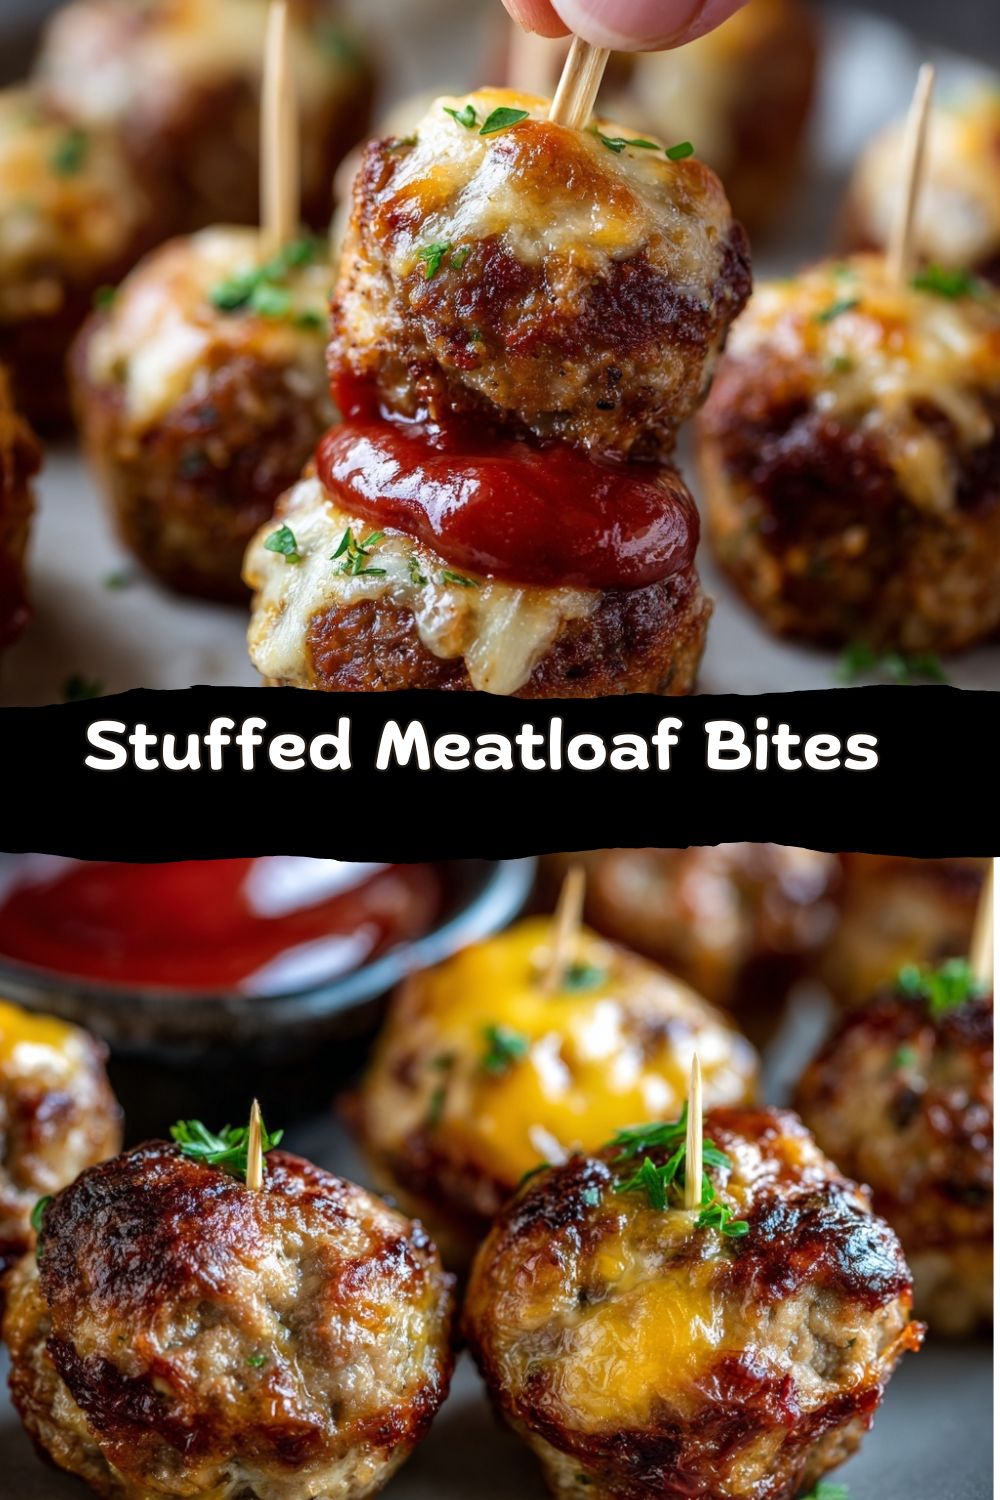
Well, I’m here to officially change the game. What if I told you we could take all that incredible, savory, comforting flavor of a perfect meatloaf—the juicy meat, the gentle spices, the nostalgic aroma—and turn it into a one-bite, cheese-pull, crowd-going-wild appetizer? That’s exactly what these Stuffed Meatloaf Bites are all about.
Picture this: tender, perfectly seasoned meat, wrapped lovingly around a hidden treasure of molten cheese, baked until they’re just golden and juicy. You pop one in your mouth, and it’s this incredible burst of savory goodness followed by that oh-so-satisfying ooze of cheese. They’re like the best meatball you’ve ever had and a grilled cheese sandwich had a delicious, bite-sized baby. They’re perfect for game day, your book club gathering, a potluck where you want to be the absolute hero, or even just a Tuesday night when you want dinner to feel like a celebration.
I’m talking minimal prep, maximum flavor, and a serious “wow” factor. So, tie on your apron, and let’s turn that classic comfort food into the life of the party. We’re about to have some serious fun in the kitchen.
The Meatloaf That Started It All
This whole idea actually came from a happy accident in my own kitchen, one that takes me right back to my mom’s table. See, my mom’s meatloaf was legendary. It wasn’t fancy, but it was the definition of comfort. She’d serve it with a mountain of buttery mashed potatoes and green beans, and it was my favorite meal as a kid.
Fast forward to me, trying to host my first big football watch party. I wanted to make something that honored that memory but was totally hands-on for a crowd. I was making a regular meatloaf, and as I was shaping it, a little chunk of cheese from my snack plate fell right into the meat mixture. Instead of fishing it out, I just shrugged and wrapped the meat around it. A lightbulb went off. What if I did that on purpose? What if I made *all* little meatloaves, *all* stuffed with cheese?
I scrapped the loaf pan, grabbed a mini muffin tin (a true kitchen MVP), and started rolling. Twenty minutes later, I had a platter of these gorgeous, steaming bites. They disappeared in about four minutes flat. My friends were literally hovering by the oven waiting for the next batch. That’s when I knew: this wasn’t just a snack. It was a whole new, incredibly fun way to share that warm, familiar flavor. It’s my mom’s Sunday dinner, reimagined for a Friday night party. And that’s the spirit of Food Meld right there.
Gathering Your Flavor Arsenal
Here’s everything you need to create these little bites of joy. I’ve added my two cents on each ingredient because knowing the “why” makes you a more confident cook!
- 1 lb ground beef (80/20 blend) or ground turkey: The star! An 80/20 beef blend gives you the perfect balance of flavor and juiciness. If you go leaner, they might be a tad drier. Ground turkey is a fantastic, lighter option—just make sure it’s not super-lean breast meat; a mix of dark and light meat works best.
- ½ cup breadcrumbs (plain): Our binder and texture-builder. They soak up the moisture and keep everything tender. No plain breadcrumbs? Panko works great, or even crushed-up saltine crackers in a pinch.
- 1 large egg: The glue that holds our little flavor packets together. Make sure it’s at room temp—it blends into the meat mixture more evenly.
- ¼ cup milk (any kind): This is my secret for extra-juicy bites. It adds moisture and richness. Don’t skip it!
- 1 clove garlic, minced: A non-negotiable for savory depth. Pro tip: grate it on a microplane for zero chunks and maximum garlicky dispersion.
- ¼ cup grated onion: This is a game-changer. Grating (on a box grater) gives you all the sweet onion flavor without any crunchy bits. Your sauce will be silkier, and your bites will be perfectly textured.
- 1 tsp Worcestershire sauce: The umami booster. It adds a deep, savory, slightly tangy note that makes the beef sing.
- ½ tsp salt & ½ tsp black pepper: The fundamental seasonings. Taste your meat mixture before forming the bites! You can always add a touch more.
- 24 small cubes of cheese (about ½” each): The glorious surprise inside! I love a sharp cheddar for its punch, or whole-milk, low-moisture mozzarella for that iconic stretch. Pepper jack would be amazing for a kick!
Let’s Build Some Bites: A Step-by-Step Party
Ready to get your hands dirty? This is the fun part. Follow these steps, and you’ll be a Stuffed Meatloaf Bite pro in no time.
- Preheat & Prep: Fire up your oven to 375°F (190°C). This is the perfect temp—hot enough to cook through and get a nice color, but not so hot that the cheese explodes out prematurely. Lightly grease a 24-cup mini muffin tin with a little oil or non-stick spray. This is my preferred method because it gives them a perfect little “cup” shape, but a parchment-lined baking sheet works too—they’ll just be more free-form “balls.”
- The Meld (Mixing the Meat): In a large bowl, add your ground meat, breadcrumbs, egg, milk, grated onion, minced garlic, Worcestershire, salt, and pepper. Here’s my biggest chef tip: use your hands! A fork or spoon will overwork the meat. Just dig in with clean fingers and mix until everything is *just* combined. Over-mixing makes the meat tough. Think gentle, like you’re folding ingredients together.
- Stuff & Roll Assembly Line: Get your cheese cubes ready on a plate. Scoop about 1 ½ tablespoons of the meat mixture. I like to use a small cookie scoop for consistency, but a spoon is fine. Flatten it into a little patty in your palm. Place one cheese cube in the center. Now, gently bring the meat up and around the cheese, pinching it closed to seal it completely. Roll it gently between your palms to form a smooth ball. The seal is crucial—we want the cheese to stay molten *inside* until that first bite! Place each ball into a prepared muffin cup.
- Bake to Golden Perfection: Slide the tin into your preheated oven. Bake for 18-22 minutes. You’re looking for the meat to be cooked through (an internal temp of 160°F for beef, 165°F for turkey) and the tops to be nicely browned. About halfway through, you might see some cheesy bubbly goodness peeking out—that’s a good sign! It means flavor town is open for business.
- The Grand Reveal (Resting is Key): Pull them out of the oven—they’ll be sizzling and gorgeous. This is important: let them cool in the tin for about 5 minutes. They’ll firm up just enough to handle, and the cheese will settle from a raging lava flow to a perfect, pullable ooze. Then, run a small knife around the edges and pop them out!
Plating Up for Maximum Impact
Presentation is part of the fun! Don’t just dump these beauties in a bowl. Arrange them on a nice platter or a wooden board. Scatter some fresh parsley or chopped chives over the top for a pop of color.
Now, for the dip station. This is where you can get creative. I like to offer a few options in small bowls right on the platter:
- Classic Ketchup Glaze: Mix ketchup with a touch of brown sugar and Worcestershire for a sweet-and-tangy dip that’s pure nostalgia.
- Smoky BBQ: Your favorite bottled sauce works, or doctor it up with a squeeze of lime and a pinch of chili powder.
- Zesty Marinara: Warm it up with a pinch of red pepper flakes for dipping. It turns the bites into Italian-inspired meatball poppers!
- Cool & Creamy Ranch or Sriracha Mayo: The cool creaminess is an awesome contrast to the warm, savory bite.
Stick a bunch of festive toothpicks or mini skewers in a few of them to encourage grabbing. Watch them disappear!
Make It Yours: 5 Flavor Twists
The basic recipe is a perfect canvas. Here’s where you can really run with it and “meld” in your own favorite flavors!
- Italian Fiesta: Add 1 tsp dried oregano and ½ tsp crushed fennel seeds to the meat mix. Use a cube of fresh mozzarella (bocconcini) and stuff a tiny piece of sun-dried tomato in with it. Serve with marinara.
- Buffalo Chicken Style: Swap the beef for ground chicken. Add ¼ cup of crumbled blue cheese to the meat mixture. Use a cheddar cube for the center. After baking, toss the warm bites in a bowl with a few tablespoons of Buffalo wing sauce.
- Breakfast-for-Dinner Bites: Use ground breakfast sausage instead of beef. Mix in a little maple syrup and sage. Stuff with a cube of sharp cheddar. Serve with a side of maple syrup for dipping—trust me on this.
- Spicy Southwest: Add 1 tsp chili powder, ½ tsp cumin, and a pinch of cayenne to the meat. Use a pepper jack cheese cube. Serve with a creamy avocado crema or chipotle mayo.
- Gluten-Free / Keto-Friendly: Super easy! Swap the breadcrumbs for ½ cup of finely crushed pork rinds or almond flour. They work like a charm as a binder.
Jackson’s Kitchen Notes
This recipe has become a staple in my house, and it’s evolved a bit. I used to stress about getting the cheese *perfectly* centered, but you know what? Sometimes it bursts out a little in the oven, and those slightly crispy, cheesy edges are everyone’s favorite. So don’t sweat perfection.
A funny story: I once made a double batch for a party and ran out of muffin tins. I baked half on a sheet pan, and they turned into more of a “stuffed meatloaf mound” shape. My friend called them “flavor nuggets,” and the name kind of stuck. So if you don’t have a mini muffin tin, roll with it (pun intended). Flavor Nuggets are just as delicious.
You can also prep these ahead! Assemble the uncooked bites, place them on a parchment-lined tray, and freeze solid. Then toss them in a freezer bag. Bake straight from frozen, just add 5-7 extra minutes. Game day just got way easier.
Your Questions, Answered
Q: My cheese leaked out everywhere! What did I do wrong?
A: No worries, it happens to the best of us! Usually, it means the seal wasn’t quite tight enough, or the cheese cubes were too big. Make sure you’re pinching the meat firmly closed and rolling it smooth. Also, a drier, harder cheese (like a block cheddar you cube yourself) melts slower than pre-shredded cheese (which has anti-caking agents).
Q: Can I make these with all turkey? They seem dry.
A> Absolutely! The key with turkey is using a blend with some dark meat (like 85/15 or 90/10) and not over-baking. That milk in the mixture is extra important here. Also, consider adding an extra tablespoon of grated onion or a dash of olive oil to the mix for moisture.
Q: How do I store and reheat leftovers?
A> They keep beautifully! Store cooled bites in an airtight container in the fridge for up to 4 days. Reheat in the oven at 350°F for about 10 minutes, or in the air fryer for 5-6 minutes, until hot. The microwave works in a pinch but can make the texture a bit rubbery.
Q: What’s the best dip, in your professional opinion?
A> You’re putting me on the spot! I’m a sucker for the classic ketchup-brown sugar glaze. It’s like the roof on the flavor house—it just completes it. But for a crowd, I always offer at least two options: one creamy and one tangy.
Nutritional Breakdown (Per Bite)
Hey, I’m all about flavor first, but it’s good to know what’s going into your body! These estimates are for one bite made with 80/20 ground beef and cheddar cheese, using the recipe as written. Remember, this is an appetizer—a few bites are a perfect serving!
- Calories: ~90
- Protein: 6g (Great for keeping you satisfied!)
- Carbohydrates: 3g
- Fat: 6g
- Sugar: 0g
- Sodium: ~160mg
Prep Time: 15 min | Cook Time: 20 min | Total Time: 35 min | Servings: 24 bites
Using ground turkey and part-skim mozzarella will lower the calorie and fat count slightly. And remember, the dips will add their own nutritional profile, so choose based on your preferences!
Let’s Keep the Party Going
And there you have it! My recipe for turning a humble classic into the most talked-about snack on the table. I love recipes like this because they prove that incredible food doesn’t have to be complicated. It’s about great ingredients, a little technique, and a whole lot of heart (and melted cheese).
The real magic happens when you make it your own. Try one of the twists, invent your own filling, or find your perfect dip combo. That’s what cooking is all about—those “you’ve gotta try this” moments we create for ourselves and the people we feed.
I really hope you and your crew love these Stuffed Meatloaf Bites as much as my friends and I do. They’re a little taste of my kitchen, my memories, and my “what if we tried this?” philosophy, all rolled into one perfect bite.
If you make them, I’d love to see it! Tag me @FoodMeld on Instagram so I can share in the cheesy, meaty goodness. Now go on, get cooking, and let’s make some memories together. Until next time, keep it bold, keep it comforting, and always keep it flavorful.
Your friend in the kitchen,
Jackson


