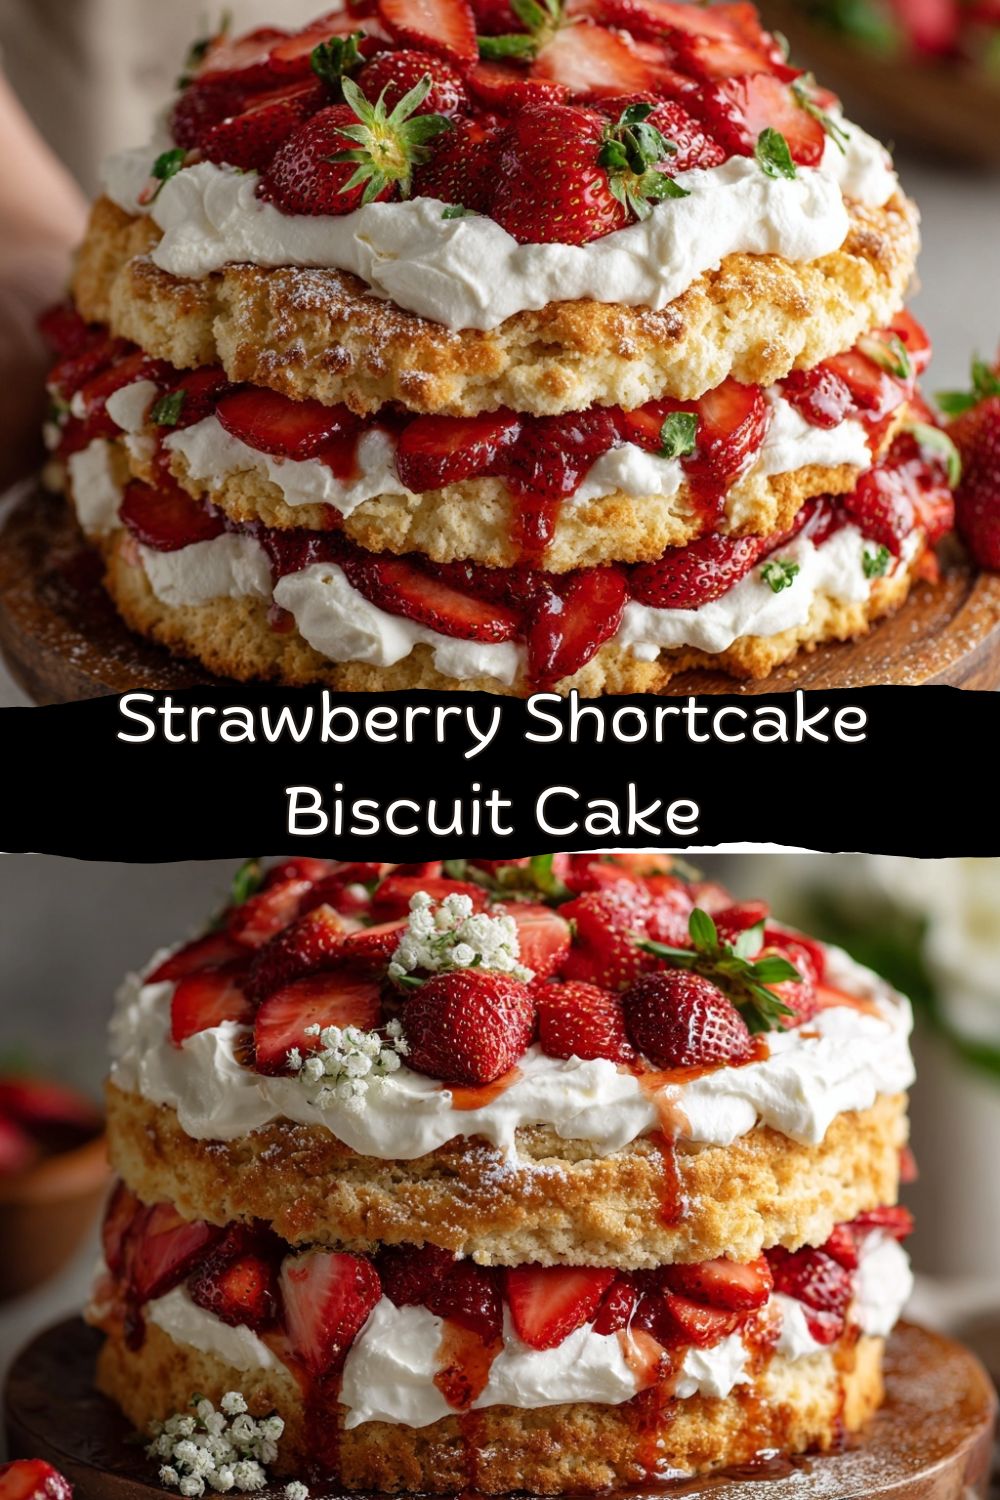
Strawberry Shortcake Biscuit Cake: Your New Go-To Showstopper Dessert
Hey friends, Jackson here from Food Meld. I’ve got a confession: sometimes, the best recipes aren’t the ones with a dozen fancy techniques. They’re the ones that feel like a hug from your grandma’s kitchen, but look like they belong on the cover of a magazine. That’s exactly the sweet spot we’re hitting today with this Strawberry Shortcake Biscuit Cake.
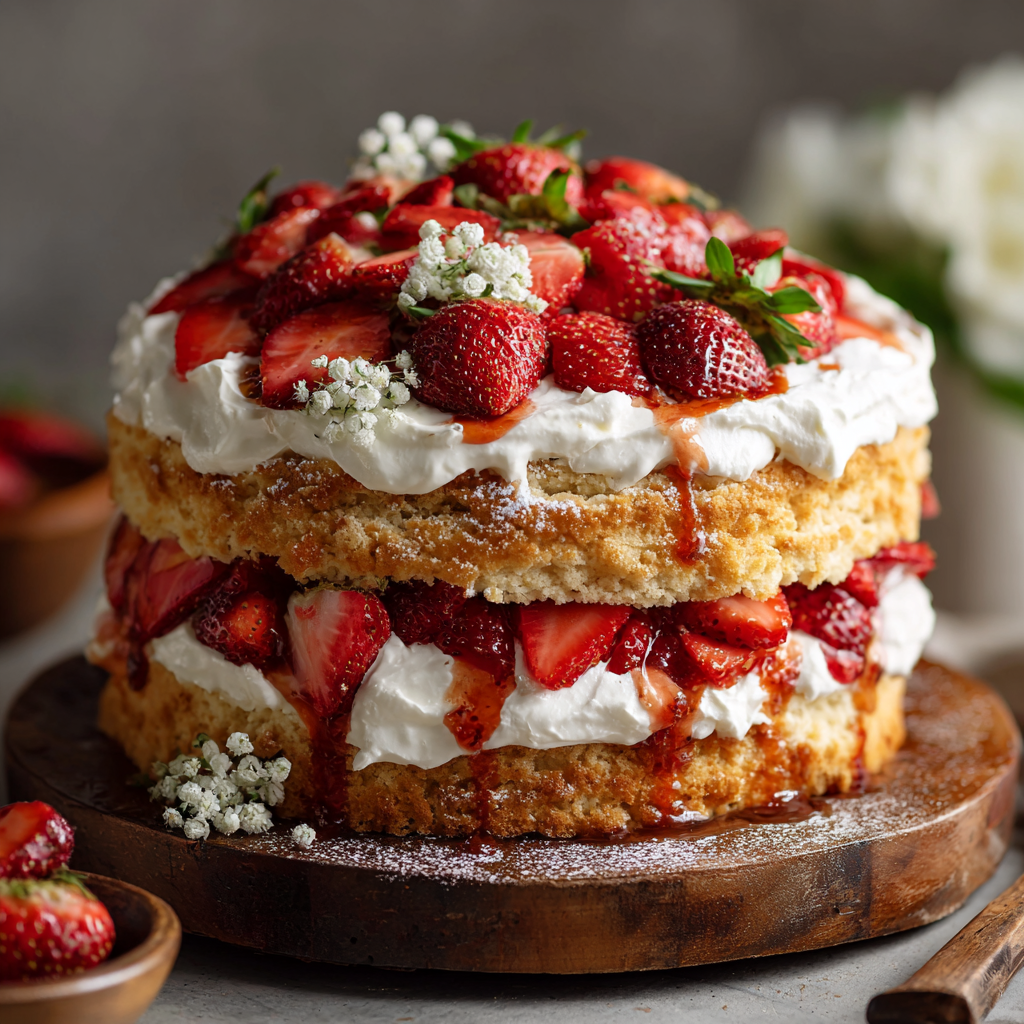
Picture this: tender, flaky, buttery biscuits—warm from the oven and smelling like pure comfort. Now, imagine stacking those bad boys high with mountains of juicy, macerated strawberries that have been soaking in their own sweet-tart syrup. And to finish it off? A glorious, billowy cloud of fresh, vanilla-specked whipped cream that melts into every nook and cranny.
This isn’t just a dessert; it’s an experience. It’s the rustic, shareable, laugh-out-loud-good centerpiece your next backyard BBQ, Sunday family dinner, or “just because” Tuesday has been waiting for. We’re taking everything you adore about classic strawberry shortcake and turning the volume way up, transforming it into a beautiful, layered cake that’s surprisingly simple to create.
I’m all about bold, comforting food with a creative twist, and this recipe is a perfect “Food Meld” moment. It’s my Southern roots (hello, buttermilk biscuits!) meeting a classic dessert, with a fun, “what if we stacked it?” energy. So, whether you’re a total beginner looking for a surefire win or a seasoned cook tired of the same old routine, grab your bowl and your favorite spoon. We’re about to cook—and eat—something truly awesome together. Let’s dive in!
The Shortcake That Started It All: A Taste of Summer Memory
This recipe takes me right back to my grandparents’ porch in Georgia. Summers there weren’t complete without my grandma’s strawberry shortcake. But hers wasn’t a dainty, single-serving thing. Oh no. She’d bake one giant, craggy-top biscuit in her cast-iron skillet, split it warm, and let the whole family attack it with bowls of berries and a giant spoonful of cream.
I remember the sound of the screen door slamming as we’d run in from playing, drawn by the smell of baking dough. My job was to hull the strawberries, a task I took very seriously (mostly because I got to sneak a few). She never measured the sugar for the berries—just a few generous pours from the jar until it looked “right.” That messy, communal, joyous way of eating stuck with me.
This Biscuit Cake is my tribute to that memory. Instead of one big biscuit, we’re making individual ones for beautiful layers, but the soul is the same: simple ingredients, maximum flavor, and the kind of dessert that begs to be shared straight from the pan, with everyone gathering around. It’s food that creates a moment, and that’s always the goal in my kitchen.
Gathering Your Flavor Arsenal: Ingredients & Chef Insights
Great food starts with great ingredients, and this recipe is a beautiful example of how a few simple things can create magic. Here’s what you’ll need and why each one matters.
- For the Biscuits:
- 2 cups all-purpose flour: The backbone. It gives our biscuits structure. For a slightly more tender crumb, you can swap in 1/2 cup cake flour, but all-purpose works perfectly.
- 1 tablespoon baking powder + 1/2 teaspoon baking soda: Our dynamic leavening duo! This combo gives us that perfect rise and a slight tang that plays so well with the sweet berries.
- 1/2 teaspoon salt: Crucial! Salt enhances all the other flavors. Don’t skip it.
- 2 tablespoons sugar: Just a touch to complement the berries and give the biscuits a hint of sweetness and a lovely golden color.
- 1/2 cup cold unsalted butter, cubed: Cold is the key word here. Those little solid butter bits are what create steam pockets in the oven, leading to ultra-flaky layers. I pop my cubed butter in the freezer for 10 minutes before starting.
- 3/4 cup cold buttermilk (plus extra for brushing): Buttermilk’s acidity activates the baking soda and adds incredible tenderness and flavor. No buttermilk? Make a quick “soured milk”: mix 3/4 cup milk with 2 teaspoons of lemon juice or white vinegar. Let it sit for 5 minutes before using.
- For the Strawberries:
- 1 1/2 lbs fresh strawberries, hulled and sliced: The star of the show! Look for berries that are fragrant and bright red. In a pinch, frozen sliced strawberries (thawed and drained) can work, but fresh is truly best here.
- 3 tablespoons sugar: This draws out the strawberries’ natural juices, creating that incredible syrup. Adjust based on berry sweetness.
- 1 teaspoon lemon juice: A bright little spark that balances the sweetness and keeps the berries from tasting flat.
- For the Whipped Cream:
- 1 cup heavy cream (or heavy whipping cream): The higher the fat content, the more stable and luxurious your whip will be. Chill your bowl and beaters for best results!
- 2 tablespoons powdered sugar: Dissolves instantly and sweetens smoothly. Granulated sugar can work, but you might get a slightly grainy texture.
- 1 teaspoon vanilla extract: Pure vanilla adds a warm, aromatic depth. A tiny pinch of salt here is also a chef’s secret to making flavors pop.
Building Your Bliss: Step-by-Step Instructions with Chef Jackson
Alright, team, let’s get our hands in the dough and build this beauty. Follow these steps, and you’ll be a shortcake superstar in no time.
Step 1: Macerate the Strawberries (The Flavor Foundation)
First thing’s first: get those berries juicy. Hull and slice your strawberries into a mixing bowl. Sprinkle with the sugar and lemon juice, then toss gently with your hands or a spoon. Let them sit on the counter for at least 20-30 minutes. You’ll see a beautiful ruby-red syrup start to pool at the bottom. Chef’s Hack: If you have time, let them go for an hour—the flavor gets even deeper!
Step 2: Make the Biscuit Dough (Keep It Cool & Confident)
Preheat your oven to a hot 425°F (220°C). Line a baking sheet with parchment paper. In a large bowl, whisk together your flour, baking powder, baking soda, salt, and sugar. Scatter your ice-cold butter cubes over the top. Now, use a pastry cutter, two forks, or even your clean fingertips to “cut” the butter into the flour. You’re looking for a mix of pea-sized crumbs and some larger, flat shards of butter. This variety is what makes the texture incredible! Once you’ve got your crumbly mixture, pour in the cold buttermilk. Stir gently with a fork just until the dough starts to clump together and no dry flour remains. It will look shaggy and messy—that’s perfect! Over-mixing is the enemy of tender biscuits.
Step 3: Shape & Bake (Embrace the Rustic!)
Dump the shaggy dough onto a lightly floured surface. Pat it—don’t roll it—into a circle or rectangle about 1-inch thick. Using a 2.5 to 3-inch round biscuit cutter (or a floured glass), press straight down to cut out your biscuits. Do not twist the cutter! Twisting seals the edges and prevents a good rise. Re-pat the scraps to cut more biscuits—you should get 6-8 depending on size. Place them on your prepared baking sheet, brush the tops with a little extra buttermilk for that gorgeous golden-brown finish, and bake for 12-15 minutes, until they’re puffed high and beautifully golden. Let them cool completely on a wire rack. Important: Cooling prevents the whipped cream from melting on contact!
Step 4: Whip the Cream (To Soft, Billowy Peaks)
While everything cools, make your whipped cream. Take your chilled bowl and beaters, pour in the heavy cream, powdered sugar, and vanilla. Start beating on medium-low, then increase to medium-high. Watch it closely! You want soft peaks that hold their shape but still curl over gently when you lift the beater. Over-beating leads to grainy butter, so stop while it’s still lush and creamy.
Step 5: Assemble the Masterpiece (The Fun Part!)
Time for the grand finale! You have two awesome options here. For a true “cake” presentation, place your first biscuit on a serving plate. Spoon on a generous layer of whipped cream, then a generous spoonful of strawberries and their syrup. Top with another biscuit and repeat, ending with a biscuit on top. Garnish the top with more cream, berries, and a mint sprig. For a more casual, “deconstructed” vibe, split your biscuits in half horizontally. Place the bottom halves on plates, pile high with berries and cream, and crown them with the biscuit tops. Either way, serve immediately and prepare for applause.
How to Serve & Savor This Sweet Masterpiece
Presentation is part of the joy! I love serving this right on a big, rustic wooden board or a beautiful cake stand. Let people see those gorgeous, juicy layers.
For individual servings, use a sharp serrated knife to slice through the stacked cake—it’s messy in the best possible way. Have extra berry syrup and whipped cream on the side for those who want to go all-in (always me). A sprinkle of fresh mint or even a tiny pinch of flaky sea salt on top of the berries just before serving can elevate it to a whole new level.
This dessert is best enjoyed the day it’s made, as the biscuits will soften over time (which is also delicious, just a different texture). Pour some iced tea, coffee, or even a sweet Moscato, gather your people, and dig in. This is food meant for sharing and creating new happy memories.
Make It Your Own: Delicious Recipe Variations
The beauty of this concept is its flexibility. Here are a few of my favorite twists to keep things exciting:
- Lemon Zest Infusion: Add the zest of one lemon to your biscuit dough and a tablespoon of limoncello to the whipped cream for a sunny, citrus-forward version.
- Mixed Berry Bonanza: Swap half the strawberries for raspberries, blueberries, or blackberries. The mix of colors and flavors is stunning.
- Boozy Berry Boost: Add a tablespoon of Grand Marnier, Chambord, or bourbon to the macerating strawberries for a sophisticated, adult-only twist.
- Gluten-Free & Vegan Friendly: Use a 1:1 gluten-free flour blend for the biscuits. For a vegan version, use plant-based butter and cold coconut cream (the solid part from a can) or a high-fat vegan whipping cream. Use agave or maple syrup to sweeten the berries.
- Grilled Biscuit Cake: For a smoky summer vibe, split and lightly grill your baked biscuits before assembling. The char is incredible with the sweet berries.
Chef Jackson’s Notebook: Extra Thoughts & Stories
This recipe has evolved in my kitchen from my grandma’s skillet method to this layered showstopper. One time, I was testing it for a friend’s potluck and, in my rush, used warm butter for the biscuits. Let’s just say we ended up with “Strawberry Shortcake Pancakes”—still tasty, but not the flaky dream I wanted! It was a perfect reminder: cold butter is non-negotiable.
I also love making mini versions using a smaller cutter for individual dessert jars—they’re adorable for parties. Don’t be afraid to play with shape and size. At the end of the day, the rule in the Food Meld kitchen is the same: if it doesn’t taste amazing, it doesn’t make the cut. This one? It’s made the cut more times than I can count.
Your Questions, Answered: FAQs & Troubleshooting
Q: My biscuits were dense, not flaky. What happened?
A: This almost always comes down to two things: 1) The butter wasn’t cold enough when it went into the oven, or 2) The dough was overworked. Remember, cold ingredients and a light touch are your best friends here.
Q: Can I make any parts ahead of time?
A> Absolutely! You can macerate the strawberries a few hours ahead and keep them covered in the fridge. The biscuits can be baked a day ahead and stored in an airtight container at room temp. Whipped cream is best made right before serving, but you can stabilize it with a teaspoon of cornstarch or instant clearjel if you need to make it earlier.
Q: My whipped cream turned runny or grainy.
A: Runny cream usually means it wasn’t whipped long enough. Grainy cream means it was over-whipped and is starting to turn into butter. The sweet spot is soft, luscious peaks. If it gets grainy, sadly, there’s no going back—but you can use it in a frosting!
Q: What if I don’t have a biscuit cutter?
A> No problem! Use the floured rim of a drinking glass, a wide-mouth mason jar ring, or simply pat the dough into a square and cut it into squares or triangles with a sharp knife. Rustic is good!
Nutritional Information (Approximate)
Here’s a rough breakdown per serving (based on 8 servings). Remember, this is a treat meant to be savored and shared!
- Calories: ~320
- Total Carbohydrates: 32g
- Dietary Fiber: 2g
- Sugars: 14g
- Protein: 5g
- Total Fat: 20g (Includes the good, satisfying fats from cream and butter)
This dessert provides a source of energy (carbs) and satisfaction (fats). The fresh strawberries also offer a dose of Vitamin C and antioxidants. As always, these numbers are estimates and can vary based on specific ingredients and portion sizes. Enjoy it as part of a balanced lifestyle!
Final Thoughts: Let’s Keep the Conversation Going!
and there you have it, friends—my ultimate Strawberry Shortcake Biscuit Cake, ready to steal the spotlight at your table.
This dessert is everything I love about cooking: unfussy, nostalgic, a little rustic, and wildly satisfying. It doesn’t ask for perfection. It asks for good ingredients, a light touch, and people you’re happy to share with. Whether your layers lean a little, the cream spills over the sides, or the berries drip down your serving plate—that’s not a mistake. That’s proof you made something real.
So bake it for the people you love. Bake it when strawberries are at their peak. Bake it when you need a reminder that the simplest foods are often the most memorable. And if you find yourself standing over the cake, spoon in hand, “just fixing the layers” for a little too long—welcome to the club.
If you give this Strawberry Shortcake Biscuit Cake a try, I’d love to hear about it. Tag me with #FoodMeld, leave a comment, or tell me how you made it your own. Until next time, keep trusting your instincts, keep asking “what if?”, and keep baking things that make people smile.
— Jackson 🍓🥛


