Strawberry Cheesecake Crescent Rolls: Your New 3-Ingredient Secret Weapon
Hey friends, Jackson here from Food Meld. Let’s get real for a second. How many times has this happened to you? It’s 7 PM, you’ve just finished a solid weeknight dinner, and suddenly… the collective family sweet tooth attacks. Or you remember, with a jolt, that you promised to bring something “little and sweet” to the book club/potluck/neighbor hang in exactly 45 minutes. The panic starts to creep in. You’re not about to spend hours in the kitchen, but you also don’t want to show up with a sad, store-bought cookie tray.
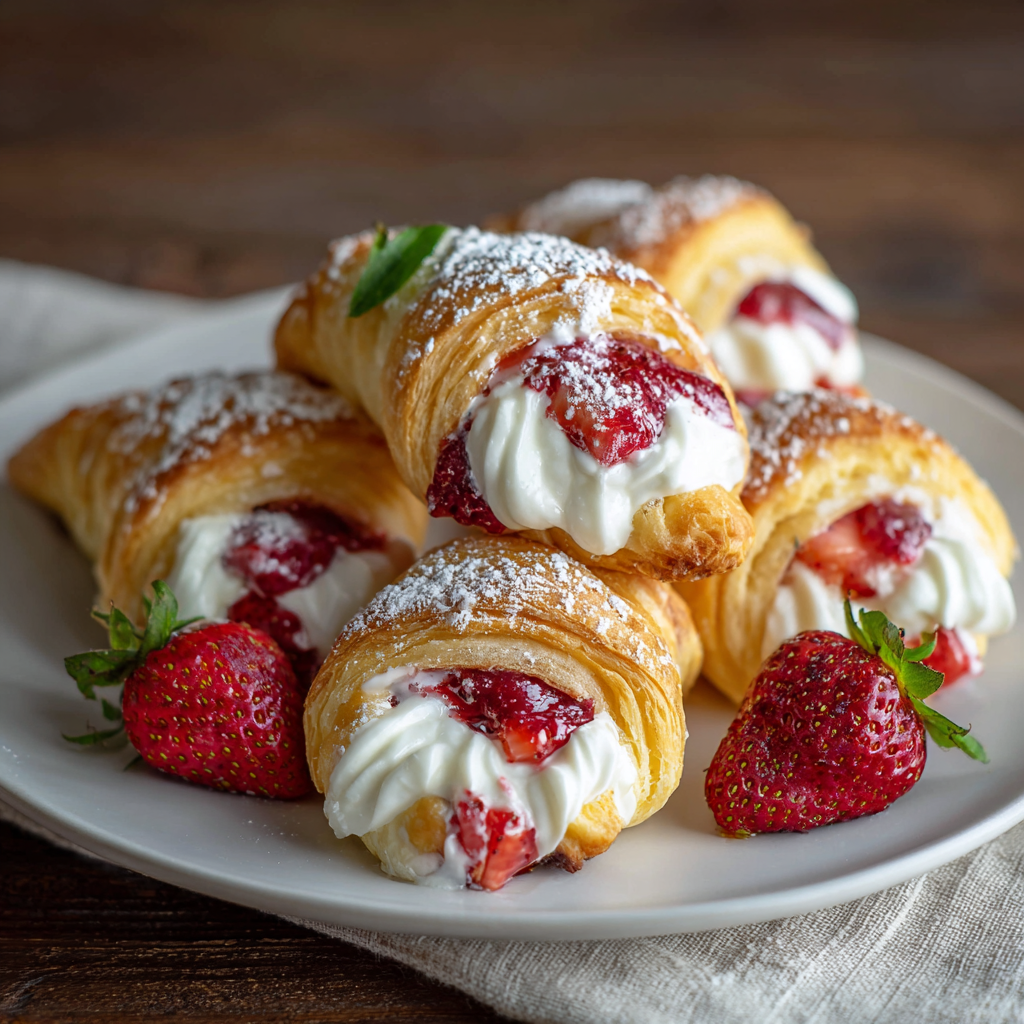
Sound familiar? That’s exactly why I created this little pocket rocket of a recipe. These Strawberry Cheesecake Crescent Rolls are your kitchen escape plan. We’re talking flaky, buttery layers hugging a pocket of sweet, tangy cream cheese and jammy strawberries, all baked into golden-brown perfection. The best part? You only need three ingredients and about 22 minutes, start to glorious finish.
This isn’t about fancy technique; it’s about smart, flavorful cooking that brings everyone to the table with a smile. It’s that beautiful “meld” I’m always talking about—taking simple, beloved components and twisting them into something that feels special. So, grab your favorite apron (the one with the stains that tell stories), and let’s turn a potential kitchen crisis into a standing ovation. Trust me, you’ve got this.

The Backyard BBQ & The Birth of a “Why Not?” Moment
This recipe was born out of pure, beautiful chaos. Picture this: It’s a hot July afternoon, and my backyard is packed. The grill is smoking, friends are laughing, and I’m in my element. I’d spent all morning on a show-stopping layered strawberry cheesecake for dessert. It was a masterpiece… until my well-meaning cousin, carrying a giant cooler, did a graceful (but disastrous) pirouette right into the picnic table where it was chilling. Let’s just say my beautiful cheesecake met an untimely, creamy demise.
With a crowd still expecting something sweet and only a semi-stocked kitchen left, I had to think fast. I saw a lonely can of crescent rolls in the fridge, some cream cheese from breakfast bagels, and a jar of my grandma’s strawberry jam staring back at me. A lightbulb went off. What if…? In 10 minutes flat, I had these little rolls stuffed, rolled, and in the oven. The smell alone pulled people away from the grill. They came out puffy, golden, and oozing with sweet strawberry goodness. They were devoured in minutes, and the “recipe” was demanded on the spot. That happy accident taught me a huge lesson: sometimes, the most unforgettable food moments come from a little pressure, a little creativity, and a whole lot of “why not?” energy.
Gathering Your Flavor Trio: It’s All About Quality
Don’t let the short list fool you—each ingredient here is a star player. Choosing good-quality versions makes a world of difference in taking these from “good” to “can-I-have-the-last-one?” good.
- 1 can (8 oz) Crescent Roll Dough: The flaky vessel for our joy! I’m a fan of the name-brand sheets or rolls for their consistent buttery flavor and layering. Chef’s Insight: Keep this cold until the very second you’re ready to use it. Warm dough is sticky and hard to work with. If you can find the “sheets” instead of pre-cut triangles, snag them! They’re easier to customize and seal.
- 4 oz Cream Cheese, softened: This is the rich, tangy heart of our “cheesecake” filling. Full-fat cream cheese gives you the best texture and flavor. Pro Tip: “Softened” is KEY. Leave it on the counter for 30-45 minutes before you start. If it’s still cool, you’ll get lumpy filling. In a pinch? Pop the sealed block in a bowl of warm water for 10 minutes.
- ½ cup Strawberry Jam OR Fresh Diced Strawberries: The sweet, fruity soul. Here’s where you can personalize:
- Jam/Preserves: Gives you an intense, consistent strawberry flavor and a beautiful gooey texture. I love a good seedless jam for smoothness, or preserves for little bursts of fruit.
- Fresh Berries: Dice them small! This gives a brighter, fresher taste. Toss them with a teaspoon of sugar to macerate for 10 minutes—it draws out their natural juices and prevents a soggy dough situation.
Let’s Build Some Magic: Step-by-Step with Chef’s Hacks
Ready? This is the fun part. We’re going to move with confidence and a few inside tricks to make these rolls look and taste bakery-level.
- Preheat & Prep: Fire up your oven to 375°F (190°C). This is hotter than some recipes, but it’s the sweet spot for getting that rapid, puffing rise and a deep golden color on the crescent layers. Line a baking sheet with parchment paper. No parchment? A light spray of cooking oil works, but parchment is the ultimate no-stick, easy-cleanup hero.
- Make the Filling: In a medium bowl, beat that softened cream cheese with a fork or hand mixer until it’s completely smooth and spreadable. Now, fold in your strawberry jam or macerated berries until you have a gorgeous pink, swirly mixture. Taste it! Want it a touch sweeter? Add a tablespoon of powdered sugar. Love lemon? A tiny zest will make the flavors pop. This is your canvas.
- Unroll & Conquer: Open the crescent dough. If you have triangles, separate them. If you have a sheet, lay it flat and cut it into 8 rectangles. Big Hack: Pinch any perforated seams together firmly. This prevents the filling from leaking out the sides during baking and gives you a better pocket.
- The Fill & Roll: Spoon about 1 heaping tablespoon of filling onto the wide end of each triangle (or rectangle). Don’t get greedy! Overfilling is the main cause of blowouts. Leave a small border. Gently roll from the wide end to the point, tucking the point underneath when you place it on the baking sheet. Sealing Secret: Give the ends a little pinch to seal in the goodness.
- Bake to Golden Glory: Space the rolls about 2 inches apart on your sheet—they need room to puff and spread their wings! Slide them into the hot oven and bake for 10-12 minutes. You’re looking for a beautiful, deep golden brown all over. The smell will be incredible. Don’t underbake! The golden color = flaky layers.
- The Cool Down (The Hardest Part): Let them cool on the sheet for at least 5 minutes. I know, it’s torture. But this allows the molten-hot cheesecake filling to set just enough so it doesn’t run everywhere when you take a bite. This is patience that pays off in flavor and structural integrity!
Plating Up the Fun: How to Serve These Beauties
Okay, they’re baked, they’re gorgeous, and the kitchen smells like a dream. Now, let’s make them look as good as they taste. Presentation is just sharing the love visually!
Place them on a simple wooden board or a cute platter. While they’re still warm, I love a light dusting of powdered sugar using a fine-mesh sieve—it looks like a light snowfall and adds a hint of extra sweetness. For a next-level finish, whip up a quick two-ingredient glaze: mix ½ cup powdered sugar with 1-2 tablespoons of milk or lemon juice until it’s drizzle-able. Zig-zag that over the rolls for a professional bakery touch.
What to serve them with? They’re phenomenal all on their own with a cup of strong coffee. For a dessert plate, add a scoop of vanilla bean ice cream on the side (the warm-cold combo is killer) or a dollop of fresh whipped cream. For brunch, pair them with crispy bacon or savory scrambled eggs to balance the sweet. The goal? Make it look like you fussed, when we both know you’re a smart, efficient kitchen rockstar.
Make It Your Own: 5 Flavor Twists to Try
The basic formula is your launchpad. Once you master it, the “what if?” game begins! Here are a few of my favorite spins.
- Lemon Blueberry Bliss: Use blueberry jam or fresh blueberries. Add the zest of one lemon to the cream cheese filling. Bright, tangy, and perfect for spring.
- Apple Pie Spice: Swap strawberry for good apple butter or finely diced sautéed apples. Mix a teaspoon of cinnamon and a pinch of nutmeg into the cream cheese. A fall favorite in minutes.
- Chocolate Hazelnut Dream: Forget the jam. Mix the cream cheese with ¼ cup of chocolate-hazelnut spread. After baking, drizzle with melted chocolate and sprinkle with chopped hazelnuts. Kid (and adult) paradise.
- Savory-Sweet Everything Bagel: Feeling adventurous? Add everything bagel seasoning to the cream cheese, use a fig jam, and sprinkle more seasoning on top before baking. Unbelievably good with a glass of wine.
- Dairy-Free Swap: Use your favorite plant-based cream cheese and ensure your crescent dough is dairy-free (many brands are!). The world is your oyster… or your strawberry.
Jackson’s Kitchen Notes: The Evolution of a Recipe
This recipe has become a staple in my home, and like any good friend, it’s evolved over time. I used to just slap jam and cream cheese on the dough and call it a day. But through trial and error (and a few messy baking sheets), I learned the little things. Letting the cream cheese truly soften. Not overfilling. That higher oven temp. These are the small tweaks that make a huge difference.
One funny fail: I once tried using whole, frozen strawberries in a rush. Big mistake. They released so much water during baking that I essentially steamed the crescents instead of baking them. Soggy city. We laughed about it, ate the delicious-but-soggy filling with a spoon, and I learned to always dice fresh or use jam. Every kitchen “oops” is just a lesson in disguise. That’s the fun of it!
Your Questions, Answered: FAQs & Troubleshooting
You ask, I answer. Here are the most common hiccups and how to glide right past them.
- Q: My filling leaked out everywhere! What happened?
A: The usual suspects: overfilling or not sealing the seams/ends well. Use a measured tablespoon of filling and really pinch those dough seams closed. Also, ensure your dough was cold—warm dough is more likely to split. - Q: Can I make these ahead of time?
A> You can assemble them, place them on the baking sheet, and refrigerate for up to 4 hours before baking. You may need to add 1-2 minutes to the bake time since they’ll be going in cold. I don’t recommend freezing them unbaked. - Q: My cream cheese is lumpy in the filling. How do I fix it?
A> That means it wasn’t soft enough. To salvage it, let the mixture sit for 10 more minutes to warm up, then beat it vigorously with a hand mixer. For next time, remember: softened to room temp is non-negotiable! - Q: The bottom seems a bit soggy. Why?
A> This can happen if the jam is extra runny or if the rolls cool completely on the sheet. Using parchment helps, and transferring them to a wire rack after the 5-minute initial cool-down lets air circulate and keeps bottoms crisp.
Nutritional Info (For Your Awareness)
Hey, we’re all about balance here at Food Meld. Sometimes you make a kale salad, sometimes you make magic crescent rolls. No guilt, just good food. Here’s the breakdown so you can enjoy them mindfully.
Per Roll (Approximate, based on 8 rolls):
Calories: ~180 | Total Fat: 9g | Saturated Fat: 4g | Cholesterol: 10mg | Sodium: 280mg | Total Carbohydrates: 20g | Dietary Fiber: 0g | Sugars: 8g | Protein: 3g
Remember, these numbers can vary based on the specific brands of dough, cream cheese, and jam you use. To lighten them up slightly, you can use reduced-fat crescent dough and Neufchâtel (1/3 less fat) cream cheese. The flavor will still be fantastic! But for a special treat, I always go for the full-fat, real-deal ingredients—it’s worth it for that indulgent, comforting experience.
Final Thoughts: You Did That!
And there you have it. From a backyard BBQ disaster to your new go-to dessert hero. These Strawberry Cheesecake Crescent Rolls are proof that you don’t need a pantry full of exotic ingredients or a culinary degree to make something that brings pure joy to the table. They’re about the spirit of cooking I love most: creative, approachable, and packed with flavor.
So the next time that sweet tooth ambushes you, or you need a last-minute win, you know exactly what to do. Roll up your sleeves, grab your trio of ingredients, and cook with a little confidence and a lot of fun. I hope this recipe becomes a part of your own kitchen story, creating those “you’ve gotta try this!” moments with the people you love.
Give it a try, tag me on social @FoodMeld if you do, and let me know what fun twists you come up with! Until next time, keep mixing it up and making it yours.
Happy cooking,
Jackson


