Your New Secret Weapon for Gooey Chocolate Bliss
Hey there, Food Meld family! Jackson here. Let me ask you a question: have you ever stared at your jar of sourdough discard and thought, “My friend, you are destined for more than just pancakes”? I have. In fact, I’ve made it my mission to find the most delicious, unexpected, and downright irresistible ways to use that tangy powerhouse. And today? Today, we’re turning it into pure, unadulterated magic.
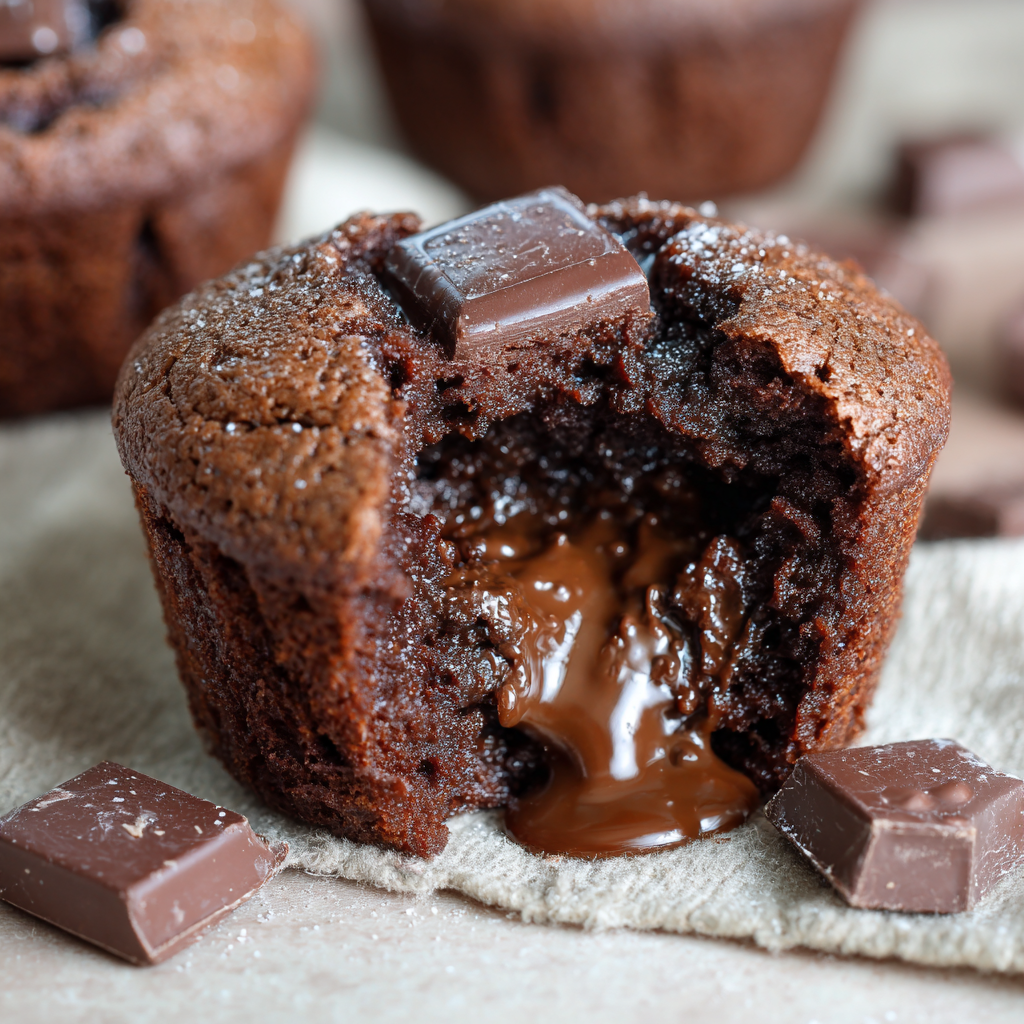
I’m talking about Sourdough Chocolate Lava Muffins. Imagine this: you pull a warm, tender muffin from the oven. It smells like a cozy bakery, with that deep, comforting scent of cocoa. You break it open, and a river of rich, dark, molten chocolate comes cascading out. That’s the dream, right? But here’s the twist—our secret ingredient, that sourdough discard, adds this subtle, sophisticated tang that cuts through the sweetness and makes the chocolate flavor pop in a way you have to taste to believe.
This isn’t just another chocolate muffin recipe. This is a small-batch masterpiece, perfect for a romantic Valentine’s dessert, a special weekend breakfast, or just because it’s Tuesday and you deserve a “you’ve gotta try this” moment. I’ve tested this one half a dozen times to get that perfect balance of tender crumb and liquid gold center. So, grab your discard, your favorite mixing bowl, and let’s turn that “what if we tried this?” energy into something truly awesome.
The Happy Accident That Started It All
This recipe actually came from a beautiful kitchen mishap. A few years back, right before Valentine’s Day, I was in a classic “Jackson” situation: I’d promised my partner a fancy, from-scratch dessert, but I’d also been feeding my sourdough starter all day. The counter was a floury mess, and time was ticking. I had a vision for individual molten chocolate cakes, but I also had a bowl of discard staring me down, begging not to be wasted.
In a moment of “let’s just go for it,” I decided to fold a big spoonful of that discard right into the chocolate batter. I wasn’t sure if it would work, but the idea of that tangy flavor playing with the dark chocolate was too tempting to ignore. The result? We pulled these little cakes out of the oven, and that first bite was a revelation. The texture was incredible—somehow more tender and complex than my usual recipe. The tang made the chocolate taste deeper, richer, and less one-note. It was a total game-changer. Now, I can’t imagine making them any other way. It just goes to show that some of the best flavors come from a little creative chaos.
Gathering Your Flavor Arsenal
This is where the fun begins! Here’s your shopping list for chocolatey greatness. Don’t stress if you’re missing something—I’ve got plenty of swaps and chef-y insights for you.
- ½ cup Sourdough Discard (unfed): This is our star player! The key here is that it’s “unfed” or “discard.” You want it at room temperature for easy mixing. Its tangy flavor is the secret weapon that elevates the entire muffin. No active starter? A thick, ½ cup of Greek yogurt or sour cream can work in a pinch, though you’ll lose that distinct sourdough character.
- ½ cup All-Purpose Flour: The trusty foundation. It gives our muffins just enough structure to hold that molten center without being tough. For a slightly nuttier flavor, you can swap in whole wheat pastry flour, but all-purpose is my go-to for that perfect, tender crumb.
- ¼ cup Cocoa Powder: Use the best quality you have! I prefer Dutch-processed for its deep, dark color and smooth flavor, but natural unsweetened cocoa works perfectly here, too. This is your primary chocolate flavor, so make it count.
- ½ tsp Baking Powder: Our little leavening agent that gives the muffins a gentle lift. Make sure yours is fresh! If it doesn’t fizz when you add it to water, it’s time for a new tin.
- ¼ tsp Salt: Never, ever skip the salt in baking. It’s the flavor enhancer that makes the chocolate taste more, well, chocolatey. It balances the sweetness and brings all the elements into harmony.
- ¼ cup Sugar: I use regular granulated sugar, but I love the caramel-like depth that coconut sugar adds. The amount is just right to provide sweetness without overpowering the dark chocolate and sourdough tang.
- 1 Egg: Our binder! It adds richness and helps create that beautiful, tender texture. Bring it to room temperature for a smoother, more cohesive batter.
- ¼ cup Milk: Whole milk adds a lovely richness, but any milk you have on hand works beautifully—almond, oat, you name it. The goal is just to bring the batter to the perfect, spoonable consistency.
- 2 tbsp Melted Butter or Coconut Oil: Butter gives that classic, irresistible flavor, while coconut oil keeps things dairy-free and adds a subtle tropical note. I’ve used both, and they’re both winners.
- 1 tsp Vanilla Extract: The classic flavor booster. It rounds out the chocolate and adds a layer of warmth. Don’t be shy with it!
- 4–6 Dark Chocolate Squares: This is the “lava”! I use high-quality dark chocolate squares (about 1-inch each) from a bar. The better the chocolate, the more incredible that molten center will be. You can also use heaping teaspoons of chocolate chips in a pinch.
Let’s Build Some Magic: The Step-by-Step
Ready to get your hands dirty? Follow these steps, and you’ll be a lava muffin pro in no time. I’m sharing all my little hacks along the way.
- Preheat and Prep. Fire up your oven to 350°F (175°C). This is our sweet spot for baking these guys through without overcooking the precious lava center. While it’s heating, grab a standard 6-cup muffin tin. I like to line it with parchment paper liners for easy cleanup, but a good greasing with butter or non-stick spray works just as well. Chef’s Hack: Give the top of the muffin tin a light spray, too. This prevents any overflowing muffin tops from sticking!
- Combine the Wet Team. In a medium-sized bowl, let’s get the wet ingredients acquainted. Crack in your egg, then add the milk, melted (but slightly cooled) butter or oil, and that glorious vanilla extract. Whisk it all together until it’s smooth and homogenous. Now, for the main event: plop in your ½ cup of sourdough discard. Whisk it in until you have a thick, slightly lumpy, but combined liquid. Don’t worry about the lumps from the discard—they’ll work themselves out.
- Whisk the Dry Crew. Grab a second, larger bowl for our dry ingredients. This is where we build our flavor base. Add the flour, cocoa powder, sugar, baking powder, and that all-important salt. Give this a really good whisk for about 30 seconds. Chef’s Insight: Whisking the dry ingredients does two things: it sifts them together to prevent lumps, and it evenly distributes the baking powder and salt, ensuring every bite is perfect.
- The Grand Meld. Time to bring the two teams together! Pour your wet ingredients into the bowl with the dry ingredients. Now, with a spatula, gently fold everything together. I cannot stress this enough: mix until the flour is *just* incorporated. A few streaks are okay! Overmixing is the enemy of a tender muffin—it develops the gluten and can make them tough. We want a thick, slightly shaggy batter.
- The Lava Pocket. Using a spoon or a cookie scoop, fill each muffin cup about halfway with batter. Now, take your dark chocolate square and press it right into the center of each one. Then, cover the chocolate completely with the remaining batter, dividing it evenly. You should fill the cups about ¾ of the way full. Chef’s Hack: Pressing the chocolate into the bottom layer of batter ensures it stays suspended in the middle, creating that perfect lava flow instead of sinking to the bottom.
- Bake to Gooey Perfection. Slide your muffin tin into the preheated oven and set your timer for 14 minutes. This is your starting point. The goal is to bake them until the tops are set and look dry, but the center still feels soft and jiggles slightly when you gently tap the tin. If they need more time, add 1-2 minutes, but keep a close watch! Overbaking is the only way to ruin the lava center. A toothpick inserted into the *side* (not the center!) should come out with a few moist crumbs.
- The All-Important Cool Down. Once they’re out of the oven, let the muffins cool in the tin for exactly 5 minutes. This allows them to set just enough so they don’t fall apart when you take them out, but they’re still wonderfully warm. Use a butter knife to gently loosen the edges and lift them onto a wire rack. Serve immediately for the ultimate molten lava experience!
How to Serve These Beauties
Presentation is part of the fun! You’ve put in the work, now let’s make these muffins shine. For the full “wow” factor, serve them warm, right out of the muffin tin (using an oven mitt, of course!). Place one on a small plate and dust it with a snowy shower of powdered sugar or a drizzle of simple melted chocolate.
But why stop there? Take it over the top by adding a scoop of high-quality vanilla bean ice cream. The contrast of the warm, gooey chocolate and the cold, creamy ice cream is a textural dream. A few fresh raspberries or strawberries on the side not only add a pop of color but their bright acidity pairs beautifully with the rich chocolate. For a cozy breakfast twist, a dollop of freshly whipped cream and a hot cup of coffee is the only companion you need.
Make It Your Own: Flavor Twists & Swaps
Once you’ve mastered the basic recipe, the kitchen becomes your playground. Here are a few of my favorite ways to mix it up:
- Orange Zest Infusion: Add the zest of one small orange to your wet ingredients. The bright, citrusy aroma cutting through the dark chocolate is a classic, elegant combination that never fails to impress.
- Spiced Mexican Chocolate: Whisk ¼ teaspoon of cinnamon and a tiny pinch of cayenne pepper into your dry ingredients. It adds a warm, subtle heat that makes the chocolate flavor incredibly complex and exciting.
- Salted Caramel Surprise: Instead of a plain chocolate square, use a soft caramel candy. Push it into the center as usual. The result is a gooey, buttery caramel lava that’s out of this world. Sprinkle a little flaky sea salt on top after baking.
- Peanut Butter Lover’s Dream: Take a teaspoon of peanut butter and freeze it in little dollops on a parchment-lined plate for 15 minutes. Use one of these frozen dollops as your “lava” center. It will melt into a rich, peanutty river.
- Gluten-Free & Dairy-Free Friendly: This recipe is a champ with substitutions. Use a 1:1 gluten-free flour blend and your favorite plant-based milk and coconut oil. Just ensure your chocolate squares are dairy-free, and you’re good to go!
Jackson’s Kitchen Notes
This recipe has evolved so much from that first frantic Valentine’s Day experiment. I’ve learned that the type of cocoa powder really changes the game—Dutch-processed gives a fudgier, darker muffin, while natural cocoa has a lighter, almost fruitier tang. I also used to be so precise with the baking time, but now I just go by the “jiggle test.” Trust your instincts! The funniest part? I once accidentally used a whole cup of discard instead of a half, and you know what? They were denser, tangier, and my sourdough-obsessed friend declared them the best thing I’d ever made. So don’t be afraid to play around. That’s where the best food memories are made.
Your Questions, Answered!
I’ve gotten a lot of questions about this recipe over time. Here are the big ones to help you bake with confidence.
- Q: My lava center solidified. What happened?
A: The most common culprit is overbaking. Remember, we’re going for a *soft* set on top. Oven temperatures can vary, so start checking at 14 minutes. The center should jiggle. Also, make sure you’re using a proper chocolate baking bar, not chocolate chips, which are designed to hold their shape. - Q: Can I make the batter ahead of time?
A: You can! Mix the batter, fill the muffin tin, cover it tightly with plastic wrap, and refrigerate for up to 24 hours. When you’re ready, bake them straight from the fridge, adding 1-2 extra minutes to the baking time. - Q: My batter is super thick, is that right?
A: Yes! This is a thick, scoopable batter, not a pourable cake batter. The thickness is what helps hold the chocolate square in the center. If it feels *impossibly* thick, like dry dough, you can add another tablespoon of milk to loosen it up. - Q: Can I use active sourdough starter instead of discard?
A: You absolutely can! The results will be very similar. The discard just gives us that distinct, tangy flavor we’re after. An active starter might make them rise a tiny bit more, but the lava center will still be glorious.
Nutritional Info (Because We’re All About Balance!)
Hey, I’m all about indulging, but I also believe in knowing what’s in your food. Here’s a general breakdown per muffin (assuming the recipe makes 6 muffins and you use granulated sugar and butter). Remember, these are estimates and can vary based on your specific ingredients.
- Calories: ~200 kcal
- Carbohydrates: 28g
- Protein: 4g
- Fat: 9g (Saturated Fat: 5g)
- Cholesterol: 40mg
- Sodium: 150mg
- Sugar: 14g
These muffins get their richness from the egg, butter, and chocolate. Using coconut sugar and coconut oil will slightly alter the numbers, and opting for a plant-based milk can lower the cholesterol. The sourdough discard adds a unique fermented element, which some find easier to digest. At the end of the day, this is a treat meant to be savored and enjoyed with zero guilt!
Let’s Keep the Conversation Going!
And there you have it, friends—my go-to recipe for turning a humble jar of sourdough discard into a show-stopping, conversation-starting, chocolate-lover’s dream. I hope these Sourdough Chocolate Lava Muffins bring as much joy to your kitchen as they have to mine. They’re proof that baking doesn’t have to be perfect or complicated to be unforgettable. It just has to be made with a little bit of fun and a whole lot of flavor.


