Let’s Turn Dinner Into a Fiesta: The Easiest, Most Epic Nachos You’ll Ever Make
Hey friends, Jackson here from Food Meld! Let’s cut right to the chase: we’ve all been there. It’s Friday night, the crew’s coming over, the game’s about to start, and the last thing you want to do is stand over the stove orchestrating a five-course meal. You want something fun, something shareable, something that makes people’s eyes light up when you walk into the room. You want a total flavor explosion that, and here’s the best part, requires almost zero cleanup. Sounds like a dream, right? Well, pull up a stool, because I’m about to introduce you to your new secret weapon: Sheet Pan Chicken Nachos.
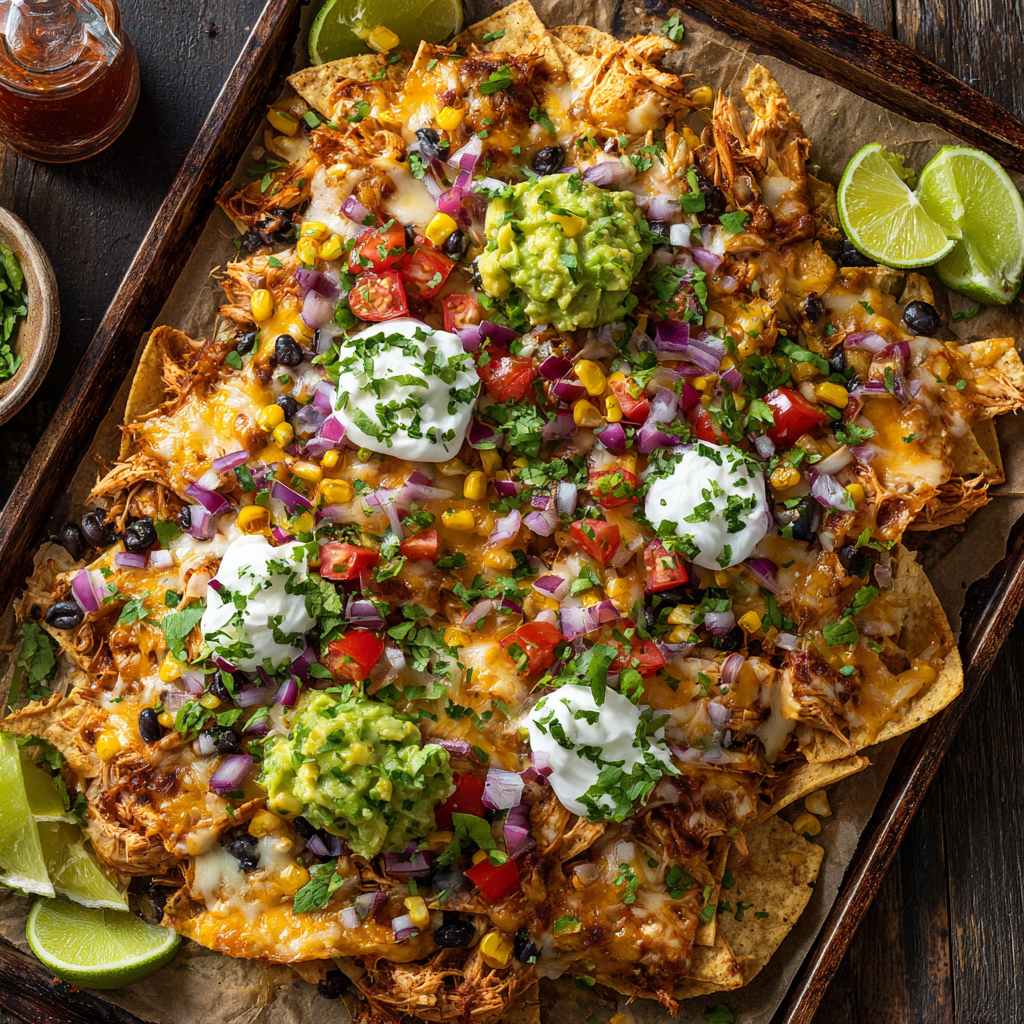
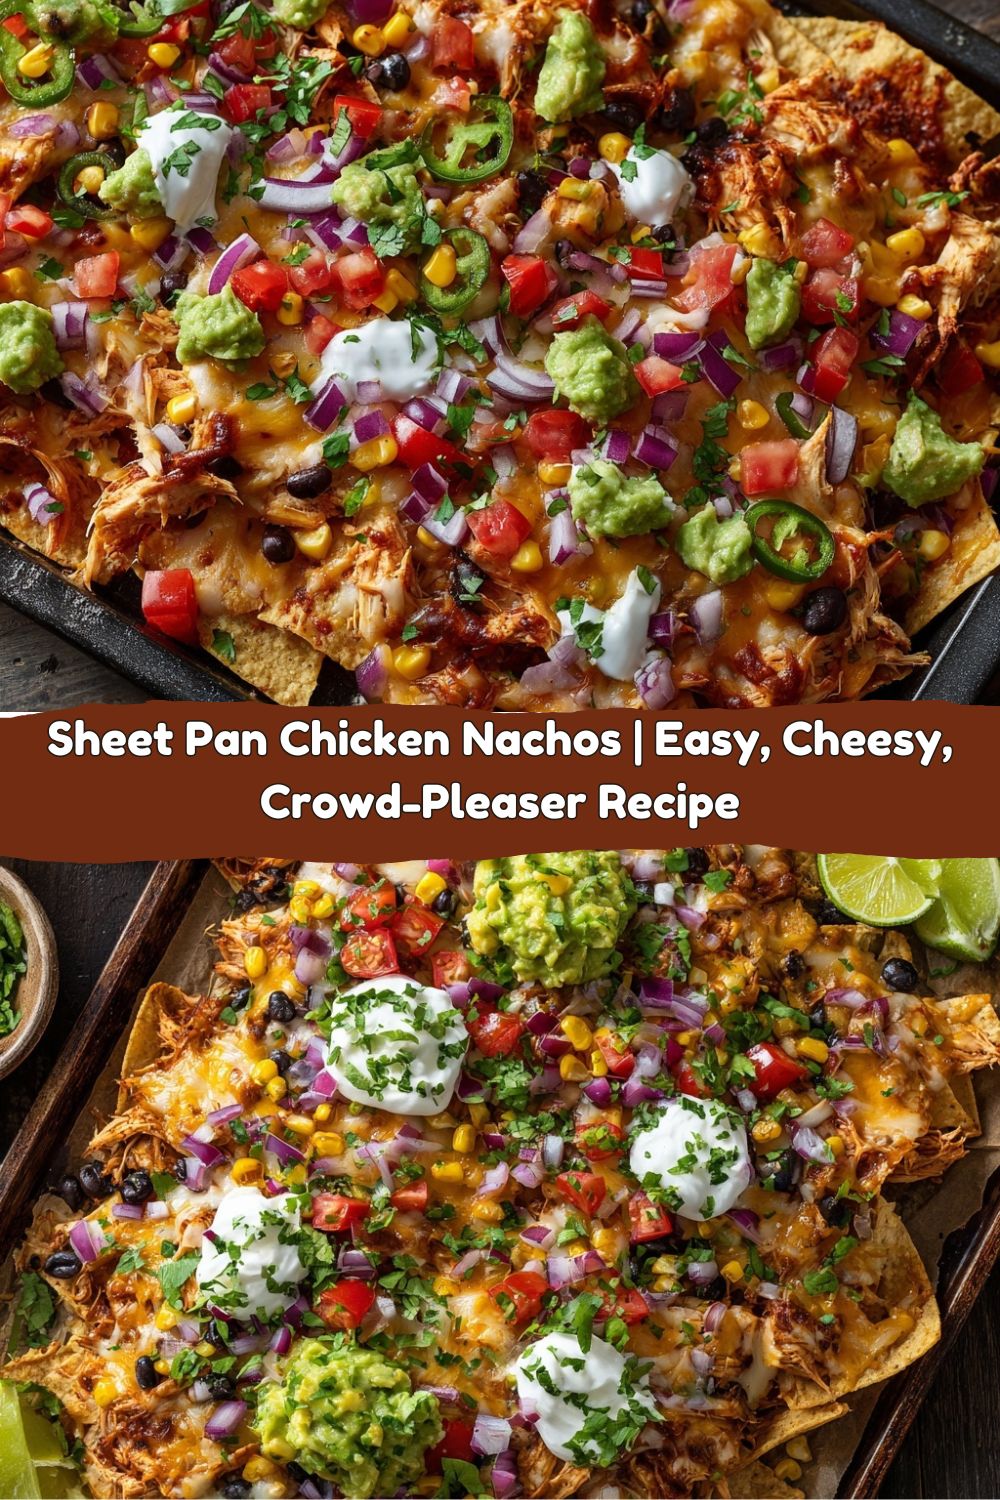
This isn’t just a snack; it’s a customizable, crispy, cheesy, fully-loaded experience baked right onto one pan. We’re talking layers of salty tortilla chips, juicy shredded chicken, hearty black beans, and a blanket of melty cheese that gets all bubbly and golden in the oven. Then, we go in with the fresh stuff—the cool, creamy dollops of sour cream, the bright pops of tomato and cilantro, the rich avocado. It’s the perfect meld (see what I did there?) of warm, comforting baked goodness and vibrant, fresh toppings.
The beauty of this recipe is its beautiful chaos. It’s meant to be a little messy, totally hands-on, and 100% adaptable to whatever you love or whatever you’ve got in the fridge. It’s the dinner that says “party,” even if the party is just you and your favorite movie on the couch. So, grab your biggest sheet pan, crank up the tunes, and let’s cook something awesome—and incredibly easy—together.
My Nacho Epiphany: How a Messy Kitchen Lead to the Best Game Day Ever
I have to tell you about the moment these nachos became a permanent fixture in my life. It was a few years back, during a particularly tense football game with my college buddies. We were all crammed into my little apartment kitchen, everyone shouting at the TV, and I was frantically trying to fry individual tortilla chips for nachos like some kind of short-order cook. It was a disaster zone—grease splatters everywhere, chips burning, and I was missing all the good plays!
In a moment of pure, hungry desperation, I looked at the pile of leftover rotisserie chicken, the half-eaten bag of tortilla chips, and the blocks of cheese in my fridge. I thought, “What if we just… threw it all on a pan and let the oven do the work?” I dumped everything onto a baking sheet, layered it haphazardly, and shoved it in. Ten minutes later, I pulled out this glorious, golden, melty masterpiece. The kitchen went silent (a miracle), then erupted in cheers. We gathered around the pan, everyone digging in with their hands, no plates needed. It was messy, it was communal, and it was absolutely unforgettable. That’s when it hit me: the best food isn’t about perfection; it’s about flavor, fun, and bringing people together. These sheet pan nachos are that philosophy, served straight from the oven.
Gathering Your Flavor Arsenal: What You’ll Need
Here’s the lineup for our flavor fiesta. The best part? This is a guideline, not a rulebook. Use what you love!
- 1 bag (12-13 oz) Sturdy Tortilla Chips: This is your foundation! Go for a thicker, restaurant-style chip. They hold up to the toppings without turning to mush. Chef’s Insight: A slightly stale chip is actually perfect here—it crisps up even better!
- 2 cups Cooked, Shredded Chicken: The ultimate time-saver. A store-bought rotisserie chicken is your best friend here. Shred it with your hands or two forks. Substitution Tip: No chicken? Ground beef (browned with taco seasoning), pulled pork, or even seasoned lentils work amazingly.
- 1 cup Black Beans, rinsed & drained: For protein and a creamy, earthy texture. That quick rinse gets rid of the excess sodium and starchy can liquid. Chef’s Insight: Pinto beans or even refried beans (dolloped on) are fantastic swaps.
- 1 ½ cups Shredded Cheese: The glue that holds our fiesta together! A pre-shredded Mexican blend is easy, but shredding a block of sharp cheddar or pepper jack yourself melts smoother. Pro Move: Use a mix! Cheddar for sharpness, Monterey Jack for meltiness.
- ½ cup Corn (optional): I love the sweet pop it adds. Frozen (thawed) or canned (drained) works. Fire-roasted corn is a next-level flavor boost.
- ½ Red Onion, finely diced: They add a necessary sharp, crunchy bite that cuts through all the richness. Soaking the diced onion in cold water for 5 minutes takes the raw edge off if you prefer.
- 1 Jalapeño, thinly sliced (optional): For heat! Leave the seeds in for more fire, take ’em out for a milder kick. Substitution Tip: A few shakes of your favorite hot sauce in the layers works too.
- Olive Oil Spray, Salt & Pepper: The simple essentials. A light spray helps the top layer of chips get extra golden and crispy.
For The Fresh Toppings (Add AFTER Baking):
- Diced Tomatoes, Avocado/Guacamole, Sour Cream or Greek Yogurt, Chopped Cilantro, Salsa, Lime Wedges: This is where you make it yours! The cool, fresh contrast to the hot, cheesy base is non-negotiable. Don’t skip it!
Building Your Nacho Masterpiece: Step-by-Step
Ready? Let’s build some edible architecture. It’s so simple, you’ll have it memorized after one try.
- Heat Things Up: Preheat your oven to 400°F (200°C). This is the perfect temp to melt cheese quickly and crisp the chips without burning them. Line your largest, heaviest sheet pan with parchment paper or foil. Chef’s Hack: The liner isn’t just for easy cleanup—it prevents any sneaky cheese drips from welding themselves to your pan forever.
- The First Layer is Key: Grab a handful of chips and scatter them in a mostly single layer on the pan. We’re creating a sturdy base. Now, take half of your chicken, beans, corn, onion, jalapeño, and cheese. Sprinkle them evenly over this first chip layer. Think of it like topping a pizza—you want a little bit of everything in every bite. Pro Tip: Avoid huge piles of any one ingredient in a single spot to prevent dreaded “sog zones.”
- Repeat for Glory: Add a second layer of chips right on top. Then, pile on the remaining half of your chicken, beans, corn, onion, jalapeño, and cheese. This double-decker method ensures every chip gets in on the action. Give the whole pan a very light mist with olive oil spray and a tiny pinch of salt and pepper. This encourages ultimate crispiness.
- Bake to Bubbly Perfection: Slide that loaded pan into your hot oven. Set a timer for 10-12 minutes. You’re waiting for that magical moment: the cheese is fully melted, bubbly, and just starting to get a few golden-brown spots, and the edges of the chips are looking toasty. Do not walk away! Ovens vary, and chips can go from perfect to burned in a minute. When it looks irresistible, it’s done.
- The Grand Finale (Do Not Skip!): Carefully pull the pan out of the oven—remember, the pan is HOT. Now, and only now, do we add our fresh toppings. Scatter the diced tomatoes, dollop guacamole and sour cream, sprinkle cilantro, and add lime wedges on the side for squeezing. This keeps the fresh toppings bright and crisp, not wilted and warm.
How to Serve These Bad Boys: Fiesta Rules Apply
Presentation here is part of the fun. You have two excellent options, both with a 10/10 on the cool factor.
Option 1: The Centerpiece. Place the entire, still-hot sheet pan right in the middle of your table or coffee table. Lay out some forks (for the polite folks) and napkins (a LOT of napkins). Let everyone gather ’round and dig in straight from the pan. This creates an instant, communal party vibe. It’s messy, interactive, and tells everyone the fun has officially started.
Option 2: The Plated Power Move. Use a big spatula to lift out sections of the nachos onto individual plates or shallow bowls. Try to get all the glorious, cheesy layers in each serving. Then, let people personalize their own plate with extra fresh toppings from little bowls you’ve set out—salsa bar style! This is great for a slightly more organized gathering or if you want to make sure everyone gets a perfect mix of chips, chicken, and beans.
No matter how you serve it, cold drinks are mandatory. I’m talking icy-cold Mexican beer, tangy margaritas, or a big pitcher of agua fresca. The cool liquid is the perfect partner for the bold, cheesy, sometimes-spicy flavors.
Make It Your Own: 5 Killer Nacho Twists
The canvas is yours! Here are some of my favorite ways to riff on this classic.
- BBQ Chicken Ranch: Swap the chicken for shredded BBQ chicken. Use a colby jack cheese blend. After baking, top with a drizzle of extra BBQ sauce, dollops of ranch, and thinly sliced green onions. Game changer.
- Breakfast Nachos: Yes, for breakfast! Use seasoned breakfast sausage or chorizo instead of chicken. Scramble a few eggs and sprinkle them on in the last 2 minutes of baking. Top with pico de gallo, avocado, and a drizzle of hot sauce. The best savory brunch ever.
- Fully Loaded Veggie: Skip the meat entirely. Add extra black beans, roasted sweet potatoes (diced small), sautéed bell peppers and onions, and roasted corn. The heartiness from the beans and potatoes makes it a super satisfying meal.
- Buffalo Blue Cheese: Toss your shredded chicken in buffalo sauce before layering. Use a mozzarella and blue cheese crumble mix. After baking, top with extra blue cheese crumbles, sliced celery, and a drizzle of ranch or blue cheese dressing.
- Hawaiian Luau: Use pulled pork or diced ham. Add drained crushed pineapple to the layers (trust me!). Use a Monterey Jack cheese. Top after baking with chopped cilantro and a sweet chili sauce drizzle for a sweet, spicy, salty combo.
Jackson’s Kitchen Notes: The Evolution of a Nacho
I’ve made these nachos probably a hundred times since that first chaotic game day, and they’ve evolved in the best ways. I used to be so precious about arranging each chip perfectly. Now? I literally just grab the bag and pour. The haphazard layers create more nooks and crannies for cheese to pool—a very good thing.
One funny fail: I once tried to add the sour cream BEFORE baking because I was in a rush. Big mistake. It separated and created a weird, greasy puddle. Lesson learned: patience with the fresh toppings pays off!
The biggest tip I can give you is to taste your chips before you start. Some brands are saltier than others. If they’re already very salty, you can skip the extra pinch of salt before baking. Cooking is about tasting and adjusting, even before the oven is on!
Nacho FAQs: Solving Your Crispy Cheese Dilemmas
Q: My nachos always get soggy in the middle. What am I doing wrong?
A: The sog is almost always caused by two things: 1) Over-topping a single spot, and 2) Wet ingredients. Make sure your beans and corn are thoroughly drained. Spread your toppings evenly in light layers (hence the two-layer method!). And never add salsa or other wet sauces before baking—those are for after.
Q: Can I make any part of this ahead of time?
A: Totally! Shred your chicken, dice your onions, rinse your beans, and shred your cheese ahead of time. Store them in separate containers in the fridge. When you’re ready, just assemble and bake. The actual baking must be done last-minute for optimal crispness.
Q: My cheese isn’t melting nicely. Help!
A: Pre-shredded cheese is coated to prevent clumping, which can also hinder melt. For the dreamiest, ooiest-gooiest melt, buy blocks and shred them yourself. It makes a noticeable difference! Also, ensure your oven is fully preheated.
Q: How do I store and reheat leftovers?
A: Honestly, leftover nachos are never quite the same. But if you must, pick off the major toppings and store the cheesy chip base in an airtight container. Reheat on a sheet pan in a 350°F oven for 5-7 minutes to re-crisp, then re-top with fresh ingredients.
Nutritional Breakdown (Because Knowledge is Power!)
Okay, let’s talk real talk. This is a fun, indulgent dish, and that’s awesome. Here’s a general idea of what you’re getting per serving (based on about 1/6th of the recipe, using the ingredients listed and standard measurements). Remember, your mileage may vary based on your specific brands and how generously you top!
Approximate Per Serving: 390 calories | 22g protein | 18g fat | 32g carbohydrates | 6g fiber | 4g sugar.
The protein from the chicken and beans makes this surprisingly satisfying as a meal, not just a snack. To lighten it up a bit, you can: use baked tortilla chips, opt for reduced-fat cheese (though it won’t melt quite as well), load up on the fresh veggie toppings, and use Greek yogurt instead of sour cream for a protein-packed tang. But my philosophy? Enjoy the real, flavorful version, savor every messy bite, and just balance it out with your other meals. Food is joy, too!
Your Turn to Build a Flavor Fiesta
And there you have it, friends—my not-so-secret, totally dependable, always-impressive formula for the ultimate Sheet Pan Chicken Nachos. This recipe is less of a rigid instruction manual and more of a permission slip: permission to keep dinner simple, to make a glorious mess, to feed a crowd without stress, and to absolutely drown a tortilla chip in all your favorite things.
I want you to take this blueprint and run with it. Raid your fridge. Use that leftover taco meat. Try that weird cheese you’ve been curious about. The goal is to create something that makes you and the people you feed genuinely happy. That’s what Food Meld is all about.
So, preheat that oven, grab your sheet pan, and let’s make some memories—one cheesy, crunchy, loaded bite at a time. Don’t forget to tag me @FoodMeld when you create your masterpiece! I can’t wait to see what you come up with.


