
Santa Hat Cheesecake Bites: Your New Favorite Holiday Party Trick!
Hey friends, Jackson from Food Meld here! Can you smell it? That’s the smell of gingerbread, pine trees, and pure, unadulterated holiday magic creeping into the air. And you know what that means—it’s officially time to start planning your party menus. But let’s be real: between shopping, decorating, and trying to remember where you stored the good wrapping paper last January, who has time for a complicated, fussy dessert?
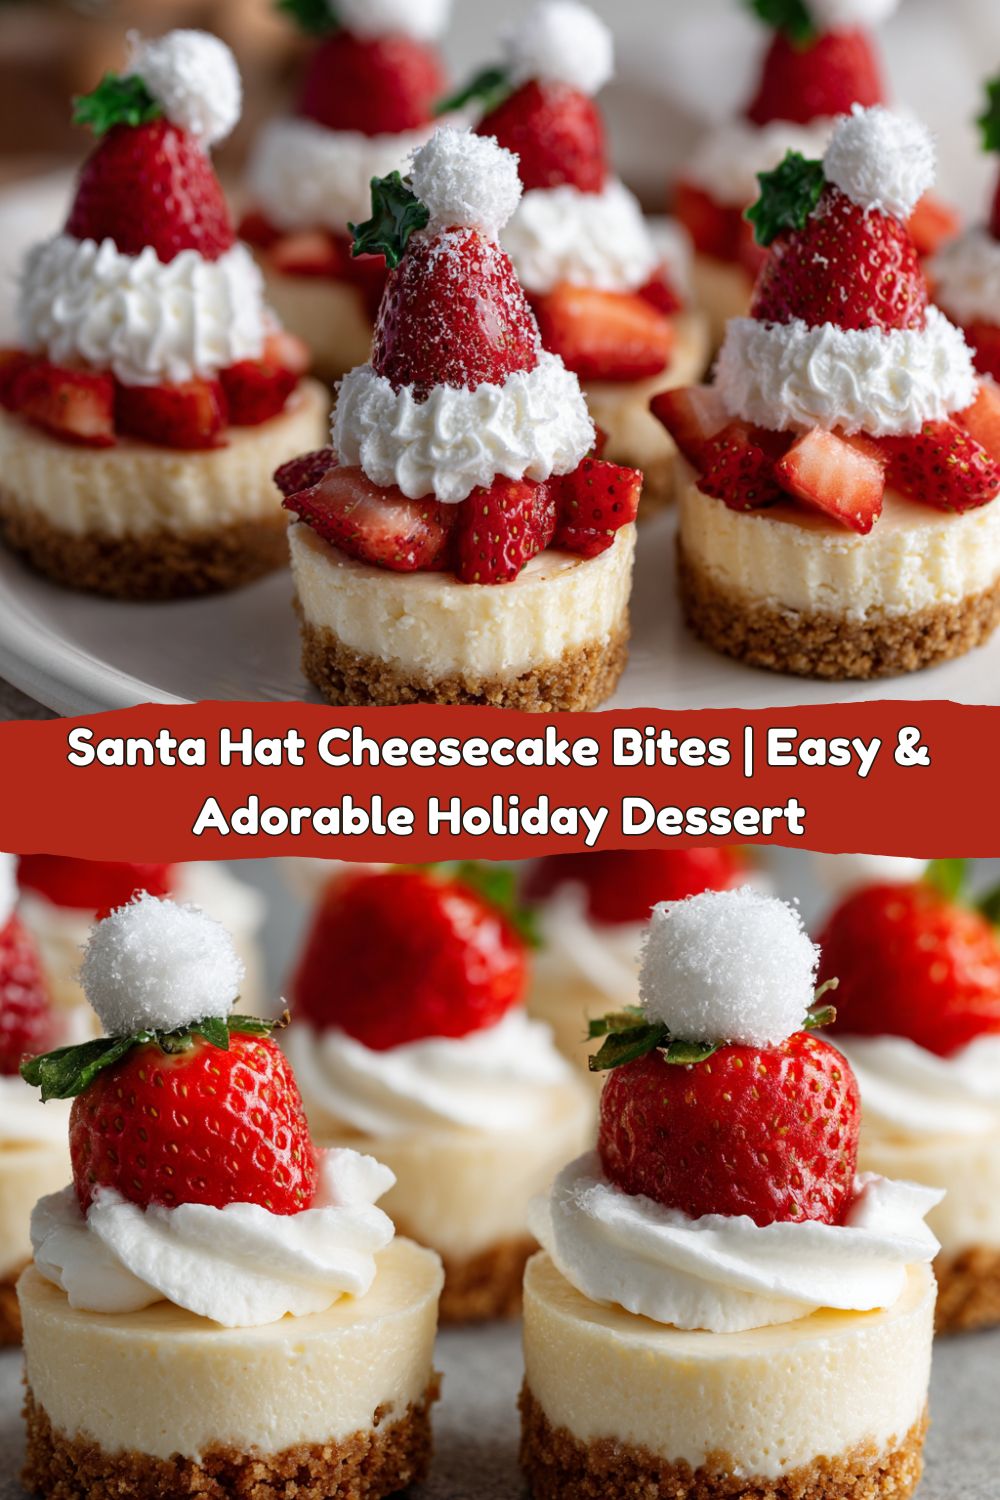
That’s exactly why I’m so obsessed with these Santa Hat Cheesecake Bites. We’re talking about miniature, no-bake-ish cheesecakes that are ridiculously easy to make, incredibly adorable, and so delicious they’ll disappear faster than cookies left out for Santa. They’re the perfect little treat for holiday parties, cookie exchanges, or just to make a random Tuesday in December feel a little more special. They’re fun to make with kids, absolutely foolproof for beginner bakers, and impressive enough that your foodie friends will be begging you for the recipe. So, let’s put on our favorite holiday playlist, grab our mixing bowls, and cook something awesome together. Welcome to the most fun you’ll have in the kitchen this season!
A Christmas Kitchen Memory
This recipe takes me right back to my grandma’s kitchen, which during the holidays was less of a kitchen and more of a festive, flour-dusted command center. My job, from the time I could see over the counter, was always Dessert Duty. One year, we were making a big, beautiful strawberry cheesecake for Christmas Eve dinner. I was in charge of the strawberry topping and, let’s just say, my enthusiasm outweighed my precision. I ended up with a bowl of brilliantly red, but utterly mashed, berries. It was more of a sauce than a topping.
Instead of getting frustrated, my grandma just laughed her warm, full-belly laugh. She looked at my red-stained apron and the bowl of berry pulp and said, “Well, Jackson, we can’t put that on top of the big cake. But we can’t let it go to waste. What else can we make?” We ended up whipping up a quick batch of mini cheesecakes in a muffin tin, spooning my “mistake” strawberry sauce over them, and calling them “Elf Cap Cupcakes.” They were a huge hit. These Santa Hat Bites are the polished, way-prettier grandchild of that kitchen save. They remind me that the best dishes often come from a little creativity and a willingness to just go with the flow—and that’s the kind of energy I want to bring to your kitchen, too.
Gathering Your Flavor Arsenal
Part of what makes these bites so magical is their simplicity. You only need a handful of ingredients to create something truly spectacular. Here’s your shopping list, with a little chef-ly wisdom for each one.
- 1 cup graham cracker crumbs – This is our foundation, our crunchy, buttery base. Chef’s Insight: You can buy pre-crumbed crackers, but smashing a sleeve of whole crackers in a zip-top bag with a rolling pin is a fantastic way to work out any pre-holiday stress. For a fun twist, try using ginger snaps or vanilla wafers!
- 3 tbsp melted butter – This is the glue that holds our crust together. Unsalted is best so we can control the saltiness, but salted will work in a pinch—just maybe ease up on any added salt elsewhere.
- 2 tbsp sugar – A little sweetness for the crust to complement the tangy cheesecake.
- 8 oz cream cheese, softened – This is non-negotiable! Take it out of the fridge at least an hour before you start. Room temp cream cheese blends into a silky-smooth filling without any lumps. Cold cream cheese will leave you with a chunky, sad batter. Full-fat is highly recommended for the creamiest texture.
- ¼ cup sugar – Just enough to sweeten the deal without overpowering the classic cheesecake flavor.
- 1 tsp vanilla extract – The secret weapon. Pure vanilla extract adds a warm, deep flavor that imitation vanilla just can’t match.
- 1 large egg – This gives the filling structure and helps it set into that perfect, creamy consistency. Make sure it’s at room temperature to blend seamlessly.
- Fresh strawberries, hulled – Look for berries that are uniform in size, bright red, and have a classic Santa Hat shape—not too long and skinny, not too short and fat. The hull is the green stem part; you’ll want to slice that end off flat so the berry can stand up straight on the cheesecake.
- Whipped cream or whipped topping – This is the fluffy white fur trim on Santa’s hat! You can use homemade whipped cream (which is divine) or a good-quality store-bought whipped topping for extra stability, especially if these are sitting out for a while.
Building Your Edible Masterpiece
Alright, team, let’s get building. This process is simple, but a few pro-tips will make sure your bites are absolutely perfect. Read through these steps first—you’ve got this!
Step 1: Preheat your oven to 325°F (163°C). This is the sweet spot for baking cheesecake—hot enough to cook, but gentle enough to prevent cracking. Line a mini muffin tin with paper liners. Trust me, the liners are your best friend for easy removal and clean-up.
Step 2: In a medium bowl, mix your graham cracker crumbs, melted butter, and that 2 tablespoons of sugar. You’re looking for a texture that resembles wet sand—it should hold together when you pinch it. Chef’s Hack: I use a small, flat-bottomed shot glass or the back of a measuring spoon to press the crumbs firmly into the bottom of each liner. A tight pack means a solid crust that won’t fall apart when you take a bite.
Step 3: Now, for the filling! In another bowl, beat your softened cream cheese, 1/4 cup sugar, and vanilla extract with a hand mixer or stand mixer until it’s completely smooth and creamy. No lumps allowed! Scrape down the sides of the bowl to make sure everything is incorporated. Now, add the egg. Beat it on low speed just until the yolk disappears. Over-beating at this stage incorporates too much air, which can lead to puffing and cracking in the oven.
Step 4: Spoon or pipe the filling over your crusts, filling the liners almost to the top. A piping bag is neat, but a small cookie scoop or two spoons work just fine. Give the tin a gentle tap on the counter to release any air bubbles trapped underneath.
Step 5: Bake for 12-15 minutes. The edges might look set, but the centers should still have a little jiggle to them—like Jell-O. That’s perfect! They’ll firm up as they cool. This is the key to a creamy, not rubbery, texture. Let them cool completely in the pan on a wire rack, then transfer them to the refrigerator to chill for at least 2 hours, but preferably overnight. This patience is the hardest part, I know!
Step 6: The grand finale! Right before serving, place a hulled strawberry, cut-side down, on top of each chilled cheesecake bite. Then, pipe or dollop a generous bit of whipped cream around the base of the strawberry to create the hat’s fluffy white trim. Add one tiny dollop on the very tip of the berry to finish the hat. And voilà! You’re a holiday dessert hero.
How to Serve These Adorable Bites
Presentation is half the fun with these little guys! For a holiday party, arrange them on a festive platter or a tiered stand so everyone can see their cute little Santa faces. You can even dust the platter with a little powdered sugar “snow” for an extra magical touch.
If you’re packaging them for a cookie swap or as a gift for neighbors, place them in a clear cellophane bag tied with a red or green ribbon. They travel beautifully and are guaranteed to bring a smile. For kids (and let’s be honest, adults too), I love serving them on a plate with a glass of cold milk, a cup of rich hot chocolate, or even a glass of sparkling prosecco for the grown-ups. The creamy, tangy cheesecake pairs wonderfully with the sweet berry and the light, airy whipped cream. It’s a perfect bite.
Mix It Up! Creative Twists on the Classic
One of my favorite things about this recipe is how adaptable it is. Feel free to get creative and make it your own!
- Chocolate Lover’s Dream: Swap the graham cracker crust for an Oreo cookie crust! Use about 1 1/4 cups of Oreo crumbs (filling included) and 3 tablespoons of melted butter. The chocolate and strawberry combo is a classic for a reason.
- Peppermint Twist: Add a little holiday spirit to the filling by mixing in 1/4 teaspoon of peppermint extract along with the vanilla. You could even sprinkle a tiny bit of crushed candy cane on the whipped cream for a festive crunch.
- Lemon Berry Brightness: Add a teaspoon of lemon zest to the cheesecake filling for a bright, zingy flavor that cuts through the richness and pairs beautifully with the strawberry.
- White Chocolate Drizzle: Melt some white chocolate and drizzle it over the assembled hats before adding the final whipped cream tip. It adds another layer of sweetness and looks super fancy with minimal effort.
- No-Bake Option: Want to skip the oven entirely? For the filling, mix the softened cream cheese, sugar, and vanilla with 1 cup of cold heavy whipping cream, whipped to stiff peaks. Fold it all together, spoon it over the crusts, and chill until firm. You lose a little of that classic baked cheesecake tang, but gain a super light, mousse-like texture.
Jackson’s Chef Notes
This recipe has become a staple in my holiday lineup, and over the years I’ve learned a thing or two. The first time I made them, I was so excited to decorate that I didn’t let the cheesecakes chill all the way. Let’s just say we had a few “leaning towers of Santa” situations. Patience is key!
Also, a funny story: one year, my nephew decided he was going to be my “sous-chef.” His job was to place the strawberries. He was so meticulous about it, making sure every single one was perfectly straight. He’d pick them up, examine them, and then carefully place them. It took forever, but his pride was worth every extra second. It reminded me that cooking is about the experience, not just the result. So put on some music, pour yourself a drink, and enjoy the process of creating something delightful.
FAQs & Troubleshooting
Q: My cheesecakes cracked! What did I do wrong?
A: Don’t worry! They’ll be covered by a strawberry and whipped cream, so no one will ever know. But for next time, cracking is usually caused by overmixing the batter (which incorporates too much air) or overbaking. Remember, you want that slight jiggle in the center when they come out.
Q: Can I make these ahead of time?
A: Absolutely! That’s one of their best features. You can bake the cheesecake bases (without toppings) up to 2 days in advance. Keep them stored in an airtight container in the fridge. Add the strawberries and whipped cream the day of serving, ideally within a few hours, to prevent the berries from getting soggy or the cream from deflating.
Q: My crust is too crumbly and falls apart. Help!
A: This usually means you need a bit more “glue” (melted butter). The mixture should hold its shape when you pinch it. If it’s dry, add another half tablespoon of melted butter and mix it in.
Q: Can I use frozen strawberries?
A: I don’t recommend it for the topping. Frozen berries release too much water when they thaw, which will make your beautiful Santa hats watery and soggy. Fresh is definitely the way to go for presentation.
Santa Hat Cheesecake Bites
- Total Time: ~2.5 hr
- Yield: ~24 bites
Description
These Santa Hat Cheesecake Bites are a merry mini dessert that’s as cute as it is delicious. Creamy, bite-sized cheesecakes sit on a graham cracker base and are topped with fresh strawberries and whipped cream to create the perfect Santa hat. Ideal for parties, trays, and little hands!
Ingredients
1 cup graham cracker crumbs
3 tbsp melted butter
2 tbsp sugar
For the Cheesecake Filling:
8 oz cream cheese (softened)
¼ cup sugar
1 tsp vanilla extract
1 egg
Toppings:
Fresh strawberries (hulled)
Whipped cream or topping
Instructions
Preheat oven to 325°F (163°C). Line a mini muffin tin with paper liners.
Mix graham crumbs, butter, and sugar. Press 1 tsp into each liner to form crust.
Beat cream cheese, sugar, vanilla, and egg until smooth. Spoon over crusts.
Bake for 12–15 minutes until just set. Cool, then chill at least 2 hours.
Top each with a strawberry and a dollop of whipped cream on top and around the base to form a Santa hat.
- Prep Time: 15 min
- Chill Time: 2 hr
- Cook Time: 15 min
Nutrition
- Calories: 110 / Bite
- Sugar: 7g / Bite
- Fat: 7g / Bite
- Carbohydrates: 10g / Bite
- Protein: 2g / Bite
Nutritional Information*
Okay, let’s be real: these are a holiday treat, and we’re here to enjoy every single bite! But for those who like to keep track, here’s a rough breakdown per cheesecake bite (assuming a yield of 24).
- Calories: 110
- Total Fat: 7g
- Saturated Fat: 4g
- Carbohydrates: 10g
- Sugar: 7g
- Protein: 2g
*Please note: This is an estimate based on the specific ingredients I used. Values can vary greatly depending on the brands you choose and any substitutions you make (like using low-fat cream cheese or a sugar alternative).
Final Thoughts
Well, that’s it, friends! Your guide to creating the most adorable, delicious, and downright fun holiday dessert on the block. These Santa Hat Cheesecake Bites are more than just a recipe; they’re a little bite of joy, a conversation starter, and a surefire way to spread some holiday cheer.
I hope this recipe gives you the confidence to get into the kitchen and create something unforgettable. Remember, it doesn’t have to be perfect. Maybe your whipped cream trim is a little messy, or your strawberries are all slightly different sizes. That’s the charm of homemade food! It’s made with love, and that’s the most important ingredient of all.
I’d love to see your creations! If you make these, tag me on social @FoodMeld and use the hashtag #FoodMeld. Nothing makes me happier than seeing you guys enjoying these recipes. From my kitchen to yours, happy holidays and happy baking!


