
Ditch the Sad Desk Lunch: Meet Your New Favorite Meal Prep
Hey friends, Jackson from Food Meld here. Let’s be real for a second. How many times have you stared into the fridge at noon, feeling that familiar dread? You’re hungry, you want something good for you, but the thought of assembling a complicated salad feels like climbing a mountain. Or worse, you’ve tried the meal-prep thing, only to open a container on Wednesday to a sad, soggy mess of what used to be greens.
I’ve been there. We’ve all been there. And that’s exactly why I’m so dang excited to share this recipe with you today. This isn’t just another salad. This is a game-changer. This is my Meal-Prepped Quinoa Chickpea Salad Jar, and it’s about to become your lunchtime best friend.
Imagine this: layers of colorful, crunchy veggies, fluffy protein-packed quinoa, and my secret weapon—crazy-crispy, air-fried chickpeas—all hanging out in a perfect little mason jar universe. The magic is in the layering. We keep the dressing at the bottom, away from the delicate greens and crunchy bits, so everything stays fresh, crisp, and absolutely delicious for days. When you’re ready to eat, you just give it a shake, pour it into a bowl, and boom. You’ve got a restaurant-worthy, power-packed lunch that’s as beautiful as it is tasty. It’s vegan, it’s loaded with good stuff, and it proves that healthy eating doesn’t have to be boring or complicated. Let’s build something awesome together.
The Jar That Started It All: A Little Backyard Inspiration
This recipe takes me right back to one sweltering summer afternoon. My buddy Ben and I were getting ready for a big hiking trip, and we needed lunches we could just grab and go. We’re talking zero prep at the trailhead, maximum flavor and energy. We started throwing things in jars—leftover quinoa, some beans, whatever veggies were in the crisper. It was a “what if we tried this?” moment, for sure.
The real turning point was the chickpeas. I had a can open and thought, “What if we made these crunchy?” A quick toss in some paprika and garlic powder, a few minutes in the air fryer, and we created a topping so good we were eating them straight off the tray. When we layered those crispy little gems on top of the jar, it was a revelation. On the trail, sitting on a big rock overlooking a valley, we shook up our jars and dug in. The crunch was still there, the veggies were still snappy, and it was a million times better than any pre-packaged trail mix. That’s the spirit I want to bring to your kitchen—a little experimentation leading to a seriously unforgettable meal.
Gather Your A-Team: What You’ll Need
Here’s the lineup for this flavor party. The beauty of this recipe is its flexibility, so don’t stress if you’re missing an item or two—I’ve got substitution ideas for you.
- For the Green Herb Vinaigrette (or 2-3 tbsp of your favorite store-bought):
- ¼ cup Extra Virgin Olive Oil: The base of our dressing. A good, fruity olive oil makes all the difference here.
- 2 tbsp Fresh Lemon Juice: For that bright, zesty kick. Fresh is best! In a pinch, red wine vinegar works great too.
- 1 tbsp Fresh Parsley, finely chopped: Adds a fresh, clean herbaceous note. Don’t have parsley? Cilantro or dill would be fantastic.
- 1 small Garlic Clove, minced: For a little pungent backbone. If you’re not a garlic fan, a teaspoon of Dijon mustard adds great flavor and helps emulsify the dressing.
- Salt and Freshly Cracked Black Pepper: Season to taste, friends! This is non-negotiable for waking up all the flavors.
- For the Jar Layers (from bottom to top):
- ½ cup Cooked Quinoa, cooled: Our hearty, protein-packed base. I love the nutty flavor, but couscous or even brown rice would be a solid swap.
- ¼ cup Kidney Beans, rinsed and drained: Adds creaminess and even more plant-based protein. Black beans or chickpeas work just as well.
- ¼ cup Corn Kernels (fresh, frozen/thawed, or canned): A pop of sweet, sunny flavor. If you have the time, charring fresh corn in a dry skillet is a next-level move.
- ¼ cup Chopped Red & Orange Bell Pepper: For color, crunch, and a sweet flavor. Yellow pepper or even some diced jicama would add a similar crunch.
- ¼ cup Diced Cucumber: The ultimate refresher. I like English cucumbers for fewer seeds, but any will do!
- 2-3 Sliced Radishes: Adds a beautiful peppery bite and fantastic color. Thinly sliced red onion would also bring that sharp, zingy flavor.
- ¼ cup Crispy Roasted or Air-Fried Chickpeas: The crowning glory! Toss canned chickpeas (dried well!) with a drizzle of olive oil, paprika, garlic powder, and salt. Air fry at 400°F (200°C) for 12-15 minutes or bake at 425°F (220°C) for 20-25 minutes until golden and crispy.
Let’s Build This Flavor Tower: Your Step-by-Step Guide
Okay, let’s get our hands dirty—or in this case, keep them clean while we assemble some art! This process is all about strategy. We’re building a fortress against sogginess.
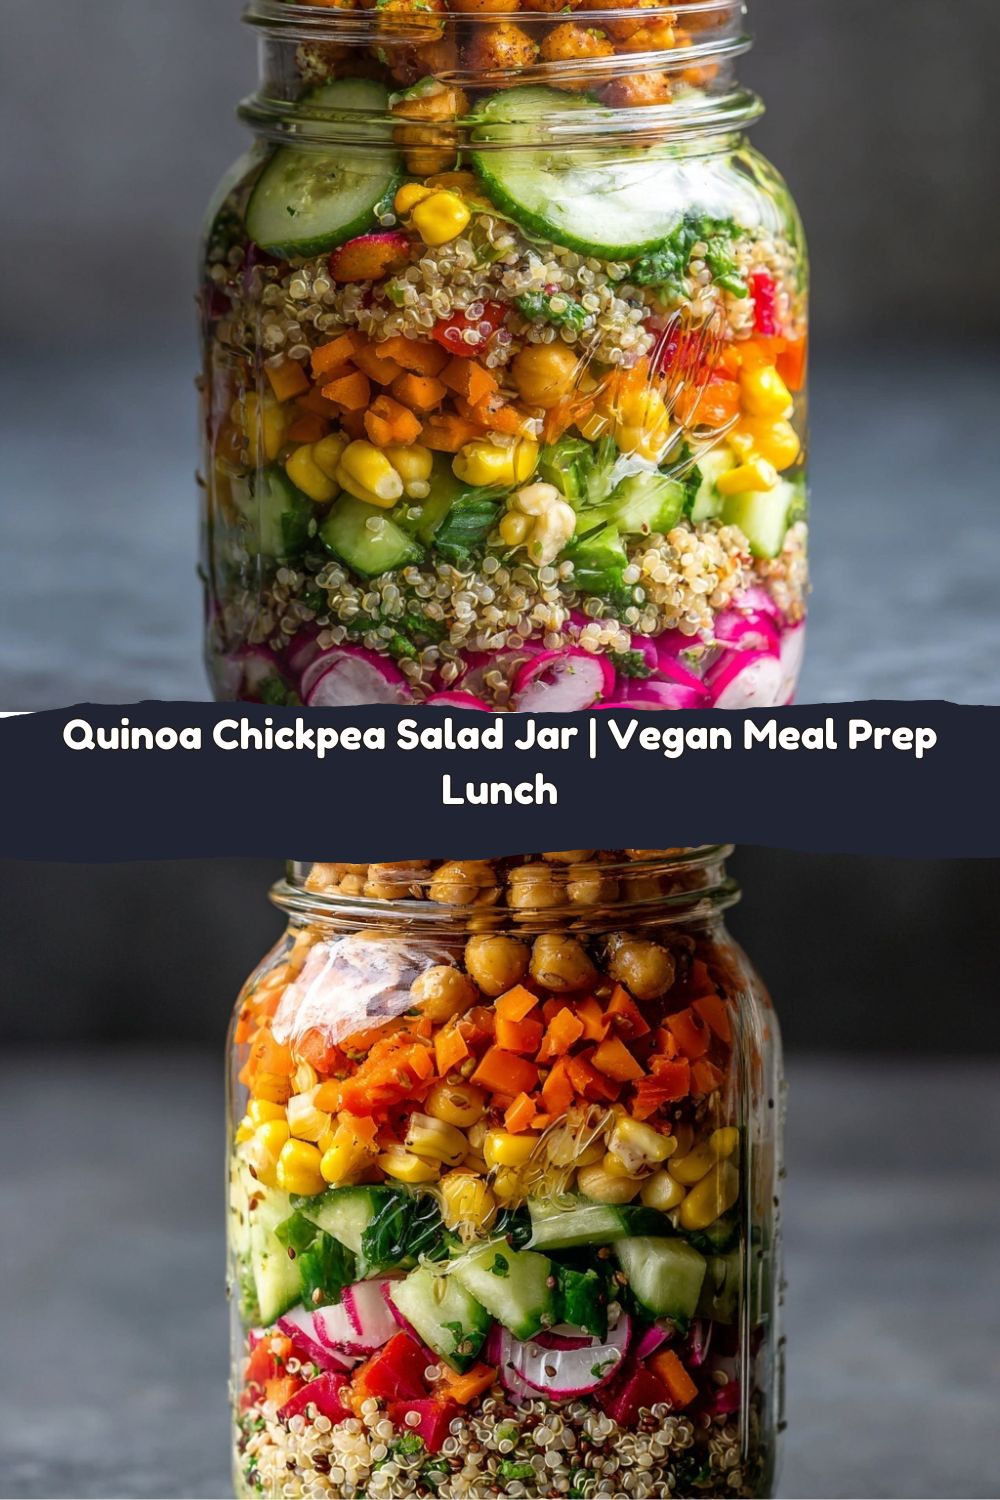
- Start with the Dressing: Grab your wide-mouth mason jar (the wide mouth is key for easy layering and eating!). Pour your 2-3 tablespoons of homemade or store-bought green herb vinaigrette right into the bottom. This is our foundation. Chef’s Hack: If you’re using a store-bought dressing that’s a bit thick, give it a little whisk with a splash of water or lemon juice to thin it out. This helps it coat everything more evenly later.
- Layer the Hearty Stuff: Now, gently spoon your cooled quinoa directly over the dressing. Pat it down lightly to create a solid, fluffy barrier. Next, add your kidney beans. This double layer is our soggy-veg shield, making sure the dressing stays put until you’re ready for it.
- Pile on the Colorful Veggies: Here’s where the party gets started! Layer in your corn kernels, followed by the cheerful chopped bell peppers, the refreshing diced cucumber, and finally, the peppery sliced radishes. Pack them in, but don’t smash them—we want to keep their structural integrity. You’ll see the rainbow forming, and that’s when you know it’s going to be good.
- The Grand Finale: The Crispy Chickpeas: This is my favorite part. Carefully place your crispy, seasoned chickpeas right on top. Do not stir them in! We’re keeping them high and dry, away from any potential moisture, so they retain their incredible crunch until the very moment you’re ready to eat.
- Seal and Store: Screw the lid on tightly, pop it in the fridge, and give yourself a pat on the back. You’ve just prepped lunch for the next few days. These jars will stay perfect for 3-4 days. When hunger strikes, just grab, shake, and pour into a bowl to enjoy all those beautiful, separate layers together in one glorious bite.
How to Serve It Up & Make It Shine
You’ve done the hard work, now for the fun part—eating! The classic method is the “shake and pour.” It’s satisfying, it mixes everything perfectly, and it’s the whole point of the jar. But let’s talk about taking it up a notch.
If you’re home and want to make it feel like a special café lunch, pour the contents of the jar over a bed of fresh baby spinach or arugula. The residual dressing will lightly wilt the greens, creating a brand new salad base. You can also crumble some vegan feta or dairy-free cheese on top for a creamy, salty element. A sprinkle of sunflower seeds or chopped almonds adds another layer of texture and healthy fats. And if you’re feeling a little extra (I always am), a few slices of creamy avocado on the side never hurt anybody. It’s your creation—make it yours!
Mix It Up: Creative Twists on the Classic
Once you’ve mastered the basic formula, the jar is your oyster! Here are a few of my favorite ways to mix it up and keep your taste buds guessing.
- Mediterranean Twist: Swap the vinaigrette for a lemon-tahini dressing. Use chickpeas in the bean layer instead of kidney beans, and add in some chopped Kalamata olives, diced red onion, and a sprinkle of dried oregano.
- Southwest Fiesta: Change up the dressing with a creamy cilantro-lime ranch. Use black beans instead of kidney beans, add a spoonful of salsa to the quinoa layer, and top with a sprinkle of toasted cumin seeds along with your crispy chickpeas.
- Greek Goddess Style: A classic Greek dressing is perfect here. Keep the chickpeas, add diced tomatoes and cucumbers, and include some thinly sliced red onion and a few pepperoncini for a tangy kick.
- For the Herb Lovers: Mix a huge handful of fresh, soft herbs like mint, dill, and parsley right into the quinoa layer. It will infuse the whole jar with an incredibly fresh, aromatic quality.
- Add More Protein: While this salad is already packed with plant-based protein, you can absolutely add grilled chicken, shrimp, or flaked salmon for a non-vegan option. Just add it in the “hearty” layer with the quinoa and beans.
Jackson’s Chef Notes & Kitchen Confessions
This recipe has become a staple in my own kitchen, and it’s evolved in the funniest ways. I once, in a serious pre-coffee haze, tried to layer one starting with the chickpeas at the bottom. Let’s just say I created a chickpea brick and learned a valuable lesson about physics and salad. The order matters, people!
Over time, I’ve found that letting the jars sit for at least a few hours before eating is actually a good thing. The dressing has a chance to marinate the quinoa and beans just a little, making them even more flavorful. And don’t be afraid to really pack the veggies in there—the more, the merrier (and the more colorful your lunch will be). This recipe is a template for a happy, healthy lunch. Own it!
Your Questions, Answered!
I’ve gotten a lot of DMs about this recipe, so here are answers to the most common head-scratchers.
- Q: My jar leaked dressing everywhere when I shook it! What gives?
A: Oh no! The culprit is usually an overfilled jar. You need a little air space at the top for the ingredients to move around and mix properly. Also, make sure your lid is on super tight. If it’s still a concern, just pour it into a bowl and mix it with a fork—still delicious!
- Q: Can I use a different grain? I’m not a quinoa fan.
A: Absolutely! This method works with any sturdy grain. Cooked farro, bulgur wheat, couscous, or brown rice are all excellent substitutes. Just make sure they’re cooled completely before layering.
- Q: How long do these jars actually last in the fridge?
A: I find they are at their absolute peak for 3 days. By day 4, the veggies might start to lose a *tiny* bit of their crunch, and the chickpeas can soften. They’re still safe to eat, but the texture won’t be perfect.
- Q: My crispy chickpeas got soft. How can I prevent this?
A: This is the most common one! The key is to make sure they are *completely* cool before you put the lid on. Any residual warmth will create steam in the jar. You can also store a big batch of crispy chickpeas in a separate container and just sprinkle them on top each morning before you head out.
The Good Stuff: A Quick Nutritional Look
Now, I’m a chef, not a dietitian, but I love knowing that what I’m eating is fueling my body. This salad jar is a nutritional powerhouse, and here’s why. That estimated 420 calories is packed with purpose. You’re getting a solid 18 grams of plant-based protein from the quinoa, kidney beans, and chickpeas, which is fantastic for keeping you full and satisfied throughout the afternoon.
The 10 grams of fiber is a huge win for your digestive health and also contributes to that feeling of fullness. The carbs (around 38g) are the good, complex kind that provide sustained energy, not a sugar crash. And the healthy fats (18g) from the olive oil in the dressing help your body absorb all the fat-soluble vitamins from those beautiful colorful veggies. It’s a balanced, energizing meal that truly tastes as good as it makes you feel.
Your New Lunch Routine Awaits
And there you have it! This Quinoa Chickpea Salad Jar is more than just a recipe; it’s a ticket to easier, happier, and more flavorful weeks. It’s proof that with a little strategy and a lot of love for bold ingredients, you can conquer the lunchtime blues for good.
I want to see your creations! When you make these jars (and I know you will), tag me on Instagram @FoodMeld with #FoodMeld. I love seeing your colorful layers and your own creative twists. It makes my day. Now, go forth, build those jars, and enjoy every single crunchy, zesty, feel-good bite. You’ve got this.
Until next time, let’s cook something awesome together.
– Jackson


