Your New Favorite Fall Obsession Is Here!
Hey friends, Jackson from Food Meld here! Is there anything better than that first crisp, cool day of fall? The air gets a little snappy, the leaves start putting on their fiery show, and suddenly, my brain does one thing and one thing only: it screams PUMPKIN. But we’re not just talking about your standard latte or pie. Nope. Today, we’re taking all that glorious, spiced, comforting flavor and turning it into the most fun-sized, shareable, and downright adorable treat imaginable: Pumpkin Cake Pops.
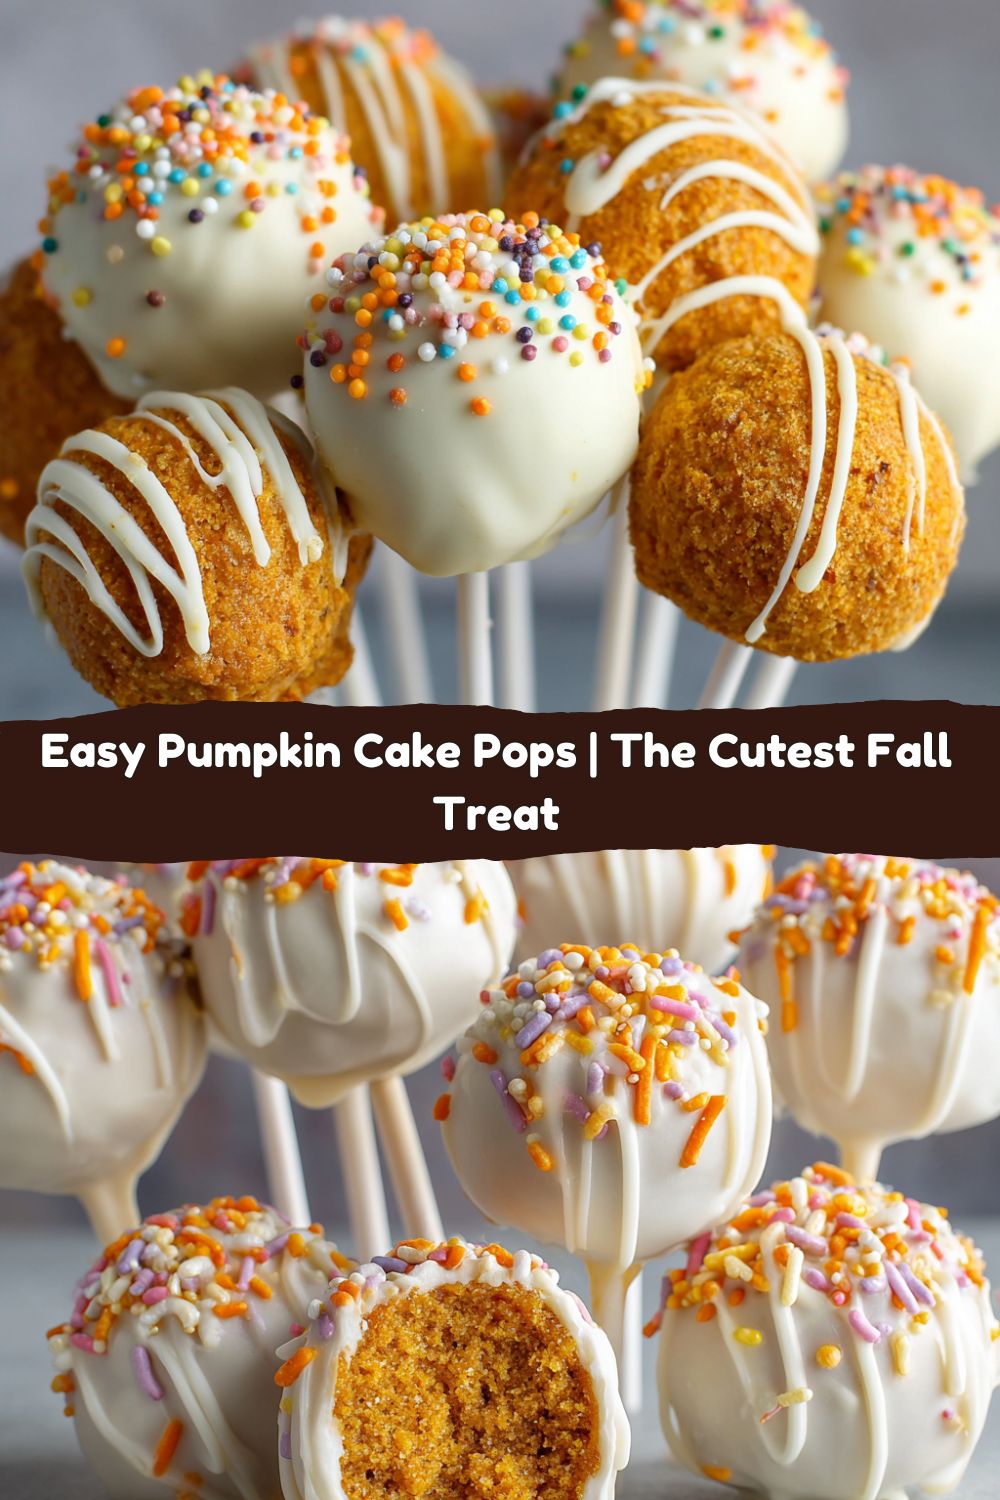
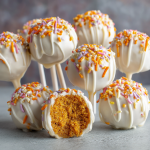
Imagine this: the most tender, moist pumpkin cake you’ve ever had, all crumbled up and mixed with a hint of creamy frosting, rolled into a perfect little bite, and then dunked in a luxurious coat of smooth white chocolate. It’s a party on a stick! They’re the ultimate crowd-pleaser for Halloween parties, a show-stopping addition to your Thanksgiving dessert spread, or just a fantastic reason to turn a regular Tuesday into something a little more special.
The best part? They’re seriously easy to make. I know cake pops can seem a little intimidating—maybe you’ve had a past experience where they turned out too soft, too crumbly, or the coating was a mess. Trust me, I’ve been there. That’s why I’ve tested and tweaked this method to be absolutely foolproof. We’re going to walk through this together, step-by-step, and by the end, you’ll be a cake pop wizard. So, grab your favorite apron, put on some tunes, and let’s cook something awesome together.
A Stick of Nostalgia: Why Cake Pops Rule
You know, my love for cake pops isn’t just about the taste—it’s about the memories. I vividly remember the first time I ever attempted them. It was years ago, right before a big Halloween potluck with my family. My niece, who was about six at the time, had seen some elaborately decorated ones in a bakery window and her eyes just about popped out of her head. “Uncle Jack, can we PLEASE make the cake balls on sticks?!” How could I say no?
Our kitchen looked like a bomb went off. There was cake crumb in places I didn’t know cake crumb could reach. We both had melted chocolate smeared on our cheeks and more sprinkles on the floor than on the actual pops. But the sound of her giggling as she carefully placed orange sprinkles on each one, and the look of pure, unadulterated joy when she presented our (slightly lopsided) creations to the family… that’s the magic. That’s the “why.” These little treats aren’t just dessert; they’re an experience. They’re about getting messy, being creative, and making someone’s day a little brighter. Every time I make a batch now, I think of that day and smile.
Gathering Your Pumpkin Posse: The Ingredients
Here’s the beautiful part: the ingredient list is short, sweet, and simple. This is all about maximizing flavor with minimal fuss. Let’s break it down.
- 1 box pumpkin cake mix (prepared and cooled): This is our secret weapon for incredible flavor and a super-moist crumb without starting from scratch. Chef’s Insight: Make sure your cake is COMPLETELY cooled before you crumble it. I mean, room-temperature, not-a-hint-of-warmth cooled. This prevents the frosting from melting when you mix it in, which is key for the right texture.
- ½ cup cream cheese frosting: The glue that holds our pop together and adds a tangy creaminess that balances the sweet pumpkin spice. Substitution Tip: Don’t have cream cheese frosting? Vanilla or even a spiced buttercream will work in a pinch!
- 12 oz white chocolate or candy melts: For that gorgeous, creamy shell. Chef’s Hack: I highly recommend using high-quality “candy melts” or “confectionery coating” for your first time. They’re specifically formulated to melt smoothly and set firmly, making the dipping process a dream. High-quality white chocolate bars (like Ghirardelli or Baker’s) work too, but you may need to add a teaspoon of coconut oil to help thin it for dipping.
- ½ tsp ground cinnamon (optional): A little extra kick of warm spice never hurt anybody. I always add it!
- Lollipop sticks: You can find these at any craft store or in the baking aisle of most big grocery stores.
- Sprinkles (optional): This is where you get to have fun! Fall-colored jimmies, orange sanding sugar, even tiny pumpkin-shaped sprinkles—go wild!
Let’s Get Rolling: The Foolproof Method
Okay, team. This is where the magic happens. Follow these steps, and you’ll have perfect cake pops every single time.
- Bake & Cool: Prepare your pumpkin cake mix according to the package directions, usually in a 9×13 inch pan. Bake it until a toothpick inserted in the center comes out clean. Now, here’s the hardest part: walk away. Let that cake cool completely on a wire rack. I’m talking a few hours, or even pop it in the fridge to speed things up. Patience here is non-negotiable for the right texture.
- The Crumble: Once your cake is cool, crumble it up into a large bowl. You want fine, even crumbs. No big chunks! I just use my hands—it’s therapeutic. Get in there!
- The Mix-In: Add your ½ cup of cream cheese frosting and the optional cinnamon to the bowl. Now, mix it all together. I start with a spatula and then, you guessed it, finish with my hands. You’re looking for a texture that holds together when you squeeze it, like a soft, moist play-dough. If it’s too dry and won’t hold shape, add a tiny bit more frosting, one tablespoon at a time.
- Shape & Chill: Using a small cookie scoop or a tablespoon, portion out the mixture and roll it into smooth, tight 1-inch balls. Place them on a baking sheet lined with parchment paper. Once they’re all rolled, pop the whole tray into the freezer for about 15 minutes or the fridge for 30. This second chill is CRUCIAL—it firms them up so they don’t fall off the stick when you dip them.
- The Dip: Melt your chocolate or candy melts according to the package instructions. I do this in a tall, narrow mug or glass—it makes dipping so much easier! Now, take your chilled cake balls. Dip the tip of a lollipop stick about ½ inch into the melted chocolate and then immediately insert it into a cake ball, pushing it about halfway through. This chocolate “glue” helps secure the stick. Repeat for all pops. Now, one by one, gently dip a cake pop completely into the melted chocolate, submerging it. Gently tap off any excess coating by lightly tapping your wrist. Pro Tip: Do NOT stir the pop—just dip and tap.
- Decorate & Set: Immediately after dipping, while the coating is still wet, add your sprinkles. Then, stand the pop upright to dry. You can stick the end of the stick into a foam block, a upside-down cardboard box with holes poked in it, or even a colander. Let them set completely at room temperature until the shell is firm.
Showing Off Your Masterpieces
Presentation is half the fun with these guys! For a party, I love sticking a foam block inside a cute Halloween-themed bucket or a small, painted pumpkin and arranging the pops so they look like a festive bouquet. It’s a total centerpiece!
For gift-giving, these are the absolute best. Once they’re fully set, you can wrap them individually in clear cellophane treat bags tied with a cute ribbon. Tuck a few into a gift basket for your hostess, your kid’s teacher, or your neighbor. It’s a little handmade gift that says, “I think you’re awesome.”
And of course, they’re best served with a big ol’ glass of cold milk, a hot coffee, or a steaming mug of apple cider. Enjoy them straight from the stick!
Mix It Up! Creative Twists on the Classic
Once you’ve mastered the basic recipe, the world is your cake pop! Here are a few of my favorite ways to play with the formula.
- The Chocolate Lover: Use a chocolate cake mix instead of pumpkin and mix it with the cream cheese frosting. Dip in dark chocolate and sprinkle with crushed pecans. Boom.
- The Gingerbread Twist: Add ¼ tsp of ground ginger and a pinch of cloves to the cake crumb mixture. Dip in white chocolate and decorate with coarse sparkling sugar.
- The “Extra” Pumpkin: Stir 2 tablespoons of canned pumpkin puree into the cake crumb and frosting mixture for an even more intense pumpkin flavor. Just be mindful of the texture—it should still be rollable.
- Dairy-Free Delight: Use a vegan cake mix and frosting, and dip in dairy-free chocolate chips melted with a tsp of coconut oil.
- The Candy Bar: Roll the cake ball around a surprise center like a small square of caramel or a mini chocolate chip before chilling and dipping.
Jackson’s Chef Notes & Kitchen Confessions
Alright, full disclosure: my first-ever batch of cake pops was a disaster. I was impatient and didn’t chill the cake balls long enough. I went to dip them and they all slid right off the sticks into the chocolate, creating a delicious but utterly useless cake-pop soup. We’ve all been there! The lesson? Respect the chill time. It’s your best friend in this process.
This recipe has evolved into my go-no-fail method. The biggest game-changer was realizing that the melted chocolate on the stick before inserting it acts like culinary superglue. Don’t skip that step! Also, if your coating is too thick, a tiny bit of coconut oil is your best friend for thinning it out. Most of all, remember to have fun with it. They don’t have to be perfect. A slightly lopsided pop made with laughter tastes infinitely better than a flawless one made with stress.
Cake Pop Q&A: Your Questions, Answered
Q: My cake pops are cracking after I dip them! What did I do wrong?
A: This usually happens for one of two reasons: 1) The temperature difference between the cold cake ball and the warm coating was too extreme. Make sure your cake balls are chilled, but not frozen solid. 2) The coating was too thick. Next time, try thinning your melted chocolate with a teaspoon of coconut or vegetable oil before dipping.
Q: Can I make these ahead of time?
A: Absolutely! They are the perfect make-ahead treat. Once fully set, store them in a single layer in an airtight container in the refrigerator for up to a week. You can also freeze them for up to a month! Just thaw in the fridge overnight.
Q: Why did my cake pops fall off the stick into the chocolate?
A: This is the classic cake pop pitfall! It’s almost always because the cake balls weren’t chilled enough, the stick wasn’t pre-dipped in chocolate first, or the coating was too thick, making the pop too heavy. Follow the chilling and dipping steps closely, and you’ll avoid this!
Q: Can I use homemade cake instead of a mix?
A: Of course! You’ll need about 4-5 cups of crumbled pumpkin cake. My from-scratch go-to is a single-layer pumpkin cake recipe. Just ensure it’s not overly oily or wet, as that will make the pops too soft.
Pumpkin Cake Pops (Fall’s Cutest Treat)
- Total Time: 1 hour
- Yield: 24 Cake pops 1x
Description
These pumpkin cake pops are soft, spiced, and dipped in creamy white chocolate. They’re festive, fun to make, and perfect for Halloween, Thanksgiving, or cozy fall snacking. Just the right balance of sweet and seasonal.
Ingredients
1 box pumpkin cake mix (prepared and cooled)
½ cup cream cheese frosting
12 oz white chocolate or candy melts
½ tsp ground cinnamon (optional)
Lollipop sticks
Sprinkles (optional)
Instructions
Bake: Prepare the cake mix according to package directions. Let cool completely.
Mix: Crumble the cooled cake into a large bowl. Add frosting and cinnamon (if using), mix until dough-like.
Shape: Roll into 1-inch balls and chill for 30 minutes.
Dip: Melt chocolate or candy melts. Dip lollipop sticks into chocolate, insert into cake balls, then dip and coat each ball.
Decorate: Add sprinkles immediately and let set on parchment or foam block.
- Prep Time: 30 minutes
- Chill Time: 30 minutes
Nutrition
- Calories: 145 kcal / Pop
- Sugar: 14g / Pop
- Sodium: 120mg / Pop
- Fat: 7g / Pop
- Saturated Fat: 4g / Pop
- Carbohydrates: 19g / Pop
- Protein: 1g / Pop
Nutritional Information
*Please note: This is an estimated nutritional breakdown based on the specific ingredients listed and using the brands I typically use. Your exact values may vary based on the specific products you choose.
Per Cake Pop (approximately):
Calories: 145 kcal
Carbohydrates: 19g
Sugars: 14g
Fat: 7g
Saturated Fat: 4g
Protein: 1g
Fiber: <1g
Sodium: 120mg
Remember, these are a treat! Enjoy them mindfully as part of your fall celebrations.
Go Forth and Create Something Awesome
And there you have it! Your complete guide to creating the most delicious, festive, and fun pumpkin cake pops that are sure to impress everyone who tries them. This is more than just a recipe—it’s an invitation to get creative in the kitchen, to make a little mess, and to create those “you’ve gotta try this!” moments we live for here at Food Meld.
I can’t wait to see what you create. Tag me on Instagram @FoodMeld with your cake pop creations—the pretty ones, the silly ones, the “my-kid-decorated-these” ones. I want to see them all! It’s all about sharing the joy of cooking and celebrating the flavor of the season, together.
Now, go melt some chocolate and make some memories. Talk soon, friends!
– Jackson