Pistachio Layer Cake with Raspberry Jam and Fresh Raspberry Buttercream
Hey there, fellow food lovers! I’m Jackson Walker, the culinary creator behind Food Meld, and let me tell you—there’s nothing quite like the joy of making a cake that looks stunning and tastes even better. Today, I’m thrilled to share one of my all-time favorites: the Pistachio Layer Cake with Raspberry Jam and Fresh Raspberry Buttercream. This cake is the epitome of comfort mixed with a flair of creativity, and it’s bound to become a showstopper at any gathering!
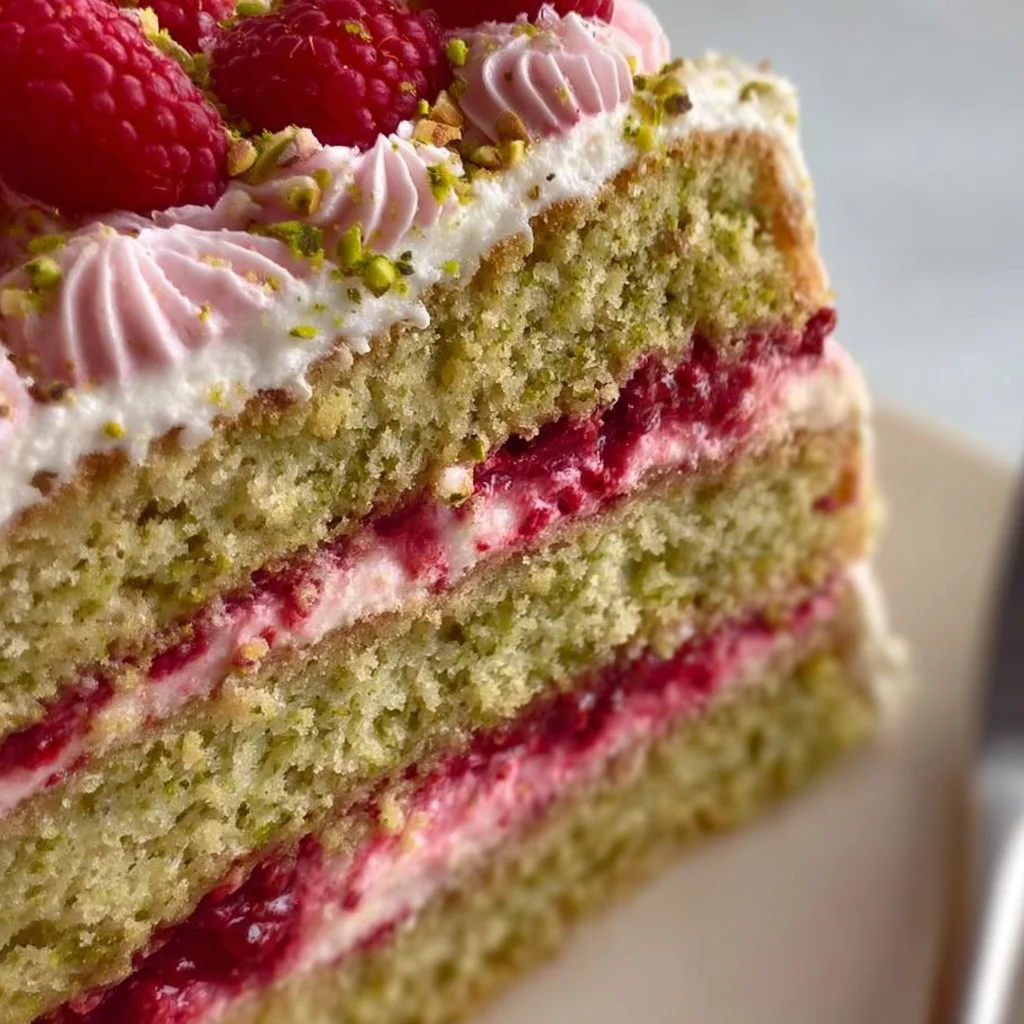
Imagine cutting into a beautiful layered cake, the vibrant green pistachio cake contrasting against the luscious red raspberry jam oozing between the layers. Adorn it with a cloud of raspberry buttercream, and you have a dessert that’s not just visually appealing—it’s a symphony of flavors that dance on your taste buds. The nutty richness from the pistachios combined with the sweet and tart raspberry is simply irresistible.
But wait, before we dive into the recipe, let’s take a moment to reminisce about my childhood and how food has the magical ability to transport us back in time…
Personal Story
I remember my grandmother’s kitchen on warm summer afternoons, where the air was filled with the sweet scent of baking treats. Those days were spent listening to her stories, learning the delicate art of baking. One of my favorite memories is of the time she decided to experiment with nuts—inspired by a trip she took to a bustling market full of vibrant spices and colors. She came home with a bag of pistachios and brazenly proclaimed that we would be making a “fancy cake.”
“Fancy cake” became a term we used for special occasions, and her pistachio cake quickly became a family favorite. The way she dressed it up with homemade raspberry jam and fluffy buttercream inspired me to carry on the tradition. Now, my version of that cake has evolved into the Pistachio Layer Cake with Raspberry Jam and Fresh Raspberry Buttercream we’re crafting together today. It bridges generations, flavors, and memories—perfect for brightening any day, be it a birthday or just because!
Ingredients
Now that we’re all feeling nostalgic, let’s gather our ingredients! Here’s what you’ll need for this delicious creation:
-
2 cups all-purpose flour
A baking essential! All-purpose flour provides the structure and base for our cake. If you’re looking for gluten-free alternatives, you can use a 1:1 gluten-free flour blend. -
1 1/2 cups granulated sugar
Sweetness! This sugar not only sweetens the cake but also helps in creating a tender crumb. Coconut sugar can be swapped for a more caramel-like flavor. -
1/2 cup unsalted butter (softened)
Real butter is the key to a rich flavor and a moist cake. If you need a dairy-free option, try using a vegan butter substitute. -
1 cup milk
Adds moisture and lightness to the batter. But if you’re dairy-free, almond or oat milk works great! -
4 large eggs
They provide structure and moisture to the cake. For an egg-free alternative, you can use unsweetened applesauce—1/4 cup per egg. -
1 teaspoon vanilla extract
A must for enhancing flavors! Pure vanilla is perfect, but you can also use almond extract for a fragrant twist. -
1 cup ground pistachios
The star of our show! Pistachios give a delicious nuttiness. You can use almond meal if you’re in a pinch. -
1/2 teaspoon baking powder
This helps the cake rise, ensuring it’s fluffy and light. -
1/2 teaspoon baking soda
This complements the baking powder and adds more lift. -
1/4 teaspoon salt
Enhances all those beautiful flavors without making it taste salty. -
1 cup raspberry jam
The fruity layer of goodness. If you prefer homemade, go for it! Otherwise, a quality store-bought jam works wonders. -
1 cup unsalted butter (softened, for buttercream)
Used to create a creamy and dreamy frosting. Again, vegan butter is a great alternative here. -
4 cups powdered sugar
This sweetens the frosting and makes it fluffy and smooth. Feel free to reduce the amount if you prefer it less sweet. -
1/4 cup fresh raspberries (pureed)
This adds intense raspberry flavor to the frosting. Fresh or even frozen raspberries will do fine! -
2 tablespoons heavy cream
Used in the buttercream for a creamy consistency. Coconut cream is a great dairy-free substitute.
Step-by-Step Instructions
Ready to get those hands dirty in the kitchen? Let’s bring this Pistachio Layer Cake to life, step by step!
-
Preheat the Oven
Preheat your oven to 350°F (175°C). This sets the stage for a perfect bake! -
Prepare Your Pans
Grease and flour two 9-inch round cake pans. Alternatively, line the bottoms with parchment paper for easy removal. This is a big step—nobody likes a cake that sticks! -
Mix the Dry Ingredients
In a bowl, whisk together the flour, baking powder, baking soda, and salt. This ensures that leavening agents are evenly distributed throughout the dry mix, creating a well-risen cake. -
Beat the Butter and Sugar
In a large mixing bowl, beat the softened butter and granulated sugar together until light and fluffy (about 3-4 minutes). This step incorporates air into the mix, creating that delightful, tender crumb we all desire. -
Add the Eggs and Vanilla
Gradually add the eggs one at a time, mixing well after each addition. Then add the vanilla extract. Scrape down the sides of the bowl to make sure everything is mixed in evenly. Each egg adds richness and helps with the leavening! -
Incorporate the Ground Pistachios
Add in the ground pistachios and mix until combined. They’ll start to add that lovely green hue! -
Combine with Dry Ingredients
Gradually add the flour mixture to the wet ingredients, alternating with the milk. Start and end with the flour. Mix just until combined—a few lumps are okay! Overmixing can toughen your cake. -
Divide and Bake
Pour the batter evenly into the prepared cake pans. Bake for 25-30 minutes, or until a toothpick inserted into the center comes out clean. Keep an eye on them—it’s all about that perfect golden brown! -
Cool the Cakes
Let the cakes cool in their pans for 10 minutes before transferring them to a wire rack to cool completely. Patience is key here; frosting a warm cake is a big no-no! -
Make the Buttercream
In a bowl, beat the softened butter until creamy. Gradually add the powdered sugar, followed by the raspberry puree and heavy cream. Beat until fluffy and well combined. If it’s too thick, add a splash more cream. Too thin? Add more powdered sugar! -
Assemble the Cake
Once the cakes are completely cooled, place one layer on a serving plate. Spread a generous layer of raspberry jam on top, followed by a nice thick layer of raspberry buttercream. Place the second cake layer on top and repeat. -
Frost the Sides and Top
Frost the top and sides of the cake with the remaining buttercream. For an added touch, use a cake scraper to smooth out the edges or create fun patterns. -
Garnish and Serve
Top with fresh raspberries and some chopped pistachios if you like—a delightful way to finish it off.
Serving Suggestions
Now that your Pistachio Layer Cake is ready, plating it is just as important as making it. Here’s how to serve it up perfectly:
- Place a slice neatly on a plate, using a sharp knife dipped in hot water for clean cuts.
- Drizzle a bit of raspberry jam around the plate for a pop of color and an extra tangy kick.
- Garnish with a sprig of mint for a fresh touch; it not only looks great but also adds an aromatic element that complements the flavors.
- Consider pairing each slice with a scoop of vanilla ice cream or a dollop of whipped cream for creaminess that balances the cake’s flavors beautifully.
Remember, presentation matters too! It enhances the experience and makes this cake even more special.
Recipe Variations
Want to mix things up? Here are some fun variations to explore:
-
Nuts Overboard: Swap out some pistachios for crushed almonds or hazelnuts. The flavor profile will change, but it’ll still be delicious!
-
Chocolate Lover’s Dream: Add cocoa powder to the cake batter for a rich chocolate variation. Raspberry and chocolate are a classic duo!
-
Lemon Zest: Incorporate lemon zest into the batter and the buttercream for a refreshing citrus twist.
-
Vegan-Friendly: Use flax eggs, coconut milk, and vegan butter to create a fantastic dairy-free variant without sacrificing taste!
-
Maple Sweetened: Replace granulated sugar with maple syrup for an earthy sweetness. Just reduce the milk slightly to maintain consistency.
Adventure awaits in the kitchen, and these variations let you tailor the recipe to suit any craving!
Chef’s Notes
Every recipe tells a story, and each time I whip up this cake, it feels like I’m reminiscing with my grandmother. She’s long since passed, but her spirit lives on in the kitchen, especially when I experiment with flavors and textures. Fun fact: this cake used to involve a lot more steps before I simplified it over the years.
One of my funniest mishaps came from trying to make a "fancy" version adorned with spun sugar. Let’s just say it was the Great Sugar Debacle of 2019. The kitchen looked like a sugar bomb went off, but it made for one memorable birthday.
Now, I focus on having fun in the kitchen, and that’s what I hope for all of you too. Cooking should be full of laughter, experimentation, and those delightful surprises when things turn out better than expected!
FAQs and Troubleshooting
1. The cake is too dense; what went wrong?
- This could happen if the batter was overmixed or if too much flour was added. Make sure to measure flour correctly, spooning it into the measuring cup without packing it down.
2. Why did my buttercream turn out too oily?
- If the butter was too soft, it can lead to an oily buttercream. Make sure to use slightly softened butter rather than melted for the best consistency.
3. What can I do if the cake is too dry?
- If the cake baked too long or was made with old flour, it can dry out. Be sure to check your cake with a toothpick around the 25-minute mark to avoid overbaking.
4. How can I store leftovers?
- The cake can be stored in an airtight container at room temperature for up to three days or in the fridge for up to a week. Freeze slices wrapped tightly in plastic wrap for up to three months!
Nutritional Info
While I believe in enjoying treats like this cake in moderation, it’s also good to be aware of what’s going into our bodies! Here’s a general idea of the nutritional content per slice (assuming 12 slices):
- Calories: Approximately 400-450
- Fat: 20 g (Saturated Fat: 10 g)
- Carbohydrates: 60 g
- Sugars: 40 g
- Protein: 5 g
Providing a balance of flavors and textures means indulging without the guilt, and you’ve got a cake that brings everyone together!
Final Thoughts
Well, my fellow kitchen adventurers, I hope this recipe for Pistachio Layer Cake with Raspberry Jam and Fresh Raspberry Buttercream inspires you to get cooking! If you try this cake, I’d love to hear your version and any tweaks you made. Remember, cooking should be a joyful experience—messy, flavorful, and full of laughter.
So grab those mixing bowls, channel your inner chef, and let’s create something unforgettable together. Whether it’s a birthday, a cozy gathering, or a self-care day with cake, this Pistachio Layer Cake will surely impress. Happy baking, and may your kitchen always be filled with love and flavor! 🍰✨
Print
Pistachio Layer Cake with Raspberry Jam and Fresh Raspberry Buttercream
- Total Time: 60 minutes
- Yield: 12 servings 1x
- Diet: Vegetarian
Description
A stunning layered cake featuring vibrant pistachio and luscious raspberry jam, topped with fluffy raspberry buttercream.
Ingredients
- 2 cups all-purpose flour
- 1 1/2 cups granulated sugar
- 1/2 cup unsalted butter (softened)
- 1 cup milk
- 4 large eggs
- 1 teaspoon vanilla extract
- 1 cup ground pistachios
- 1/2 teaspoon baking powder
- 1/2 teaspoon baking soda
- 1/4 teaspoon salt
- 1 cup raspberry jam
- 1 cup unsalted butter (softened, for buttercream)
- 4 cups powdered sugar
- 1/4 cup fresh raspberries (pureed)
- 2 tablespoons heavy cream
Instructions
- Preheat your oven to 350°F (175°C).
- Prepare two 9-inch round cake pans by greasing and flouring them.
- Mix together the flour, baking powder, baking soda, and salt in a bowl.
- Beat the softened butter and granulated sugar until light and fluffy.
- Add the eggs one at a time, mixing well after each, followed by the vanilla extract.
- Incorporate the ground pistachios into the mixture.
- Combine the flour mixture with the wet ingredients, alternately adding the milk.
- Divide the batter between the prepared cake pans and bake for 25-30 minutes.
- Cool the cakes in the pans for 10 minutes before transferring to a wire rack.
- Make the buttercream by beating the softened butter and gradually adding powdered sugar, raspberry puree, and heavy cream.
- Assemble the cake by layering raspberry jam and buttercream between the cake layers.
- Frost the top and sides of the cake with the remaining buttercream.
- Garnish with fresh raspberries and chopped pistachios.
Notes
For a dairy-free option, use vegan butter and plant-based milk. Experiment with flavor variations such as adding lemon zest or using cocoa powder for a chocolate version.
- Prep Time: 30 minutes
- Cook Time: 30 minutes
- Category: Dessert
- Method: Baking
- Cuisine: American
Nutrition
- Serving Size: 1 slice
- Calories: 425
- Sugar: 40g
- Sodium: 200mg
- Fat: 20g
- Saturated Fat: 10g
- Unsaturated Fat: 6g
- Trans Fat: 0g
- Carbohydrates: 60g
- Fiber: 2g
- Protein: 6g
- Cholesterol: 50mg
Keywords: cake, pistachio, raspberry, dessert, layer cake


