Turn Easter Into a Sweet, Sticky Celebration!
Hey there, welcome back to Food Meld, your kitchen for bold, comforting, and unforgettable food! Jackson here. You know me—I’m all about those “what if we tried this?” moments that turn simple ingredients into something seriously awesome. And with Easter just around the corner, I found myself staring at those iconic, colorful Peeps marshmallows in the grocery store, and a lightbulb went off. What if we took that classic campfire s’more, the one we all love for its gooey, messy, chocolatey perfection, and gave it a major springtime upgrade? What if we made it into a bar that’s perfect for a crowd, requires zero campfire, and is bursting with color?
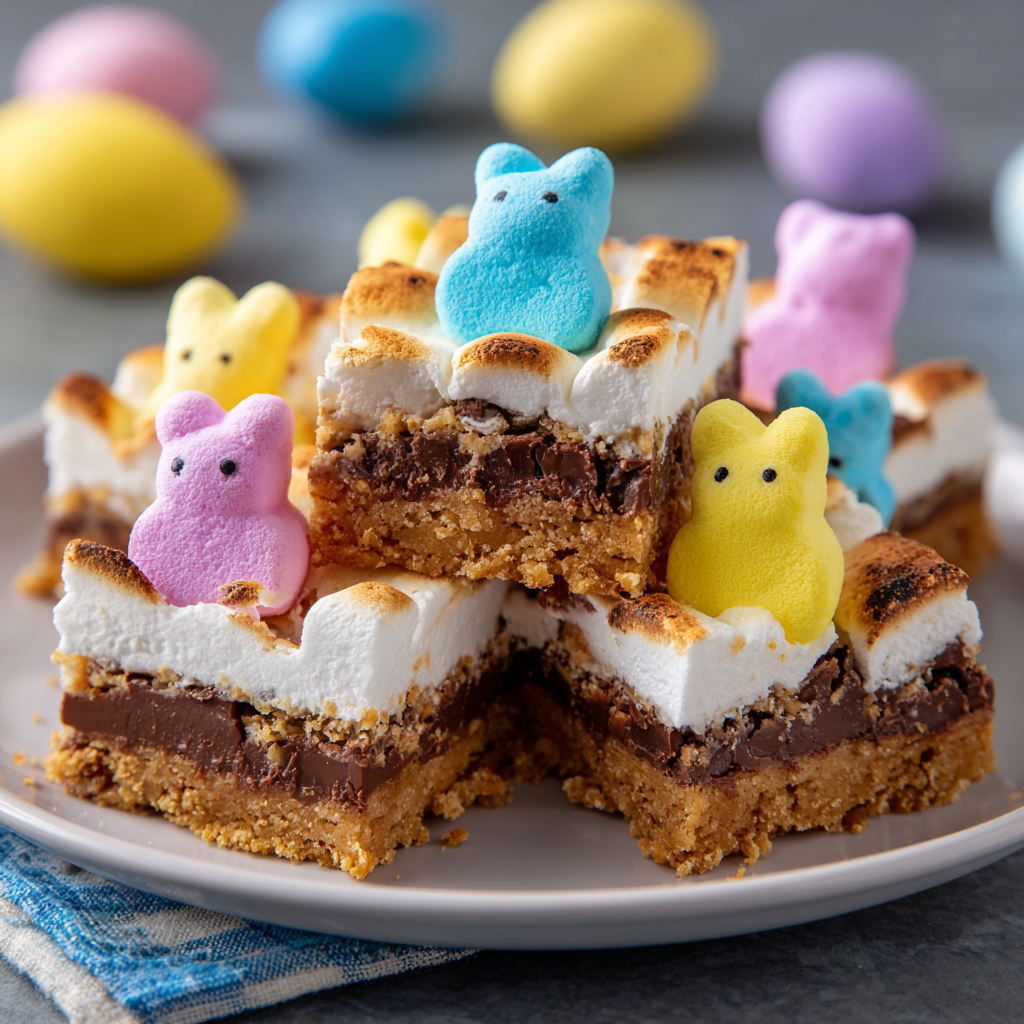
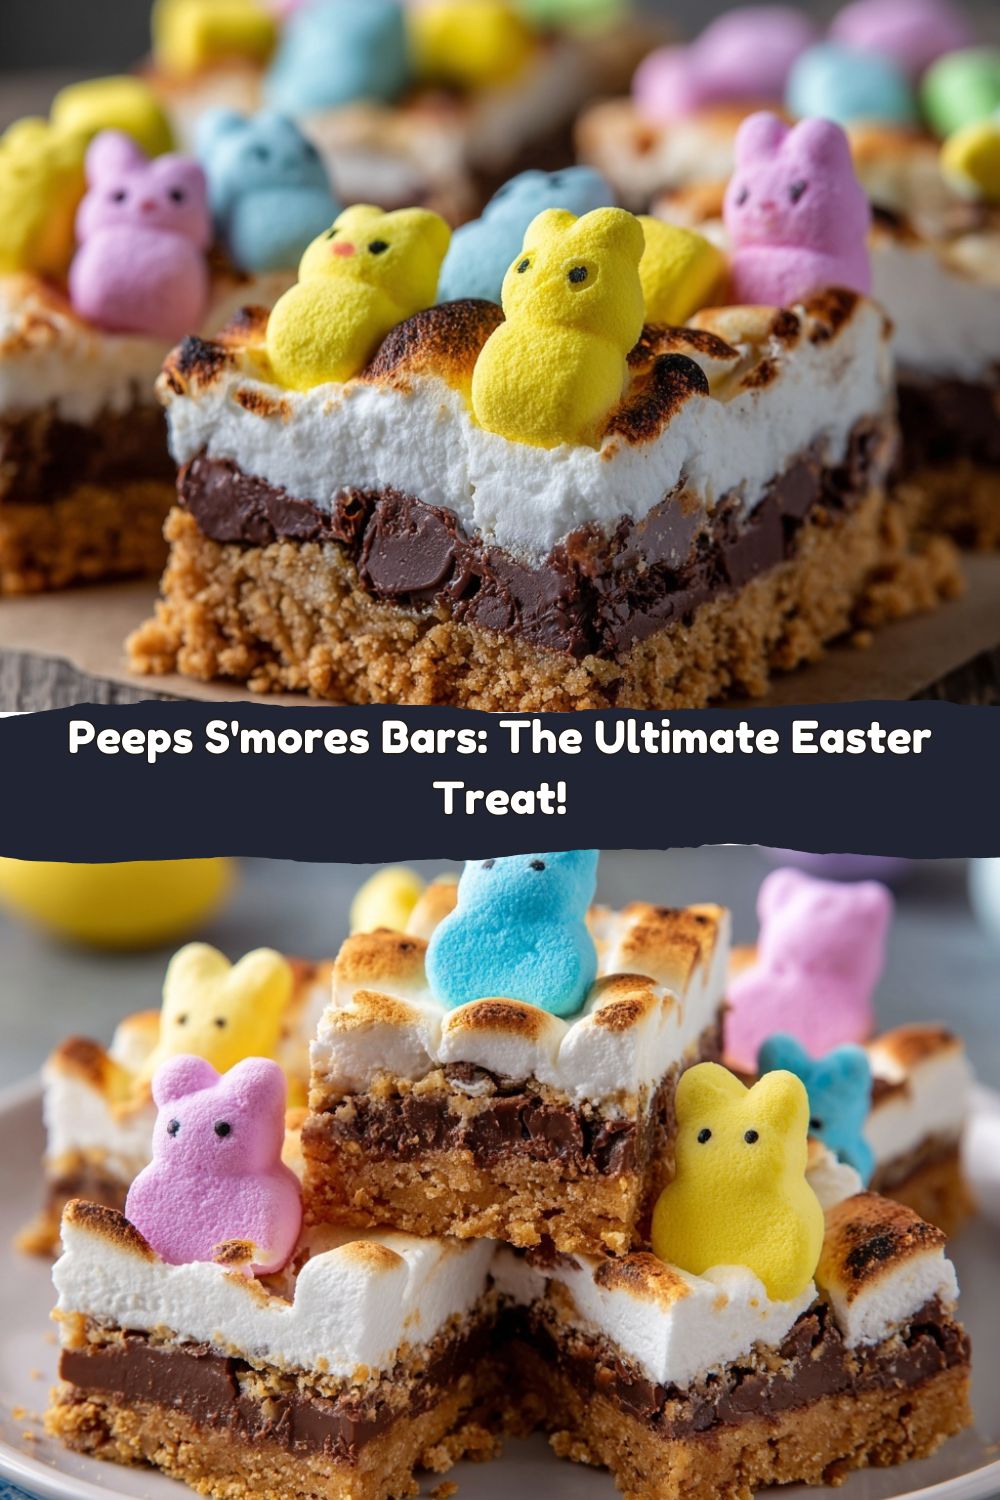
Friends, let me introduce you to your new favorite Easter treat: Peeps S’mores Bars. Imagine a buttery, toasty graham cracker crust. A layer of rich, melty semi-sweet chocolate. Topped with a whole flock of soft, lightly toasted Peeps that puff up and get gloriously sticky in the oven. It’s a symphony of textures and sweetness in every single bite. The best part? This is one of those “dump, mix, press, bake” kind of recipes. No fancy skills required, just a willingness to create a little delicious chaos. So, whether you’re prepping for a big family brunch, need a show-stopping dessert for your spring gathering, or just want to make a regular Tuesday feel like a holiday, these bars are your answer. Let’s ditch the complicated baking and cook something fun, colorful, and downright incredible together.
A Tale of Two Treats: My S’mores & Peeps Origin Story
This recipe is a total “Food Meld” moment for me, because it smashes together two of my biggest childhood food obsessions. First, the s’more. My grandparents had a little place near a lake, and some of my best memories are of my dad teaching me the sacred art of toasting a marshmallow. The goal was never “golden brown”—it was “ON FIRE, blow it out, and eat the charred, molten sugar shell.” Messy fingers, sticky faces, the whole deal.
Then, there were the Peeps. Every Easter, my mom would put a single yellow chick in our lunchboxes. It wasn’t Easter without that bright, sugary squish. I’d always save it for last, nibbling the beak first (anyone else?). I loved them, but I never thought of them as an *ingredient*—they were just a festive, squishy toy you could eat.
Fast forward to last spring. I was developing recipes for the blog and had a bag of Peeps leftover from a photoshoot. I also had a serious craving for s’mores, but it was raining. Stuck inside, I had that classic “what if…” thought. What if I used Peeps *as* the marshmallow layer? I threw together a quick graham crust, some chocolate chips, and lined up those colorful chicks on top. When I pulled the pan out of the oven and saw them puffed, glossy, and beautifully toasted, I knew I was onto something. The first bite was pure nostalgia, but better—all the flavors of childhood, baked into one perfect, shareable bar. It’s a happy little kitchen accident that’s now a spring tradition in my house.
Gathering Your Flock: What You’ll Need
Here’s the beautiful part: you only need a handful of simple ingredients to create this magic. I’ve added my chef insights and swap ideas so you can make it your own.
- 2 cups graham cracker crumbs: This is the foundation of our “campfire” flavor. You can buy pre-crumbled crumbs or just pulse whole graham crackers in a food processor or zip-top bag. Chef’s Insight: For a deeper flavor, toast your whole graham crackers on a baking sheet at 350°F for 5 minutes before crushing them. It adds a whole new level of toasty goodness!
- ½ cup unsalted butter, melted: This binds our crust and gives it that irresistible, rich, buttery crispness. Using unsalted lets you control the salt level. Substitution Tip: In a pinch, salted butter works just fine—maybe just skip any added salt in the crust mix.
- ¼ cup brown sugar: A little brown sugar mixed into the crust is my secret weapon. It adds a hint of caramel-like moisture and depth that plain graham crumbs lack. It’s the difference between good and “wow, what’s in this crust?”
- 2 cups semi-sweet chocolate chips: The river of molten chocolate! Semi-sweet is my go-to for balancing the sweetness of the Peeps. Substitution Tip: Feel free to mix it up! Use milk chocolate for a sweeter bar, dark chocolate for a more sophisticated bite, or even a mix of chocolate and butterscotch chips. You do you.
- 1 package Peeps marshmallows: The star of the show! Use the classic chicks or bunnies, and go for a mix of colors for that vibrant Easter look. Chef’s Insight: Don’t separate them until you’re ready to place them! They’re easier to handle in their connected rows. Pro-tip: Snip them apart with kitchen shears for clean cuts.
Let’s Build These Iconic Bars: Step-by-Step
Ready? Preheat that oven to 350°F (175°C) and let’s get our hands dirty. This is the fun, messy part I love.
- Prep Your Pan: Line an 8×8-inch baking pan with parchment paper or aluminum foil, leaving some overhang on two sides. This is your BEST FRIEND. It creates a “sling” so you can lift the entire block of bars out of the pan for super clean, easy cutting. Give the paper/foil a light spritz with cooking spray for extra non-stick insurance.
- Create the Crust: In a medium bowl, combine the graham cracker crumbs, melted butter, and brown sugar. Stir it with a fork until it looks like wet sand and every crumb is coated. Dump this magical mixture into your prepared pan. Now, use your fingers, the bottom of a flat measuring cup, or a glass to press it down firmly and evenly. We want a solid, compact base. A firm press now means bars that hold together later! Pop it in the preheated oven for 8-10 minutes. You’ll smell that toasty graham aroma—that’s your cue.
- The Chocolate Layer: As soon as you pull the hot crust out of the oven, immediately sprinkle all the chocolate chips evenly over the top. The residual heat from the crust will start melting them. Walk away for 2 minutes—let the magic happen. After they’ve had a minute to soften, take an offset spatula or the back of a spoon and gently spread the chocolate into an even, smooth layer. It should melt beautifully. If you have a few stubborn chips, a quick 30-second pop back in the warm (but turned off) oven will finish the job.
- Peeps Patrol: Time for the colorful finale! Gently place your Peeps on top of the melted chocolate layer. You can arrange them in neat rows, a fun pattern, or just scatter them with joyful abandon—I’m a fan of the latter. Press them down just slightly so they stick to the chocolate.
- The Final Toast: Carefully return the pan to the oven. Bake for 5-7 more minutes. Watch closely! You’re looking for the Peeps to puff up, get glossy, and just *begin* to turn golden brown in a few spots. They will continue to set as they cool. Over-baking can make them too hard, so when in doubt, pull them out!
- The Crucial Cool Down: This is the hardest part: patience. Let the pan cool completely on a wire rack. I mean it—at least 30 minutes, but an hour is even better. If you try to cut them while warm, you’ll have a delicious, gooey mess (which, honestly, isn’t the worst thing). For clean bars, let them set. For ultimate clean cuts, you can even pop the whole pan in the fridge for 20 minutes after the initial cool.
- Slice & Serve: Use the parchment paper sling to lift the entire block out of the pan and onto a cutting board. Grab a sharp knife. Here’s my favorite hack: lightly grease the knife with butter or cooking spray. This helps it glide through the sticky marshmallow layer without tearing. Wipe the blade clean between cuts for perfect bars.
How to Serve These Show-Stopping Bars
Presentation is part of the fun with a treat this colorful! You can keep it simple and serve them right on the parchment paper for a rustic, “dig in” vibe. For a prettier plate, arrange them on a vibrant platter or a wooden board.
Want to take it over the top? A little drizzle never hurt anybody. Right before serving, melt a tablespoon of white chocolate or extra semi-sweet chips and drizzle it artfully over the bars with a fork. A tiny sprinkle of coarse sea salt on top of the drizzle creates an incredible sweet-salty contrast that’s just *chef’s kiss*.
These bars are rich, so I like to cut them into 9 generous squares for a crowd, or you can go for 12 smaller, more portion-friendly rectangles. Serve them with a tall glass of cold milk, a scoop of vanilla ice cream on the side (yes, really!), or a hot coffee to balance the sweetness. They’re the perfect centerpiece for your Easter dessert table, a fantastic addition to a brunch spread, or just a happy surprise in tomorrow’s lunchbox.
Make It Your Own: Fun Twists & Swaps
The beauty of this recipe is its adaptability. Don’t be afraid to play with it! Here are a few of my favorite “what if…” spins:
- The Candy Swap: Not a Peeps person? No problem! Use 3-4 cups of mini marshmallows instead. Or, for a next-level twist, try a mix of chopped peanut butter cups, caramel bits, and marshmallows for a “Turtle S’mores Bar.”
- Gluten-Free Friendly: Easily make this gluten-free by using certified gluten-free graham crackers (they exist and they’re great!). The rest of the ingredients are naturally GF.
- Nutty Crunch: Add ½ cup of chopped toasted pecans or walnuts to the graham cracker crust mixture for a wonderful textural contrast and nutty flavor.
- Seasonal Peeps: This isn’t just for Easter! Use Halloween Pumpkin Peeps for a fall treat, Christmas Tree Peeps for a holiday party, or heart-shaped Peeps for Valentine’s Day. The recipe works year-round.
- Extra Gooey: For a truly decadent, rocky-road-style bar, sprinkle ½ cup of mini marshmallows in with the chocolate chips *before* adding the Peeps on top. Double the marshmallow, double the fun.
Jackson’s Kitchen Notes & Stories
I’ve made these bars more times than I can count, and they’ve become my go-to “emergency dessert” for any spring potluck. They always disappear first. One funny story: the first time I brought them to a friend’s BBQ, I didn’t let them cool *nearly* long enough. I tried to transport them in the pan, and let’s just say… the car ride created a beautiful, abstract art piece of swirled chocolate and Peeps. It still tasted amazing, but it was served with a spoon! Now I’m a religious follower of the “cool completely” rule.
The recipe itself has evolved, too. The brown sugar in the crust was a game-changer I discovered on batch three. And I learned that arranging the Peeps with a little space between them makes for easier, cleaner slicing. It’s these little tweaks, born from happy accidents and “oops” moments, that make a recipe truly foolproof and special. Don’t stress perfection—embrace the fun of it!
Your Questions, Answered
Q: My bars are too gooey to cut, even after cooling. Help!
A: No worries! This usually means they needed a bit more cooling time. Pop the whole pan (or the lifted-out block) into the refrigerator for 20-30 minutes. The chocolate and marshmallow will firm up beautifully, making slicing a breeze.
Q: Can I use a different size pan?
A: Absolutely. A 9×9-inch pan will work; your crust will be slightly thinner and the bars will bake a minute or two faster. A 9×13 pan is doable, but you’ll need to increase the recipe by 1.5x to have a good thickness. Keep an eye on the bake time.
Q: How should I store leftovers?
A: Store them in an airtight container at room temperature for up to 3 days. You can layer them between sheets of parchment paper to prevent sticking. For longer storage, they freeze surprisingly well! Wrap individual bars tightly in plastic wrap and freeze for up to a month. Thaw at room temperature.
Q: My Peeps got really dark/burnt on top. What happened?
A: Ovens can have hot spots! Your oven might run hot, or the Peeps might have been placed directly under a heating element. Try baking the final 5-7 minutes on a lower rack, or tent the pan loosely with foil if you see them browning too quickly.
Nutritional Info (For Your Reference)
Here’s a basic breakdown per bar (based on 9 servings). Remember, this is a celebratory treat meant to be enjoyed in the spirit of fun and flavor!
- Calories: ~250
- Total Fat: 12g
- Carbohydrates: 34g
- Protein: 3g
As always, these are estimates based on the specific ingredients used. For precise dietary tracking, I recommend using a calculator with your exact brand inputs. The great thing about cooking at home is you control the ingredients—feel free to use your favorite chocolate or a butter alternative if needed!
Let’s Cook Something Awesome Together
And there you have it! My colorful, crowd-pleasing, joyfully simple Peeps S’mores Bars. This recipe, to me, is what Food Meld is all about: taking familiar favorites (s’mores! Peeps!), shaking them up with a little creative energy, and creating something new that’s guaranteed to spark smiles and “you’ve gotta try this!” moments around your table.
I hope you give these a try this Easter (or anytime!). Grab your ingredients, put on some good music, and don’t be afraid to get a little messy. That’s where the best memories—and the best food—are made. When you make them, I’d love to see your creation! Tag me on social @FoodMeld so I can cheer you on.
From my kitchen to yours, happy baking, and welcome to Food Meld—where flavor meets fun. Until next time, let’s keep mixing it up!
– Jackson


