Hey, Let’s Make Some Magic: Southern Pecan Pralines
Hey there, friend! Jackson here from Food Meld. You know that feeling when you bite into something so perfectly sweet, so wonderfully rich, and so unapologetically comforting that you just have to close your eyes for a second? That’s the magic I’m always chasing in my kitchen, and that’s exactly the experience I want to share with you today. We’re making classic Southern Pecan Pralines. Now, I know the word “candy” might sound a little intimidating—like it requires a fancy degree or a secret handshake. But trust me, if you can stir a pot and use a thermometer, you are 100% equipped to create these buttery, nutty, melt-in-your-mouth wonders. This isn’t just a recipe; it’s a ticket to creating those “you made this?!” moments, whether you’re wrapping them up as heartfelt gifts or crowning your holiday table with something truly special. So, grab your favorite saucepan, and let’s cook something awesome together. Welcome to the sweet, sticky, and incredibly rewarding world of homemade pralines.

A Sweet Slice of My Southern Roots
I can’t talk about pralines without getting a little nostalgic. My earliest memory of them isn’t from a fancy bakery, but from a wobbly card table set up on a hot, humid afternoon somewhere in Louisiana. My family was on one of our classic “let’s see where this road goes” road trips, and we stumbled upon a small farmers’ market. An older woman with the kindest smile you’ve ever seen was selling pralines from a big glass jar. She handed me a piece, still slightly warm from being made that morning. The second it hit my tongue—that crisp sugar shell giving way to a creamy, almost fudgy center packed with toasted pecans—I was hooked. It tasted like pure, unadulterated joy. It tasted like home, even though I was miles from ours. That’s the power of food, y’all. It’s not just fuel; it’s a feeling. And every time I make these, I’m right back at that wobbly table, reminded that the best recipes are the ones that come with a story.
Gathering Your Flavor Arsenal
Simple ingredients, incredible results. That’s the Food Meld motto. Here’s everything you’ll need to make about two dozen of these heavenly candies. Don’t just measure—taste, smell, and get to know your team players!
- 1½ cups granulated sugar: This is our foundation. It provides structure and that classic crystalline texture we’re after. Using only brown sugar would make them too soft.
- 1½ cups packed light brown sugar: This is the flavor MVP. The molasses in the brown sugar gives pralines their iconic deep, caramel-like taste and that gorgeous color. Chef’s Tip: Really pack it into the measuring cup for an accurate measure!
- 1 cup heavy cream: This is what makes our candy rich and creamy, not hard and brittle. For the best texture, there’s no substitute here. Half-and-half or milk won’t give you the same lush result.
- 4 tbsp unsalted butter: Because butter makes everything better, right? Using unsalted lets us control the salt level. It adds a incredible richness and a velvety mouthfeel.
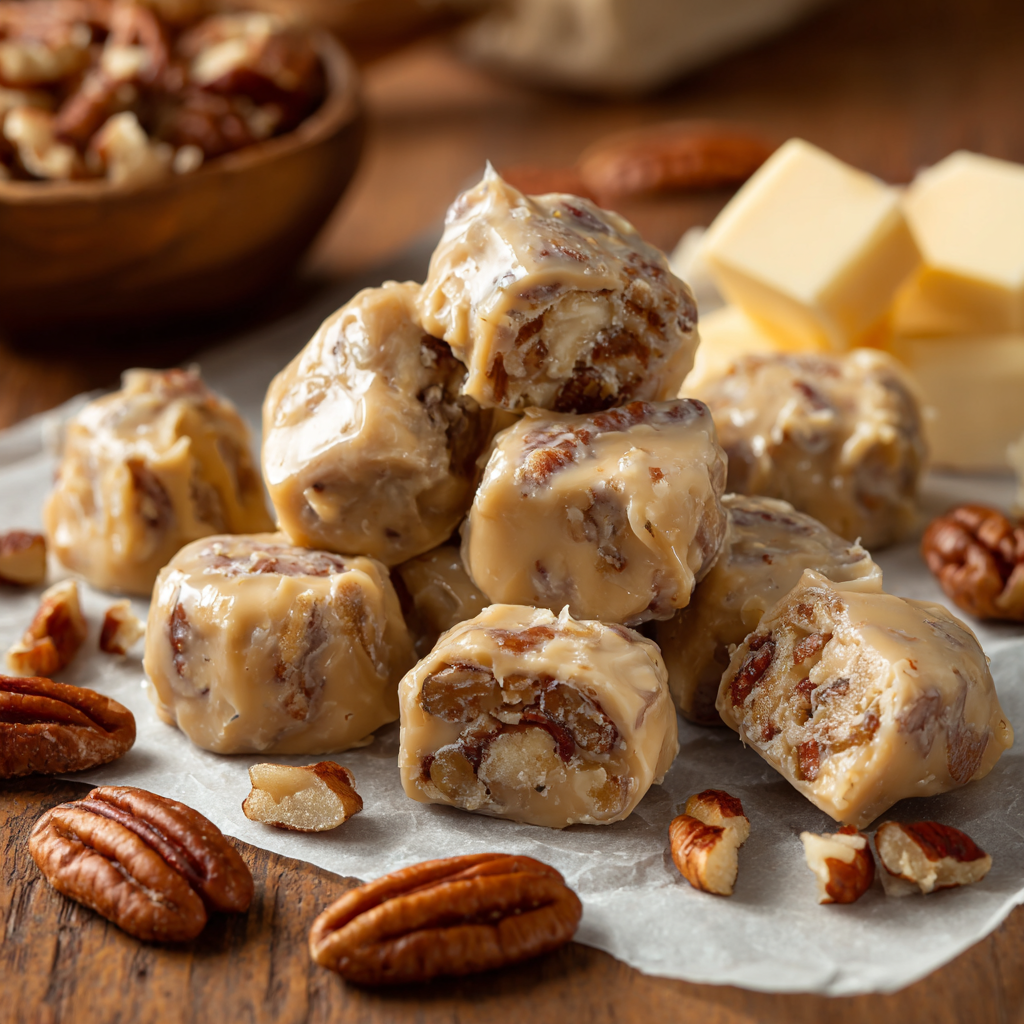
- 2 cups pecan halves or pieces: The star of the show! I like a mix—halves for a beautiful look on top and pieces dispersed throughout. Pro Move: Toast them in a dry skillet for a few minutes first. It wakes up their oils and adds a massive flavor boost.
- 1 tsp vanilla extract: The finishing touch. Use the real stuff! It adds a warm, aromatic depth that perfectly complements the caramel and nuts.
- Pinch of salt: Never, ever skip this. Salt is the magic wand that makes all the sweet flavors pop and balances everything out beautifully.
Let’s Get Cooking: Your Foolproof Praline Roadmap
Okay, team. Here’s where the fun begins. Read through these steps once before you start. Candy-making is a dance—it’s all about timing and rhythm. But don’t stress! I’ve got your back with all my favorite hacks.
Step 1: Prep Your Surface
First things first: line a baking sheet with parchment paper. I give mine a very, very light spritz of cooking spray, just to be extra sure nothing sticks. Have this ready to go right next to your stove. In candy-making, you can’t be running around looking for a tray when your mixture is at the perfect temperature!
Step 2: Cook the Mixture
In a large, heavy-bottomed saucepan (this ensures even heat and prevents scorching), combine both sugars, the heavy cream, butter, and that all-important pinch of salt. Now, turn the heat to medium and start stirring. I’m talking constant, gentle strokes until the butter is fully melted and the sugars have completely dissolved. You’ll see the mixture go from grainy to smooth. This is crucial—undissolved sugar can cause graininess later. Once it comes to a rolling boil, you’re on your way.
Step 3: Boil to Soft-Ball Stage
Here’s the part that makes people nervous. Don’t be! Clip your candy thermometer to the side of the pan, making sure the tip isn’t touching the bottom. Let the mixture boil away, stirring occasionally to prevent hot spots. Now, be patient. It will feel like it’s taking forever, but then the temperature will start to climb steadily. We are waiting for it to hit 238°F (114°C)—this is the “soft-ball” stage. If you don’t have a thermometer, you can do the cold water test: drop a small bit of syrup into a cup of ice water. If you can form it into a soft, pliable ball that flattens when you take it out, you’re good! But a thermometer is your best friend here.
Step 4: Add Pecans & Vanilla
The second that thermometer hits 238°F, pull the pan off the heat immediately! No dilly-dallying. Now, gently stir in your toasted pecans and the vanilla extract. This will cause the mixture to bubble vigorously—that’s normal. Now, here’s the key: grab a wooden spoon and start beating the mixture. You’re not trying to win a strength contest; just stir with purpose for 2-3 minutes. You’ll feel it begin to thicken and become less glossy. It should still be very pourable, but it will start to hold its shape on the spoon. This step is what gives pralines their perfect creamy-yet-firm texture.
Step 5: Spoon Onto Tray
Working quickly but carefully (that sugar is crazy hot!), drop tablespoon-sized mounds onto your prepared parchment paper. If you want them super uniform, use a small cookie scoop. If they spread a little, that’s fine! They’re homemade and full of character. Let them cool completely at room temperature. Do NOT put them in the fridge to speed this up, as it can cause them to sweat and get sticky.
How to Serve Your Sweet Masterpieces
Once your pralines are completely cool and set (they should be firm to the touch), it’s time for the best part: serving! I love stacking them on a rustic wooden board or a beautiful vintage plate. They’re rich, so I usually just serve them as is, maybe with a cup of strong black coffee or a glass of cold milk to cut through the sweetness. For a holiday gathering, arrange them in little cupcake liners on a platter—it makes them look extra special and makes them easy to grab. And honestly, stacking them in a clear glass jar with a ribbon tied around it is the simplest, most beautiful gift you can give anyone. It’s a gift made with love and butter, and who doesn’t want that?
Mix It Up: Creative Praline Twists
Once you’ve mastered the classic, the world is your oyster! Or, well, your pecan. Here are a few of my favorite ways to play with this recipe:
- Maple Kissed: Replace ¼ cup of the granulated sugar with pure maple syrup. It adds a wonderful, warm complexity that screams fall.
- Chocolate Drizzle: Once the pralines are completely cool, melt some dark or semi-sweet chocolate and drizzle it over the top with a fork. Let it set. It’s a simple way to make them look professionally done.
- Coconut Crunch: Stir in ¼ cup of toasted shredded coconut along with the pecans. It adds a fantastic chewy texture and tropical vibe.
- Spiced & Nice: Add a pinch (about ¼ tsp) of cinnamon, nutmeg, or even a dash of cayenne pepper to the sugar mixture at the beginning for a praline with a warm, spicy kick.
- Bourbon Bliss: For the adults, add a tablespoon of good bourbon along with the vanilla. It deepens the flavor profile incredibly.
Jackson’s Chef Notes & Kitchen Confessions
Alright, real talk. The first time I made pralines by myself, I was so nervous I checked the thermometer about fifty times. And you know what? I still misjudged it and they came out a little grainy. It happens! Candy-making is a skill that gets better with practice. My biggest lesson? Don’t stir the mixture too vigorously once it’s boiling, as this can encourage sugar crystals to form. A gentle occasional swirl is all it needs. And toasting the pecans is non-negotiable for me now—it’s the difference between a good praline and a “holy-wow” praline. This recipe has become my go-to for cookie exchanges and neighbor gifts because it feels fancy but is genuinely approachable. Remember, a little mess in the kitchen is just a sign of a good time!
Praline Problems? I’ve Got Answers!
Q: My pralines are grainy/gritty. What went wrong?
A: Graininess usually happens if sugar crystals formed on the sides of the pan during cooking and got stirred back in. To prevent this, you can use a wet pastry brush to wash down any sugar crystals on the sides of the pan during the initial dissolving stage. Also, avoid stirring once the mixture comes to a boil until it’s time to check the temperature.
Q: My mixture never got to a firm stage and is still sticky. Help!
A: This means it likely didn’t reach the full 238°F. The weather can actually play a role here—on a humid day, it can take longer to reach the right temperature. Trust your thermometer! Next time, ensure you’re cooking at a steady, medium boil until it hits the mark.
Q: Can I double this recipe?
A: I don’t recommend it for your first try. A larger volume of sugar syrup can behave differently and may not cook as evenly. Master a single batch first, then if you’re feeling confident, you can try two separate batches to be safe.
Q: How do I store these, and how long do they last?
A: Store them in an airtight container at room temperature with a piece of parchment between layers. They are best enjoyed within a week. If your kitchen is warm, you can store them in the fridge, but let them come to room temperature before serving for the best texture and flavor.
Nutritional Info (Because We’re All Friends Here)
Look, these are a candy—a special treat to be savored and enjoyed mindfully. I’m a big believer that food is about joy, not just numbers. But I also believe in being transparent! This estimated nutritional information is per praline (assuming the recipe makes 24). They are a rich, energy-dense treat thanks to the sugars, fats from the cream, butter, and pecans. The pecans do bring a small amount of protein and healthy fats to the party. So, enjoy one or two with your coffee, share them with friends, and relish every single delicious bite without guilt.
Estimated per praline: ~180 kcal | 10g fat | 23g carbs | 1g protein
Your New Go-To Sweet Treat
And there you have it! You’re now armed with everything you need to create a batch of incredible, Southern-style pecan pralines that will absolutely wow everyone who tries them. This recipe is a perfect example of what I love about cooking: it’s equal parts science, art, and heart. It might feel like a project, but it’s one that pays off in spades with delicious, shareable results. So, the next time you’re craving a baking adventure or need a truly memorable homemade gift, I hope you’ll give this a try. Remember, the kitchen is your playground. Now, go forth, melt some sugar, and create something unforgettable. And be sure to tag me @FoodMeld if you share a picture—I love seeing your creations!
Stay hungry,
Jackson


