Rustic Pear & Almond Galette: Your New Go-To “Fancy” Dessert
Hey friends, Jackson here from Food Meld. Let’s be real for a second. Sometimes you want a dessert that feels a little special, a little elegant—the kind of thing you’d be proud to serve at a dinner party or just to treat yourself on a Tuesday night because, well, you deserve it. But the thought of making a perfect, lattice-topped pie or some fussy, multi-layered pastry can be enough to send you straight to the freezer aisle. I get it. I’ve been there. That’s why I’m utterly obsessed with the magic of a galette.
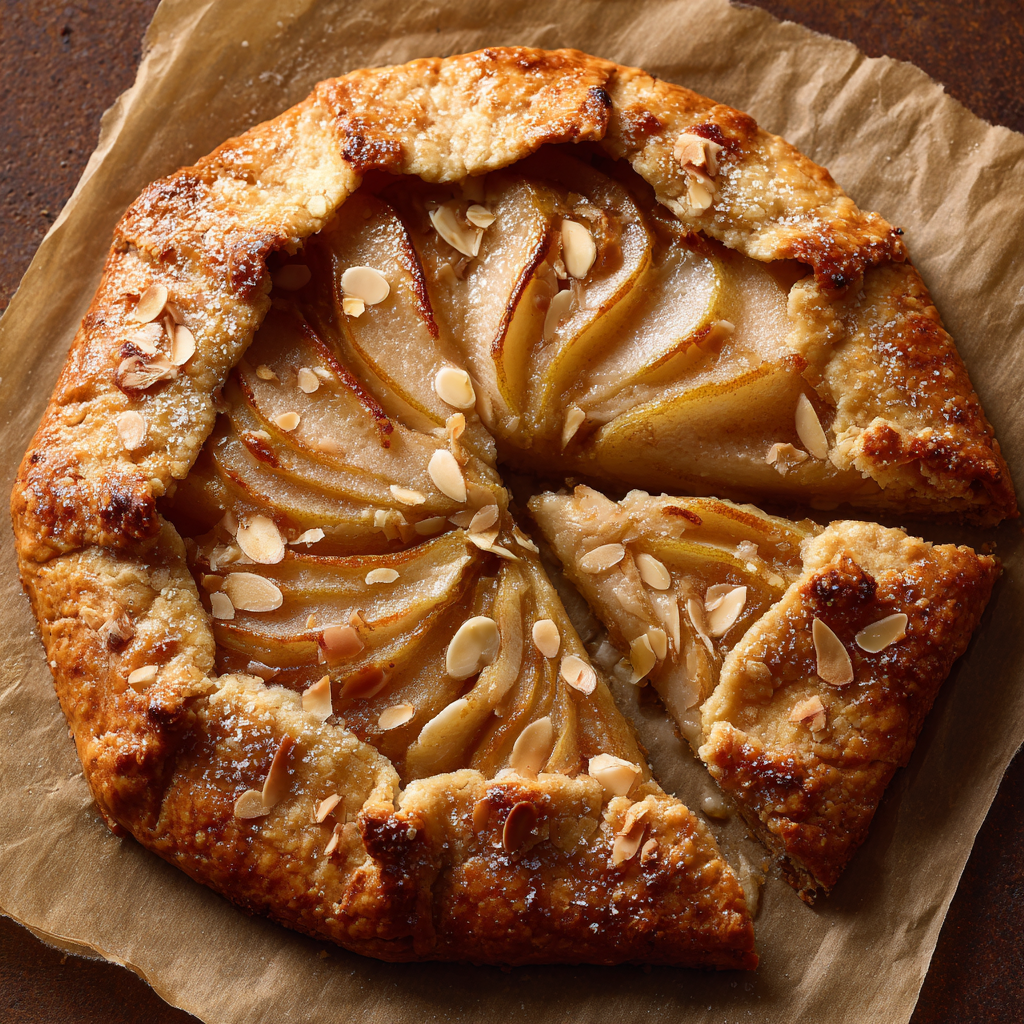
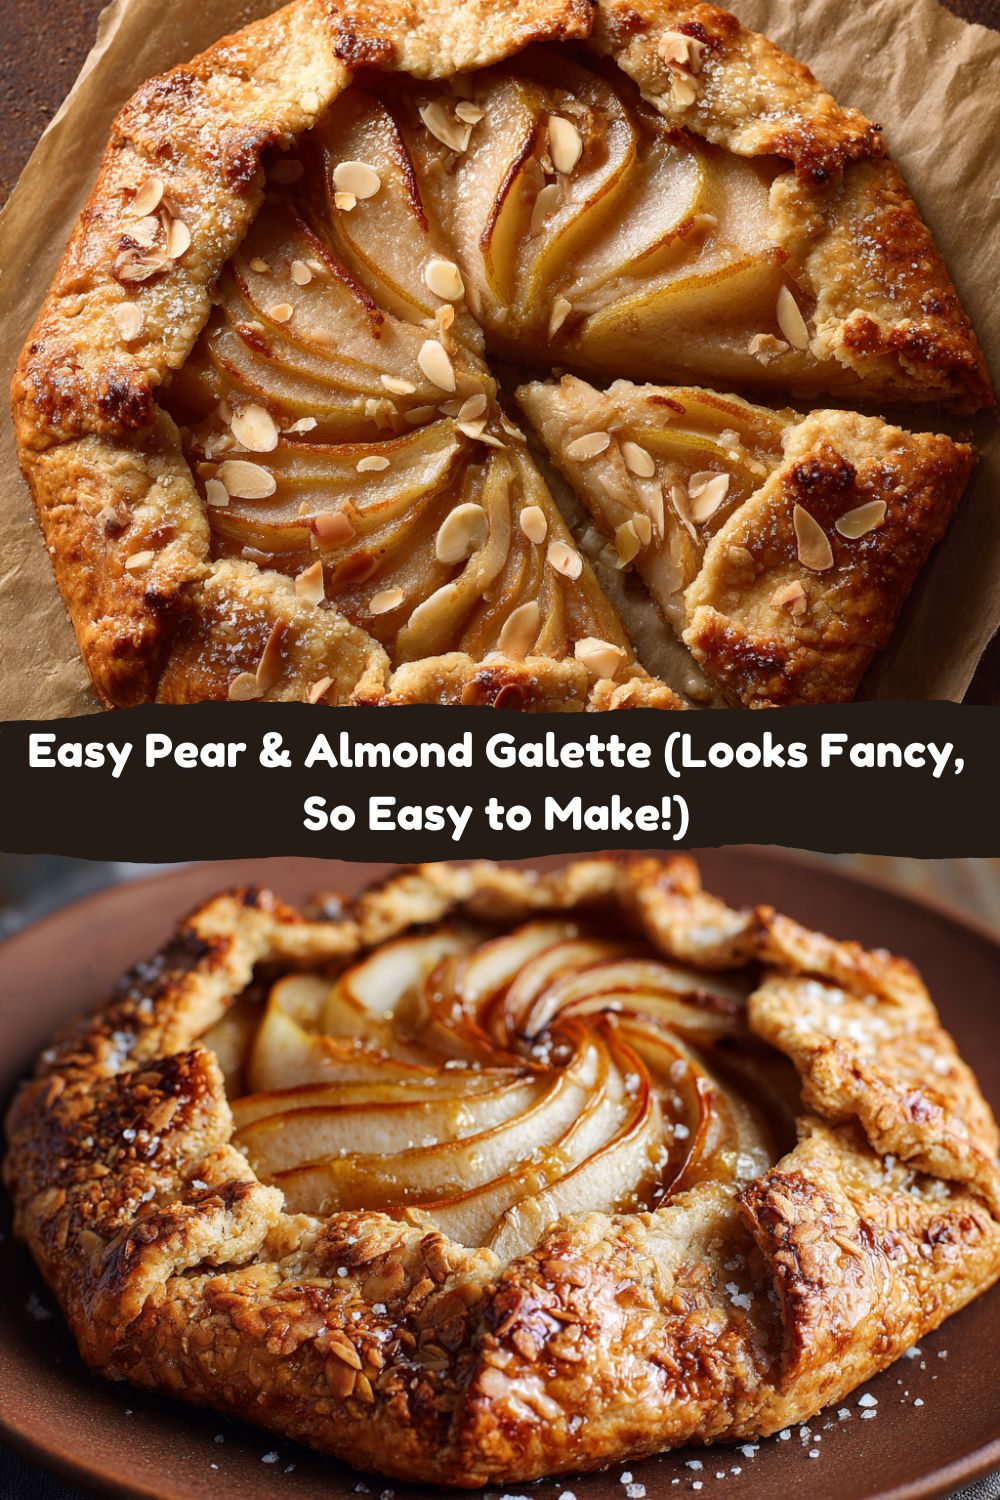
Think of a galette as pie’s cooler, more relaxed cousin. It’s free-form, rustic, and honestly, a little forgiving. There’s no fancy pie dish required, and “messy edges” are literally part of its charm. This particular beauty—a Pear & Almond Galette—is my current favorite. We’re talking tender, spiced pears nestled on a hidden layer of sweet, nutty frangipane (that’s just a fancy word for almond filling, don’t let it scare you), all wrapped up in the flakiest, butteriest crust you’ve ever made. It’s the perfect blend of cozy and sophisticated, and I’m here to show you just how easy it is to pull off. So, grab your rolling pin, and let’s cook something awesome together.
A Slice of Memory
This recipe takes me right back to my grandma’s kitchen in late autumn. She wasn’t a fancy pastry chef; she was a “a little of this, a little of that” kind of cook. I remember one chilly afternoon, a bushel of pears from a neighbor’s tree sat on the counter, and a pie felt like too much work. So, she simply rolled out her biscuit dough, sprinkled on some sugar and nuts from a jar, and artfully arranged those pears before folding the edges over. She called it a “rustic tart,” and to my eight-year-old eyes, it was the most beautiful, delicious thing I’d ever seen. It was imperfectly perfect. That’s the spirit I bring to this galette. It’s not about precision; it’s about heart, flavor, and embracing the beautiful mess of creating something with your own hands. Every time I smell that combination of baking pears and toasted almonds, I’m right back there with her, covered in flour and full of wonder.
Gathering Your Flavor Squad
Here’s everything you’ll need to bring this beauty to life. Don’t stress about exact brands—this is about using what you have and making it work!
For the Crust:
- 1¼ cups all-purpose flour: The foundation. I like unbleached for a heartier flavor, but any AP flour works like a charm.
- 1 tbsp sugar: Just a touch to lightly sweeten the crust and help it get that gorgeous golden-brown color.
- ½ tsp salt: Non-negotiable. It balances the sweetness and makes all the other flavors pop. I use fine sea salt.
- ½ cup cold unsalted butter, cubed: The key to flakiness! Keep it cold, cold, cold. I pop the cubed butter in the freezer for 10 minutes before I start. For a dairy-free twist, a high-quality vegan butter works surprisingly well.
- 3–4 tbsp ice water: The binder. The ice-cold temperature is crucial—it keeps those butter bits solid until they hit the oven.
For the Almond Filling (Frangipane):
- ½ cup almond flour: This gives the filling its incredible moist, dense texture and rich flavor. If you have whole almonds, you can pulse them with the sugar in a food processor until finely ground.
- ¼ cup sugar: Sweetens the deal. Regular granulated sugar is perfect here.
- 1 egg: Binds it all together and adds richness. For a vegan version, a flax egg (1 tbsp ground flax + 3 tbsp water) can work in a pinch.
- 2 tbsp butter, softened: Makes it luxuriously creamy. Again, unsalted so we control the salt level.
- ½ tsp almond extract: This is my secret weapon! It amplifies the nutty flavor tenfold. Pure extract makes a world of difference.
For the Pears & Finish:
- 2–3 ripe but firm pears: Bosc or Anjou pears are my go-to. They hold their shape beautifully when baked. You want them ripe for sweetness, but firm so they don’t turn to mush.
- 1 tbsp sugar + ½ tsp cinnamon: A simple sprinkle for a warm, spiced top.
- 1 tbsp apricot jam (optional, for glaze): This is the professional baker’s trick for a gorgeous, glossy finish. It adds a subtle shine and a hint of extra fruitiness.
Let’s Build This Galette!
Ready? This is where the fun begins. Put on some music, and don’t be afraid to get your hands dirty.
- Make the crust: In a medium bowl, whisk together the 1¼ cups flour, 1 tbsp sugar, and ½ tsp salt. Now, add your super-cold, cubed butter. Using a pastry cutter, two forks, or even your fingertips, work the butter into the flour until the mixture looks like coarse sand with a few pea-sized butter pieces still visible. Chef’s Hack: Those visible butter bits are what will create steam pockets in the oven, leading to that incredible flaky texture. Don’t overwork it! Now, drizzle in the ice water, one tablespoon at a time, and gently mix with a fork until the dough just begins to clump together. You might not need all the water. Dump the shaggy dough onto a piece of plastic wrap, form it into a disk (don’t knead it!), wrap it tightly, and chill in the fridge for at least 30 minutes. This rest period is non-negotiable—it relaxes the gluten and re-chills the butter.
- Preheat and Roll: Preheat your oven to 375°F (190°C). Take your chilled dough disk and place it on a large piece of parchment paper. This is our secret weapon for easy moving! Lightly flour your rolling pin and roll the dough from the center out, turning it occasionally, until you have a rough circle about 12 inches across and ⅛-inch thick. Don’t worry about it being a perfect circle—rustic is the goal! Chef’s Tip: If the dough is cracking, let it sit for 5 minutes at room temperature to soften just a touch.
- Whip Up the Almond Filling: In a small bowl, mix together the ½ cup almond flour, ¼ cup sugar, 1 egg, 2 tbsp softened butter, and ½ tsp almond extract. Stir until it’s completely smooth and creamy. This is your frangipane! Spread this mixture evenly over the center of your dough circle, leaving a clean 2-inch border all the way around.
- Arrange the Pears: Slice your pears thinly, about ¼-inch thick. You can core them first, or I sometimes just slice around the core—your call! Now, get artistic. Arrange the slices in a concentric spiral or in overlapping rows right on top of the almond filling. This is your chance to make it pretty. Sprinkle the arranged pears with the mix of 1 tbsp sugar and ½ tsp cinnamon.
- The Big Fold: Here’s the signature galette move. Carefully fold the bare 2-inch border of dough up and over the edge of the filling. As you work your way around, fold and pleat the dough every few inches. It’s okay if it cracks a little—just pinch it back together. This isn’t about perfection; it’s about character!
- Bake to Golden Perfection: Slide the parchment paper with the galette directly onto a baking sheet. Bake for 35-40 minutes, or until the crust is a deep golden brown and the almond filling is puffed and set. Your kitchen will smell absolutely incredible.
- The Glaze (Optional but Recommended): If you’re using the apricot jam, warm it in the microwave for 15-20 seconds until it’s runny. Use a pastry brush to gently glaze the warm pear slices. This adds a beautiful professional finish and a little extra layer of flavor.
How to Serve This Masterpiece
Let the galette cool on the baking sheet for at least 15-20 minutes before you even think about cutting into it. This allows the juices to set so it doesn’t fall apart. I love serving big, warm slices right out of the oven, maybe with a scoop of vanilla bean ice cream slowly melting over the top. A dollop of freshly whipped cream or even a drizzle of cold cream is also a winner. For a truly next-level experience, a tiny sprinkle of flaky sea salt right before serving creates an amazing sweet-and-salty contrast.
Mix It Up & Make It Yours
The beauty of a recipe like this is its versatility. Don’t be afraid to play!
- Apple Cinnamon Swap: Not a pear person? Use 2-3 firm, tart apples like Granny Smith or Honeycrisp instead. Toss the slices with a squeeze of lemon juice first to prevent browning.
- Chocolate Hazelnut Twist: Swap the almond extract for vanilla and swirl 2 tablespoons of Nutella or chocolate hazelnut spread into the frangipane before spreading it.
- Ginger-Spiced: Add ¼ teaspoon of ground ginger or even some finely chopped crystallized ginger to the sugar-cinnamon mix for a warm, spicy kick.
- Venture into Berries: In the summer, skip the pears and use a mix of raspberries, blueberries, and blackberries. Just pat them very dry before arranging.
- Gluten-Free Friendly: Use a 1:1 gluten-free all-purpose flour blend for the crust. The result is just as delicious and flaky!
Jackson’s Kitchen Notes
I’ve made this galette more times than I can count, and it’s evolved from a “special occasion” recipe to a “I need dessert now” staple. The biggest lesson? Embrace the mess. My first attempt looked like a delicious pastry asteroid—lopsided, leaking a little juice, but oh my goodness, it tasted incredible. Don’t get hung up on looks. The flavor is what wins people over every single time. I also started adding the almond extract after a happy accident where I grabbed the wrong bottle, and it was the best mistake I ever made. It just makes the almond flavor sing. This recipe is a template for your own creativity. Make it, share it, and make some messy, delicious memories of your own.
Galette FAQs: Your Questions, Answered
Q: My dough is too sticky and hard to roll. What did I do wrong?
A: This usually means either the butter was too warm to start with, or a bit too much water was added. No worries! Just flour your work surface and rolling pin generously. If it’s really sticking, you can roll it out between two pieces of parchment paper—it’s a lifesaver technique.
Q: Why did my galette leak juice everywhere in the oven?
A A little leaking is normal and part of the rustic charm! But a river of juice usually means the pears were very ripe and extra juicy, or the folds in the crust weren’t quite tight enough. Make sure your fruit is firm, and really press your pleats down firmly to create a barrier. Placing the baking parchment on a baking sheet with a lip will catch any rogue juices.
Q: Can I make any part of this ahead of time?
A: Absolutely! You can make the dough disk up to 2 days in advance and keep it wrapped in the fridge. You can also whip up the almond filling and keep it covered in the fridge for a day. For the freshest result, I recommend assembling and baking the same day, but a baked galette actually keeps wonderfully at room temperature for a day.
Q: My crust isn’t getting golden brown. Help!
A: Ovens can vary. If your crust is looking pale after 40 minutes, your oven might run cool. Don’t be afraid to leave it in for another 5-10 minutes. You can also brush the crust with an egg wash (1 egg beaten with a tbsp of water) before baking for a deeper, shinier brown color.
Pear & Almond Galette
- Total Time: 1 hour 5 minutes
- Yield: 8 1x
Description
Rustic elegance at its finest—this free-form tart wraps tender pear slices in a flaky crust with a sweet almond filling tucked underneath. It’s buttery, nutty, and just the right amount of fancy without the fuss.
Ingredients
For the Crust:
1¼ cups all-purpose flour
1 tbsp sugar
½ tsp salt
½ cup cold unsalted butter, cubed
3–4 tbsp ice water
For the Almond Filling:
½ cup almond flour
¼ cup sugar
1 egg
2 tbsp butter, softened
½ tsp almond extract
For the Pears:
2–3 ripe pears, thinly sliced
1 tbsp sugar
½ tsp cinnamon
Optional: 1 tbsp apricot jam for glaze
Instructions
Make the crust: In a bowl, combine flour, sugar, and salt. Cut in butter until crumbly. Add ice water 1 tbsp at a time until dough holds together. Form into a disk, wrap, and chill for 30 minutes.
Preheat oven to 375°F (190°C). Roll chilled dough into a 12-inch circle on parchment paper.
Make almond filling: Mix almond flour, sugar, egg, butter, and almond extract until smooth. Spread in the center of the dough, leaving a 2-inch border.
Arrange pears over the filling in a spiral or overlapping rows. Sprinkle with sugar and cinnamon.
Fold edges of dough over the filling, pleating gently. Bake for 35–40 minutes until golden brown.
Optional: Brush pears with warmed apricot jam for a glossy finish.
- Prep Time: 25 mins (plus chilling)
- Cook Time: 40 minutes
Nutrition
- Calories: 310 / Serving
- Sugar: 14g / Serving
- Sodium: 140mg / Serving
- Fat: 19g / Serving
- Carbohydrates: 30g / Serving
- Fiber: 3g / Serving
- Protein: 5g / Serving
Nutritional Info (Per Slice, 8 servings)
Serves: 8 | Prep Time: 25 mins (plus chilling) | Cook Time: 40 mins
- Calories: ~310
- Carbs: 30g
- Protein: 5g
- Fat: 19g
- Fiber: 3g
- Sugar: 14g
- Sodium: ~140mg
*Please note: These are estimates generated by an online calculator. For precise dietary needs, please use your preferred nutritional analysis tool with the exact brands and quantities you use.
Final Thoughts
The beauty of a Rustic Pear & Almond Galette is that it manages to feel both effortless and elegant at the same time. With its flaky, golden crust, velvety almond filling, and tender spiced pears, this dessert is proof that “fancy” doesn’t have to mean fussy. It’s the kind of bake that turns a simple weeknight into something special and makes any gathering feel like a celebration.
What I love most is how forgiving it is—you don’t need perfect edges or a flawless spiral of pears for this galette to wow a crowd. In fact, its charm comes from the little folds and imperfections that make each one unique. Whether you serve it warm with ice cream, cool with a dollop of cream, or sneak a slice straight off the pan, this galette is guaranteed to become a recipe you’ll reach for again and again. So roll out that dough, embrace the rustic, and let this simple yet stunning dessert earn its place in your fall baking rotation.


