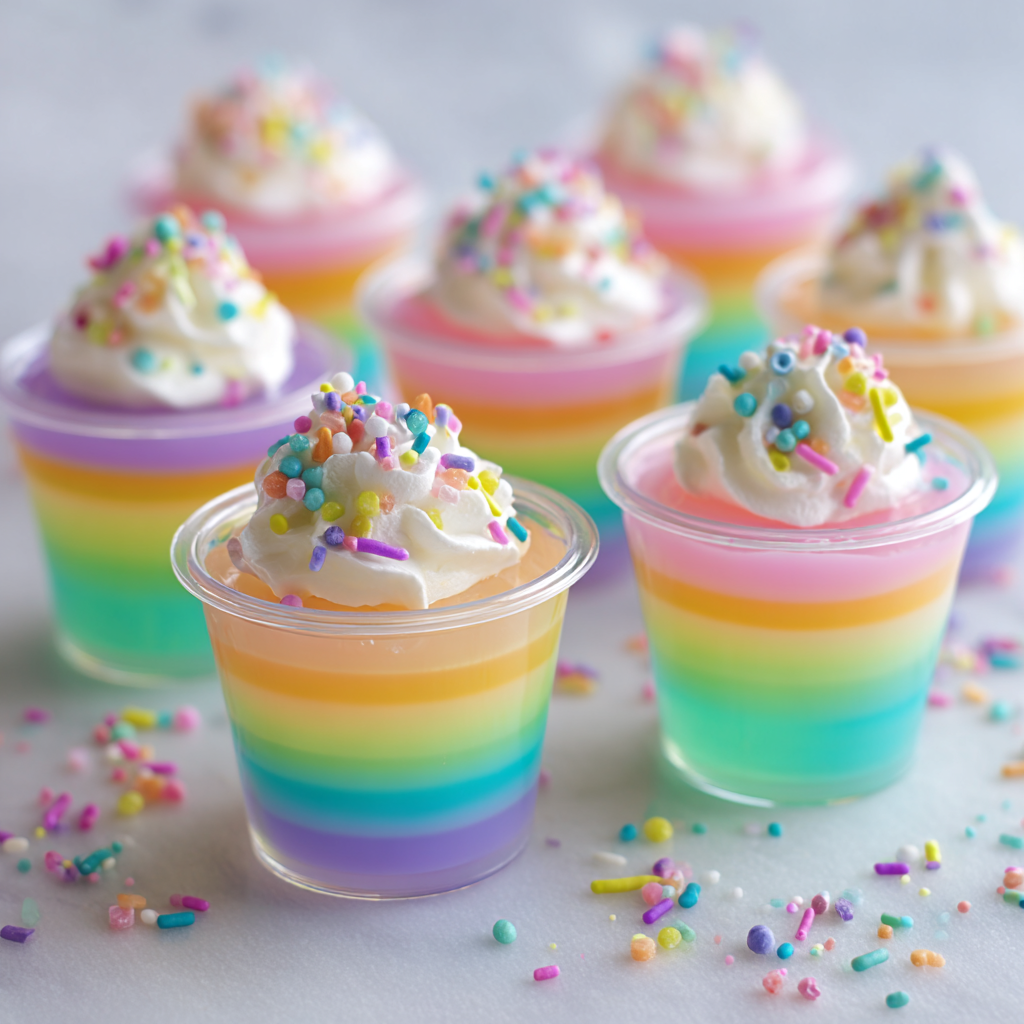
Let’s Make Some Magic: Pastel Rainbow Gelatin Cups
Hey there, friend! Jackson here from Food Meld. Can you smell that? It’s the scent of spring creeping through the kitchen window – a little bit of fresh grass, a hint of blooming flowers, and the undeniable, sugary promise of a holiday dessert table. Easter’s rolling around, and if your mind just jumped to complicated baked goods or hours of fussy decorating, I’m here to stop you right there. I’m a firm believer that the most show-stopping treats are often the ones that let you have the most fun making them. Enter my Pastel Rainbow Gelatin Cups.
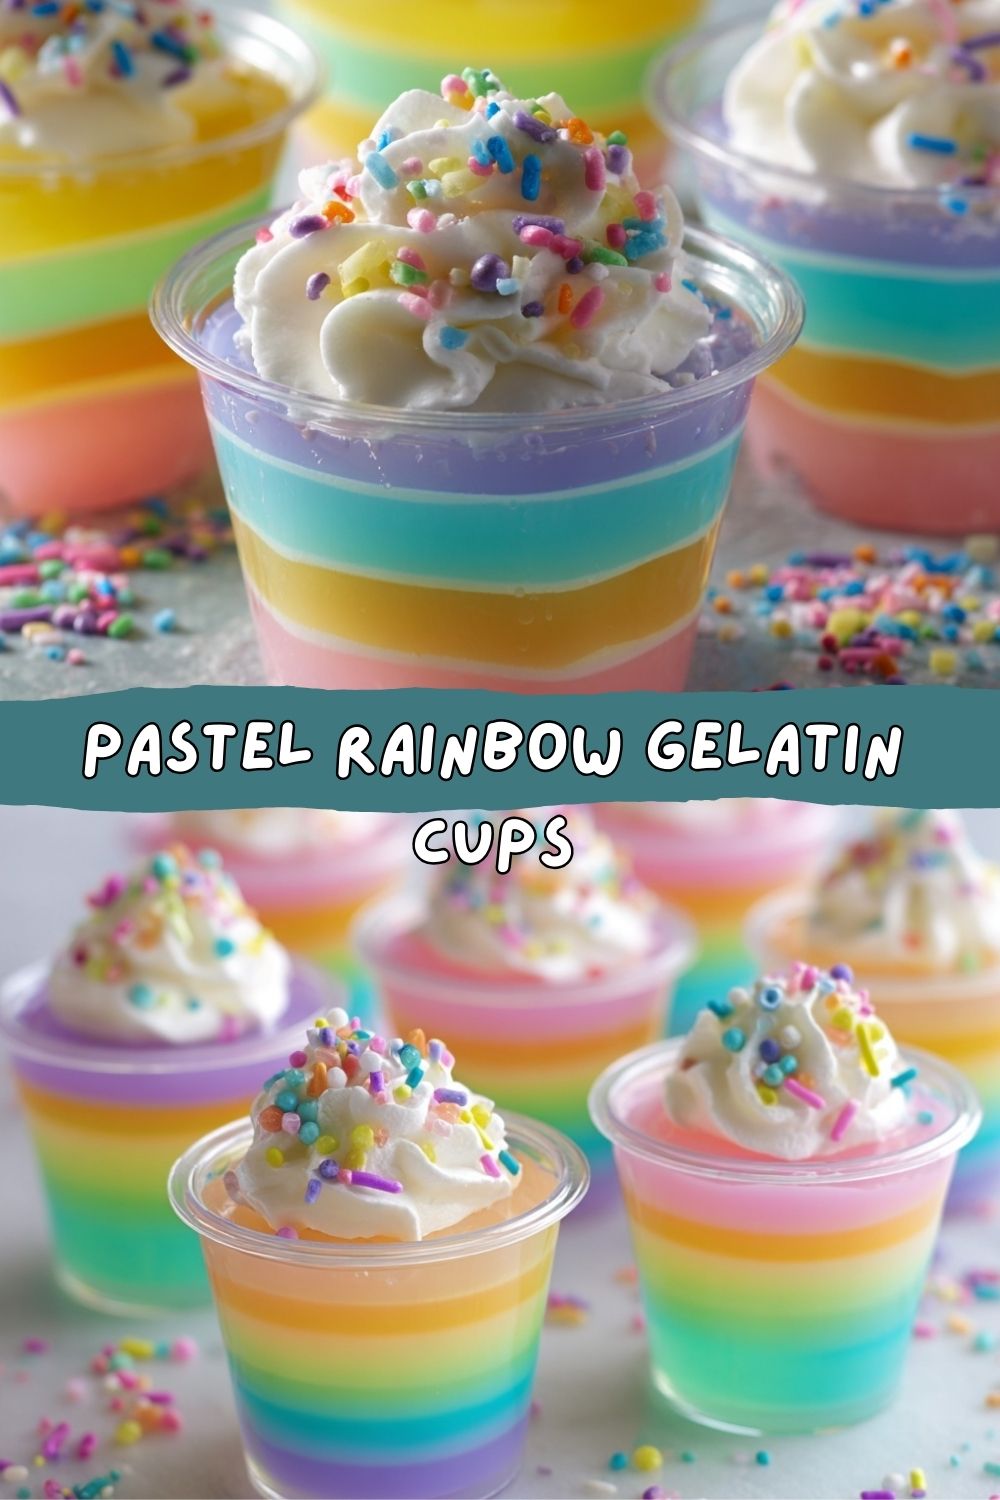
These little guys are pure, jiggly joy. We’re talking soft, sunset-colored layers stacked up in a clear cup, each one smooth and sweet, creating a dessert that’s as much a centerpiece as it is a delicious bite. They sparkle. They shimmer. And when a kid (or a kid-at-heart) sees them, their eyes light up like you’ve just presented edible treasure. The best part? This isn’t a test of your culinary degree. It’s a simple, forgiving process that’s perfect for little helpers. It’s about creating those “wow” moments without the stress. So, grab your favorite mixing bowl and a bunch of clear cups – we’re about to cook up some colorful, unforgettable fun that tastes as good as it looks.
A Story in Layers: My Rainbow Connection
This recipe takes me straight back to my grandma’s linoleum-floored kitchen. She wasn’t a fancy pastry chef; she was a master of “making do” with magic. One rainy spring Saturday, she pulled out a box of strawberry Jell-O and a handful of mismatched juice glasses. “We’re building a sky,” she declared. I watched, utterly captivated, as she created a thin, ruby-red layer. Then, after what felt like a lifetime of waiting, she poured a sunny yellow layer on top. It was the first time I understood food could be built, not just made.
We didn’t have every color of the rainbow, but we had imagination. That wobbly, two-toned dessert felt more special than any store-bought cake. It was ours. That’s the spirit I bring to these Rainbow Cups. It’s not about rigid perfection. It’s about the giddy anticipation between layers, the pride of creating something beautiful with your own hands, and the shared smile when you finally dig a spoon through all that colorful history. It’s a tradition that’s as light and bright as the dessert itself.
Gathering Your Rainbow: What You’ll Need
Here’s the beautiful part: the ingredient list is super short. The magic is in the process. I like using the standard boxes of flavored gelatin for their vibrant, consistent color and ease. But I’ll also give you some “chef’s choice” twists if you want to play!
- 4–5 boxes of flavored gelatin in pastel colors Think: strawberry (pink), lemon (yellow), lime (green), berry blue (blue), and grape (purple). This is your palette! Chef’s Insight: Using 5 boxes gives you a fuller rainbow, but 4 works beautifully too. I often skip blue or purple if I want a softer “Easter egg” palette.
- 4–5 cups boiling water & 4–5 cups cold water You’ll use these according to the package directions for each box. Chef’s Hack: I always boil a full kettle at the start. Having hot water ready to go makes the layering process smooth and fast.
- Clear plastic cups or small glass jars (6-8 oz size) This is non-negotiable! The clear vessel is your canvas. You have to see those gorgeous layers. Mason jars, parfait glasses, or even sturdy disposable cups work great.
- Whipped cream (optional, but highly recommended) A fluffy cloud on top mimics a spring sky. Use fresh whipped cream, the stuff from a can (no judgment!), or even a dollop of vanilla yogurt.
- Sprinkles (the ultimate festive confetti) Pastel nonpareils, tiny Easter egg sprinkles, or even a dusting of colored sugar. This is where you and your helpers can go wild with personality.
Want a Natural Twist? You can swap a boxed gelatin layer with a homemade version using plain gelatin powder, 100% fruit juice (like pomegranate, orange, or white grape), and a touch of honey. The colors will be more muted, earthy, and stunning in their own way.
Building Your Edible Rainbow: Step-by-Step
Ready? Put on some music, clear a shelf in your fridge, and let’s build. The key here is patience between layers, but I’ve got a trick to speed things up, too.
- Prep Your Station. Line up your clear cups on a small baking sheet or tray. This makes them easy to transport to the fridge without the dreaded jelly-jiggle-wobble-spill. Trust me on this one.
- Layer One: The Foundation. Choose your starting color (I often go from purple at the bottom to pink at the top, but reverse rainbows are cool too!). Dissolve the first gelatin packet completely in 1 cup of boiling water. Stir for a full 2 minutes – no lazy stirring! Then stir in 1 cup of cold water. Chef’s Hack: To create thinner, more numerous layers, you can split this mixture between more cups, or use only 3/4 of the liquid. Pour your first layer into each cup, filling them only about 1/6th of the way. Carefully slide the tray into the fridge.
- The Waiting Game (The Fast-Forward Version). Here’s the big tip: you don’t need to wait for a layer to be rock solid. You just need it set enough to hold the next layer without them mixing. This takes about 20-30 minutes in a standard fridge. To speed it up dramatically, pop the cups in the freezer for 10-15 minutes. Just set a timer! Don’t let it freeze.
- The Finger Test & The Gentle Pour. Gently touch the surface of the set gelatin. It should be firm and not stick to your finger. Now, for the next layer: prepare your next color. The most crucial step is to let this new mixture cool to room temperature before pouring. If it’s too hot, it will melt the layer below! I pour it from the measuring cup, aiming it over the back of a spoon held just above the set layer. This disperses the force and prevents a breakthrough.
- Repeat with Joy! Keep going! Chill, test, cool your liquid, and pour. This rhythm is meditative. It’s your kitchen dance. If a layer mixes a tiny bit, don’t sweat it. It creates a cool ombre effect. Embrace the “handmade” vibe.
- The Final Chill. Once your last layer is poured, give the whole tray a solid 1-2 hours in the fridge to become completely firm. This is when the magic really sets.
Presenting Your Masterpiece
This is the grand reveal! Pull those sparkling cups out of the fridge. See how the light catches each pastel band? Gorgeous. For serving, keep it simple and elegant. Just before your guests arrive or the kids come running to the table, add the finishing touches. A generous swoosh of whipped cream on top looks like a fluffy cloud. Then, the crowning glory: a pinch of cheerful sprinkles. For an extra-special brunch or dinner, arrange them on a platter scattered with a few real or faux spring flowers (keep them away from the rims!). The contrast is stunning. Provide long spoons so everyone can dive right down to the bottom and get a perfect bite of every single layer.
Mix It Up! Creative Twists on the Rainbow
Once you’ve mastered the basic rainbow, the playground is open. Here are a few of my favorite ways to riff on this theme:
- The Creamy Dream: Replace the cold water in ONE of your layers (the white one, if you’re doing a classic rainbow) with cold canned coconut milk or sweetened condensed milk. It creates a stunning, opaque white layer that tastes incredible.
- Fruity Confetti: After you pour a warm gelatin layer but before it sets, stir in a small handful of finely diced fresh fruit. Think mango in the orange layer, blueberries in the blue, or kiwi in the green. It adds texture and bursts of real fruit flavor.
- The “Shirley Temple” Sparkler: For an adults-only version, replace the cold water in each layer with chilled lemon-lime soda or ginger ale. It adds a subtle fizz and flavor complexity. You can even swap a layer’s cold water with a little vodka or champagne for a celebratory cocktail cup (serve with a disclaimer!).
- Layered Parfait: Break the rules! Instead of waiting for each layer to set, let them all cool to room temperature. Then, quickly but carefully, pour each one sequentially into the cup. You’ll get wild, swirling, tie-dye effects that are totally unique for each cup.
Jackson’s Chef Notes & Kitchen Confessions
I’ve made these more times than I can count, and they’ve starred at everything from Easter potlucks to baby showers. My favorite “oops” moment? I once forgot the cold water in a lime layer. I poured hot, super-concentrated lime gelatin onto a set strawberry layer. Let’s just say I invented “Lime-Strawberry Fusion Soup” that day. Not my finest hour, but a great lesson in reading directions! Over time, I’ve learned that the personality of these cups comes from their slight imperfections. A wavy line between colors, a bubble trapped inside, a sprinkle that sank—these aren’t mistakes, they’re proof of a good time in the kitchen. The recipe has evolved from my grandma’s two-layer sky to my full rainbow, but the heart of it—playful, colorful, shared creation—is exactly the same.
Your Questions, Answered
Q: My layers are mixing! What am I doing wrong?
A: Two likely culprits: 1) The layer below isn’t set enough. Give it more time or use the freezer trick. 2) Your new gelatin liquid is too hot. Let it sit on the counter until it’s no longer warm to the touch (room temperature) before pouring.
Q: Can I make this in one big dish instead of cups?
A: Absolutely! Use a clear glass 9×13 dish. The layering process is the same, but each chill time needs to be longer—more like 30-40 minutes per layer—since there’s more volume to set. You’ll slice it into gorgeous, layered squares to serve.
Q: How far in advance can I make these?
A: They’re perfect for making ahead! Prepare them completely (without toppings) up to 2 days in advance. Cover the tray with plastic wrap. Add the whipped cream and sprinkles within an hour of serving so they stay fresh and perky.
Q: My gelatin is super wobbly/soft even after hours. Help?
A> This usually means your fridge is overcrowded or not cold enough. Ensure there’s good air circulation around the cups. If you’re in a hurry, the freezer is your friend—just don’t forget them in there!
A Quick Note on Nutrition
Let’s keep it real: this is a celebratory dessert, a treat meant for joy. A standard serving (one cup with all layers) made with name-brand gelatin has about 110 calories, 26g of carbohydrates (primarily from sugar), and 2g of protein from the gelatin itself. It’s fat-free and a low-sodium option. The values can vary if you use sugar-free gelatin (which works perfectly in this recipe, by the way) or add creamy layers. The whipped cream and sprinkles add extra calories and sugar, so you can adjust those to your liking. For me, it’s all about balance. We eat our veggies, we enjoy our colorful, jiggly rainbow cups. It’s all part of a life well-fed.
Let’s Keep the Fun Going!
And there you have it! You’re now officially a Rainbow Gelatin Architect. I hope you have a blast making these as much as I do. The true success of this recipe isn’t just in the perfect layers (though they are pretty satisfying), but in the laughter while you wait, the curiosity in a child’s eyes as they watch the colors stack up, and the simple, sweet pleasure of eating something you built together. That’s the whole spirit of Food Meld: taking simple ideas, mixing them with a little creativity and a lot of heart, and creating something unforgettable. So, go forth and make a rainbow. Then, tag me on social @FoodMeld so I can see your beautiful, jiggly creations! Happy Easter, happy spring, and happy cooking, my friend. Until next time, let’s keep making the kitchen our favorite playground.