Your New Favorite Dinner is Just One Pot Away
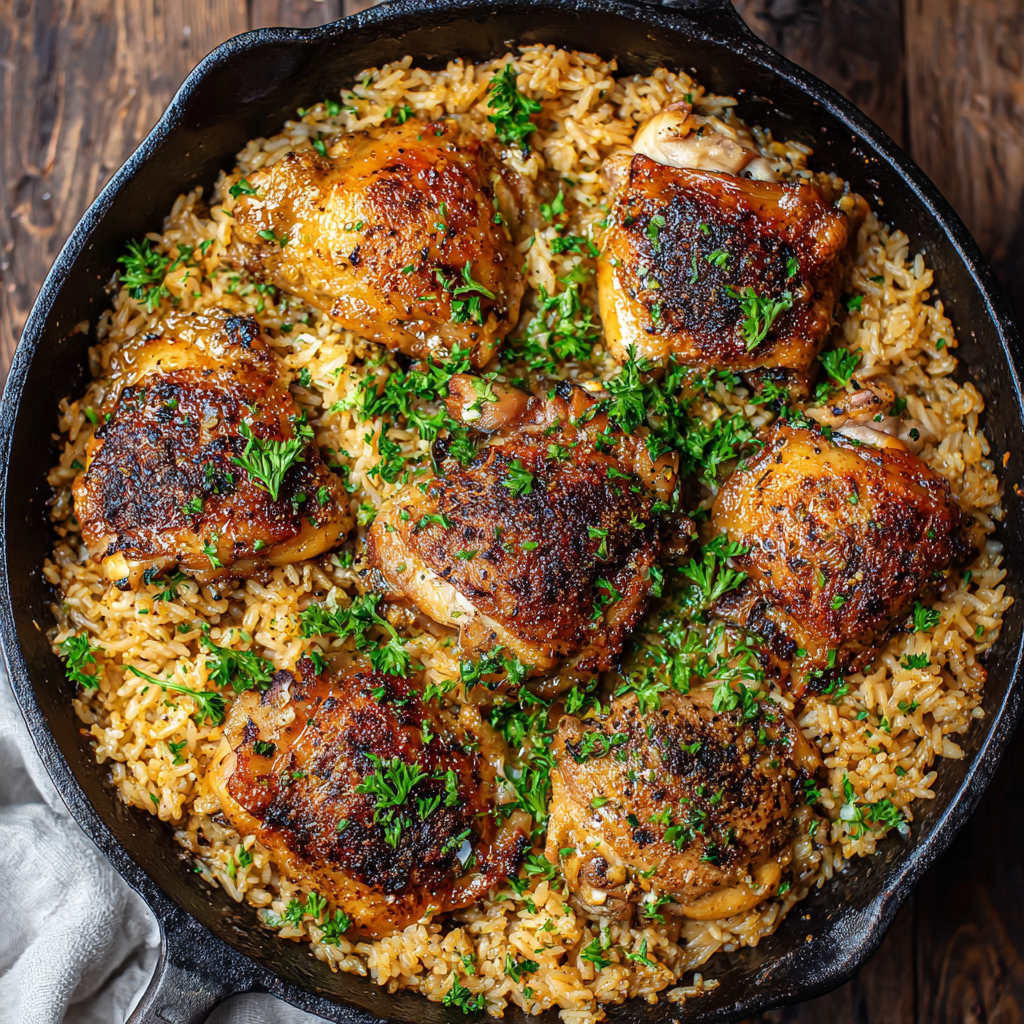
Hey friends, Jackson from Food Meld here. Let’s talk about a universal truth: we all want a dinner that’s a total showstopper, but we don’t always have the time or energy for a mountain of dishes. Sound familiar? That’s exactly why I’m so obsessed with one-pan wonders, and this One-Pot Garlic Butter Chicken and Rice is the undisputed champion of my weeknight lineup.
Imagine this: juicy, seared chicken thighs with that perfect, crispy skin, nestled into a bed of the most fragrant, buttery rice you’ve ever tasted. The rice cooks slowly in the same pan, soaking up every single drop of flavor from the chicken, the garlic, and all those little browned bits at the bottom of the skillet (that’s the good stuff, my friends!). The result is a cozy, complete meal that feels like a warm hug from the inside out. It’s the kind of dish that makes everyone at the table ask, “What’s the special occasion?” and you get to smile and say, “Just Tuesday.”
I’ve tested this recipe more times than I can count, tweaking and tuning it until it’s absolutely foolproof. Whether you’re just starting your cooking journey or you’re a seasoned pro looking for a new go-to, this recipe is for you. It’s simple, it’s real, and it’s absolutely packed with the kind of bold, comforting flavor we love here at Food Meld. So, grab your favorite skillet, and let’s cook something awesome together.

A Skillet Full of Memories
This dish always takes me right back to my grandma’s kitchen in Georgia. She wasn’t a fancy chef, but man, could she make a chicken sing. She had this old, cast-iron skillet that was smoother than glass from decades of use. Her version of this was simpler—just chicken, rice, and a whole lot of love—but the principle was the same: one pot, big flavor, and everyone leaves the table happy.
I remember one sweltering summer evening, the power went out right as she was starting dinner. Undeterred, she just moved her operation to the grill outside. She seared that chicken in her trusty cast iron right over the coals, and we all sat on the porch steps eating this incredible, smoky version of her classic. It was in that messy, unplanned moment that I truly got it: cooking isn’t about perfection. It’s about the joy you pour into the food and the people you share it with. That “what if we tried this?” energy is the heart and soul of this recipe, and I hope it becomes a part of your own story, too.
Gathering Your Flavor Arsenal
Here’s everything you’ll need to create this masterpiece. Don’t stress if you’re missing an item or two—I’ve included my favorite swaps and chef insights to help you make it your own!
- 4–6 bone-in, skin-on chicken thighs: This is the MVP. The bone keeps the meat incredibly juicy, and that skin? It’s going to get golden and crispy, rendering fat that will flavor the entire dish. Chef’s Insight: If you only have boneless, skinless thighs, that’s okay! Just reduce the initial searing time by a minute or two per side.
- Salt and pepper, to taste: The foundation of all good seasoning. Don’t be shy here—season that chicken generously!
- 1 teaspoon paprika: This adds a subtle sweetness and a beautiful red hue to the chicken skin. Smoked paprika would be a fantastic twist for a deeper flavor.
- 1 tablespoon olive oil: We use this to kickstart the searing process and prevent the butter from burning right away.
- 3 tablespoons unsalted butter (divided): Butter makes everything better, right? We use a little for searing and the rest for building our aromatic base. Using unsalted lets you control the sodium level perfectly. Substitution Tip: A great dairy-free butter alternative works beautifully here.
- 1 small onion, finely chopped: This sweet, aromatic base is the start of our flavor foundation.
- 4 garlic cloves, minced: Garlic and butter are a match made in heaven. Fresh is best here for that sharp, fragrant punch! Chef’s Insight: If you’re in a real pinch, 1 teaspoon of garlic powder can work, but fresh really shines.
- 1 cup long-grain white rice (uncooked): I like long-grain for its fluffy, separate texture. Important Note: Do NOT use instant or pre-cooked rice. It will turn to mush.
- 2 ¼ cups chicken broth: This is the liquid that will cook our rice and infuse it with savory goodness. Using broth instead of water is a total game-changer for flavor. Substitution Tip: Vegetable broth works just fine for a pescatarian version!
- 1 teaspoon dried thyme or Italian seasoning: Herbs for the win! Thyme is classic, but an Italian blend adds a lovely, aromatic complexity.
- Fresh parsley, for garnish (optional): A little sprinkle of green at the end adds a pop of color and a fresh flavor that cuts through the richness.
Let’s Build Some Flavor, Step-by-Step
Okay, team. This is where the magic happens. Follow these steps, and you’ll have a perfect one-pot meal in no time. I’ve packed this section with all my favorite little hacks to ensure your success.
- Pat that Chicken Dry: This might be the most important tip in the whole recipe! Use a paper towel to thoroughly pat the chicken thighs dry. Removing that surface moisture is the secret to getting skin that’s crackling-crispy, not pale and steamed. Season both sides generously with salt, pepper, and that teaspoon of paprika. Chef’s Hack: I like to season the chicken about 15 minutes before cooking and let it sit on the counter. Taking the chill off helps it cook more evenly.
- Sear to Perfection: Heat the olive oil and 1 tablespoon of the butter in a large, oven-safe skillet or Dutch oven over medium-high heat. When the butter is melted and sizzling, carefully place the chicken thighs in the pan, skin-side down. Don’t move them! Let them sear for a solid 4-5 minutes until the skin is golden brown and releases easily from the pan. Flip and cook for another 3-4 minutes. They don’t need to be cooked through yet—we’re just building flavor and color. Remove them to a plate and set aside. Chef’s Commentary: Those browned bits left in the pan? That’s fond, and it’s pure flavor gold. We’re about to put it to work!
- Build Your Aromatic Base: Reduce the heat to medium. Add the remaining 2 tablespoons of butter to the skillet. Once melted, add the chopped onion and sauté for 2-3 minutes until it starts to soften. Now, add the minced garlic and cook for just another 30-60 seconds until it’s incredibly fragrant. Be careful not to burn it! Chef’s Hack: If things are cooking too quickly, just pull the pan off the heat for a moment while you add the garlic. Burnt garlic is bitter, and we want sweet, fragrant goodness.
- Toast the Rice: Stir in the uncooked rice. We’re going to toast it for a minute in that buttery onion and garlic mixture, coating every grain. This simple step gives the rice a wonderful nutty flavor and helps it stay beautifully separate after cooking.
- Simmer and Nestle: Pour in the chicken broth and add your dried herbs. Give everything a good stir, scraping up all that delicious fond from the bottom of the pan. Bring the liquid to a lively simmer. Now, carefully nestle the seared chicken thighs back into the skillet, right on top of the rice. Pour any accumulated juices from the plate over everything. Chef’s Insight: The liquid should just cover the rice but not the chicken. We want that skin to stay crispy!
- The Gentle Cook: Cover the skillet tightly with a lid, reduce the heat to low, and let it cook undisturbed for 20-25 minutes. This is a trust-the-process moment! No peeking—we need to trap that steam to cook the rice perfectly. The dish is done when the rice has absorbed all the liquid and is tender, and the chicken has an internal temperature of 165°F.
- The Final Rest: Turn off the heat and let the skillet rest, still covered, for about 5 minutes. This allows the rice to steam to fluffy perfection and makes everything easier to serve. Remove the lid, fluff the rice around the chicken with a fork, garnish with fresh parsley, and get ready for the applause.
Plating Up Your Masterpiece
How you serve this dish is part of the fun! I’m a big believer that we eat with our eyes first. Here’s how I like to do it:
Use a large spoon to scoop up that glorious, buttery rice and create a bed on each plate. Place a golden-brown chicken thigh right on top, letting it be the star of the show. Spoon a little extra rice around the sides. That crispy skin should be front and center!
While this meal is a complete powerhouse on its own, a simple, bright side dish can really make it sing. A quick arugula salad with a lemony vinaigrette cuts through the richness beautifully. For something heartier, some roasted green beans or asparagus are fantastic. And don’t forget a big wedge of crusty bread for mopping up every last bit of that garlic-butter sauce at the bottom of the skillet—trust me, you won’t want to leave a single drop behind.
Mix It Up & Make It Yours!
This recipe is like a blank canvas for your cravings. Here are a few of my favorite twists to keep things exciting:
- “Sun-Dried Tomato & Spinach” Twist: After toasting the rice, stir in ¼ cup of chopped sun-dried tomatoes. In the last 5 minutes of cooking, scatter a few large handfuls of fresh spinach over the top before putting the lid back on. It wilts down into the rice for a pop of color and flavor.
- “Lemon Herb” Brightness: Add the zest of one lemon to the broth, and squeeze the juice over the finished dish right before serving. Fresh herbs like dill or tarragon are a game-changer here.
- “Creamy Mushroom” Comfort: After searing the chicken, sauté 8 oz of sliced cremini mushrooms with the onions until they’re golden brown. Proceed with the recipe as written for an ultra-savory, earthy version.
- “Spanish-Inspired” Fiesta: Swap the paprika for 1 tsp smoked paprika and a pinch of saffron (if you have it). Stir in ½ cup of frozen peas and ¼ cup of chopped roasted red peppers right before the final rest.
- Dairy-Free Delight: Easy! Just substitute the butter with your favorite plant-based butter or extra olive oil. The flavor will still be incredible.
Jackson’s Kitchen Notes
This recipe has been a living, evolving thing in my kitchen. The first time I made it, I was so nervous about the rice cooking through that I kept lifting the lid to check. Big mistake! I ended up with crunchy, undercooked rice because I let all the precious steam escape. Let my mistake be your lesson—keep that lid on!
I’ve also learned that not all stovetops are created equal. “Low” on my gas stove might be “medium-low” on yours. If you find your liquid is evaporating too quickly, just reduce the heat a touch. If after 25 minutes your rice is still a bit firm, add a couple tablespoons of warm broth, cover, and cook for another 5 minutes. Cooking is about adapting, and you’ve got this!
Your Questions, Answered!
I’ve gotten a lot of questions about this recipe over the years. Here are the most common ones to help you troubleshoot like a pro.
- Q: Can I use chicken breasts instead of thighs?
A: You can, but you need to be careful! Boneless, skinless chicken breasts can dry out with this longer cooking time. I’d recommend searing them as directed, then setting them aside. Add them back to the pan to nestle into the rice for only the last 10-12 minutes of cooking, just to heat through. Check their temp to ensure they hit 165°F. - Q: My rice is still hard/undercooked. What happened?
A: This usually means there wasn’t enough liquid, the heat was too high so it evaporated too fast, or the lid wasn’t on tight enough. No worries! Just add ¼ cup of warm broth, cover, and cook on low for another 5-10 minutes. Next time, make sure you’re bringing the broth to a good simmer before covering and reducing the heat to the lowest setting. - Q: My rice is mushy. What did I do wrong?
A: Mushy rice typically means too much liquid or too much stirring. Remember the rice-to-liquid ratio (1 cup rice to 2 ¼ cups broth is my sweet spot) and resist the urge to stir it once the chicken is nestled in. Stirring releases the rice’s starch, making it gummy. - Q: Can I make this ahead of time?
A: It’s best served fresh, but you can store leftovers in an airtight container in the fridge for up to 3 days. Reheat gently in the microwave with a splash of broth to keep it moist. The chicken skin will lose its crispiness, but the flavor will still be amazing!
Nutritional Information*
I know many of you like to keep an eye on these things, so here’s a general breakdown per serving (based on 4 servings). Remember, this is just an estimate, and your specific ingredients may cause variations.
- Calories: ~530
- Fat: 28g
- Carbohydrates: 32g
- Protein: 36g
- Sodium: 540mg
- Fiber: 1g
*This information is provided as a courtesy and is an estimate only. Please consider using a nutritional calculator with the exact brands and quantities you use for the most accurate data.
You’ve Got This!
And there you have it, friends—my ultimate one-pot comfort meal. This Garlic Butter Chicken and Rice is more than just a recipe; it’s a reminder that incredible food doesn’t have to be complicated. It’s about layering simple, honest flavors and letting them meld together into something truly special.
I hope this dish becomes a trusted friend in your kitchen, a recipe you turn to on busy nights, and a meal that creates its own delicious memories around your table. Don’t forget to have fun with it. Tweak the herbs, add your favorite veggie, and make it yours.