Your New Secret Weapon: The No-Bake Oreo Dessert That Steals Every Show
Hey friends, Jackson from Food Meld here. Let’s get real for a second. Ever have one of those days where you need a show-stopping dessert, but the thought of turning on the oven feels like a monumental task? Maybe it’s a last-minute potluck, a birthday surprise, or just a Tuesday that deserves a little extra sweetness. I’ve been there more times than I can count. That’s why I’m absolutely obsessed with no-bake desserts, and this one? This No-Bake Oreo Cream Cheese Dessert is the undisputed champion of my recipe box.
We’re talking about a dessert that walks into a room and commands attention. It’s the plate everyone eyes up, the one that sparks whispered “you’ve gotta try this” comments, and the one that vanishes before you can even think about going back for seconds. It’s lush, it’s creamy, it’s got that incredible crunch, and the best part? It’s laughably easy. This isn’t about fancy techniques or hard-to-find ingredients. This is about taking a few simple, powerhouse items and melding them into something truly unforgettable. We’ve taken the classic and given it a few of my signature twists—a hint of lemon zest for brightness, the option for a nutty almond vibe—to make it even more “can’t-put-my-fork-down” delicious. So, grab your favorite mixing bowl and let’s cook up some pure, unadulterated joy. No oven required.
The Midnight Snack That Started It All
This recipe takes me right back to my college days. My roommate, Leo, and I were notorious for our late-night “what if we tried this?” kitchen experiments. One night, after a particularly grueling round of finals, we found ourselves with a package of Oreos, a block of cream cheese, and a serious case of the munchies. We weren’t bakers by any stretch, but we were hungry and determined.
We crushed those Oreos with the back of a heavy textbook (culinary innovation at its finest), mashed them with some melted butter we’d zapped in our dodgy microwave, and pressed it into a pie plate. Then, we just started beating the cream cheese with whatever sweet stuff we had—in this case, some powdered sugar from a donut-making attempt. We slapped it all together, threw it in the fridge, and forgot about it until the next day. When we finally sliced into it, we were blown away. It was creamy, it was crunchy, and it was pure magic. That messy, thrown-together creation was the humble, delicious origin of the dessert you’re about to make. It proved to me that the best food doesn’t have to be complicated—it just has to be made with a little bit of heart and a whole lot of flavor.
Gathering Your Flavor Arsenal
Here’s the beautiful part: you only need a handful of ingredients to create this masterpiece. I’m a big believer in understanding your ingredients, so I’ve added a few chef insights and swaps to make this recipe truly yours.
For the Crust:
- 40 Oreo Cookies: That’s about one standard package. And here’s my biggest tip: do not remove the filling! The cream in the middle adds flavor and helps bind the crust. We’re using the whole cookie, baby.
- 4 tbsp Unsalted Butter, melted: This is the glue that holds our crunchy foundation together. Using unsalted lets you control the salt level, but salted works in a pinch and will just give a slight salty-sweet kick.
For the Luscious Filling:
- 16 oz (two 8 oz blocks) Cream Cheese, softened: This is non-negotiable. Full-fat cream cheese is key for that rich, silky texture and structure. Take it out of the fridge at least an hour before you start—soft cream cheese is the secret to a lump-free, dreamy filling.
- ½ cup Powdered Sugar: Also called confectioner’s sugar. It dissolves instantly into the cream cheese, giving us a smooth sweetness without any grittiness.
- 1 tsp Vanilla Extract: The classic. It rounds out all the flavors beautifully. Chef’s Twist: Try almond extract for a subtle, nutty depth that plays amazingly with the chocolate.
- Zest of 1 Lemon (optional but highly recommended): This is my secret weapon. A little zest doesn’t make it taste lemony; it just cuts through the richness and makes the entire dessert taste brighter and more balanced. Trust me on this one.
For the Toppings (Go Wild!):
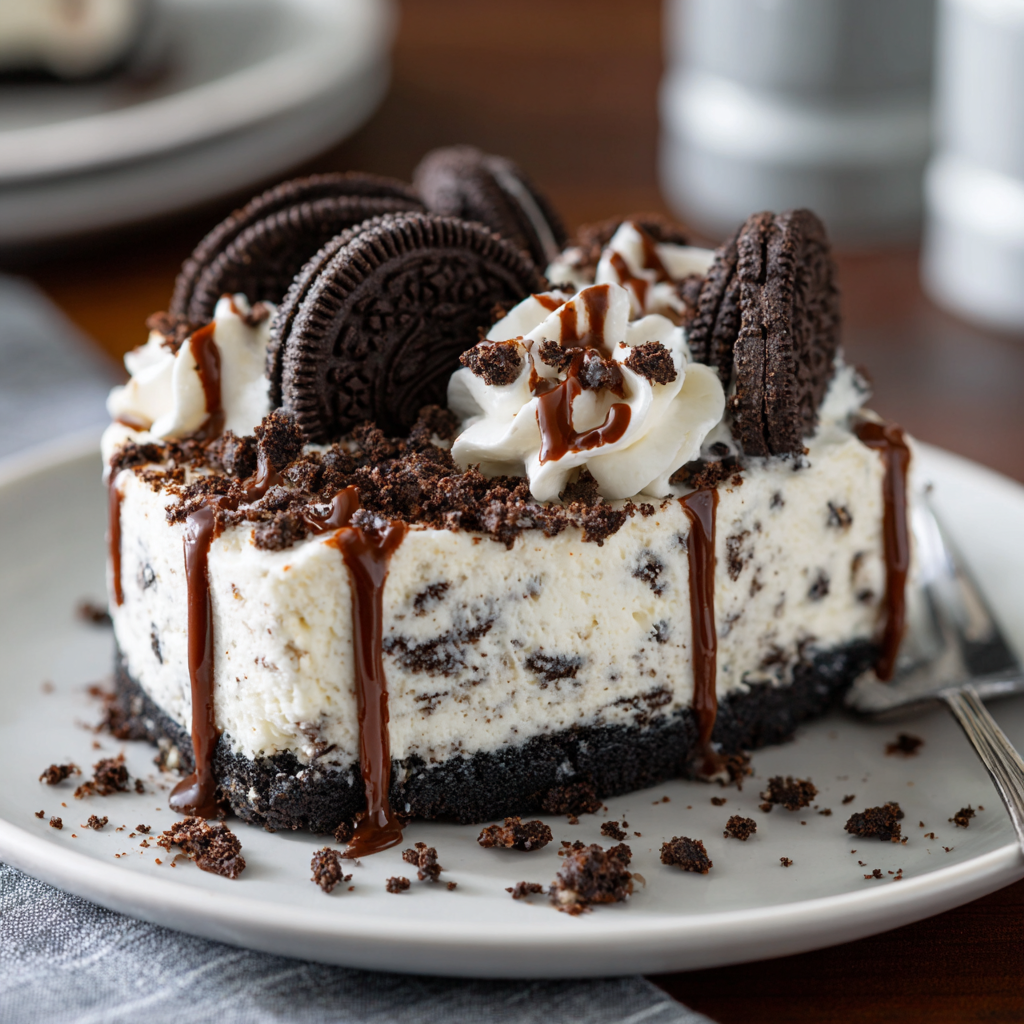
- Chocolate Drizzle: Melted chocolate chips or a store-bought sauce. It’s all about that extra chocolatey punch.
- Crushed Oreos: For more texture and that iconic Oreo look.
- Whipped Cream: A dollop of fresh whipped cream or the stuff from a can—no judgment here!
- Fresh Fruit: Sliced strawberries, raspberries, or even bananas add a fresh, fruity contrast.
- Mini Chocolate Chips or Chopped Nuts: For a little extra crunch and flavor.
Let’s Build This Beauty: Your Step-by-Step Guide
Ready to get your hands dirty? This is the fun part. I’ll walk you through each step with some of my favorite kitchen hacks to ensure perfect results every single time.
Step 1: Make the Crust
First up, we’re building our foundation. You have two main weapons of choice for crushing the Oreos. The food processor is the speed demon—just pulse until you have fine, even crumbs. No processor? No problem. My college method still works perfectly. Toss the Oreos into a large zip-top bag, press out the air, and seal it. Then, grab a rolling pin, a heavy-bottomed pan, or even that textbook, and go to town! Crush them until you have a mix of fine crumbs and a few small chunks for texture.
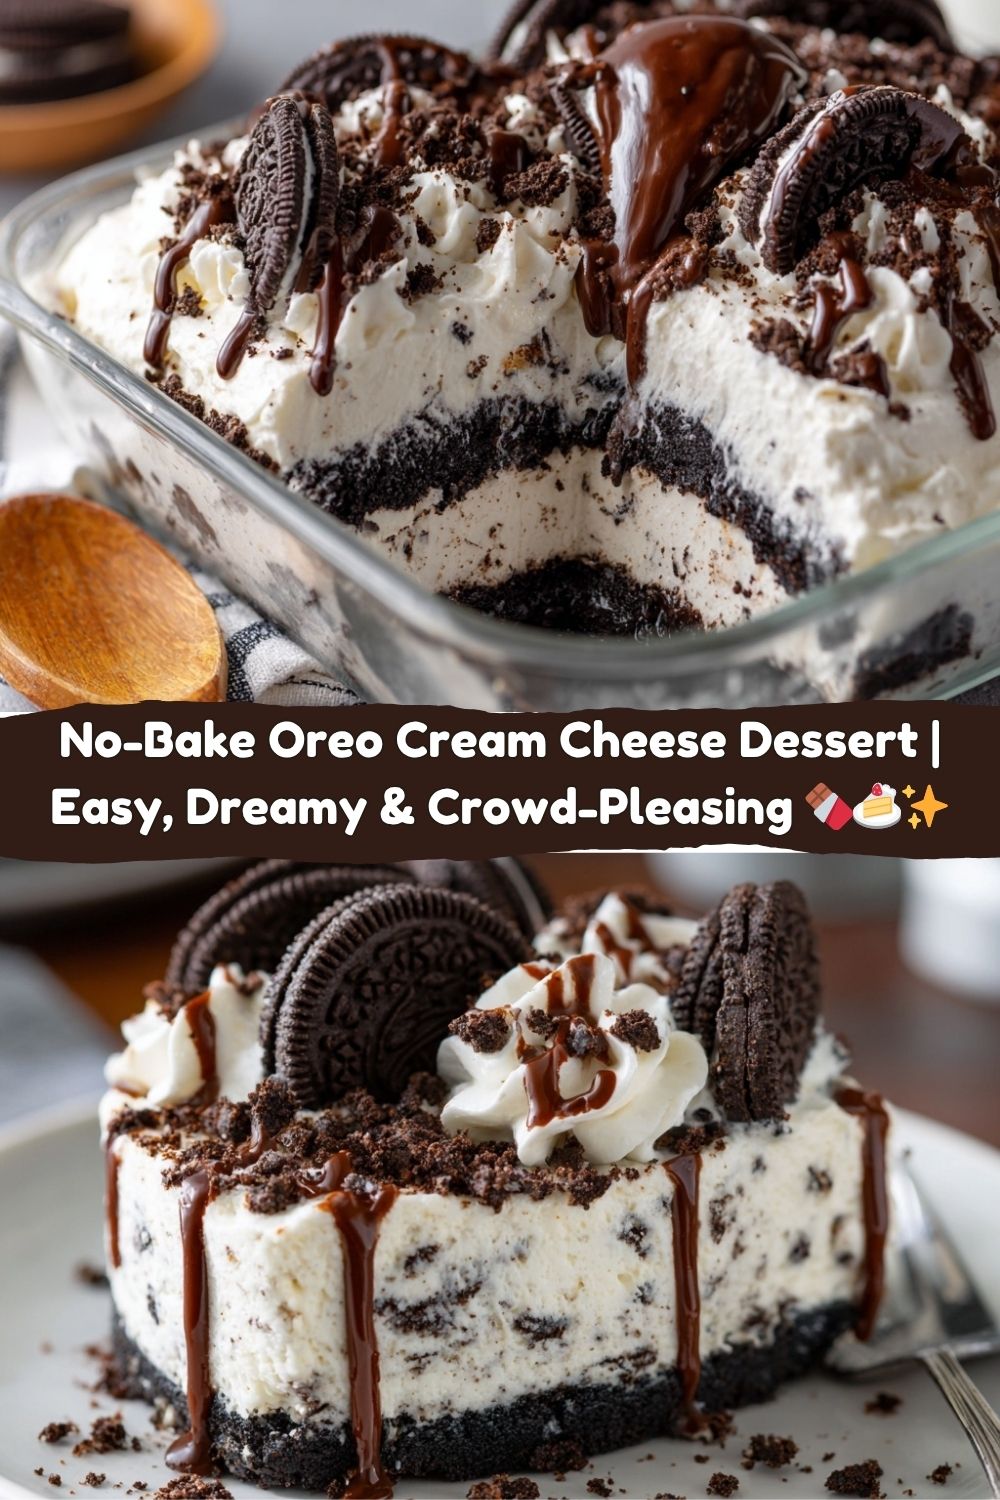
Dump your Oreo crumbs into a bowl and pour the melted butter over them. Mix it with a fork until it looks like wet sand and every crumb is coated. This is crucial for a crust that holds together when you slice it. Now, transfer this glorious buttery crumb mixture into your dish—an 8×8 or 9×9 square pan works great. Chef’s Hack: Use the bottom of a flat measuring cup or a glass to press the crumbs down firmly and evenly. You want a solid, compact layer. Pop this into the fridge for 15-20 minutes to let it set up. This quick chill stops the crust from mixing into the filling later.
Step 2: Whip Up the Dreamy Filling
While the crust is chilling, let’s make the star of the show. In a large mixing bowl, combine your softened cream cheese, powdered sugar, vanilla (or almond) extract, and that magical lemon zest. Now, here’s where muscle or a handy appliance comes in. Using a hand mixer or a stand mixer fitted with the paddle attachment, beat this on medium-high speed for a good 2-3 minutes. Don’t just mix it—beat it! We’re not just combining ingredients; we’re incorporating air into that cream cheese. You’ll know it’s ready when the mixture is completely smooth, pale, and fluffy. Scrape down the sides of the bowl halfway through to make sure everything is perfectly incorporated. No one wants a pocket of un-mixed cream cheese!
Step 3: The Grand Assembly
Pull your now-firm crust out of the fridge. Grab your bowl of fluffy filling and plop it all right on top of the crust. Using an offset spatula or the back of a spoon, gently spread the filling into an even layer, all the way to the edges. Pro-Tip: If you dip your spatula in warm water and shake it off, it will glide smoothly over the filling, giving you a perfectly sleek top.
Step 4: The Topping Extravaganza
This is where you make it your own. Artfully drizzle that melted chocolate. Generously sprinkle on those extra crushed Oreos. Create a beautiful pattern with fresh strawberry slices. Or, go for the triple threat and do all of the above! There are no rules here, only flavor.
Step 5: The Final (and Hardest) Step: The Chill
I know, I know. You want to dig in right now. But patience, young grasshopper, is what transforms this from a creamy mixture into a sliceable, firm, incredible dessert. Cover the pan with plastic wrap and refrigerate it for at least 2 hours, but ideally 4 hours or even overnight. This waiting game allows the flavors to meld together and the structure to set perfectly, so you get those clean, beautiful squares when you cut it.
How to Serve It Like a Pro
When it’s finally time to serve, you want to do it right. Take a sharp knife and run it under hot water. Wipe it dry, and then make your first slice. The hot knife will cut through the creamy filling and crunchy crust like a dream, giving you those pristine, clean edges. Wipe the blade and re-heat it between cuts for the prettiest pieces.
I love serving these on simple white plates to let the gorgeous layers of chocolate, cream, and toppings really pop. Add a final little flourish right before serving—a fresh mint leaf, a tiny extra dollop of whipped cream, or a single, perfect raspberry on the side. It’s those little touches that make people feel like they’re getting a dessert from a fancy bakery, right from your own kitchen.
Mix It Up! Creative Twists on the Classic
Once you’ve mastered the base, the world is your oyster! Here are a few of my favorite ways to mix it up and keep things exciting.
- The Peanut Butter Paradise: Swap out the regular Oreos for Peanut Butter Oreos in the crust. Then, add a ½ cup of smooth peanut butter to the cream cheese filling. Top with chopped Reese’s Peanut Butter Cups. You’re welcome.
- Mint Chocolate Chip Cool Down: Use Mint Oreos for the crust and add ¼ tsp of peppermint extract (not mint extract—it’s stronger!) to the filling. Fold in ½ cup of mini chocolate chips before spreading it over the crust for that classic mint chip vibe.
- Cookies & Cream Cheesecake: Feeling decadent? Fold 1 cup of lightly sweetened whipped cream into the cream cheese filling before assembling. This lightens it up and makes it even more mousse-like and cheesecake-y.
- Fruity Fun: After spreading the cream cheese layer, top it with a single, even layer of sliced fresh strawberries or raspberries. *Then* add your final drizzle of chocolate. It’s like a chocolate-covered strawberry in every bite.
- Dairy-Free Delight: You can still join the party! Use your favorite vegan cream cheese and plant-based butter. Most classic Oreos are actually vegan (always double-check the label!), so you’re good to go on the crust.
Jackson’s Chef Notes & Kitchen Confessions
This recipe has come a long way from my college dorm room, but the spirit remains the same: easy, bold, and packed with flavor. I’ve learned a few things along the way. The lemon zest was a total happy accident—I had zested a lemon for a pasta dish and thought, “why not?” It was a game-changer. Also, a little confession: I am notoriously impatient and have definitely tried to slice this after only an hour in the fridge. It was a delicious, messy puddle. Learn from my mistakes! Let it set. The wait is 100% worth it. This dessert is now a non-negotiable at our family gatherings. My cousin requests it every year for her birthday, and it’s the first thing to go at our summer cookouts. It’s more than a recipe; it’s a memory maker.
Your Questions, Answered!
I’ve gotten a lot of questions about this dessert over the years. Here are the answers to the most common ones.
Q: My filling is lumpy! What did I do wrong?
A: 99% of the time, this is because the cream cheese wasn’t soft enough. It needs to be at room temperature, which can take a good 60-90 minutes on the counter. If you’re in a pinch, you can microwave the sealed blocks for 10-15 seconds, but be very careful—you don’t want to melt it, just soften it. If you have small lumps, you can sometimes beat them out on high speed, but starting with soft cheese is the real key.
Q: Can I make this ahead of time?
A: Absolutely! In fact, I highly recommend it. This dessert is the perfect make-ahead treat. You can assemble it completely and keep it covered in the fridge for up to 2 days before serving. The flavors just get better as they mingle.
Q: Can I freeze this Oreo dessert?
A> You can! Wrap the entire pan tightly in a couple layers of plastic wrap and then foil. It will freeze well for up to a month. Thaw it overnight in the refrigerator before you plan to serve it. The texture might be a slightly firmer, more like ice cream, but it’s still delicious.
Q: My crust is too crumbly and falls apart when I slice it.
A: This usually means you needed a bit more “glue.” Next time, try adding one more tablespoon of melted butter to the crumb mixture. Also, make sure you are pressing it into the pan *very* firmly—really put some muscle into it!
Let’s Talk Nutrition (The Fun Kind!)
Look, we’re all here for a good time, and this is a dessert, through and through. I’m not a nutritionist, but I am a big believer in enjoying your food mindfully. This is a rich, indulgent treat, and that’s exactly what it’s meant to be! The estimated nutritional info per square (based on 12 servings) is around:
- Calories: ~280
- Fat: 18g
- Carbs: 25g
- Sugar: 16g
- Protein: 3g
These are just estimates, and they can vary based on your specific ingredients and toppings. My philosophy? Serve smaller squares if you’re watching portions, pair it with a fresh cup of coffee to balance the sweetness, and most importantly, savor every single bite without an ounce of guilt. Life’s too short not to enjoy the delicious things.
Ready to Make Some Magic?
And there you have it! Your complete guide to creating the most epic, crowd-pleasing, no-fuss dessert of your dreams. This No-Bake Oreo Cream Cheese Dessert is everything I love about cooking: it’s simple, it’s creative, and it brings people together over truly amazing flavor.


