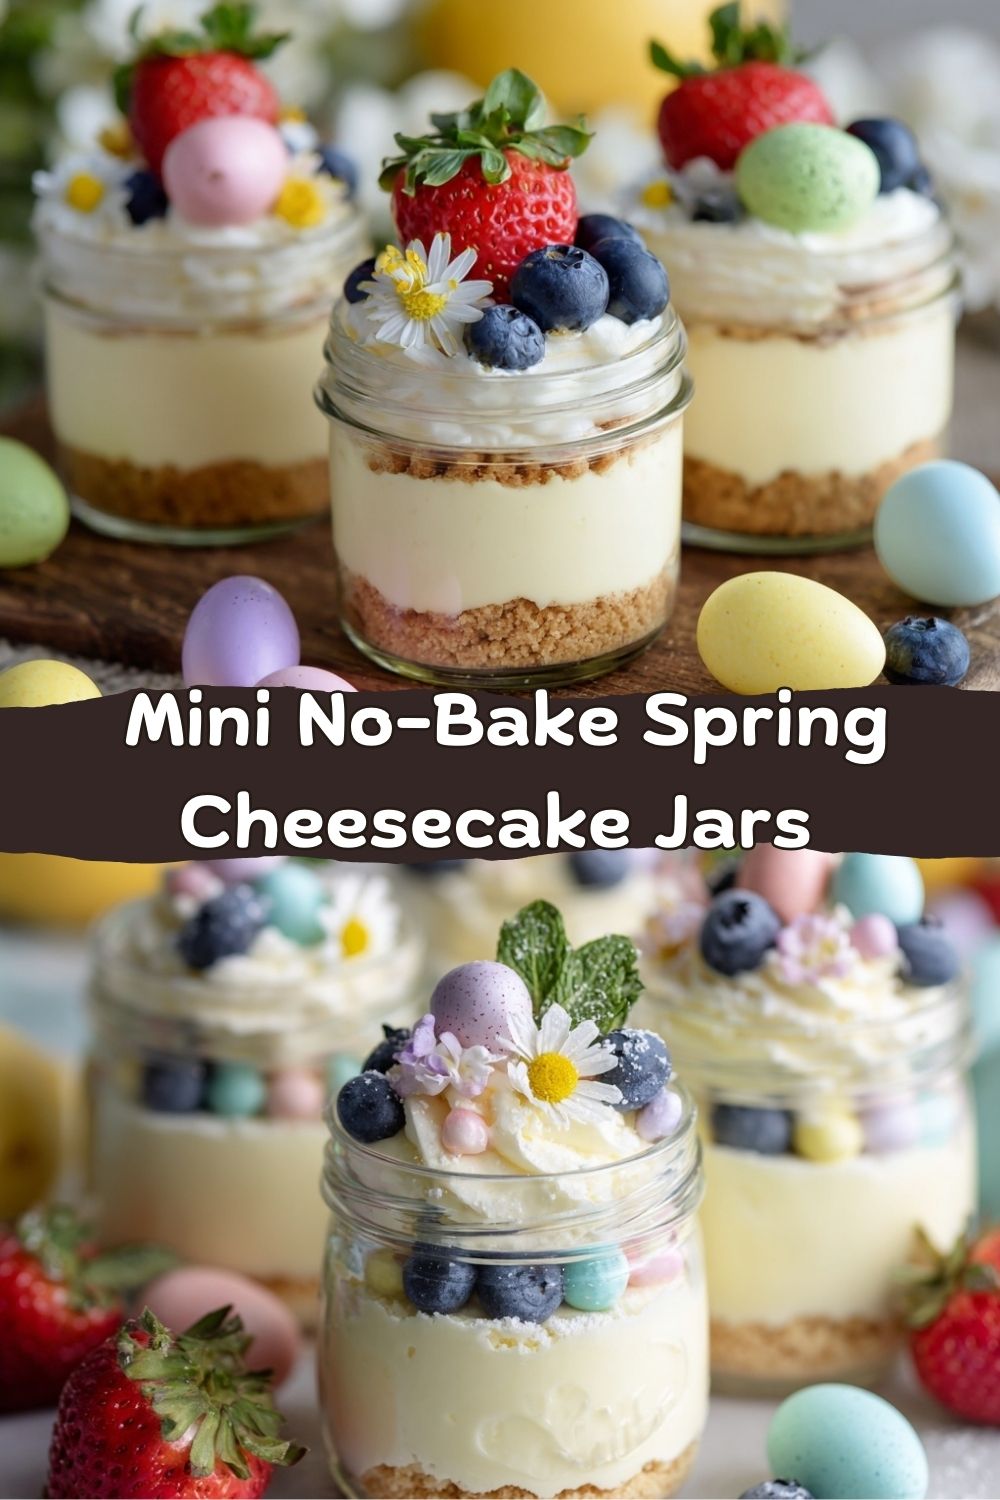
Mini No-Bake Spring Cheesecake Jars: Sweet, Simple & Celebration-Ready
Hey friends, Jackson here from Food Meld. Can you feel it? That crisp, hopeful air that whispers of longer days, blooming flowers, and the sudden, undeniable urge to gather with your favorite people? Spring has this magical way of making us want to celebrate the light, the color, and the fresh starts. But let’s be real—when the party planning starts, the last thing anyone wants is to be chained to a hot oven, missing all the fun.
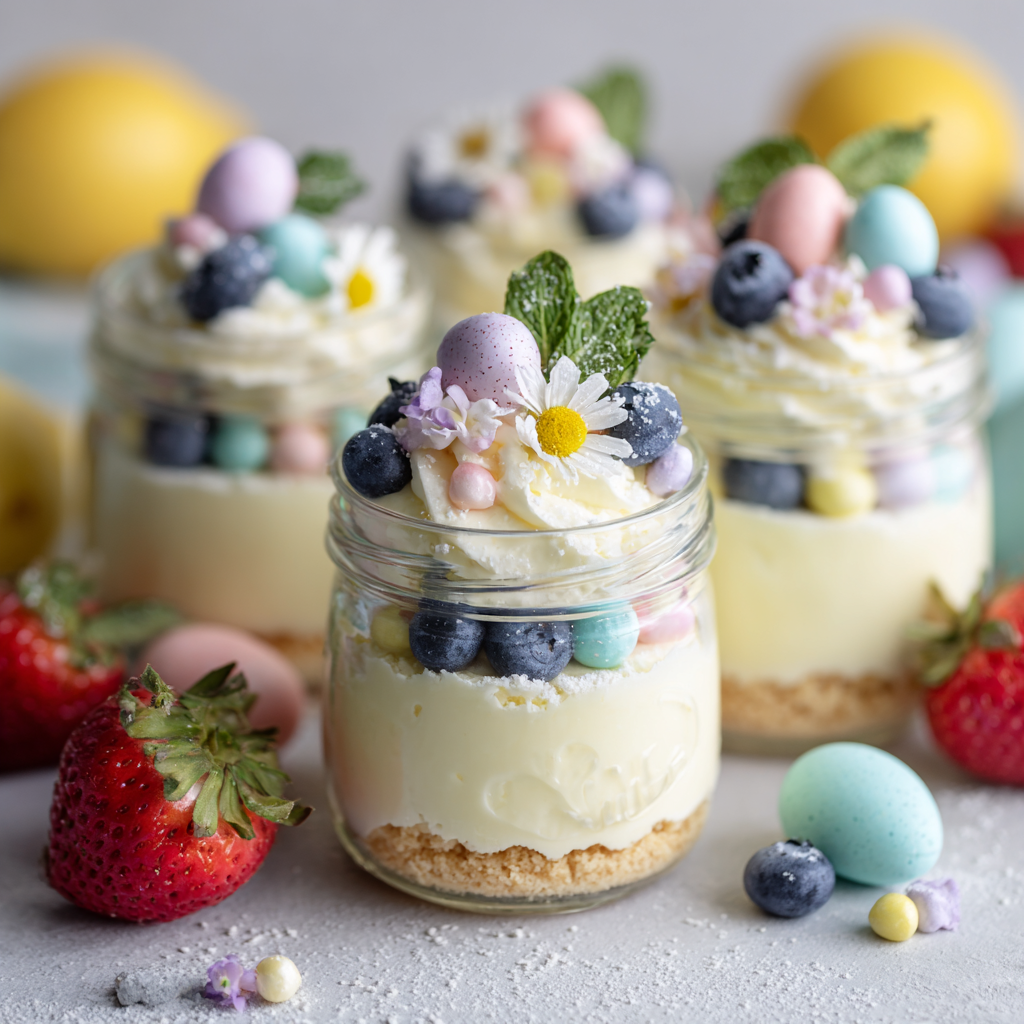
That’s exactly why I’m head-over-heels for these Mini No-Bake Spring Cheesecake Jars. They are my secret weapon for looking like a total kitchen rockstar while putting in “weeknight easy” effort. Imagine: individual layers of buttery, crumbly crust, a cloud-like creamy filling that’s brightened with a kiss of lemon, all topped with a confetti of fresh berries or pastel toppings. Each jar is its own little edible masterpiece.
This isn’t just a recipe; it’s a vibe. It’s for the Easter brunch that needs a showstopper, the bridal shower that calls for something elegant, the “just because” picnic in the park, or the Tuesday night when you deserve a seriously delicious treat. We’re keeping it simple, real, and packed with the kind of flavor that makes people ask, “Wait, you MADE these?” So, grab your favorite mixing bowl and a few cute jars—let’s cook (or, well, *not* cook) something awesome together.
The Picnic That Started It All
This recipe takes me straight back to one of those perfect, golden-hour spring picnics a few years ago. My wife and I were meeting friends at the park, and I volunteered for dessert duty. The problem? I’d spent the whole day filming a spicy skillet recipe for the blog, and my kitchen (and my energy) was officially spent. Oven? Absolutely not. Complicated steps? Hard pass.
I stared into the fridge and saw cream cheese, heavy cream, and a pint of strawberries begging to be used. I had some leftover graham crackers from a s’mores experiment. In a moment of “what if we tried this?” energy, I smashed, mixed, whipped, and layered everything into some leftover mason jars I had. I threw them in the fridge, crossed my fingers, and ran out the door.
You guys, the reaction was everything. Sitting on that blanket, passing around these cool, creamy, handheld cheesecakes while the sun set… it was a total “you’ve gotta try this” moment. My friend’s kid even declared it “better than cake.” That’s when I knew this throw-together triumph needed a permanent spot in the Food Meld lineup. It’s proof that the most unforgettable treats often come from a little creativity and a desire to get back to the fun, fast.
Gathering Your Flavor Players
Here’s the beautiful part: this recipe requires minimal, superstar ingredients. Quality matters here, but so does flexibility—I’ve got your back with swaps.
For the Crust:
- 3/4 cup crushed graham crackers or digestive biscuits: This is your flavor foundation. Grahams give that classic, honey-kissed taste, while digestives offer a richer, buttery note. Chef’s Insight: Don’t have a food processor? Toss them in a zip-top bag and roll with a rolling pin or wine bottle—super therapeutic!
- 3 tablespoons melted butter: The glue. It holds our sandy crumbs together into that perfect, pressable layer. Salted butter adds a nice flavor contrast, but unsalted works great too.
- 1 tablespoon sugar (optional): I usually add this if I’m using plain digestives. If your graham crackers are already pretty sweet, you can skip it. Trust your taste buds!
For the Filling:
- 8 oz (one block) full-fat cream cheese, softened: NON-NEGOTIABLE. Full-fat gives us that lush, stable structure and rich flavor. Take it out of the fridge at least an hour ahead. Pro Tip: If you forget, microwave it on 50% power for 15-20 seconds—no more!
- 1/2 cup heavy cream (also called heavy whipping cream): This is our magic wand for fluffiness. We’ll whip it to soft peaks, which gives the filling its dreamy, mousse-like texture.
- 1/3 cup powdered sugar: I prefer powdered over granulated here because it dissolves instantly, leaving no grittiness, and it helps stabilize our whipped filling.
- 1/2 teaspoon pure vanilla extract: The warmth behind the scenes. It rounds out all the flavors beautifully.
- Zest of 1 lemon (optional, but highly recommended): This is the “spring brightness” hack. The zest (just the yellow part, avoid the bitter white pith) adds a pop of fresh, aromatic citrus that cuts the richness perfectly. It makes the flavor sing!
For Topping & Assembly:
- 4-6 small jars, glasses, or ramekins: Get creative! I use 8-oz mason jars, but pretty glass tumblers or even sturdy stemless wine glasses work. The visual layering is half the fun.
- Your choice of toppings: This is where you make it yours! Fresh berries, a dollop of lemon curd or fruit preserves, crushed pastel candy eggs for Easter, a drizzle of honey, edible flowers, or even a sprinkle of toasted nuts.
Let’s Build Some Edible Sunshine: Step-by-Step
Ready? Put on some good music, clear a little counter space, and let’s get into the flow. This is the fun, messy, rewarding part.
Step 1: Create Your Crust Base. In a medium bowl, combine your finely crushed crackers, melted butter, and that optional tablespoon of sugar. Mix it with a fork until it resembles wet sand and holds together when you pinch it. Divide this mixture evenly among your jars. Now, here’s my hack: use a small glass, like a shot glass, or the bottom of a measuring cup to press the crumbs down firmly and evenly. This compact layer is key for a satisfying bite. Pop these in the fridge while you make the filling to let the butter set up a bit.
Step 2: Whip Up the Dreamy Filling. In a large bowl, beat your softened cream cheese with a hand mixer (or stand mixer) for about 30-60 seconds until it’s completely smooth, creamy, and no lumps remain. Scrape down the sides. Add the powdered sugar, vanilla, and lemon zest. Beat again until everything is fully incorporated and silky.
Step 3: Bring on the Fluff. In a separate, clean bowl, pour in your heavy cream. Using your mixer’s whisk attachment or clean beaters, whip the cream on medium-high speed. Watch it transform from liquid to soft, billowy peaks. You’ll know it’s ready when you lift the beaters and the peak forms but gently curls over at the tip. Don’t over-whip to stiff peaks, or it’ll be harder to fold and can get grainy.
Step 4: The Gentle Fold. This step is crucial for keeping that airy texture. Add about one-third of the whipped cream to the cream cheese mixture. Use a rubber spatula to gently fold it in—think of it as a gentle scoop-and-turn motion from the bottom up, rotating the bowl. This lightens the dense cream cheese. Once incorporated, add the remaining whipped cream and continue folding gently until no white streaks remain. You should have a gloriously thick, smooth, and fluffy mixture.
Step 5: Layer & Chill. Pull your jars with the chilled crust from the fridge. Spoon or pipe the filling over the crust, smoothing the tops. If you’re feeling fancy, piping it with a large star tip looks incredible! Now, the hardest part: patience. Cover the jars loosely (I use plastic wrap) and chill them in the refrigerator for at least 2 hours, but 4 or overnight is even better. This chill time allows the flavors to marry and the filling to set up perfectly.
Step 6: The Grand Finale – Topping! Right before serving, unleash your creativity with toppings. This keeps textures perfect—berries stay fresh, cookies stay crunchy. Go wild and make each jar unique!
How to Serve These Little Jars of Joy
Presentation is everything with these minis, and the best part is, the jars do most of the work for you. For a casual gathering, I line them up on a wooden board or a pretty tray lined with a tea towel. Tuck a few fresh flowers or lemon leaves around the base for that effortless spring touch.
If you’re serving them as a plated dessert, place each jar on a small plate or saucer. Add a delicate shortbread cookie on the side or a sprig of mint. Provide small spoons or long-handled dessert spoons—there’s something so satisfying about diving all the way to the bottom to get a bit of crust, filling, and topping in every single bite.
My biggest serving tip? Make them ahead! These are the ultimate make-ahead dessert. Assemble them the day before your event, keep them covered in the fridge, and just add toppings at the last minute. You get to be the cool, calm, collected host who actually enjoys the party.
Make It Yours: Creative Twists & Swaps
The “Meld” in Food Meld means I live for variations. Here are a few of my favorite ways to mix it up:
- The Cookie Monster: Swap the graham crust for crushed Oreos (keep the filling cream!), vanilla wafers, or biscoff cookies. For a lemon jar, try a crust made from crushed shortbread or lemon Oreos.
- Flavor Fusion Filling: After folding in the whipped cream, gently swirl in 2-3 tablespoons of lemon curd, seedless raspberry jam, or salted caramel sauce. Don’t fully mix—let those beautiful ribbons shine through.
- Fresh Herb Brightness: Infuse your filling with a tablespoon of finely chopped fresh basil or mint. It’s incredible with strawberry or blueberry toppings.
- Dairy-Free Delight: Use your favorite plant-based cream cheese and chilled coconut cream (the thick part from a can of full-fat coconut milk) instead of heavy cream. The crust can be made with vegan butter or coconut oil.
- Lighter Option: Use Neufchâtel cheese (the 1/3 less fat block) and swap the heavy cream for well-chilled plain Greek yogurt. The texture will be denser but still delicious and tangy.
Jackson’s Kitchen Notes
This recipe has evolved from that frantic picnic prep into my go-to celebration dessert. I’ve made it for probably two dozen events now. One funny fail? I once tried to speed-chill the jars in the freezer. Big mistake. The filling froze unevenly and wept when it thawed. The fridge is your friend—slow and steady wins the race.
I also learned that the lemon zest is a game-changer. I made a batch without it for a friend who claimed not to like lemon, and she said it was “good, but missing something.” Added the zest back the next time, and she devoured it, never even realizing the “something” was lemon! It’s that subtle brightness that elevates the whole experience. Don’t skip it!
Your Questions, Answered
Q: My filling turned out runny. What happened?
A: The most common culprits are: 1) The cream cheese wasn’t fully softened, leading to lumps that break the emulsion. 2) The heavy cream wasn’t whipped to soft peaks before folding. 3) It just needs more chill time! If it’s still too soft after 2 hours, give it more time. The fridge will firm it up.
Q: Can I make one big no-bake cheesecake instead of jars?
A> Absolutely! Press the crust into the bottom of a 7-inch or 8-inch springform pan, spread the filling over top, and chill for at least 6 hours or overnight. Slice and serve.
Q: How far in advance can I make these?
A> You can assemble the jars (without toppings) up to 2 days in advance. Keep them tightly covered in the fridge. Add your fresh toppings within a few hours of serving for the best texture and appearance.
Q: My whipped cream looks grainy or turned to butter! Help!
A> You likely over-whipped. Once you see soft peaks, stop immediately. If it’s just slightly grainy, try folding in a splash (1-2 tbsp) of fresh, liquid heavy cream to smooth it out. If it’s full-on butter, well… you’ve just made sweet butter! Start over with new cream for the filling, and use your homemade butter on toast later.
Nutritional Info (A Note from Jackson)
Look, I’m a chef, not a dietitian. I believe in real ingredients and enjoying delicious food. That said, I know many folks like to have a general idea, so here’s a basic breakdown per serving (assuming 6 jars, with graham crust and without extra toppings). This is an estimate, as your specific ingredients will vary. Remember, these are a treat—meant to be savored and shared!
- Calories: ~320
- Protein: 4g
- Carbohydrates: 22g
- Fat: 24g
- Prep Time: 20 minutes active
- Chill Time: 2 hours minimum
- Servings: 4-6 gorgeous jars
Final Thoughts: Let’s Celebrate!
And that’s it, friends! You’re now armed with the recipe for the most charming, fuss-free spring dessert imaginable. These Mini No-Bake Cheesecake Jars embody everything I love about cooking: they’re approachable, customizable, and guaranteed to create those happy, shared moments around the table.
So, whether you’re hosting a big shower, bringing a dish to a potluck, or simply treating yourself after a long day, I hope you give these a try. Remember, cooking shouldn’t be intimidating.


