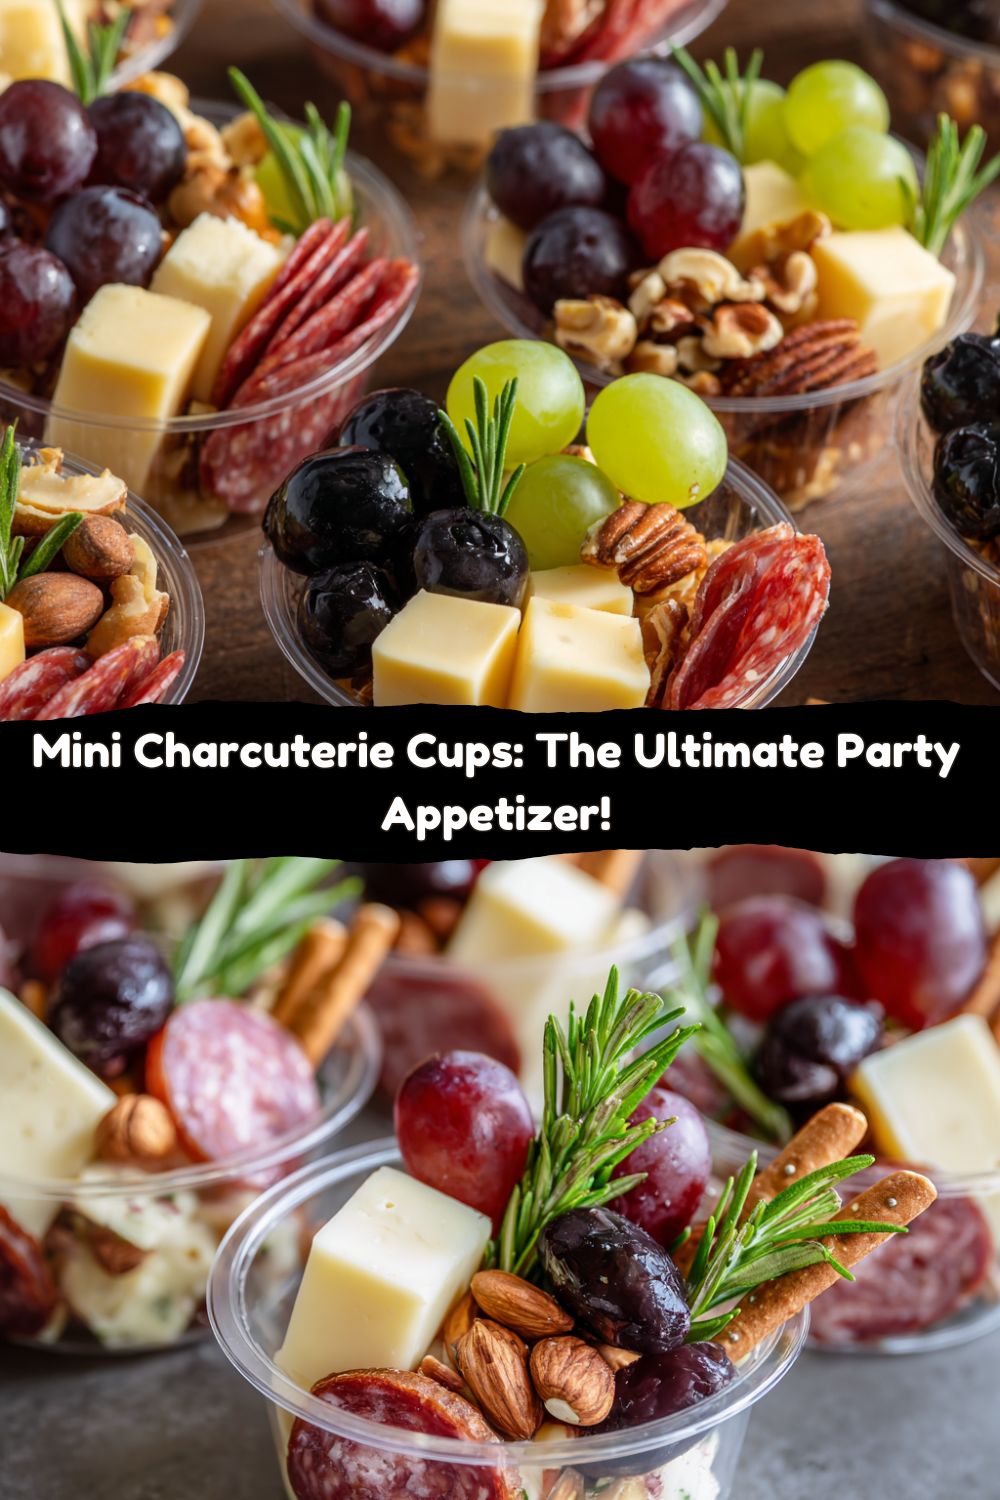
Ditch the Boring Platter: Your New Party Secret is Here!
Hey friends, Jackson from Food Meld here! Ever been to a party where you’re all huddled around one giant charcuterie board, playing a delicate game of Jenga with crackers and cheese, trying not to elbow the person next to you? Or maybe you’ve been the host, stressed out because your beautiful, Instagram-worthy spread got completely demolished in the first five minutes, leaving a sad-looking olive in the corner? I’ve been there. We’ve ALL been there. That’s exactly why I’m so obsessed with the solution we’re diving into today: Mini Charcuterie Cups.
This isn’t just a recipe; it’s a game-changer. Imagine this: every single guest gets their own perfectly curated, adorable cup filled with all the savory, salty, crunchy, and sweet goodness of a classic charcuterie board. No more fighting over the last slice of prosciutto. No more double-dipping dilemmas. It’s portion-controlled, incredibly portable, and honestly, just so darn cute. They’re the ultimate party hack for everything from fancy holiday gatherings and bridal showers to casual picnics and game day. I’m talking maximum flavor with minimal fuss—my absolute favorite kind of cooking. So, let’s grab some cups and cook something awesome together. Welcome to the future of snacking!
A Picnic, a Proposal, and a Packed Board
This idea didn’t just come to me in a dream (though I have had dreams about cheese, but that’s a story for another time). It was born from a slightly chaotic but incredibly sweet memory. A few years back, my best friend tasked me with creating a picnic for his now-wife’s birthday. The catch? He was planning to propose. No pressure, right? I went all out on a massive, beautiful wooden board loaded with everything you could imagine. It was a masterpiece. We got to the scenic spot, he got down on one knee (she said yes!), and as we all celebrated with tears and laughter, a gust of wind decided to join the party. Crackers went flying, a rogue napkin stuck to some brie, and we spent the next ten minutes playing edible frisbee.
It was hilarious and memorable for all the right (and wrong) reasons, but it got me thinking: there has to be a more secure, more personal way to do this. The idea for individual, grab-and-go cups hit me right there. They’re romantic, they’re practical, and most importantly, they’re immune to surprise weather! Now, every time I make these mini charcuterie cups, I smile, thinking about that windy day that led to a perfect marriage and a even better party trick.
Gathering Your Flavor Posse
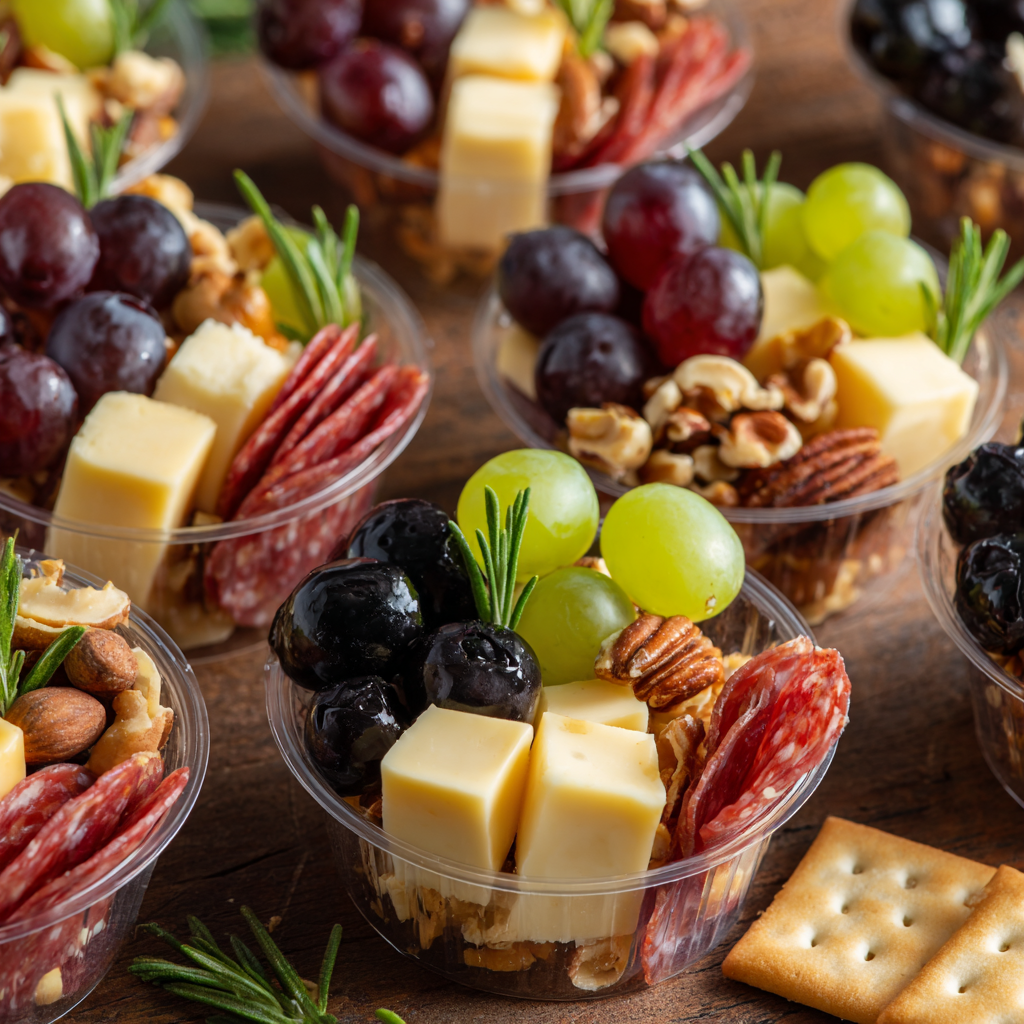
The beauty of this concept is its flexibility. Think of this list as your blueprint, not a rigid rulebook. This is where you can truly make it yours! Here’s what you’ll need for about 12 show-stopping cups:
- 24 slices salami (2 per cup): I love using a hard salami for its peppery bite and because it holds its shape perfectly when folded. Chef’s Insight: Feel free to swap in prosciutto, soppressata, or even thinly sliced smoked turkey for a different vibe!
- 2 cups cheese cubes (cheddar, gouda, or pepper jack): Cubes are key for easy eating! I’m using sharp white cheddar for a classic punch and creamy gouda for a smoky, buttery contrast. Pro Tip: For the best flavor, let your cheese sit out for 15-20 minutes before cubing—it tastes so much richer at room temp!
- 1 cup green or black olives: I’m using castelvetrano olives here—they’re buttery, mild, and less briny than your standard black olive. They’re a total crowd-pleaser, even for olive skeptics!
- 1 cup grapes or berries: The sweet burst of a grape is essential for cutting through the richness of the meat and cheese. Red seedless grapes are my go-to, but in the summer, strawberries or blueberries are incredible.
- 1 cup crackers or breadsticks: This is your crunch factor! I like using a mix of buttery, flaky crackers like Clubhouse® and a few skinny breadsticks for height. Gluten-free crackers work perfectly here too.
- ½ cup nuts (almonds, cashews, or pecans): Toasted Marcona almonds are my absolute favorite for their rich, luxurious flavor. Toasting any nut in a dry pan for a few minutes will seriously level up their flavor.
- Fresh herbs (rosemary, thyme) for garnish: This isn’t just for looks! A sprig of rosemary or thyme adds a gorgeous aroma every time you take a bite.
- 12 small plastic or paper cups: The 5-oz bathroom size is perfect. Clear plastic lets all the colorful ingredients shine through, but festive paper cups are great for holidays!
Building Your Flavor Cups, Step-by-Step
This is the fun part! We’re not just throwing things in a cup; we’re building layers of texture and taste. Get your assembly line ready—it goes super quick!
- Prep Your Ingredients: First things first, let’s get everything ready to go. Cube your cheeses into bite-sized pieces (about ½-inch), wash and dry your grapes, and if your olives aren’t pitted, give them a quick pit. Portion out your crackers and nuts into small bowls. This “mise en place” (everything in its place) makes the assembly process a breeze and keeps you from scrambling. Chef’s Hack: Use a cherry pitter to pit olives in seconds—it’s a lifesaver!
- Create Your Salami Base: Take your first salami slice and press it into the bottom of the cup. It acts as a little barrier and adds that first hit of flavor. For the second slice, get creative! You can simply lay it flat, but I love to fold it into quarters or roll it up and tuck it standing up against the side of the cup. This adds height and makes the cup look professionally styled.
- Layer in the Cheeses & Olives: Now, drop in a few cubes of each cheese. I like to mix them up for variety in every bite. Scatter in 2-3 olives. Try to place them around the edges so they’re visible—we eat with our eyes first!
- Add the Sweetness and Crunch: Tuck a small cluster of grapes (about 4-5) into the cup. Then, carefully slide your crackers or breadsticks along the side, using the other ingredients to hold them in place. This keeps them from breaking and makes for a great presentation.
- The Finishing Touches: Sprinkle a small handful of your toasted nuts over the top. Finally, give it that “chef’s kiss” by adding a small, fresh sprig of rosemary or thyme. It makes the whole thing look like it came from a gourmet market.
- Serve and Celebrate! You can serve these immediately or cover them lightly with plastic wrap and refrigerate for up to 2 hours before your party starts. The flavors will meld together beautifully!
How to Serve These Little Beauties
Presentation is everything with these cups! Since they’re already individual masterpieces, serving them is a snap. For a party, I love arranging them on a large wooden board or a sleek metal tray. It gives that communal board feel but with all the convenience of personal portions. If you’re heading out for a picnic, simply pack them upright in a basket or a shallow box so they don’t tip over in transit.
For an extra touch of elegance, place a small spreader knife or a cocktail pick in each cup. It encourages people to dig in and makes eating the cheese and meat even easier. These cups are conversation starters all on their own, so just set them out and watch your guests’ faces light up!
Mix It Up: Endless Flavor Combinations
Don’t stop here! The whole point of Food Meld is to get creative. Here are a few of my favorite twists on the classic:
- The Italian Stallion: Swap salami for prosciutto and mozzarella pearls (ciliegine). Use sundried tomatoes instead of olives and add a few fresh basil leaves. Drizzle with a tiny bit of balsamic glaze right before serving.
- Everything Bagel: For a brunch vibe, use smoked salmon strips, whipped cream cheese dollops, halved mini bagels or bagel chips, capers, and thin slices of red onion. Garnish with fresh dill!
- Spicy Fiesta: Use pepperoni, spicy pepper jack cheese cubes, pickled jalapeños, and corn nuts for crunch. Add a couple of tortilla chips and a lime wedge on the side.
- Sweet & Savory Fig Deal: Perfect for fall! Use goat cheese crumbles, diced apple or pear, candied pecans, and a dollop of fig jam. Skip the olives and use a rosemary sprig for garnish.
- Veggie Lover’s Delight: Skip the meat entirely! Load up with extra cheese, blistered tomatoes, mini pickles, blanched asparagus tips, and artichoke hearts. Hummus makes a great dip at the bottom!
Jackson’s Chef Notes
I’ve made these cups more times than I can count, and they’ve evolved from a simple idea to my most-requested party item. One time, I was catering a friend’s wedding shower and decided to make a “his and hers” version—one with all spicy ingredients and one with sweeter, milder ones. They were a huge hit! The best part is how they free you up as a host. Instead of constantly rearranging a big board, you can actually enjoy your own party. Remember, the ingredients are your playground. See a cool cheese at the store? Grab it! Have some leftover jam from breakfast? Swirl it in! Make it unforgettable, make it yours, and most importantly, have fun with it.
FAQs & Troubleshooting
Q: Can I make these mini charcuterie cups ahead of time?
A: Absolutely! You can prep all your ingredients (cube cheese, wash fruit, etc.) the day before and keep them separate in airtight containers in the fridge. I recommend assembling the cups no more than 2 hours before serving to keep the crackers from getting soft.
Q: My crackers got soggy. What happened?
A: This usually happens if they’re assembled too far in advance or if a particularly juicy piece of fruit is directly touching the cracker. The key is to use the cheese and meat as a barrier. Place the crackers last, and if you’re using very moist ingredients like fresh mozzarella, pat them dry with a paper towel first.
Q: What are the best cups to use?
A: I prefer clear 5-oz plastic cups because they’re sturdy and you can see all the beautiful layers. For a more eco-friendly option, you can use small reusable glass jars or even sturdy paper cups. For a picnic, small mason jars with lids are perfect for travel!
Q: How do I keep the salami from looking messy in the cup?
A: Folding is your friend! Instead of just laying it flat, try fan-folding it or rolling it into a cone shape. It adds visual interest and looks much more intentional.

Mini Charcuterie Cups
- Total Time: 20 minutes
- Yield: 12 cups 1x
Description
A fun and portable way to serve charcuterie. These single-serve cups are packed with cheese, salami, olives, and crackers—perfect for parties, picnics, or holiday gatherings.
Ingredients
Ingredients (for 12 cups)
24 slices salami (2 per cup)
2 cups cheese cubes (cheddar, gouda, or pepper jack)
1 cup green or black olives
1 cup grapes or berries
1 cup crackers or breadsticks
½ cup nuts (almonds, cashews, or pecans)
Fresh herbs (rosemary, thyme) for garnish
12 small plastic or paper cups
Instructions
Prepare ingredients: Cut cheese into cubes, wash fruit, and portion out crackers and nuts.
Assemble cups: Place 2 slices of salami in each cup, fold or roll as needed. Add a few cheese cubes, olives, and fruit.
Add crunch: Tuck crackers or breadsticks along the side. Sprinkle nuts on top.
Garnish: Add a small sprig of rosemary or thyme for a festive touch.
Serve immediately, or cover and refrigerate until ready to serve.
- Prep Time: 20 minutes
Nutrition
- Calories: 210 / Cup
- Sugar: 2g / Cup
- Sodium: 580mg
- Fat: 14g / Cup
- Saturated Fat: 6g
- Carbohydrates: 10g / Cup
- Protein: 10g / Cup
- Cholesterol: 30mg / Cup
Nutritional Information*
Okay, let’s talk nutrition real quick. I’m all about balance, and the great thing about these cups is you know exactly what you’re getting. Here’s a rough estimate per cup, based on the ingredients listed above.
Per Serving (1 cup):
Calories: ~210 | Total Fat: 14g | Saturated Fat: 6g | Cholesterol: 30mg | Sodium: 580mg | Total Carbohydrates: 10g | Dietary Fiber: 1g | Sugar: 2g | Protein: 10g
*Please note: This is an estimate based on the specific ingredients I used. Values can vary widely depending on the types of cheese, meat, and crackers you choose. For more precise info, I recommend using a nutritional calculator with your exact brands.
Your Party Just Got a Whole Lot cooler
And there you have it! Your guide to ditching the giant board and embracing the mini charcuterie cup revolution. They’re simple, they’re fun, and they are guaranteed to impress. This is what cooking should be about—sharing awesome food without the stress, and creating those “you’ve gotta try this!” moments with the people you love.
I can’t wait to hear how you make this recipe your own. Tag me on Instagram @FoodMeld with your creations—I love seeing your flavor combinations and kitchen wins! Now go forth, assemble, and conquer your next gathering. Let’s cook something awesome together!
Jackson


