
More Than Just Banana Bread: Your New Go-To Comfort Recipe
Hey friends, Jackson from Food Meld here. Let’s talk about that universal kitchen signal: the spotty, almost-black banana sitting on your counter. You know the one. It’s past its prime for your morning cereal, but it’s whispering sweet nothings about its future potential. For years, my answer was always the same—a classic banana bread loaf. Don’t get me wrong, I love a good slab of the stuff, but I wanted to shake things up. I wanted something more shareable, more giftable, and honestly, something that baked faster so I could get that warm, spiced, chocolatey goodness into my face ASAP.
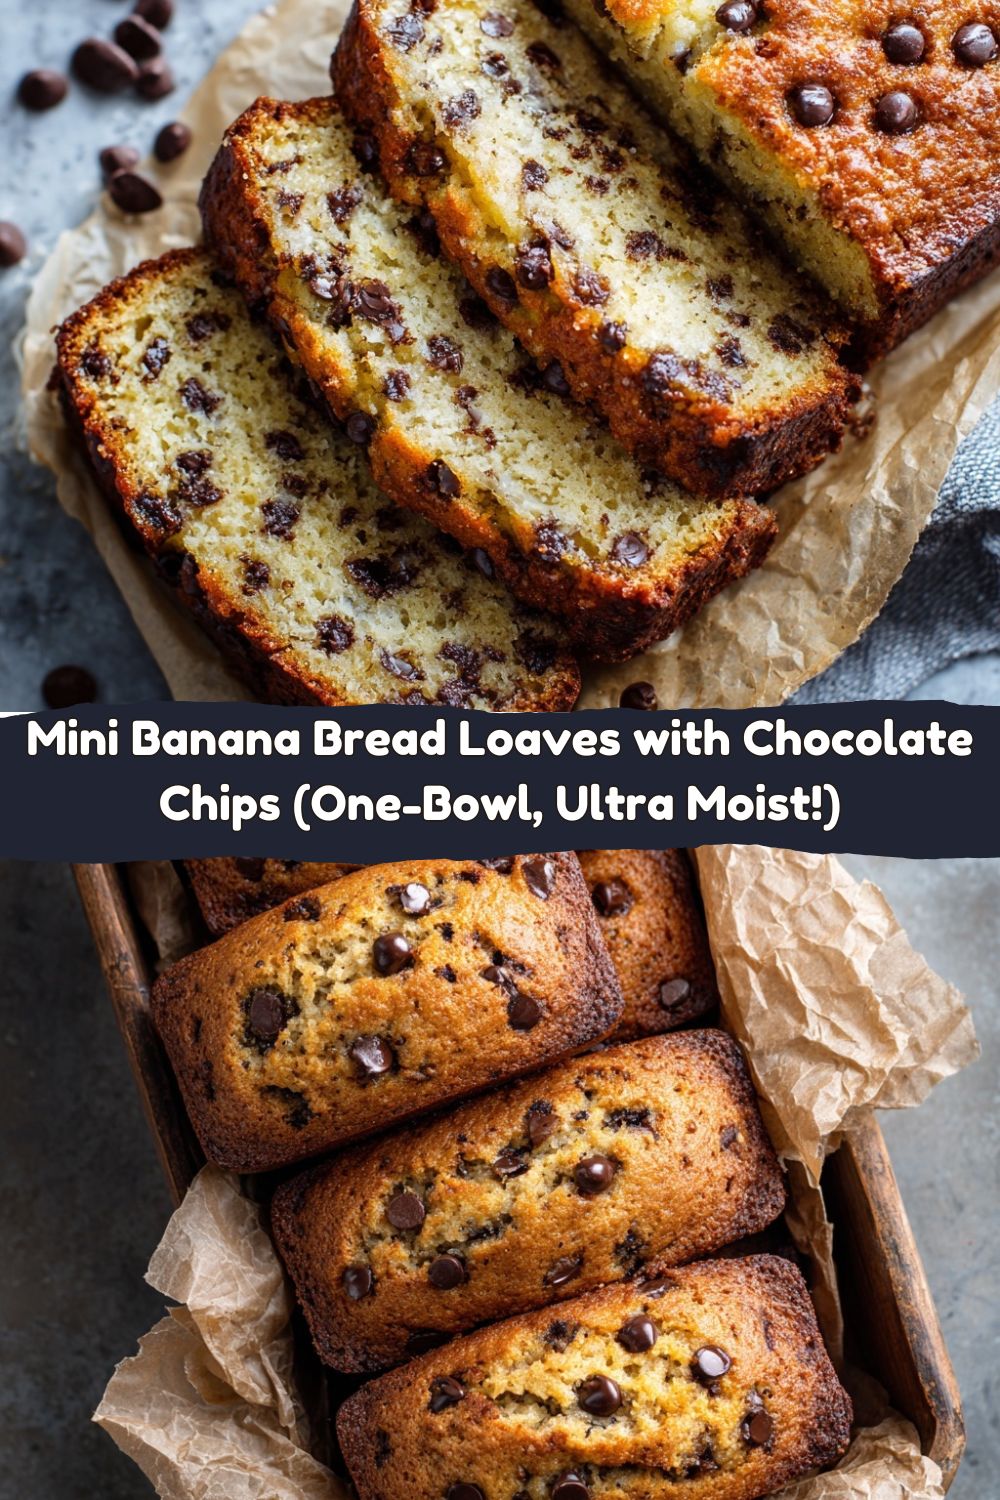
That’s how these Mini Banana Bread Loaves with Chocolate Chips were born. They’re everything you adore about your grandma’s recipe—incredibly moist, tender-crumbed, and deeply comforting—but with a fun, modern twist. By baking them as mini loaves, you get those irresistible, crispy-edged corners we all fight over, but in a perfectly personal portion. And let’s be real, adding a generous handful of melty chocolate chips just feels like a hug from the inside. It’s the ultimate upgrade.
This recipe is a total game-changer for busy weekdays, last-minute hostess gifts, or when you just need a little baking therapy. It comes together in one bowl (minimal cleanup for the win!), bakes in about half the time of a standard loaf, and fills your kitchen with that unmistakable “everything is going to be okay” aroma. So, grab those ripe bananas and let’s turn them into something unforgettable. Welcome to your new favorite baking project.
The Bakery Window That Started It All
This recipe takes me right back to my college days. There was this little bakery near campus that had a display window packed with these gorgeous, individual-sized cakes and loaves. Every time I walked by, my eyes would lock onto their mini banana breads, each one glistening with a perfect, crackly top and studded with chocolate. It was my little splurge after a tough exam or a long week. I’d get one, still warm from the oven, and it felt like a secret handshake with comfort food itself.
I must have tried a dozen times to recreate that magic in my tiny, shared apartment kitchen. My early attempts were… educational. Let’s just say I learned that baking soda is not the same as baking powder the hard way! But that quest for the perfect mini loaf—one that was dense yet soft, sweet but not cloying, and packed with banana flavor—is what fueled my “what if we tried this?” energy. This recipe is the happy, chocolate-chip-filled result of all that delicious trial and error. It’s my homage to that bakery window and the simple joy of a perfect little treat, all your own.
Gathering Your Flavor Arsenal
This is where the magic starts. The beauty of this recipe is in its simple, humble ingredients. Let’s break them down so you know exactly why each one is here and how you can make it your own.
- 1 cup mashed ripe bananas (about 2 large): This is the star of the show! The blacker and spottier, the better. These super-ripe bananas are naturally sweeter and pack the most intense banana flavor. Chef’s Insight: Don’t you dare throw those brown bananas away! Peel them, pop them in a freezer bag, and freeze them for future baking. They thaw perfectly for recipes like this.
- 1/2 cup brown sugar: I prefer brown sugar over white because its molasses notes add a deeper, caramel-like warmth that pairs beautifully with the bananas and chocolate. Substitution Tip: You can use an equal amount of coconut sugar for a less refined option, or even maple syrup—just reduce the Greek yogurt by a tablespoon to account for the extra liquid.
- 1/4 cup melted butter or coconut oil: This gives our loaves that rich, tender crumb. Butter delivers classic flavor, while coconut oil keeps things dairy-free and adds a subtle tropical vibe. Chef’s Insight: If using coconut oil, make sure your other ingredients are at room temp so it doesn’t solidify when you mix it in.
- 1/4 cup Greek yogurt or sour cream: This is my secret weapon for ultimate moisture! The slight tanginess balances the sweetness, and the acidity helps activate the baking soda for a better rise. Substitution Tip: No yogurt? Unsweetened applesauce is a fantastic substitute that also keeps things incredibly moist.
- 1 large egg: Our trusty binder, holding everything together and adding structure.
- 1 teaspoon vanilla extract: The flavor enhancer. It rounds out all the other flavors and makes the whole kitchen smell like a bakery.
- 1 cup all-purpose flour: The foundation of our loaf. Substitution Tip: For a whole-wheat version, you can swap in 1/2 cup of whole wheat flour, but I wouldn’t go 100% as it can make the loaves a bit dense.
- 1/2 teaspoon baking soda & 1/2 teaspoon baking powder: The dynamic duo of leavening! This combo gives us the perfect lift and that beautiful domed top.
- 1/4 teaspoon salt: Crucial for making all the flavors pop. Never skip the salt in baking!
- 1/2 cup mini or regular chocolate chips: The “fun” factor. I love mini chips because they distribute more evenly, but regular work great too. Chef’s Insight: Toss your chocolate chips in a teaspoon of the flour mixture before folding them in. This little hack prevents them from sinking to the bottom of the loaves!
- Optional: 1/2 teaspoon cinnamon: A warm, cozy whisper in the background. Highly recommended!
Let’s Build Some Magic: The Step-by-Step Guide
Alright, team, aprons on! This is the fun part. We’re going to mix, pour, and bake our way to mini-loaf heaven. Follow these steps, and you’ll be a pro in no time.
- Preheat and Prep. Fire up your oven to 350°F (175°C). While it’s warming up, grab your mini loaf pan. Give it a good spray with baking spray, or lightly grease it with butter. If you want super easy cleanup and removal, you can line the cavities with parchment paper slings. Chef’s Hack: A hot oven is key for that initial “oven spring” that gives our loaves a nice rise, so don’t skip the preheat!
- The Wet Team Assembles. In a large bowl, add your mashed bananas, brown sugar, melted butter (or coconut oil), Greek yogurt, egg, and vanilla. Now, take your whisk and go to town! Whisk it all together until it’s smooth and beautifully combined. You’ll see the mixture turn a lovely pale caramel color. Chef’s Commentary: See how the yogurt instantly blends with the melted butter? That’s how you know you’re on the right track to a perfectly emulsified, non-greasy batter.
- The Dry Team Gets Ready. In a separate, smaller bowl, whisk together your flour, baking soda, baking powder, salt, and that optional cinnamon. Whisking the dry ingredients first is a non-negotiable step for me—it ensures the leavening agents and salt are evenly distributed, so you don’t get a bitter bite of baking soda in one loaf and a flat loaf next to it.
- The Big Meld. Now, pour your dry ingredient mixture into the wet ingredients. Put the whisk away and grab a spatula. This is important: gently fold the dry into the wet until the flour is just incorporated. A few streaks of flour are okay! Overmixing is the enemy of tender banana bread—it develops the gluten and can make things tough. Chef’s Tip: I like to use a figure-eight motion with my spatula. It’s gentle and efficient.
- Welcome the Chocolate! Sprinkle your chocolate chips (remember, tossed in a bit of flour!) over the batter. Gently fold them in until they’re evenly distributed. Your batter will be thick and glorious.
- Divide and Conquer. Using a spoon or a cookie scoop, divide the batter evenly between your prepared mini loaf cavities. I usually get 3-4 loaves out of this, depending on the size of your pan. Fill them about 2/3 to 3/4 of the way full to leave room for rising. Chef’s Hack: For picture-perfect loaves, smooth the tops with the back of your spoon and press a few extra chocolate chips on top before baking. It looks so professional!
- Bake to Perfection. Slide the pan into your preheated oven and set your timer for 22 minutes. The magic number is usually between 22-26 minutes. You’ll know they’re done when the tops are golden brown, the edges are pulling away from the pan, and a toothpick inserted into the center of a loaf comes out with just a few moist crumbs (not wet batter).
- The Cool Down. This is the hardest part—waiting! Let the loaves cool in the hot pan for 10 minutes. This allows them to set up so they don’t fall apart when you take them out. After 10 minutes, run a knife around the edges and gently lift them out onto a wire rack to cool completely. Chef’s Truth: I won’t judge you if you slice into one while it’s still warm and the chocolate is all gooey. In fact, I encourage it.
How to Serve Up These Little Beauties
Okay, you’ve baked the perfect mini loaves. Now, how do you serve them? The possibilities are endless, but here are my favorite ways to enjoy them.
For the ultimate breakfast or snack, just grab one and go! They’re perfectly self-contained. If you’re feeling fancy, slice a cooled loaf and pop it in the toaster for a minute. The heat slightly re-melts the chocolate chips and gives the edges a delightful crispness. Top that warm, toasted slice with a thin smear of salted butter. Trust me on this.
For a decadent dessert, warm a loaf slightly in the microwave and serve it à la mode with a scoop of high-quality vanilla bean ice cream. The contrast of warm cake and cold, creamy ice cream is a next-level experience. Drizzle with a little caramel sauce, and you’ve got a restaurant-worthy dessert in minutes.
And let’s not forget gifting! These mini loaves are made for sharing. Let them cool completely, then wrap them in clear cellophane and tie them with a rustic piece of twine. They make the most thoughtful “thinking of you” gift for a neighbor, a new parent, or a friend who needs a pick-me-up. It’s a little package of homemade love.
Make It Yours: Fun Flavor Twists
Once you’ve mastered the base recipe, the playground is open! Here are a few of my favorite ways to mix it up and keep things exciting.
- The Nutty Professor: Fold in 1/3 cup of chopped walnuts or pecans along with the chocolate chips. The nutty crunch against the soft bread and melty chocolate is a classic for a reason.
- Peanut Butter Cup Swirl: Oh yeah. Drop 1/4 cup of creamy peanut butter by the spoonful onto the batter after you’ve divided it into the pans. Use a toothpick to swirl it gently into the batter. You get these incredible pockets of peanut butter throughout. It’s a game-changer.
- Double Chocolate Dream: For the chocoholics out there, replace 2 tablespoons of the flour with an equal amount of unsweetened cocoa powder. You’ll get a rich, deep chocolate banana bread that’s absolutely irresistible.
- Dairy-Free & Vegan-Friendly: It’s easy! Use coconut oil, a flax egg (1 tbsp ground flax + 3 tbsp water, let sit 5 mins), and dairy-free yogurt. Be sure to use dairy-free chocolate chips, and you’re good to go!
- Tropical Vibes: Fold in 1/3 cup of shredded coconut and swap the chocolate chips for chopped macadamia nuts. It’s like a vacation in a mini loaf pan.
Jackson’s Kitchen Notes & Stories
This recipe has been a staple in my kitchen for years, and it’s evolved in the best ways. I remember one time, early in my Food Meld days, I was filming a video for this recipe and I accidentally used a tablespoon of baking powder instead of a teaspoon. Let’s just say the loaves had… ambitions. They rose like volcanic mountains and then collapsed into delicious, but very dense, craters. We laughed about it, ate the evidence (it still tasted great!), and I learned to always double-check my measurements before adding. It’s all part of the fun!
The other evolution has been in the ripeness of the bananas. I used to think “ripe” was yellow with a few spots. Now I know that the true power lies in the nearly black ones. I keep a “banana graveyard” bag in my freezer specifically for this purpose, and I encourage you to do the same. It’s the ultimate kitchen hack that means you’re never more than 35 minutes away from warm banana bread.
Your Questions, Answered!
I get a lot of questions about this recipe, so I’ve gathered the most common ones here to help you bake with confidence.
Q: Can I make this as one big loaf instead of minis?
A: Absolutely! Pour the batter into a standard 9×5-inch loaf pan that you’ve greased and lined with parchment paper. You’ll need to bake it for about 50-60 minutes. Start checking at the 50-minute mark with a toothpick. If the top is browning too quickly, tent it loosely with aluminum foil.
Q: My bread is dense and gummy. What happened?
A: This is almost always due to overmixing the batter. Remember, fold until *just* combined! The other culprit could be under-baking or using bananas that weren’t ripe enough. Super-ripe bananas have more sugar and less moisture, which is what we want.
Q: Can I freeze these mini loaves?
A: Yes, they freeze beautifully! Let them cool completely, then wrap each one tightly in plastic wrap and again in aluminum foil. They’ll keep for up to 3 months. To serve, just thaw at room temperature or warm them up in a 300°F oven until heated through.
Q: I don’t have a mini loaf pan. What can I use?
A: No problem! This batter works wonderfully in a standard muffin tin. Just fill the muffin cups 3/4 full and reduce the baking time to 18-22 minutes. You’ll get about 10-12 perfect banana chocolate chip muffins.
Nutritional Info (Because We’re Curious!)
I’m all about balance, and I believe knowing what’s in your food is part of the fun. Here’s a rough breakdown per mini loaf (assuming the recipe makes 4 loaves). Remember, this is an estimate and can vary based on your specific ingredients.
Each mini loaf comes in around 320–360 calories, depending on whether you use butter or coconut oil and how generous you are with those chocolate chips. Most of the calories come from the natural sugars in the bananas and brown sugar, plus the fats that keep the crumb unbelievably tender. Each loaf has:
-
Fat: ~14–18g
-
Carbs: ~45–50g
-
Protein: ~4–5g
-
Fiber: ~2g
These little beauties aren’t “health food,” but they are real-food comfort at its finest—made from ripe fruit, simple pantry ingredients, and a whole lot of heart. They’re the kind of treat that fuels your day, warms your mood, and makes your kitchen smell like you’ve got your life together. And honestly? That’s nourishment of the highest order.


