Mac & Cheese Chili Bombs: The Ultimate Game Day Bite You NEED to Make
Hey there, Food Meld fam! Jackson here. Let’s cut right to the chase: have you ever looked at your plate of chili and your bowl of mac and cheese and thought, “My life would be complete if these two just… hugged?” I mean, truly embraced. Became one glorious, singular, bite-sized explosion of joy? Well, stop dreaming and start prepping, because today we’re making that fantasy a crispy, gooey, utterly irresistible reality. Meet the Mac & Cheese Chili Bomb.
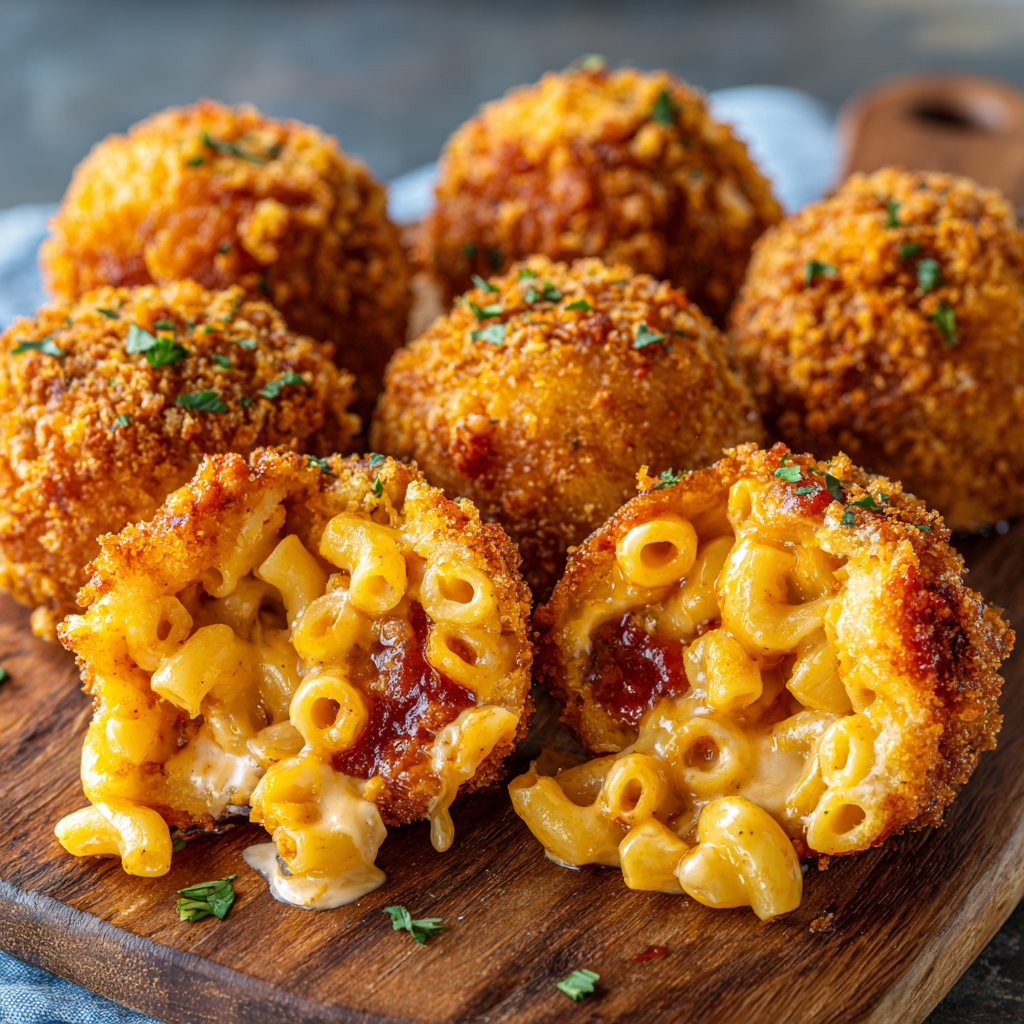
Imagine this: a golden-brown, perfectly crispy shell gives way to the creamiest, cheesiest mac and cheese you’ve ever made. And just when you think it can’t get any better, a spicy, savory river of hearty chili comes flowing out. It’s a surprise in every bite, a party in your mouth, and the undisputed MVP of any game day spread, potluck, or “I-deserve-a-treat” Tuesday night. This isn’t just a recipe; it’s an experience. It’s the kind of food that makes people put down their phones, gather around the kitchen island, and ask, “Okay, how did you DO that?” with pure wonder in their eyes. That’s the Food Meld magic I live for—taking the bold, comforting flavors we love and twisting them into something unforgettable and, most importantly, fun to make. So, tie on your apron, crank up some tunes, and let’s cook something awesome together. We’re about to create culinary fireworks.

The Game Day Tradition That Started It All
This recipe was born from pure, unadulterated snack desperation—and a lifelong love of messy, hands-on food. Growing up, Sundays were sacred in our house. Not for quiet reflection, but for the glorious chaos of football. The TV was blaring, my dad was (lovingly) yelling at referees, and the kitchen was a rotating buffet of dips, wings, and anything that could be eaten in one or two bites without missing a play.
My personal contribution for years was a big pot of chili and a baking dish of my from-scratch mac and cheese. They were always the first things to disappear, usually side-by-side on the same paper plate. One particularly intense game, I watched a friend casually scoop a bite of mac right into his bowl of chili and eat it. The look of bliss on his face was instantaneous. A lightbulb went off. What if we didn’t just eat them together, but fused them? What if we could hold that perfect combo in our hands? After a few… let’s call them “exploratory” kitchen sessions (some involving very messy forks and failed attempts at stacking), the “bomb” concept was born. Now, these crispy little parcels of joy are a non-negotiable part of our game day ritual. They’re more than a snack; they’re a edible memory of laughter, rivalry, and the simple joy of sharing ridiculously good food with your favorite people.
Gathering Your Flavor Arsenal
Here’s everything you’ll need to build these flavor bombs. I’ve included my best tips and swaps so you can make this recipe your own with what you’ve got!
- 3 cups prepared mac and cheese, cooled and thick: This is your foundation! Use your absolute favorite recipe—extra cheesy is key. I swear by a sharp cheddar and gruyère combo for maximum flavor and melt. Pro Tip: Leftover mac from last night’s dinner is PERFECT here. It’s firmer and easier to handle. If your mac is too saucy/loose, pop it in the fridge for an hour to really set up.
- 1 cup thick chili, no excess liquid: You want a hearty, bean-and-meat filled chili, not a soupy one. Drain it in a fine mesh strainer for a minute if needed. This is the glorious, spicy surprise inside, so make sure it’s packed with flavor! Vegetarian chili works amazingly well here too.
- 1 cup shredded cheddar cheese: A little extra cheese mixed into the mac or sprinkled on before breading never hurt anybody. It adds another layer of gooey texture.
- 1/2 cup all-purpose flour: The first step in our crispy armor. It helps the egg wash stick. For a gluten-free version, a 1:1 GF flour blend works great.
- 2 eggs, beaten: Our “glue.” They create the layer that holds the breadcrumbs on for that essential crunch.
- 1 1/2 cups breadcrumbs (panko for extra crunch): This is where the magic texture happens. I’m team panko all the way—they fry up lighter and crunchier than traditional breadcrumbs. For a different twist, try crushed pork rinds or gluten-free breadcrumbs.
- Salt and pepper: Season every layer! Taste your mac and chili before assembling. Well-seasoned components = a mind-blowing final product.
- Oil for frying: Use a neutral oil with a high smoke point like canola, vegetable, or peanut oil. You’ll need enough for about 1.5-2 inches deep in your pot or skillet.
- Sour cream or chipotle aioli, for dipping: The cool, creamy counterpart to the spicy, rich bomb. A must-have for balance! My quick aioli: mix 1/2 cup mayo with 1 minced chipotle in adobo and a squeeze of lime.
Let’s Build Some Bombs: A Step-by-Step Guide
Okay, team! Assembly line time. This process is fun, a little messy (embrace it!), and incredibly satisfying. Read through once, then let’s get our hands dirty.
Step 1: The Scoop & Seal. Grab your cooled, thick mac and cheese. Using a cookie scoop or a large spoon, portion out golf ball-sized amounts (about 2 tablespoons). Roll them briefly in your hands to smooth them, then flatten each into a disc in the palm of your hand. Now, take a small spoonful of your drained, thick chili—about a teaspoon—and place it right in the center of the mac disc. Here’s the fun part: gently fold the mac and cheese up and around the chili, carefully sealing it inside. Pinch any cracks closed and roll it gently between your palms to form a neat ball. Think of it as making a savory snowball with a delicious secret heart. Place each finished bomb on a parchment-lined baking sheet.
Step 2: The Strategic Chill. This step is NON-NEGOTIABLE for success. Pop that baking sheet right into the freezer for 15-20 minutes. We’re not freezing them solid, just firming them up. This makes the breading process a million times easier and prevents a meltdown (literally) when they hit the hot oil. Use this time to clean up and set up your breading station!
Step 3: The Breading Triathlon. Set up three shallow bowls or plates in a row: one with flour (season it with a pinch of salt and pepper!), one with the beaten eggs, and one with the breadcrumbs. Take your semi-firm bombs from the freezer. Roll each one first in the flour, shaking off the excess. Then, dunk it thoroughly in the egg wash, letting the extra drip off. Finally, roll it in the breadcrumbs, pressing gently to make sure the whole surface is coated. Place it back on the parchment. This flour-egg-breadcrumb order is the holy trinity of crispy frying. For an extra-thick crust, you can do a double dip: after the first breadcrumb coat, give it another quick dip in the egg and then a second roll in breadcrumbs.
Step 4: The Golden Fry. In a heavy-bottomed pot, Dutch oven, or deep skillet, heat 1.5-2 inches of oil over medium heat until it reaches 350°F (175°C). Use a thermometer if you have one—it’s the best way to ensure perfect results. If you don’t have one, test the oil by dropping in a small breadcrumb; it should sizzle energetically and turn golden in about 30 seconds. Carefully lower 3-4 bombs into the hot oil using a slotted spoon or spider strainer. Don’t crowd the pan! Fry for 2-3 minutes, turning occasionally, until they’re a deep, uniform golden brown. The smell will be insane. Transfer them to a plate or baking sheet lined with paper towels to drain. Repeat with the remaining bombs.
Step 5: The Grand Finale – Serve Immediately! These babies are at their absolute peak when they’re still piping hot and the cheese inside is at maximum ooze. Transfer them to a serving platter, provide a big bowl of that cool, creamy dipping sauce, and watch them disappear. The first bite, with that crunch and then the lava flow of chili? Pure. Bliss.
How to Serve These Show-Stoppers
Presentation is part of the fun! Don’t just dump these gorgeous golden bombs on a plate. Let’s make them the star of the show they are. I love using a rustic wooden board or a simple white platter to make their color pop. Pile them high in the center for a casual, abundant feel. Scatter a little extra chopped fresh cilantro or sliced green onions around the base for a fresh hit of color. Place a generous bowl of the chipotle aioli or sour cream right in the middle or off to the side. For a real “stadium snack” vibe, serve them in a parchment paper-lined basket with small individual cups of sauce for dipping. And don’t forget the napkins—lots and lots of napkins. This is gloriously messy food, and that’s the whole point. Encourage everyone to dig in with their hands and experience that first, magical bite straight from the fryer.
Make It Your Own: 5 Flavor Twists
The basic blueprint is a winner, but the “what if we tried this?” energy is what Food Meld is all about. Here are some of my favorite ways to mix it up:
- The Buffalo Blue: Use a buffalo chicken mac and cheese (shredded rotisserie chicken tossed in hot sauce mixed into the mac) and fill it with a blue cheese and cream cheese mixture instead of chili. Serve with ranch for dipping. Game. Changer.
- The BBQ Brisket Bash: Fill your mac bomb with a tablespoon of tender, shredded smoked brisket in BBQ sauce. Mix a little smoked paprika into your breadcrumbs for an extra layer of smokiness.
- Veggie Lover’s Delight: Go fully plant-based! Use a killer vegan mac (cashew-based sauces are amazing here) and a robust, meatless chili. For breading, use a flax egg and vegan breadcrumbs.
- Breakfast Bomb: Yes, really. Use a bacon and cheddar mac, fill with a spoonful of scrambled eggs and crumbled sausage, and bread them. Fry as usual and serve with maple syrup for dipping. The ultimate brunch weapon.
- Baked, Not Fried: Want a slightly lighter version? After breading, place the bombs on a wire rack over a baking sheet. Spray generously with cooking oil and bake at 425°F (220°C) for 15-20 minutes, turning once, until crispy and heated through. They’ll be slightly less crunchy but still delicious!
Jackson’s Kitchen Notes & Stories
This recipe has seen some… experimental phases. The first batch, I was so excited I skipped the chilling step. Let’s just say I ended up with more of a “Mac & Cheese Chili Pancake” situation in the fryer. It tasted incredible, but it was not a bomb. It was a delicious, cheesy puddle. Lesson learned: patience is a ingredient. Another time, I tried to get fancy and added the shredded cheese to the *outside* of the breadcrumb coating. It immediately burned and smoked up my kitchen. The dog was not impressed. The version you see here is the result of all those happy accidents—streamlined, foolproof, and guaranteed to deliver that iconic “ooze” we’re after. It’s a recipe that laughs with you, not at you. And if one breaks open during frying? Chef’s snack. Quality control is a tough job, but someone’s gotta do it.
Your Questions, Answered
Q: Can I make these ahead of time?
A: Absolutely! You can assemble and bread the bombs, then freeze them in a single layer on a baking sheet before transferring to a freezer bag. Fry directly from frozen, adding 1-2 minutes to the cooking time. No thawing needed!
Q: My bombs are leaking chili in the oil! What did I do wrong?
A: This usually means 1) The chili wasn’t thick/drained enough, or 2) The sealing wasn’t quite complete. Make sure you’re really pinching the mac closed around the filling and that your chill isn’t runny. A good chill in the freezer is your best friend to seal the deal.
Q: What’s the best way to reheat leftovers?
A: While best fresh, leftovers can be revived! Reheat them in an air fryer or toaster oven at 375°F (190°C) for 5-8 minutes until hot and re-crisped. The microwave will make them soggy, so avoid it if you can.
Q: Can I use store-bought mac and cheese or chili?
A> You sure can! This is about fun, not stress. A high-quality deli mac or a thick, favorite canned chili will work in a pinch. Just make sure whatever you use is intensely flavorful—that’s what shines through.
A Quick Note on Nutrition
Let’s be real: Mac & Cheese Chili Bombs are a celebration food, a treat, the life of the party. They’re not intended as an everyday health food, and that’s perfectly okay! Food is about joy, connection, and flavor. That said, you can make mindful choices within the recipe. Baking instead of frying reduces the fat content significantly. Using lean ground turkey or a plant-based meat in your chili, loading it with veggies, and opting for a whole-grain or gluten-free breadcrumb are all great tweaks. Each bomb, as written, is estimated to be around 250-300 calories, but remember, it’s a rich, satisfying bite. Enjoy them as part of a spread with fresh veggie sticks and other lighter options. My philosophy? Don’t deprive—just savor every single incredible bite mindfully and without guilt.
Let’s Keep the Party Going
And there you have it! Your guide to creating the most talked-about snack at any gathering. I hope this recipe brings as much laughter and “oh wow!” moments to your kitchen as it has to mine. Remember, cooking is an adventure. If your bombs aren’t perfect spheres on the first try, who cares? They’ll taste incredible. The real goal is to have fun, get a little messy, and share something made with love (and a whole lot of cheese).
Did you make these? What twist did you try? Tag me @FoodMeld on social media—I LIVE for seeing your creations. It’s the best part of this whole journey. Until next time, keep mixing it up, making it yours, and enjoying every single bite. Let’s cook something awesome again soon!
Jackson


