
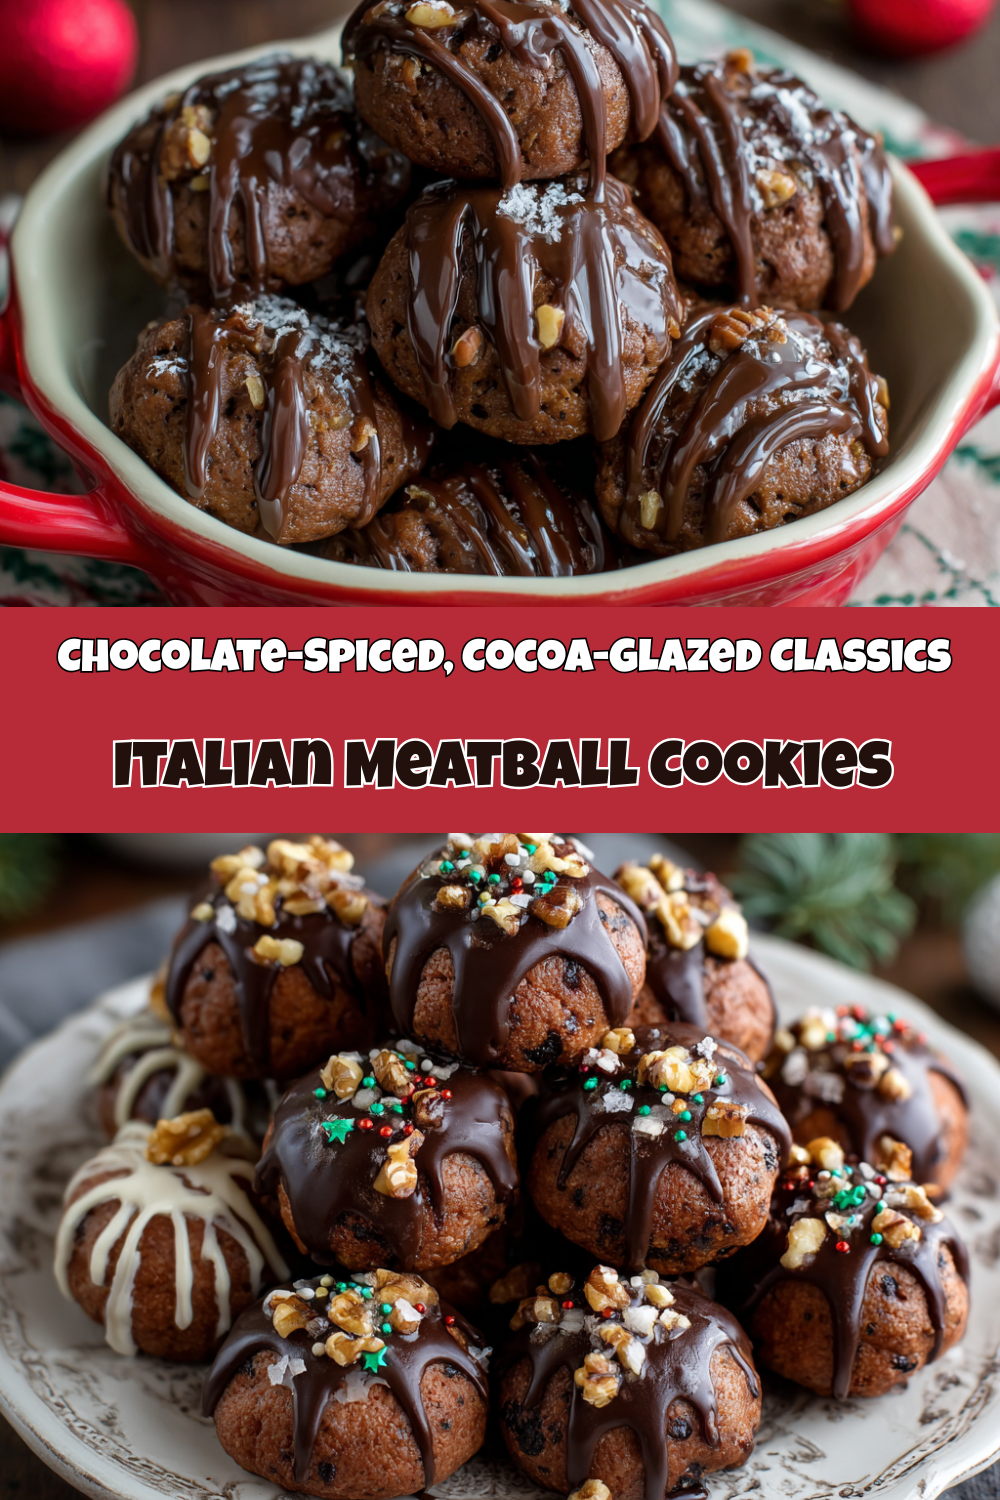
Italian Meatball Cookies: The Chocolate-Spiced Holiday Miracle You NEED to Make
Hey friends, Jackson from Food Meld here! Let’s talk about that magical moment when your kitchen starts to smell like the holidays. You know the one—it’s a mix of warm spices, rich chocolate, and pure, unadulterated joy. If you’re chasing that feeling, I’ve got the perfect recipe for you. We’re making Italian Meatball Cookies, and before you ask, no, there is absolutely no actual meat involved. These little guys are a beloved Italian-American tradition, and they are a total flavor explosion. Imagine if a soft gingerbread cookie and the richest brownie had a beautiful, perfectly spiced baby. That’s what we’re baking today.
They’re called “meatball” cookies because of their shape and deep, earthy color, but one bite and you’ll be transported. They’re soft, cake-like, and packed with walnuts and warm spices like clove and allspice, all wrapped up in a decadent, silky cocoa glaze. They look impressive, but I promise you, they are so simple to make. This is the kind of recipe that creates those “you’ve gotta try this” moments I live for. So, preheat your oven, grab your favorite mixing bowl, and let’s cook something awesome together. Welcome to your new favorite holiday cookie.
A Kitchen Full of Laughter and (Chocolate) Meatballs
This recipe takes me right back to my friend Maria’s chaotic, wonderful, and incredibly loud kitchen during the holidays. I was maybe 22, and her entire family was in a full-blown Christmas cookie marathon. There were trays of pizzelles, stacks of pignoli cookies, and in the center of it all, were these dark, mysterious little orbs she kept calling “meatball cookies.” I was so confused until her nonna, a tiny woman with the strength of a longshoreman and a heart of gold, shoved one in my mouth.
The flavor just blew my mind. It was so complex and warm, unlike any other cookie I’d ever had. I must have eaten half a dozen before I even offered to help. That’s when the real fun started. Maria’s nonna, who spoke about ten words of English, took me under her wing. She’d gesture, I’d nod, and we’d roll dough balls together, communicating through smiles and the universal language of good food. It was messy, it was fun, and it’s a memory I cherish every time I smell these spices and cocoa mixing together. That’s the power of food, right? It’s not just about what’s on the plate; it’s about the stories and the people you share it with.
Gathering Your Flavor Arsenal
This is where the magic starts. Let’s break down what you’ll need. Don’t be intimidated by the spice list—this is the soul of the cookie! I’ve added my chef insights and substitutions so you can make this recipe your own.
For the Cookies:
- 3 cups all-purpose flour: The foundation of our cookie. It gives them that perfect, cakey structure.
- ⅔ cup unsweetened cocoa powder: Use a good quality one! This is our main flavor, so don’t skimp. Chef’s Insight: For a deeper chocolate flavor, try using a dark cocoa powder.
- 1½ teaspoons baking powder + 1½ teaspoons baking soda: Our leavening dream team. The combo ensures our “meatballs” puff up perfectly and have a lovely tender crumb.
- 1 teaspoon salt: Crucial for balancing all the sweetness and making the chocolate flavor pop. Never skip the salt!
- 1 cup chopped walnuts: They add a fantastic crunch and nutty depth. Substitution Tip: Not a walnut fan? Pecans or almonds work beautifully, or leave them out for a nut-free version.
- The Spice Squadron:
- 1 teaspoon ground cloves
- 1 teaspoon ground allspice
- 1 teaspoon ground cinnamon
- ½ teaspoon ground nutmeg
This is the heart and soul of the cookie’s holiday aroma. It’s warm, bold, and incredibly comforting. Chef’s Insight: For the absolute best flavor, try grating your own nutmeg. It’s a game-changer.
- 1½ cups white sugar: Sweetens the deal and helps create a tender texture.
- 3 large eggs: Binds everything together and adds richness. Make sure they’re at room temperature for best results!
- ½ cup unsalted butter, softened: For that rich, buttery flavor and soft texture. Substitution Tip: You can use an equal amount of vegetable shortening if needed, but butter is king for flavor here.
- 2 teaspoons vanilla extract: The flavor enhancer that ties all the other ingredients together in a warm, fragrant bow.
For the Chocolate Glaze:
- 4 cups confectioners’ sugar: Creates that smooth, crackly glaze we all love.
- ¼ cup unsweetened cocoa powder: Doubles down on the chocolate goodness.
- ½ cup milk: Thins the glaze to a perfect dipping consistency. Substitution Tip: Any milk works here—dairy, almond, oat, you name it. You may need a tablespoon more or less to get it right.
Let’s Make Some (Cookie) Magic: Step-by-Step
Alright, team, let’s get our hands dirty. This is the fun part. Follow these steps, and you’ll have a kitchen that smells like a Christmas dream.
- Preheat and Prep: Fire up your oven to 350°F (175°C). This is our sweet spot for baking these cookies to perfection. Line your baking sheets with parchment paper. Chef’s Hack: If you don’t have parchment, a light coating of baking spray works, but parchment guarantees no sticking and makes cleanup a breeze.
- Whisk the Dry Goods: In a large bowl, grab your whisk and go to town on the flour, cocoa powder, baking powder, baking soda, salt, all those gorgeous spices (cloves, allspice, cinnamon, nutmeg), and the chopped walnuts. Whisking them now ensures every single cookie gets an even distribution of flavor and leavening. No bland bites allowed on my watch!
- Cream the Butter & Sugar: In your stand mixer or a separate large bowl with a hand mixer, cream together the softened butter and white sugar. We’re looking for light and fluffy, which usually takes about 2-3 minutes on medium speed. This step incorporates air, which helps our cookies rise.
- Incorporate the Wet Ingredients: Beat in the eggs, one at a time, letting each one fully incorporate before adding the next. Then, mix in the vanilla extract. Scrape down the sides of the bowl to make sure everything is getting to know each other.
- Bring It All Together: Now, with your mixer on low speed, gradually add the dry ingredient mixture to the wet ingredients. Pro Tip: Don’t overmix! As soon as you stop seeing streaks of flour, stop the mixer. The dough will be thick and a bit sticky—that’s exactly what we want.
- Roll Those “Meatballs”: This is the perfect job for little helpers or for zoning out to some good music. Pinch off pieces of dough and roll them into 1-inch balls. They don’t have to be perfect! A little irregularity adds to their homemade charm. Place them about an inch apart on your prepared baking sheets.
- Bake to Perfection: Pop those trays in the oven and bake for 10-12 minutes. They’re done when the tops look set and if you gently press one, it springs back slightly. They might look a little soft, but they will firm up as they cool. Chef’s Hack: For even baking, rotate your sheets halfway through the bake time.
- The All-Important Cool Down: Let the cookies cool on the baking sheet for 5 minutes before transferring them to a wire rack to cool completely. I know it’s tempting to glaze them warm, but patience, young grasshopper! A warm cookie will make the glaze melt right off. They must be completely cool.
- Whip Up the Glaze: While the cookies are cooling, make the simple glaze. In a medium bowl, whisk together the confectioners’ sugar and cocoa powder. Slowly whisk in the milk until you have a smooth, glossy, and dip-able consistency. It should coat the back of a spoon nicely. If it’s too thick, add a teaspoon more of milk. Too thin? Add a bit more powdered sugar.
- The Grand Finale—Glazing! Now for the best part. Take a cooled cookie, dip the top right into the glaze, give it a little swirl, and lift it out. Let the excess drip off and place it back on the wire rack. Repeat with all your cookies and let the glaze set completely. This might take an hour or two, but it’s worth the wait.
How to Serve These Show-Stoppers
Okay, the glaze is set. Now what? These cookies are a masterpiece on their own, but presentation is part of the fun!
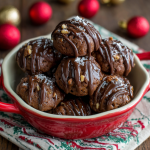
I love piling them high on a vintage cake stand or a simple rustic wooden board. They look incredible when they’re all stacked up together. They’re the perfect addition to any holiday cookie box or platter—they add a deep, dark chocolate element that contrasts beautifully with lighter cookies like snowballs or shortbread.
Pair them with a big glass of cold milk for the ultimate nostalgic treat, or serve them alongside a cup of strong espresso. The bitterness of the coffee cuts through the sweetness of the glaze perfectly. They also make a fantastic edible gift! Tuck a dozen into a cellophane bag tied with a festive ribbon, and you’ve just become everyone’s favorite gift-giver.
Make It Your Own: Creative Twists
Once you’ve mastered the classic, it’s time to play! Here are a few of my favorite ways to mix it up.
- Chocolate Chip Surprise: Fold ½ cup of mini chocolate chips into the dough right at the end. Because more chocolate is always the answer.
- Mocha Magic: Dissolve 1 teaspoon of instant espresso powder into the vanilla extract before adding it to the dough. It won’t make the cookies taste like coffee, but it will deepen and intensify the chocolate flavor like you wouldn’t believe.
- Citrus Zing: Add the zest of one orange to the dough when you’re creaming the butter and sugar. The bright, citrusy notes play so well with the warm spices and chocolate.
- Festive Toppings: Immediately after dipping in the glaze, while it’s still wet, sprinkle on some holiday sprinkles, crushed pistachios, or even a little flaky sea salt for a sweet-and-salty situation.
- Boozy Soak: For an adult-only version, add a tablespoon of rum or brandy to the glaze instead of a tablespoon of the milk. So good!
Jackson’s Chef Notes & Kitchen Stories
This recipe is a testament to the idea that the best dishes often have the messiest stories. The first time I made these solo, I was so confident I didn’t read the recipe twice. I accidentally used powdered sugar instead of confectioners’ sugar in the dough. Let’s just say I ended up with a flat, oily puddle of spicy chocolate. It was a disaster! But it taught me to always mis en place—that’s chef talk for getting all your ingredients measured and set out before you start. It saves you from silly mistakes and makes the whole process so much more relaxing.
Over the years, I’ve tweaked the spice ratios to be a little bolder, because that’s how I like it. Don’t be afraid to do the same! If you love cinnamon, add an extra half teaspoon. If you’re not a huge clove fan, dial it back. The recipe is your playground. Make it unforgettable.
FAQs & Troubleshooting: Your Questions, Answered
Q: My dough is really sticky and hard to roll. What did I do wrong?
A: You probably didn’t do anything wrong! This dough is meant to be a little sticky. If it’s unmanageable, pop it in the fridge for 20-30 minutes to firm up. You can also lightly dampen your hands with water to prevent sticking while you roll.
Q: Can I make these cookies ahead of time?
A: Absolutely! These are fantastic make-ahead cookies. You can store the unglazed cookies in an airtight container at room temperature for up to 3 days, then glaze them the day you want to serve them. You can also freeze the unglazed baked cookies for up to 3 months. Thaw and glaze when ready.
Q: My glaze is too thin/thick. How can I fix it?
A> No worries, glazing is an art! If it’s too thin, whisk in more confectioners’ sugar, a quarter cup at a time. If it’s too thick and gloopy, add more milk, a teaspoon at a time, until it reaches a smooth, dippable consistency.
Q: Why are my cookies dry or cakey?
A: The most common culprit is overbaking. Remember, they continue to cook on the hot tray after you take them out. Pull them at 10 minutes and check. Overmixing the dough can also lead to a tougher texture by developing too much gluten in the flour.
Italian Meatball Cookies
- Total Time: ~45–60 minutes
- Yield: 60 Cookies 1x
Description
These “meatball” cookies are a beloved Italian Christmas tradition—rich with cocoa, spiced like a gingerbread dream, and finished with a silky cocoa glaze. Despite their name, there’s no meat here—just deeply nostalgic flavor and that unmistakable holiday aroma that fills the kitchen with cheer.
Ingredients
Cookies:
3 cups all-purpose flour
⅔ cup unsweetened cocoa powder
1½ teaspoons baking powder
1½ teaspoons baking soda
1 teaspoon salt
1 cup chopped walnuts
1 teaspoon ground cloves
1 teaspoon ground allspice
1 teaspoon ground cinnamon
½ teaspoon ground nutmeg
1½ cups white sugar
3 large eggs
½ cup unsalted butter, softened
2 teaspoons vanilla extract
Chocolate Glaze:
4 cups confectioners’ sugar
¼ cup unsweetened cocoa powder
½ cup milk (more as needed for consistency)
–
Optional Twists:
Add ½ cup mini chocolate chips or raisins to the dough
Mix 1 teaspoon espresso powder for a mocha twist
Stir in orange zest for a citrus-spice flavor
Top glaze with festive sprinkles or crushed nuts before it sets
Instructions
Preheat oven to 350°F (175°C). Line baking sheets with parchment.
In a large bowl, whisk flour, cocoa, baking powder, baking soda, salt, spices, and walnuts.
In another bowl, cream butter and sugar. Beat in eggs and vanilla. Gradually add dry mixture to form a thick dough.
Roll dough into 1-inch balls and place on baking sheet.
Bake 10–12 minutes until set. Cool completely.
For glaze, whisk confectioners’ sugar, cocoa powder, and milk until smooth. Dip cooled cookies and let glaze set.
- Prep Time: 25 minutes
- Cook Time: 10–12 minutes per batch
Nutrition
- Calories: 110 / Cookie
- Sugar: 12g / Cookie
- Sodium: 50mg / Cookie
- Fat: 4g / Cookie
- Carbohydrates: 18g / Cookie
- Protein: 1g / Cookie
Nutritional Information (Because Knowledge is Power!)
Okay, let’s be real—these are a holiday treat, and we’re here to enjoy them! But I know some of you like to keep track, so here’s a rough estimate per cookie (based on a yield of 60 cookies). Remember, these values can change based on specific brands and exact measurements.
- Calories: 110 kcal
- Fat: 4g
- Carbohydrates: 18g
- Sugar: 12g
- Protein: 1g
- Sodium: 50mg
To make them a bit lighter, you could try using a sugar substitute designed for baking, though the texture may change slightly. Using a nut milk in the glaze is a great easy swap, too!
Final Thoughts: Let’s Keep the Tradition Alive
There you have it, friends. My take on a classic Italian holiday cookie that’s packed with more flavor and heart than just about anything I know. This isn’t just a recipe; it’s an invitation to create your own kitchen memories. To get a little messy, to fill your home with an incredible aroma, and to share something truly delicious with the people you love.


