Your New Favorite Holiday Tradition: Hot Cocoa Cups!
Hey friends, Jackson from Food Meld here! Is there anything better than wrapping your hands around a steaming mug of hot cocoa on a chilly day? That rich, chocolatey warmth, the fluffy marshmallows melting on top… it’s pure comfort in a cup. But what if I told you we could take that cozy feeling and turn it into something even more magical, something you can literally gift? Enter: Hot Cocoa Cups. These aren’t just any cocoa—they’re adorable, self-contained layers of chocolatey joy, waiting for a splash of hot milk to transform into the most incredible drink you’ll have all season. We’re talking a built-in chocolate shell, your favorite cocoa mix, mini marshmallows, and a surprise candy center, all packed into a little paper cup. They’re the perfect edible gift, a fantastic party favor, or just a super fun way to treat yourself. So, let’s ditch the boring packets and cook up some real holiday magic together. I promise, it’s easier than you think and twice as fun. Let’s get melding!
Print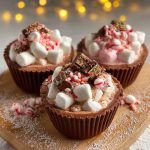
HOT COCOA CUPS
- Total Time: 1 hour
- Yield: 2 cups
Description
These Hot Cocoa Cups are mini holiday magic in a cup—rich chocolate, fluffy marshmallows, and your favorite cocoa blend all layered into a cute, melt-and-sip treat. Perfect for gifting, party favors, or your own cozy night in. Just add hot milk!
Notes
Melt chocolate: Microwave chocolate chips in 30-sec bursts, stirring until smooth.
Pour & build: Add ~2 tbsp melted chocolate into each paper cup. Insert paper straw into the center while chocolate is still warm.
Layer the love: While chocolate is warm, top with 1 cocoa packet’s contents, a few mini marshmallows, and your chosen candy. Gently press down.
Chill: Let cups set at room temp or refrigerate until firm (about 15–20 min).
To serve: Peel off the paper cup, place in a mug, and pour over hot milk. Stir until melted and creamy!
- Prep Time: 10 minutes
- Chill Time: 20 minutes
- Cook Time: 30 minutes
Nutrition
- Calories: 210 / Cup
- Sugar: 18g / Cup
The Snow Day That Started It All
This recipe takes me right back to my grandma’s kitchen after a huge snowstorm. The power was out, but she had the wood stove roaring. We were bundled up, and she decided we weren’t going to let a little thing like a blackout ruin our cocoa. She didn’t have any pre-made mix, so she got creative. She grated a bar of chocolate into our mugs, tossed in a spoonful of sugar from the pantry, and even found a hidden bag of marshmallows. She poured in the hot milk straight from a pot on the stove, and we stirred until it became this insanely rich, slightly chunky, and utterly perfect homemade cocoa. It was a “make it work” moment that tasted better than any perfectly measured recipe. These Hot Cocoa Cups are my modern, giftable twist on that feeling. They’re about that same spirit of creativity and making something unforgettable out of simple, good ingredients. No power required—just a whole lot of heart.
Gathering Your Cocoa Cup Arsenal
Here’s the beautiful part: you probably have most of this stuff already. The magic is in the assembly! This makes two generous cups, but I highly recommend doubling (or tripling!) the batch because you’ll want to make more.
- 2 Candy Shop™ hot cocoa packets (any flavor): This is your flavor base! I love the classic milk chocolate, but this is where you can get wild. Peppermint, dark chocolate, salted caramel—go for whatever makes you happy. Chef’s Insight: If you don’t have packets, you can use ¼ cup of your favorite bulk hot cocoa mix per cup.
- ½ cup HERSHEY’S chocolate chips (or any melting chocolate): This creates the rich, shell-like bottom that melts into silky goodness. Substitution Tip: Use white chocolate chips for a different vibe, or a high-quality dark chocolate bar chopped up for a more grown-up, bittersweet kick.
- Handful of mini marshmallows: Non-negotiable for that classic, fluffy topping! They get a little toasted when you pour the hot milk over them. Pure bliss.
- 2 HERSHEY’S, REESE’S, or YORK candies (whole or chopped): The fun surprise! A hidden treasure that melts into the cocoa. Chef’s Insight: Chopping a Reese’s cup ensures peanut butter in every sip. A York Peppermint Pattie? Holiday in a mug.
- 2 small paper cups (3–5 oz): The vessel! Think Dixie bathroom cups or small dessert cups. Pro Tip: Using festive holiday-themed cups makes them instantly giftable without any extra wrapping.
- 2 festive paper straws: Part tool, part decoration. They help with stirring and make the whole thing look Insta-worthy.
Building Your Edible Masterpiece: Step-by-Step
Alright, let’s do this! It’s less about cooking and more about crafting. Put on some holiday tunes, and let’s have fun with it.
- Melt Your Chocolate: Dump your chocolate chips into a microwave-safe bowl. Pop it in the microwave and heat for 30 seconds. Take it out and give it a good stir. It won’t look melted yet—that’s okay! Another 30 seconds, stir again. Keep doing this in short bursts until the chocolate is smooth and glossy. Chef’s Hack: Rushing this step is the number one way to burn chocolate. Trust me, I’ve made chocolate charcoal. Patience is key! If you have a double boiler, feel free to use it for ultimate control.
- The Pour & The Straw: Using a spoon, divide the melted chocolate between your two paper cups. You want a good base layer, about 2 tablespoons worth. Now, here’s the crucial part: immediately take your paper straw and stick it right into the center of the chocolatey pool. Hold it there for a few seconds so it starts to set in place. This is what gives your cocoa cup its structure and built-in stirrer!
- Layer the Love: While the chocolate is still warm and soft, start building! First, split the contents of one cocoa packet between the two cups, sprinkling it right over the chocolate. Next, add a layer of mini marshmallows. Then, press your chosen candy into the center. Gently press everything down just a little so it all sticks together. Chef’s Commentary: Don’t wait for the chocolate to harden before adding the other layers! The warmth helps everything bind together into one solid unit.
- The Big Chill: Now, we play the waiting game. You can let these set up at room temperature if your kitchen is cool, but for speed, I just pop them right into the fridge. They’ll be firm and ready to go in about 15-20 minutes. You’ll know they’re done when you can gently squeeze the side and it feels solid.
- The Grand Finale (Serving!): This is the best part. When you’re ready to serve, simply peel the paper cup away from your chocolate masterpiece. It should come off easily. Place the revealed cocoa cup right into a mug. Heat up some milk (or milk alternative) until it’s steaming hot—not boiling—and slowly pour it over the cup. Watch the magic happen! Grab that straw and give it a good stir until everything is melted, combined, and wonderfully creamy.
How to Serve These Bad Boys
Presentation is half the fun! For yourself, a big, cozy mug is perfect. But if you’re gifting these or serving them at a party, let’s make it special. Place the unwrapped cocoa cup on a saucer next to a cute mug. Tie a ribbon around the mug with a tag that says “Add hot milk and stir!” For a party, set up a “cocoa bar”: have a thermal carafe of hot milk, and let guests choose their cocoa cup and unwrap it themselves. You can even have little bowls of extra toppings like whipped cream, cinnamon, or more crushed candy canes for them to add after their cup melts. It’s an interactive, delicious experience that everyone will love.
Get Creative: Fun Flavor Twists!
The basic recipe is just the beginning. This is a Food Meld project, so we’re gonna play with our food!
- The Peppermint Wonderland: Use a peppermint hot cocoa packet, crush up a candy cane and mix it into the chocolate layer, and use a dark chocolate base. Top with a whole mini candy cane on the side of the mug.
- The Salty Sailor: Use a caramel cocoa packet or mix a pinch of sea salt into your classic cocoa powder. Use a ROLO or a caramel Hershey’s Kiss as your hidden candy. The sweet and salty combo is unreal.
- The Spiced Adventurer: Add a pinch of cayenne pepper or chili powder to your cocoa mix layer for a amazing Mexican hot chocolate experience. The little kick of heat at the end is so good.
- The Cookie Lover’s Dream: Crush up some vanilla wafers, shortbread cookies, or even Oreos and add a layer on top of the marshmallows. It adds an incredible cookie crunch to your drink.
- The White Christmas: Use white chocolate chips for the shell and a white chocolate cocoa packet. Hide a white chocolate Reese’s or a Lindt white chocolate truffle inside. It’s so pretty and decadent.
Jackson’s Chef Notes & Kitchen Confessions
I’ve made a lot of these over the years, and they’ve evolved from a messy kitchen experiment to my go-to holiday gift. The first time I tried it, I used way too much chocolate and it never fully melted—my poor friend needed a spoon to chisel it out of her mug! Lesson learned: a 2-tablespoon base is the sweet spot. I also love making a big batch of the components and letting my nieces and nephews assemble their own. It gets them involved and they love choosing their own candy surprise. The kitchen gets messy, everyone has chocolate on their faces, and it’s absolutely perfect. That’s what cooking is all about.
Your Questions, Answered!
Q: Can I make these ahead of time for gifts?
A: Absolutely! They are the perfect make-ahead gift. Once set, just keep them in an airtight container in a cool, dry place. They’ll be perfect for up to two weeks. I wouldn’t recommend the fridge long-term as condensation can make the paper cups soggy.
Q: My chocolate shell cracked when I took the paper cup off. What did I do wrong?
A: No worries, it’s still gonna taste amazing! This usually means the chocolate layer was a bit too thick. Next time, try a slightly thinner layer. Even if it cracks, it’s all going to melt into the same delicious drink.
Q: Can I use almond milk or oat milk to make the drink?
A: 100% yes! Any milk or milk alternative will work beautifully. Just make sure it’s nice and hot so it melts the chocolate cup effectively.
Q: The straw won’t stand up straight. Help!
A> I feel you! This is a common hiccup. Make sure your chocolate layer is deep enough to anchor the straw. Hold it in place for a good 15-20 seconds after inserting it. If it’s still wobbly, you can prop it up against something in the fridge while it sets.
Nutritional Info (Per Cocoa Cup)
Alright, let’s keep it real—this is a treat, through and through. But it’s a treat you make with love and control the ingredients in! Here’s a rough estimate per cocoa cup (before adding milk):
- Calories: ~210
- Sugar: ~18g
- Prep Time: 10 min
- Chill Time: 15–20 min
- Total Time: ~30 min
Remember, these numbers can vary based on the specific brands of cocoa and candy you use. Using dark chocolate and a sugar-free cocoa mix are great ways to lighten it up a bit if that’s your goal!

Let’s Keep the Fun Going!
And there you have it! Your secret weapon for the most memorable hot cocoa of your life. I hope you have as much fun making these as I do. They’re more than just a recipe; they’re a little project that spreads joy. Whether you’re gifting them to a neighbor, surprising your kids after school, or just treating yourself to a next-level cozy night in, these Hot Cocoa Cups are what Food Meld is all about: simple, real, and always packed with flavor.
I’d love to see your creations! Tag me on Instagram @FoodMeld and show me your flavor twists. Did you use a Snickers? Add some bacon? (Hey, don’t knock it ‘til you try it!). Let’s inspire each other.
Until next time, keep cooking boldly and enjoying every single bite.
Yours in flavor,
Jackson


