The Unforgettable Magic of a Warm Dinner Roll
Hey friends, Jackson from Food Meld here. Let’s get real for a second. Is there anything in this world that feels quite as much like a hug from the inside as a warm, soft, homemade dinner roll, fresh from the oven?
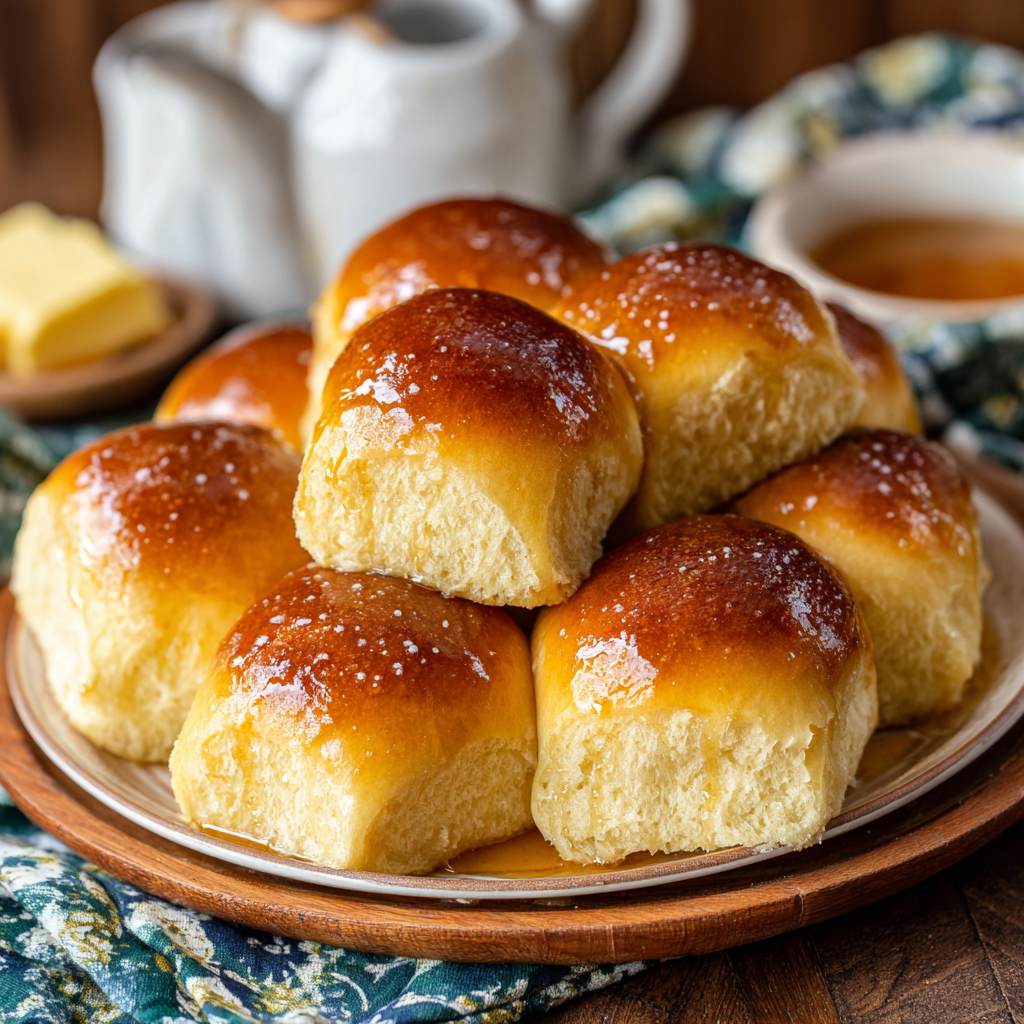
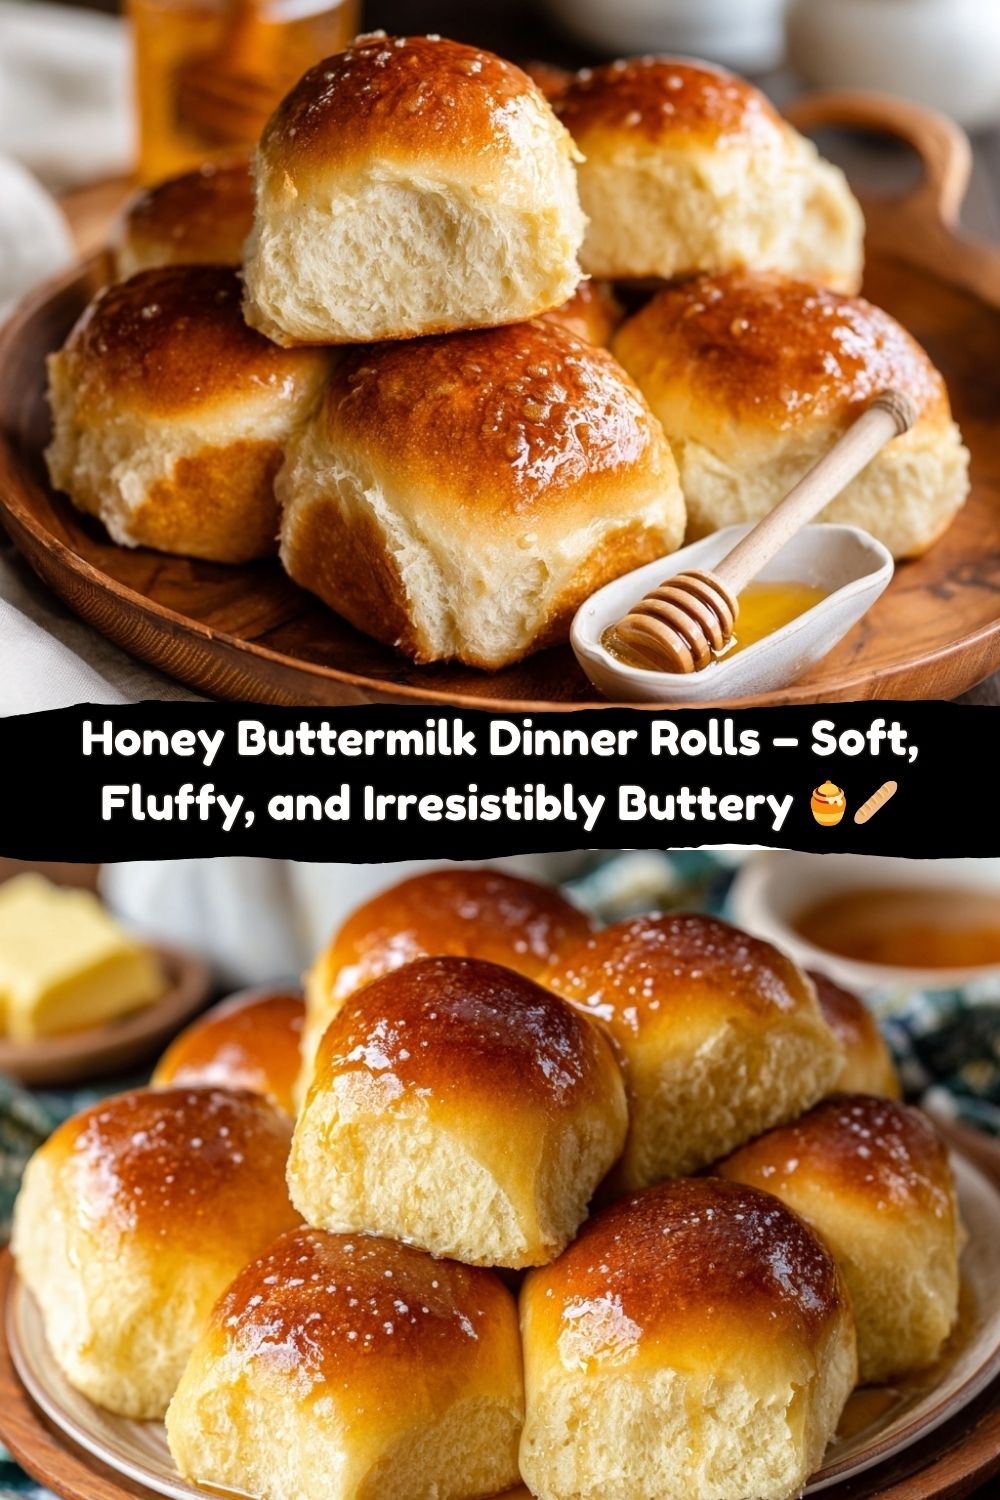
I’m talking about the kind of roll that’s so impossibly light and fluffy it practically melts on your tongue. The kind with a delicate, golden-brown top that glistens with a brush of melted butter. The kind that carries a whisper of honey-sweetness and the subtle, tangy richness of buttermilk. You break it open, and a cloud of warm, yeasty steam hits you right in the face—and right in the soul. That’s the magic we’re making today.
I know what you might be thinking: “Jackson, homemade yeast bread? That’s intimidating.” I hear you! But I’m here to tell you, with my whole chef-heart, that it doesn’t have to be. This isn’t a fussy, complicated bakery recipe. This is a down-to-earth, “let’s get our hands a little dusty with flour and have some fun” kind of recipe. We’re taking the beloved flavor profile of my Honey Buttermilk Bread and turning it into the ultimate shareable, pass-around-the-table dinner roll. No bread machine, no fancy skills—just simple ingredients, a little bit of patience (the hardest part, I know!), and a whole lot of love. So, tie on your apron, and let’s cook something awesome together.
A Pinch of Nostalgia: The Roll That Started It All
This recipe takes me straight back to my Granny Walker’s kitchen in Georgia. It was always a whirlwind of laughter, clattering pots, and the most incredible smells. But before the big holiday feast even hit the table, there was always a “test batch” of rolls. Granny would pull the first golden pan out of the oven, and we grandkids would swarm like little bees, drawn by the scent of honey and yeast.
She’d hand us each a roll, hot enough to make us dance from hand to hand as we tore into them. No butter needed—they were perfect just as they were. That first bite, in that warm, chaotic, love-filled kitchen, is my core food memory. It taught me that the simplest foods, made with care and shared with people you love, are the ones that truly stick with you. These Honey Buttermilk Rolls are my tribute to her, and my way of passing that warm, buttery feeling on to you and your family.
Gathering Your Flavor Arsenal
Here’s the lineup of simple ingredients that are about to become your new best friends. This isn’t just a list; it’s a flavor roadmap. Let’s talk about why each one matters.
- 1 tablespoon active dry yeast (or 1 packet): This is our magic leavening agent, the tiny organism that makes our rolls rise up light and fluffy. Make sure your yeast isn’t expired for the best results!
- 1 pinch powdered ginger: Okay, this is one of my favorite little chef hacks. The ginger isn’t for flavor—you won’t taste it at all. It just gives the yeast a little extra kick in the pants to get it foaming and active faster. Think of it as a yeast energy drink.
- 1 teaspoon sugar: The yeast’s first meal! This little bit of sugar gets the yeast munching and producing those lovely bubbles that will give our rolls their airy texture.
- ¼ cup warm water (105°F–110°F): The perfect warm bath to wake up our yeast. Too hot, and you’ll kill it; too cold, and it’ll stay sleepy. If it feels comfortably warm on your wrist, it’s perfect.
- 1¾ cups warm buttermilk (105°F–110°F): The superstar! Buttermilk adds a wonderful tangy flavor and, thanks to its acidity, creates an incredibly tender crumb. It’s the secret to that “melt-in-your-mouth” quality.
- ¼ cup honey: Our natural sweetener. Honey gives the rolls a delicate, floral sweetness that sugar just can’t match. It also helps them brown up to a beautiful golden color.
- 1 teaspoon kosher salt (or ¾ tsp table salt): Crucial for flavor! Salt balances the sweetness and makes all the other ingredients pop. Never skip the salt in yeast breads.
- ½ teaspoon baking soda: A surprise guest! The baking soda reacts with the acidic buttermilk, giving the dough an extra little lift and making the rolls even softer.
- 5 to 5½ cups all-purpose or bread flour: The backbone of our rolls. I often use all-purpose, but bread flour has more protein, which can give you a slightly chewier, taller roll. We’ll start with 5 cups and add more as needed.
- ¼ cup melted butter (plus more for brushing): For richness, flavor, and that gorgeous, glistening finish. Butter makes everything better. It’s a fact.
Let’s Get Baking: The Step-by-Step Fun
Alright, team, this is where the magic happens. Follow these steps, read my little commentary, and you’ll be a roll-making rockstar in no time.
- Wake Up the Yeast: In a large mixing bowl, dissolve your yeast, that pinch of ginger, and the teaspoon of sugar in the ¼ cup of warm water. Give it a quick stir and then just walk away. Let it sit for 5-10 minutes until it looks foamy and creamy, like a little root beer float. This is called “proofing” and it’s your sign that the yeast is alive and ready to party! Chef’s Hack: If it doesn’t foam, your yeast might be old or your water was too hot/cold. Toss it and start this step over.
- Create the Base: Once your yeast is foamy, pour in the warm buttermilk, honey, salt, and baking soda. Stir it all together with a wooden spoon until everything is happily combined. It might look a little lumpy and separated at first, but that’s totally normal.
- Incorporate the Flour: Now, we add the flour. Start with 5 cups, adding it one cup at a time, mixing with your spoon after each addition. Once the dough becomes too thick to stir, it’s time to get your hands in there! Dust your counter with some of the remaining ½ cup of flour and turn the dough out.
- The Kneading Dance: Here’s the therapeutic part. Knead the dough for 8-10 minutes. Push it down and away from you with the heel of your hand, fold it over, give it a quarter turn, and repeat. Add sprinkles of the reserved flour only if the dough is sticking to your hands or the counter. You’re done when the dough is smooth, slightly elastic, and springs back slowly when you poke it. Chef’s Hack: If you have a stand mixer, use the dough hook and let it run on medium for 5-6 minutes. I won’t tell!
- The First Rise: Place your beautiful ball of dough into a lightly greased bowl (I just use the same mixing bowl, wiped clean and greased). Turn the dough over once to coat it lightly in oil. Cover the bowl with a clean kitchen towel or plastic wrap and let it rise in a warm, draft-free spot for 1 to 1 ½ hours, until doubled in size. My favorite spot? On top of the warm, but OFF, oven.
- Shape the Rolls: Punch that puffy dough down! It’s very satisfying. Turn it out onto a lightly floured surface and divide it into 20 equal pieces. Don’t stress about perfection. To shape, take a piece and pull the dough edges down and underneath, pinching them together to form a smooth top. Place these little dough balls seam-side down into a greased 9×13-inch baking dish or two 9-inch round pans.
- The Second Rise: Cover the pans again and let the rolls rise for another 45 minutes or so. They should look nice and puffy and be touching each other. This is what gives you those classic “pull-apart” soft sides!
- Bake to Golden Perfection: Preheat your oven to 375°F (190°C). Once hot, bake your rolls for 18-22 minutes. You’re looking for a gorgeous, deep golden brown on top. If you tap the top and it sounds hollow, they’re done!
- The Final Touch: The second those beauties come out of the oven, brush the tops generously with the extra melted butter. This gives them an incredible flavor, a gorgeous sheen, and keeps the tops soft. Let them cool in the pan for just a few minutes before devouring.
Sharing the Love: How to Serve These Beauties
Okay, you’ve got a pan of golden, buttery heaven. Now what? The simplest way is to just put the whole pan on the table with a basket and a tea towel and let everyone go to town. But let’s get creative!
For a holiday table, I love placing the warm rolls in a beautiful napkin-lined basket to keep them cozy. Set out a small dish of flaky sea salt for sprinkling and a pot of softened, high-quality butter or honey butter. For a next-level experience, mix some roasted garlic and fresh chopped rosemary into your softened butter before serving.
These rolls aren’t just for fancy dinners, though. They’re your secret weapon for turning a simple weeknight bowl of soup or a basic salad into a meal that feels special. And yes, they make absolutely incredible next-day sandwich sliders or mini burger buns. Trust me on this.
Mix It Up! Your Roll, Your Rules
Once you’ve mastered the base recipe, the fun really begins. Here are a few of my favorite twists to make these rolls uniquely yours.
- Herb & Garlic Swirl: After the first rise, roll the dough out into a large rectangle. Brush it with melted butter and sprinkle generously with minced fresh herbs (rosemary, thyme, parsley) and garlic powder. Roll it up jelly-roll style, slice into 20 pieces, and place them in the pan for stunning, swirled rolls.
- Everything Bagel Bliss: Before the second rise, brush the tops of the shaped rolls with a little water or an egg wash and sprinkle liberally with everything bagel seasoning. Savory, salty, and so good.
- Sharp Cheddar & Chive: Knead 1 cup of shredded sharp cheddar cheese and ¼ cup of finely chopped fresh chives into the dough right before the first rise. Cheesy, savory, and impossible to resist.
- Whole Wheat Honey: Substitute up to half of the all-purpose flour with whole wheat flour for a nuttier, heartier roll. You might need a tiny bit more buttermilk as whole wheat flour absorbs more liquid.
- Dairy-Free Delight: No buttermilk? No problem! Make a “vegan buttermilk” by adding 1 tablespoon of lemon juice or white vinegar to 1 ¾ cups of warm, unsweetened almond or oat milk. Let it sit for 5 minutes to curdle. Use vegan butter for the dough and the glaze.
Jackson’s Kitchen Confidential
This recipe has been a living, evolving thing in my kitchen for years. I once, in a frantic holiday rush, used cold buttermilk straight from the fridge. Let’s just say the rolls took a three-hour nap instead of a one-hour power-up. Lesson learned: warmth is key! I’ve also learned not to be shy with the flour during kneading if the dough is truly sticky, but to also resist the urge to add too much, which makes the rolls dense. The perfect dough is tacky but not sticky. It’s a feel you’ll learn fast. And my final, most important note? The best sound in my kitchen isn’t the timer going off—it’s the collective “Mmm…” when that first roll is tasted.
Your Roll Questions, Answered!
I’ve gotten a lot of questions about this recipe over the years. Here are the most common ones to help you succeed.
- Q: Can I make these rolls ahead of time?
A: Absolutely! You have two great options. 1) After shaping the rolls, cover the pan tightly and refrigerate overnight. The next day, let them sit at room temp for an hour to finish rising, then bake. 2) Bake them completely, let them cool, freeze them in a zip-top bag, and re-warm in a 350°F oven for 10 minutes. - Q: My dough didn’t rise. What happened?
A: The usual suspects are old/expired yeast, liquid that was too hot and killed the yeast, or a drafty, cold rising environment. Always test your yeast, use a thermometer if you’re unsure, and find a warm spot (like an oven with the light on). - Q: Why are my rolls dense and heavy?
A: This is almost always due to using too much flour or not kneading enough. Measure your flour by spooning it into the cup and leveling it off—don’t scoop! And give that dough a good, full 8-10 minute knead to develop the gluten structure properly. - Q: Can I use milk instead of buttermilk?
A: You can, but you’ll lose the signature tang and tender texture. For a better substitute, make a “soured milk” by adding 1 ½ tablespoons of white vinegar or lemon juice to a 2-cup measuring cup, then filling it to the 1 ¾ cup line with regular milk. Let it sit for 5 minutes before using.
Let’s Talk Nutrition (The Fun Part)
Look, we’re here for a good time, not a long time, and a homemade roll is a treat worth savoring. But it’s always good to know what you’re enjoying! These nutritional values are estimates per roll.
Each golden roll gives you a good source of energy from carbohydrates, with a little bit of protein and fat to keep you satisfied. The honey provides natural sugars, and using buttermilk adds a touch of probiotics and calcium. Compared to many store-bought rolls, you’re in control—no preservatives or unpronounceable ingredients. Just real, simple food. So, enjoy one (or two!) without any guilt, knowing you’ve made something wholesome and delicious from scratch.
Your New Go-To Recipe
And there you have it, my friends. Your guide to creating the most unforgettable, soft, golden Honey Buttermilk Dinner Rolls. This recipe is a testament to my core belief: that cooking should be fun, approachable, and always, always packed with flavor.
You don’t need to be a professional baker to fill your kitchen with the incredible aroma of baking bread. All you need is a little courage, a few simple ingredients, and the desire to create something beautiful to share. I hope this recipe becomes a staple in your home, creating its own warm, buttery memories for years to come.


